
11 Tips Every New AirPods User Needs to Know
 Ivan Shenets / Shutterstock
Did you get yourself a new pair of AirPods? If so, you won't regret it. While there are many other great wireless earbuds on the market, Apple's AirPods work flawlessly with all your Apple products and have offer great sound quality.
If this is your first time using AirPods, you might not know where to begin. Luckily, your AirPods are ready to go as soon as you connect them to your iPhone or any other Apple accessories.
With that said, if you want to take your experience to another level, there are a few settings that you might want to change. To help you master your new AirPods, read on for 11 of the best beginner tips and tricks you need to try.
Change Your AirPods' Name
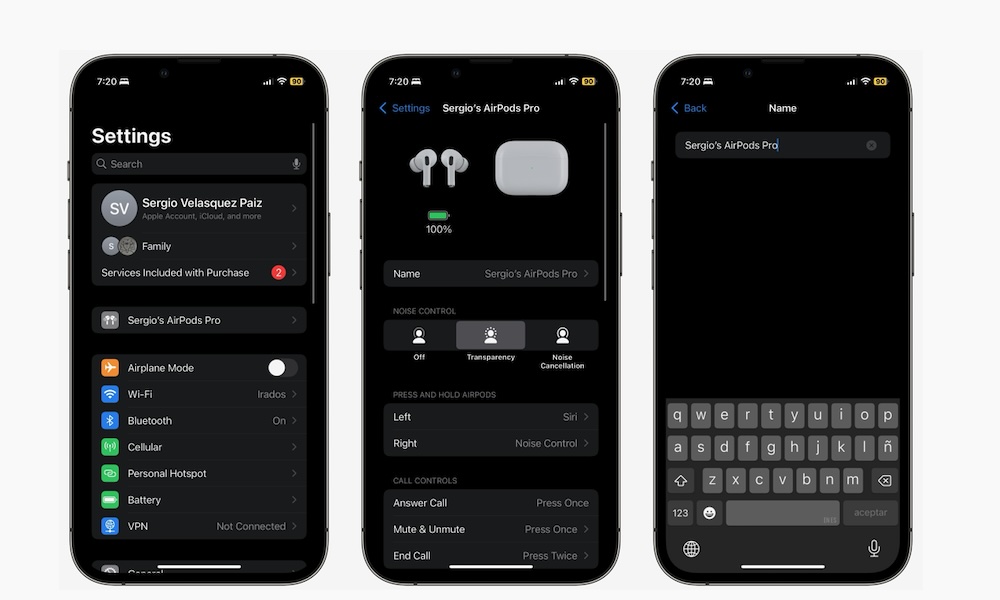
The first time you connect your AirPods to your iPhone, they're assigned a default name. While this name might be good enough for most people, you can change it to anything you want.
Here's how to change the name of your AirPods:
- Open the Settings app on your iPhone.
- If your AirPods are in your ears and connected to your iPhone, your current AirPods' name will appear right below your Apple ID. If you can't see it, go to Bluetooth and tap the info button (i) next to your AirPods' name.
- Tap the AirPods' current name.
- Enter the new name that you want to use.
- Tap done on your keyboard.
And that's it. You can hit the back button and see your AirPods' new name.
Set Up Personal Spatial Audio
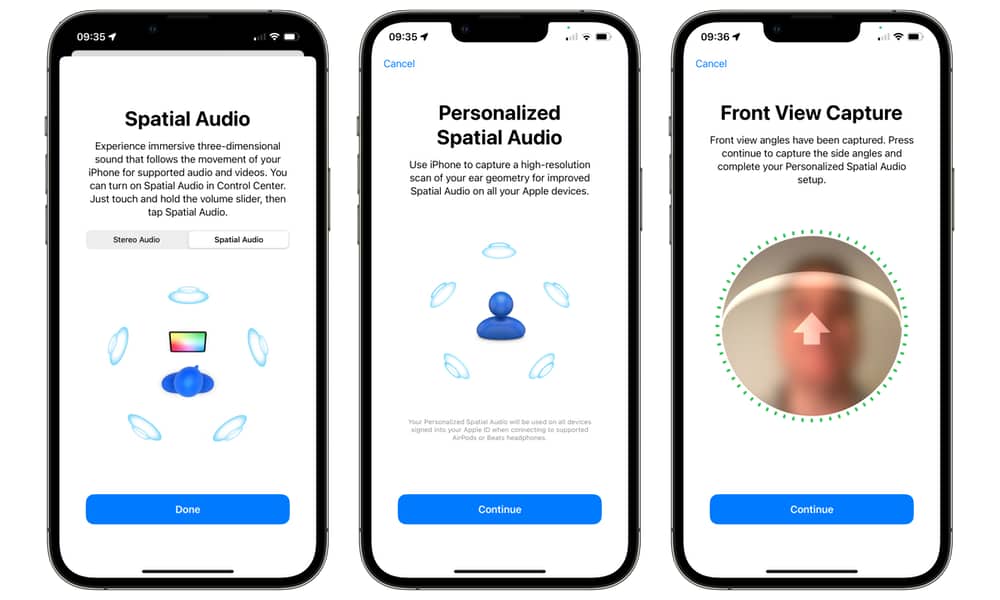
Spatial Audio is a cool feature that lets your AirPods track your head movement and automatically adjust the sound from the movie or video you're watching to make it seem like it's surrounding you.
Spatial Audio is available on the third-generation AirPods, both generations of the AirPods Pro, and the AirPods Max out of the box. However, your iPhone also lets you personalize it for the best experience. Here's how:
- Open the Settings app on your iPhone.
- With your AirPods in your ears and connected to your iPhone, tap your AirPods' name right below your Apple ID. If you can't see it, go to Bluetooth and tap the info button (i) next to your AirPods' name.
- Scroll down and tap on Personalized Spatial Audio.
- Tap Personalize Spatial Audio.
- Tap Continue and follow the instructions.
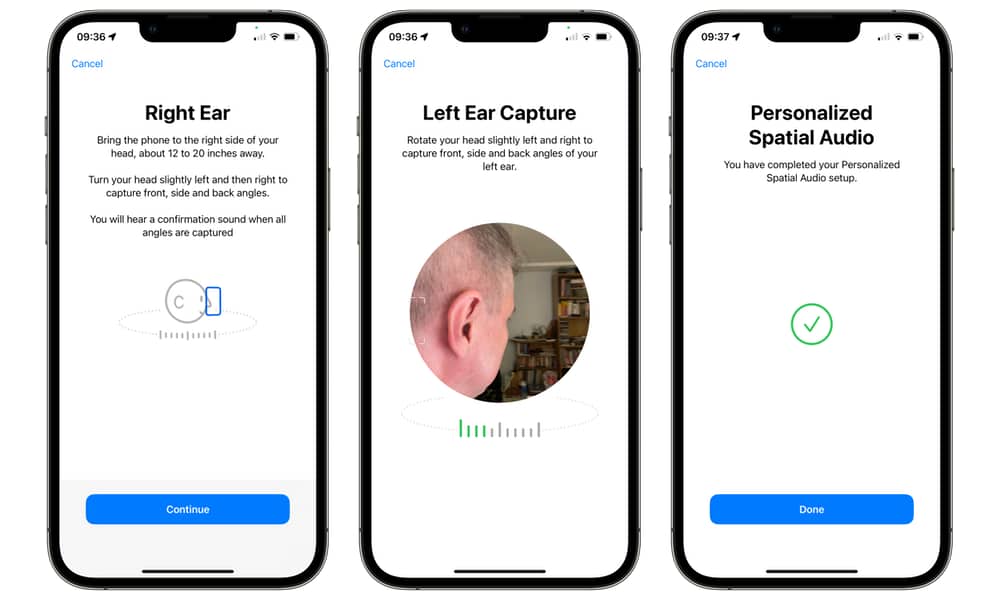
Your iPhone will walk you through using your front Face ID camera to scan your head and ears to create a personalized audio experience. When you're finished, you can tap See & Hear How It Works to hear the difference between regular audio and Spatial Audio.
Customize Your Accessibility Settings
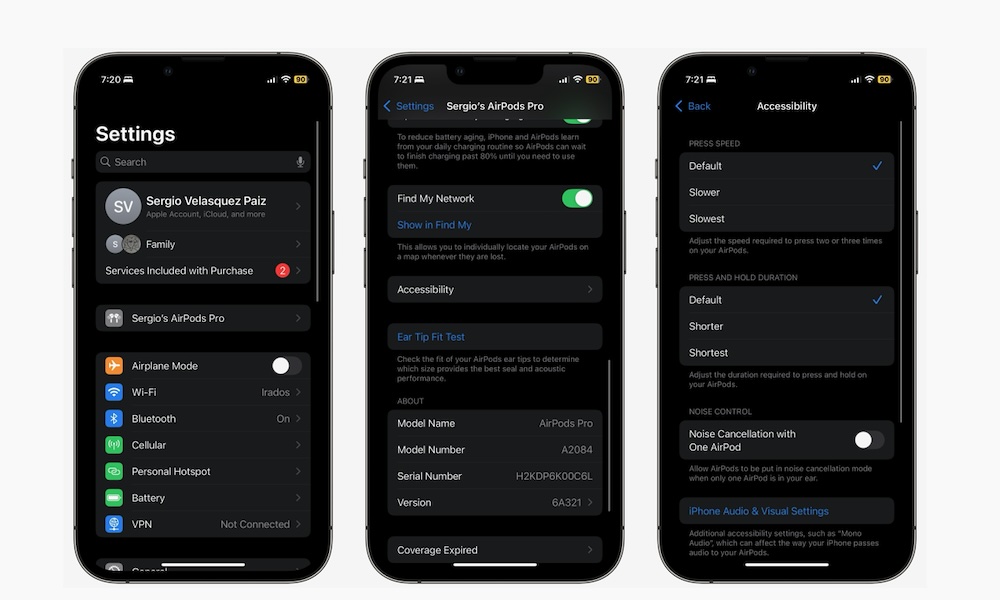
Your AirPods come with specific Accessibility settings you can tweak to fit your needs. For instance, you can change the speed required to double- or triple-press the stem of the AirPods or the tone volume.
There are a lot of things you can change. Here's how to get started:
- Open the Settings app on your iPhone.
- With your AirPods in your ears and connected to your iPhone, tap your AirPods' name right below your Apple ID.
- Scroll down and tap on Accessibility.
- Change any the settings you want to adjust.
- Tap the Back button at the top left corner of your screen.
You can also tap on Audio Accessibility Settings, which will take you to another set of audio and visual accessibility settings you can customize. There are also Headphone Accommodations, which we'll discuss in a moment.
Use Your AirPods Noise Control Features
If you're using the AirPods Pro or the AirPods Max you have access to a feature called Noise Control that lets you switch between Active Noise Cancellation and Transparency Mode. The second-generation AirPods Pro also offer a third "Adaptive" mode that automatically blends the two.
With Active Noise Cancellation, your AirPods' microphones will detect and cancel out any unwanted external sounds so you can focus on your music.
Transparency mode does the opposite. When it's on, your AirPods will let external sounds in so you can be aware of your surroundings. There are a couple of ways to use these controls, but if you want to do it with your iPhone, here's how:
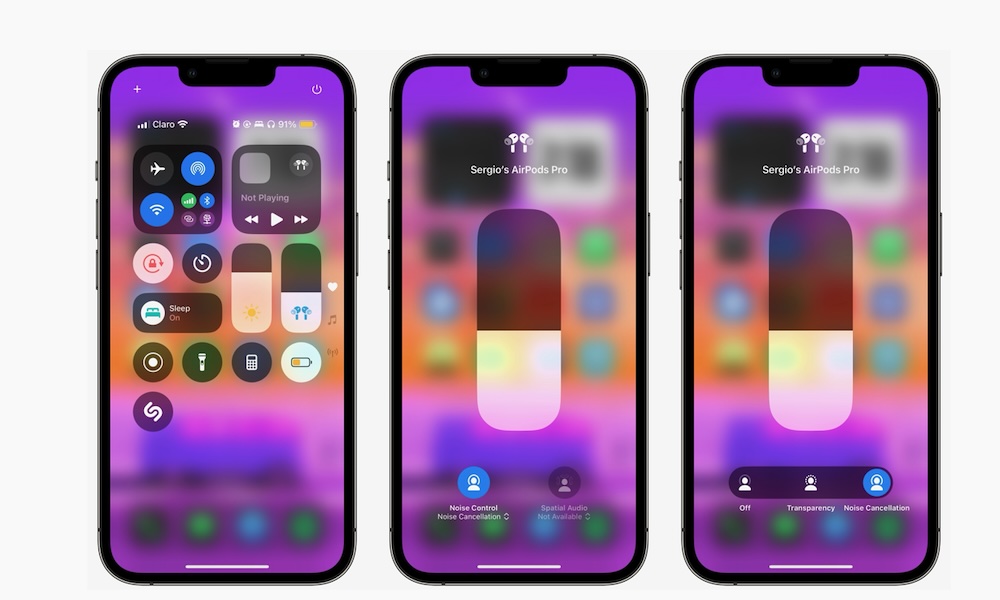
- Open Control Center. If you have an iPhone with Face ID, swipe down from the top right corner of your screen. If your iPhone has Touch ID, swipe up from the bottom of your screen.
- With your AirPods connected and in your ears, press and hold the volume slider.
- Tap Noise Control in the bottom left corner.
- Select Transparency, Noise Cancellation, or Off.
With the default settings, you can toggle between these modes using the AirPods' controls. The AirPods Max have a noise control button located near the Digital Crown, while the AirPods Pro require you to long-press the stem of either earbud.
You can also customize these controls to behave differently. We'll explain how to do this in the next section.
Customize Your AirPods Buttons
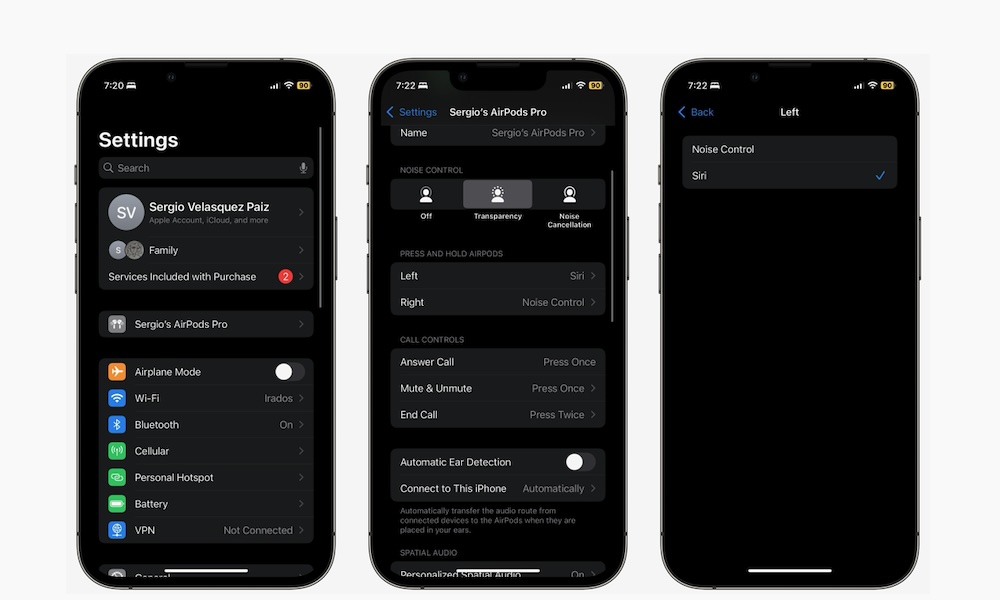
The AirPods Pro and the third-generation AirPods come with sensors in the stem that you can press to trigger an action. For instance, you can long-press them to change your Noise Controls, activate Siri, or end calls.
The best part is that you can customize them to make your experience a tad better. Here's how:
- Open the Settings app on your iPhone.
- With your AirPods in your ears and connected to your iPhone, tap your AirPods' name right below your Apple ID.
- Scroll down, and under Press and Hold AirPods, tap on Left or Right. Then, change what you want that action to do.
- Go back to the previous page, and under Call Controls, select how you want to Answer Call, Mute & Unmute, and End Call.
You can also customize the button on the AirPods Max in the same way.
Manage Automatic Ear Detection
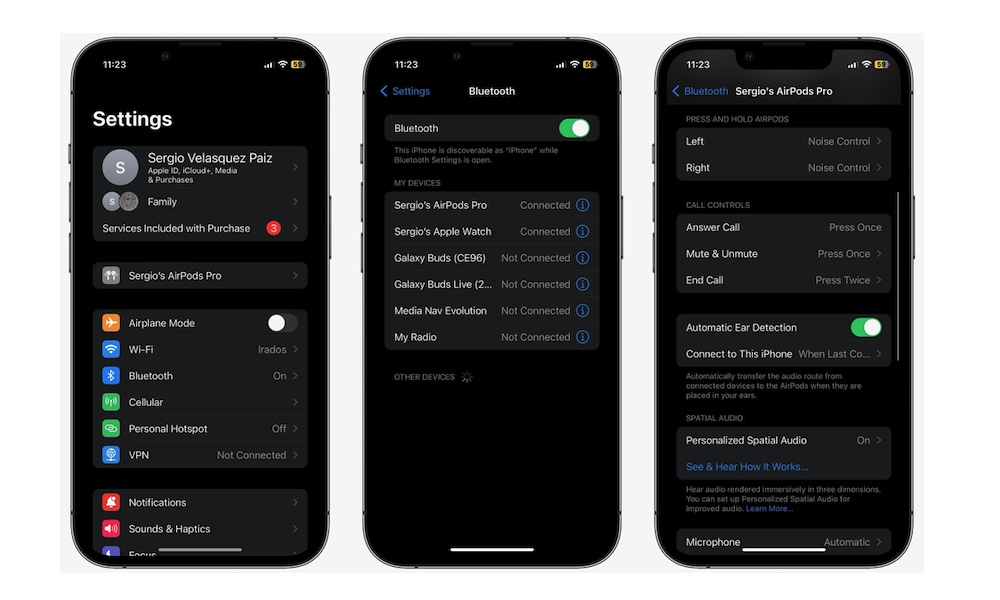
Your AirPods have a feature called Automatic Ear Detection (Automatic Head Detection on the AirPods Max), which, as you can probably guess, lets them detect when you're wearing them.
With this on, your AirPods will automatically pause any song or video when you remove them, and resume playing as soon as you put them back in your ears or on your head.
Of course, depending on the situation, this can be very helpful or pretty annoying, but you can manage this feature however you want.
- Open the Settings app.
- With your AirPods in/on your ears and connected to your iPhone, tap your AirPods' name right below your Apple ID.
- Scroll down and enable or disable Automatic Ear Detection or Automatic Head Detection, depending on which AirPods you're using.
How to Check Your AirPods' Battery
There are several ways to quickly check your AirPods and charging case's battery life.
For your charging case, all you need to do is either flip it open or quickly press the button on the back. If the light that comes on is green, that means you still have at least one full charge left in the case. If it's amber, it means you have less than that and should charge them soon. If it doesn't light up at all, it means the battery in the case is dead.
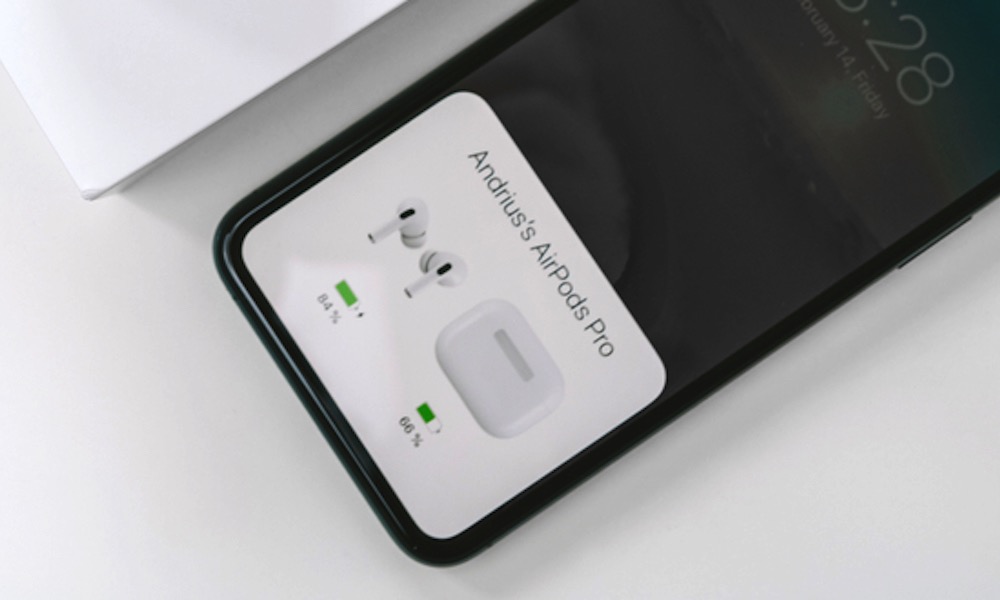
However, there's a better way to know the battery of both the case and the AirPods. First, put your AirPods in their charging case and close it.
Then, put the charging case close to your iPhone and open the lid. Wait a few moments and a small window will pop up telling you how much battery your AirPods and charging case have.
If you want to monitor your battery life at all times, you can use Apple's Battery widget. This will let you track your iPhone's battery, as well as the battery level of your AirPods, their charging case, and even your Apple Watch. Here's how to set it up:
- Press and hold in an open space on your Home Screen and tap the plus icon in the top left corner of your screen.
- Type "batteries" in the search bar at the top and select the Batteries search result
- Choose the style of widget you want.
- Tap on Add Widget.
Once the widget is in place you'll be able to see the battery levels of all of your Apple devices at a single glance.
Use Siri With Your AirPods

You can also call up Siri on your iPhone with your AirPods on, which is a useful and quick way to ask your virtual assistant for some help.
How you call activate Siri will depend on the AirPods you're using. If you're using AirPods Pro or the third-generation AirPods, press and hold the force sensor on the stem of your AirPods. For older AirPods, you'll need to double-tap the outside of either AirPod. For AirPods Max, you need to press and hold the Digital Crown. After you do this, you can start making a request to Siri.
You can also call Siri with your voice by saying "Hey Siri" or "Siri" if you're using the second-generation AirPods Pro.
Make Siri Stop Describing Your Notifications

When you have your AirPods on and you get a notification, Siri can read it out loud to you so you know what it's about without looking at your iPhone. Of course, if you're listening to your favorite song, getting interrupted by a synthetic voice feels awful.
Luckily, you can disable or enable this feature whenever you want by doing the following:
- Open the Settings app.
- Scroll down and go to Notifications.
- Under Siri, tap on Announce Notifications.
- Enable or disable Announce Notifications.
If this feature is useful to you, you can always choose which apps Siri can announce notifications from. That way, you'll only get alerted by your most important apps from your most important people.
Improve Sound Quality With Headphone Accommodations
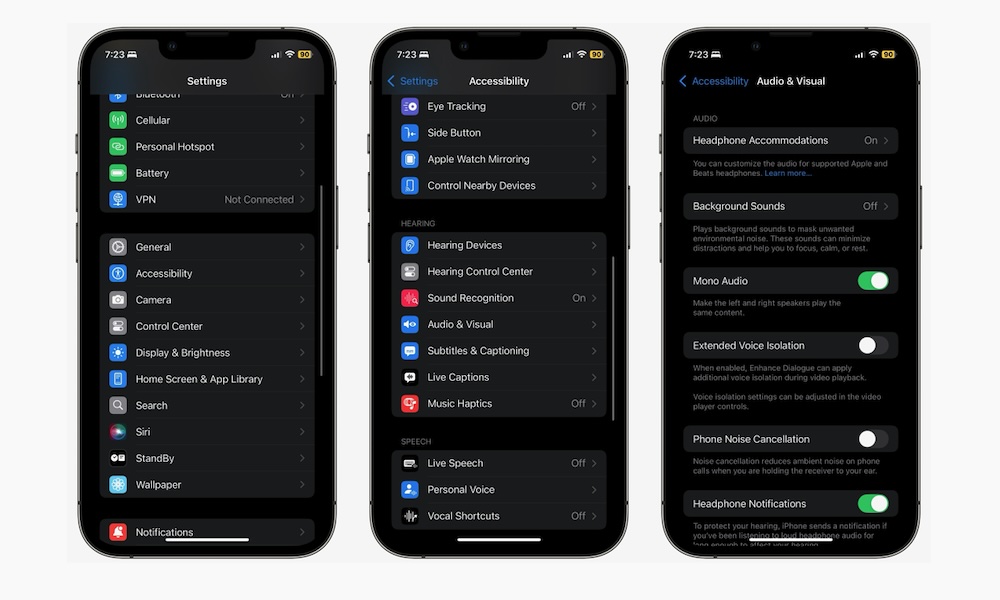
Headphone Accommodations is an accessibility feature that every AirPods user should use. You can use it to change things like tuning the audio for music and phone calls and even create a customized audio setup.
Here's how to get started with Headphone Accommodations:
- Open the Settings app.
- Scroll down and go to Accessibility.
- Scroll down again and select Audio & Visual.
- Go to Headphone Accommodations.
- Enable Headphone Accommodations and change all the settings you need.
- For a more personalized experience, you can also go to Custom Audio Setup and customize it however you want.
Never Miss a Word With Live Listen
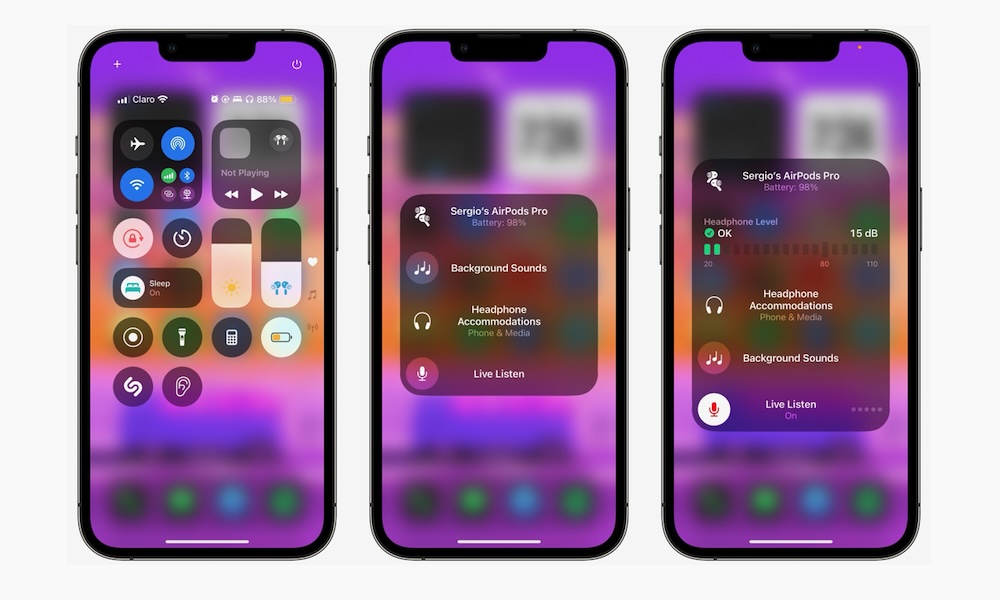
One of the coolest features of AirPods is Live Listen. This feature uses your iPhone's microphone to listen to other people from your AirPods. You can also use it if you're far away from someone but still want to hear them.
To use this feature, you first need to add the Hearing control to your Control Center. To do this, go to Settings > Control Center and tap the plus icon next to the Hearing control.
Next, you can use this feature by doing the following:
- Put your AirPods in your ears and make sure they're connected to your iPhone.
- Open your iPhone's Control Center. If you have an iPhone with Face ID, you do this by swiping down from the top left corner of your screen. If you have an iPhone with Touch ID, swipe up from the bottom of your screen.
- Tap the Hearing control (the one that looks like an ear).
- Tap on Live Listen.
And that's it. Your iPhone will begin "listening" to your surroundings, and you'll hear everything from your AirPods.