
How to Scan Documents Using the Notes App in iOS 11

Image via iMangoss
Toggle Dark Mode
Notes in iOS 11 has received a number of new features that will take your note taking experience to a whole new level. One of the best features is that you can now scan documents right from the Notes app and then add it to a particular note or share it with other apps. While this new feature is not as extensive as third-party apps such as Genius Scan, it offers most of the essential features. It can automatically scan a document and detect its borders, set to grayscale mode, and much more.
Here’s how you can scan documents using the Notes app in iOS 11.
How to Scan Documents Using Notes App in iOS 11
Step 1:Â Open the Notes app on your iOS device.
Step 2: Create a new note or open an already existing note.
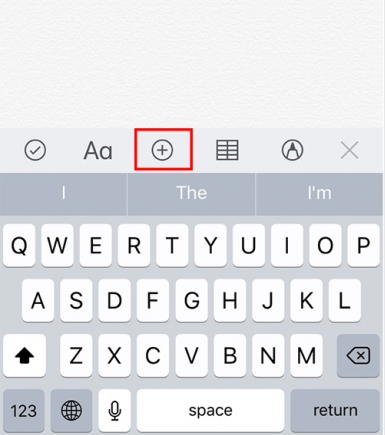
Step 3: You’ll find a set of editing tools at the bottom of the note. If the keyboard is open, the tools will be above it. Tap on the + button.
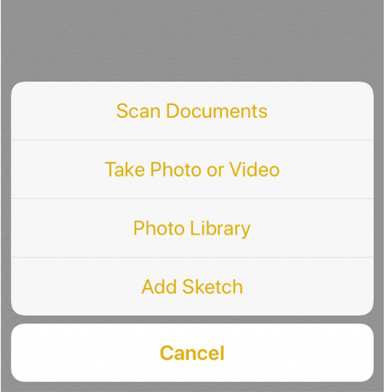
Step 4: From the menu that opens, tap on Scan Documents.
Step 5: The camera is displayed, ready to scan your document. Point it at the document you wish to scan. It will automatically detect the document and its edges, and will snap a perfect shot without requiring any input from your side.
- By default, the scanner is set to Auto mode. If you wish to scan documents manually, then you have to switch from Auto to Manual mode.
Step 6: You can now edit the scanned document to fix the edges in case the scanner didn’t get it right. Tap on any edges of the document that you want to fix, then move it to the spot where it should be. Once done, tap on Use Scan. In case you’re not satisfied with the scanned document, you can press Retake.
That’s it! The scanned document will be added to the note that you had open. You can also rename the document and share it with third-party apps. Here’s how.
How to Rename and Share Scanned Documents
Step 1: Open the note where the scanned document is located.
Step 2:Â Right above the preview of the scanned document, you’ll see its name. Tap on it.
Step 3: A popup appears to rename it. Type in any name that you wish to give to the document, then press Save.
Step 4:Â Now tap on the document’s preview. This opens the editing screen where you’ll find tools for cropping, rotating and adding filters to the document. Tap on the Share button.
Step 5: From the Share Sheet, you can choose the app where you wish to export the scanned document. For instance, you can share it to Dropbox so that it gets saved there.
- The Share Sheet also has an option for adding Markup. This allows you to draw on the document as well as annotate.
This is how you can use the new document scanner in iOS 11. While it offers all the essential features, it cannot replace a full fledge third-party scanning app such as Genius Scan or Scanner Pro. For instance, it cannot detect text using OCR and doesn’t allow you to export documents in another format, such as in PDF.
Nonetheless, if you don’t require the additional features that third-party apps provide, then you can stick to the native scanner provided by the Notes app. It does a great job at it and removes the burden of managing a third-party app.
iOS 11 is currently in beta and available to registered developers. If you’re not part of the Apple Developer Program, you can install the Public Beta. However, we recommend that you wait until the final version of iOS 11 is released as beta versions often contain bugs that can create problems on your device.


