
How to Run Windows 11 on your Mac
 Ray-Bon / Shutterstock
Toggle Dark Mode
There’s no doubt that macOS is one of the best operating systems in the world. It’s fast, reliable, and easy to start using. However, it’s still far from perfect. There are many features that are exclusive to other operating systems like Windows.
What makes the Mac such a great computer is that you can actually run Windows 11 without breaking a sweat. There are actually two methods you can use; which one to choose will depend on your current Mac hardware. Here’s everything you need to know.
You can now get Windows 11 Pro for under $50 – Forever.
Is It Possible to Run Windows 11 on Mac?
The short answer is, absolutely. Not only that but there are actually two ways to do it.

First, there’s Boot Camp. This is a piece of software specifically developed by Apple and Microsoft to let users run Windows on Mac. Every compatible Mac has the Boot Camp Assistant installed, so you can start using it for free.
With that said, there are two big drawbacks: First, Boot Camp only works with Intel-based Macs, which means you won’t be able to run Windows with Boot Camp if you have an Apple Silicon Mac — that’s any Mac with an M1 or M2 chip.
Secondly, while it is possible to install Windows 11 using Boot Camp on an Intel Mac, only Windows 10 is officially supported by Apple and Microsoft, which means you’ll have to jump through some extra hoops to get Windows 11 up and running.
The good news is that there’s another way, but the bad news is that you’ll have to pay for it. Mac users with Apple Silicon will need to use Parallels, which lets you run Windows on your Mac almost seamlessly inside what’s called a virtual machine. In this guide, we’ll show you how to install Windows 11 on your Mac with both methods and show you everything you need to get started.
How to Install Windows 11 on Mac With Boot Camp
First, let’s take a look at the requirements you need to use Boot Camp. As we mentioned, you can’t use Boot Camp to install Windows 11 if you have an Apple Silicon Mac. Apple stopped supporting Boot Camp after the release of the M1 chip since the commercially available versions of Windows require an Intel chip and can’t run on Apple Silicon.
Therefore, you’ll need an Intel-based Mac, which means that pretty much any MacBook or Mac that came out after 2020 is a no-go.
If you aren’t sure what processor your Mac has, you can check by clicking the Apple menu in the top left corner of your screen and selecting About this Mac. If, right next to Chip, you see something like Apple M1 or Apple M2, then you’ll need to move on to the second method.
If you see an Intel chip there, then you’ll also need to make sure you have enough storage. Your Mac should have at least 64GB of storage available, but the more, the better. Also note that you won’t be able to install Windows 11 directly if you’re using a MacBook with a Touch Bar, as you’ll need to press F10 during the installation process, and Touch Bar Macs don’t have one of those. In that case, you’ll have to install Windows 10 first and then upgrade to Windows 11 from there.
With that out of the way, you can start installing Windows on your Mac. Be warned, though: this takes quite a few steps — and if you want to install Windows 11 rather than Windows 10, you’re going to have to work around the fact that Macs are officially incompatible with Windows 11. There are a couple of ways to do this; we cover the fastest one in the steps below.
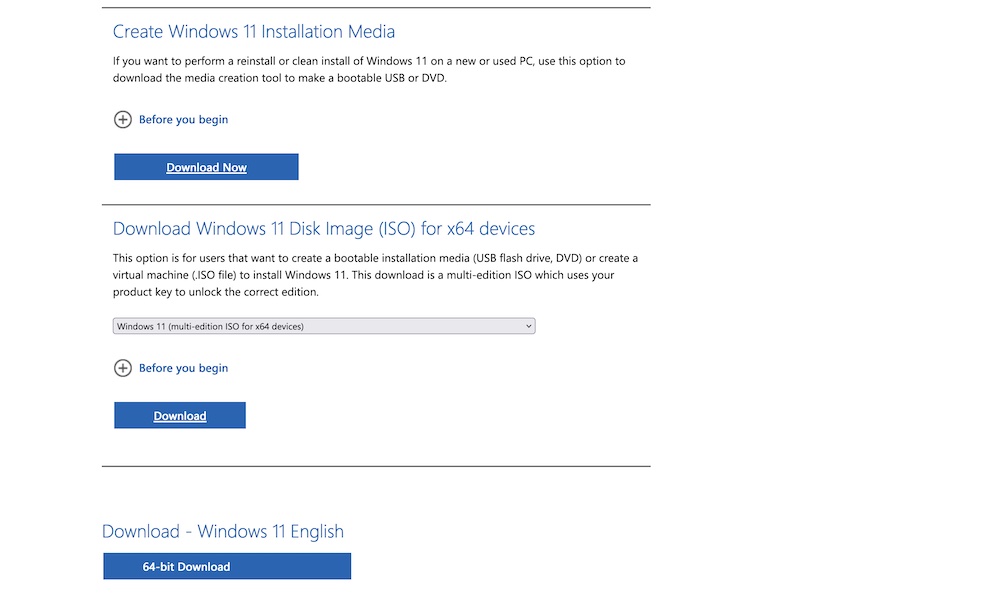
- Go to Microsoft’s page and download the Windows 11 ISO. You’ll find it right under Download Windows 11 Disk Image (IOS) for x64 devices.
- Click Select Download and select Windows 11 (multi-edition ISO for x64 devices).
- Click Download.
- Your browser will validate your request. Afterward, you’ll need to select the product language. Select English (United States) and then click Confirm.
- Now, under Download – Windows 11 English, click 64-bit Download. Keep in mind that this link will be valid for up to 24 hours.
- It may take quite a while, but after you’ve downloaded it, open Boot Camp. You can just open your Spotlight Search (pressing Command + spacebar) and then enter Boot Camp Assistant.
- Boot Camp will give you an introduction. After you read it, click Continue. You may be asked to Select Tasks. If that appears, click Create a Windows 10 or later install disk, and then click Continue.
- Next, you need to select a partition for Windows. Drag the divider between macOS and Windows around until you have the amount of storage you want to use.
- When the Windows 11 setup screen appears. you’ll see a message that “This PC Can’t Run Windows 11.” In that case, press SHIFT+F10 to open the Windows Command Prompt.
- In the command prompt window, type “regedit” to open the Registry Editor.
- In the Registry Editor, browse to the HKEY_LOCAL_MACHINE\SYSTEM\Setup folder, then right-click on Setup and New > Key from the context menu that appears.
- Enter “LabConfig” when prompted.
- Right-click on the new LabConfig key and select New > DWORD (32-bit).
- Enter BypassTPMCheck as the name. Create two more values with the following names:
- Repeat steps 13 & 14 twice more to create values named BypassRAMCheck and BypassSecureBootCheck
- Double-click on each of those new entries and set each one to a value of 1.
- Close the Registry Editor and type Exit at the command prompt to return to the Windows 11 installation screen.
- Click Install Now and wait for Windows 11 to finish installing.
Once the installation is finished, you’ll be asked to restart your Mac. After your computer is done restarting, you should see the Windows logo on your screen. Simply wait for your Mac to finish loading Windows and finish the Windows setup by following the steps on the screen. It might take a while before Windows finishes installing on your Mac, but afterward, you should be able to use it with no issues at all.
You can now get Windows 11 Pro for under $50 – Forever.
How to Install Windows 11 on Mac With Parallels Desktop
Mac users with the M1 or M2 chip won’t be able to install Windows 11 with Boot Camp. Instead, we need to use a third-party virtualization app called Parallels Desktop.
Sadly, the app isn’t completely free. You can download a trial version, but you’ll have to pay at least $100 to use it for more than 14 days.
However, the good news is that it may be worth it. The setup process is much faster, Windows 11 is officially supported, and you can quickly switch between macOS and Windows in a flash.
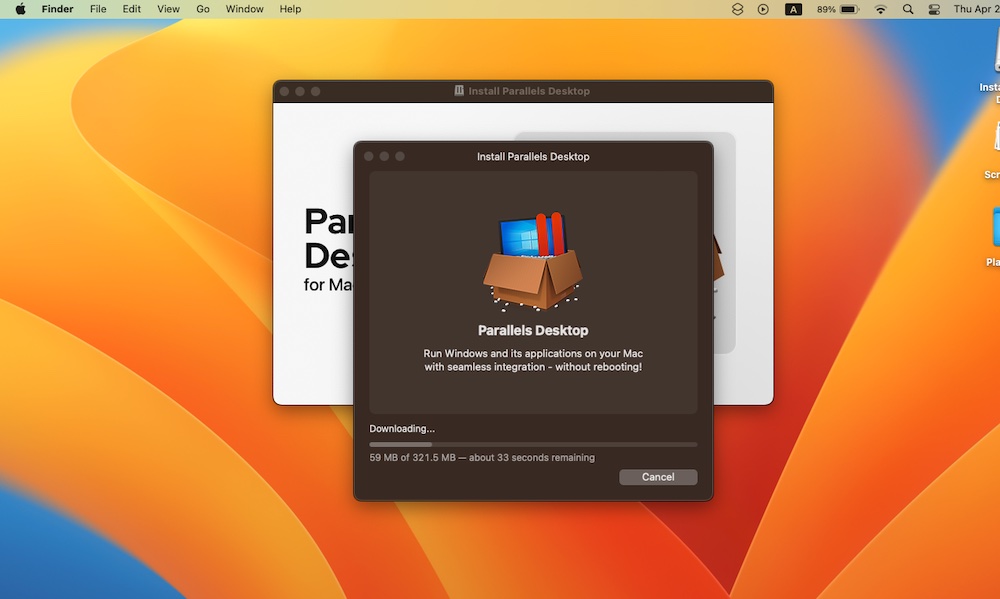
To get started, you’ll need to download the Parallels free trial and install it as you would any other macOS app.
Once you’ve installed Parallels, the app will prompt you to install Windows 11 automatically. Click Install Windows, and after that’s done, just follow these steps:
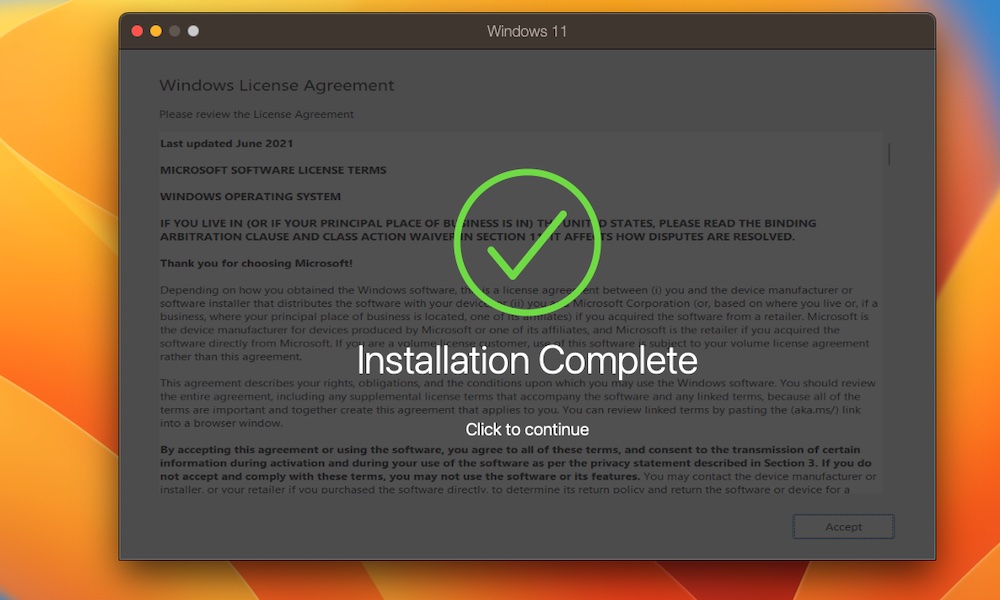
- After Parallels finishes downloading Windows 11, your Mac will install the new operating system on its own. The process will take a long time, but you should eventually see a message letting you know that the installation is complete.
- If this is your first time using Parallels, you’ll also need to create a new account.
- You’ll see the Windows License Agreement. After reading through it, click Accept in the bottom right corner of the window.
- Once that’s done, you’ll be able to start playing around with Windows 11.
And that’s it. Start using Windows as much as you like. As you’ll notice, you’re still running macOS in the background, with Windows 11 running inside of a virtual machine — like a computer within a computer. This has its own benefits and drawbacks, but at least you’ll be able to switch between operating systems in a matter of seconds.
To close Windows 11, you’ll need to close the Parallels window. You can use the Close button in the top left corner, click the Parallels icon in the menu bar at the top of your screen and select Quit Parallels Desktop.
Get the Best of Both Worlds on Your Mac
macOS and Windows 11 both offer a lot of cool and unique features that Mac users will love. What’s great about the Mac is that, unlike Windows computers, you can run two different operating systems in just a few minutes.
Remember that Boot Camp will only work for Intel-based Macs — and it doesn’t officially support Windows 11 — whereas Parallels will work on both Intel-based and Apple Silicon computers. However, you’ll need to pay to use Parallels if you want to use it indefinitely. The good news is that you can try its free trial and see if the app works for you.
You can now get Windows 11 Pro for under $50 – Forever.


