
10 iPhone Features You’re Sleeping On (And How to Wake Them Up)
 anatoliy_gleb / Adobe Stock
Many of the best iPhone features aren’t new — they’re just buried. Some live in the Settings app, in places you rarely scroll to, while others only appear at the right moment in an app. Then there are those few that are the kind of quiet upgrades that you don’t think about until you try them once and wonder how you lived without them.
Apple has added a ton of features over the years. So many that it's next to impossible to list all of them. That's why we’ve gathered some of the most useful hidden features that you may still haven’t tried for yourself. These features make your iPhone feel smarter without installing anything. You’ll get faster ways to do common tasks, better call quality, useful safety tools, and privacy options that help you stay in control.
Read on for 10 of the iPhone's most useful hidden features.
Back Tap
Back Tap turns the back of your iPhone into one or two secret buttons. You can double- or triple-tap the back of the phone to trigger an action, such as taking a screenshot, opening Control Center, launching the camera, or running a Shortcut. It sounds gimmicky until you assign it to something actually useful. Then it becomes a time-saver.
The best way to use Back Tap is to assign it to actions you do frequently. If you always open a specific app, you can assign a Shortcut that launches it and sets up what you need. It’s also great if you’re constantly using one hand, and it lets you access your Control Center or Notifications without having to stretch your thumb or reach across the screen.
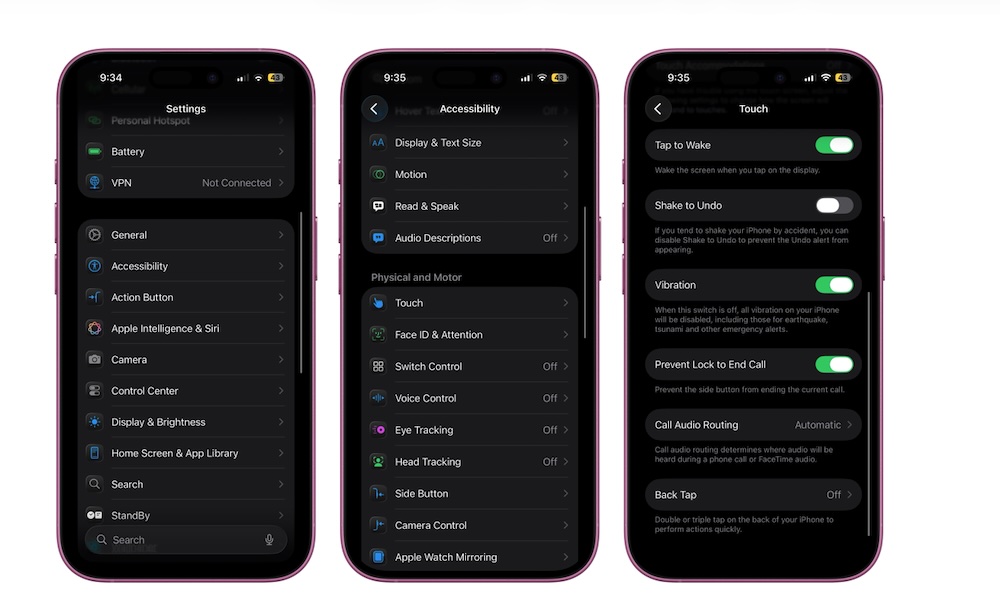
Here's how to find and enable Back Tap:
- Open the Settings app.
- Scroll down and go to Accessibility.
- Tap on Touch.
- Scroll down and tap on Back Tap.
- Select Double Tap or Triple Tap.
- Choose the action you want.
Live Voicemail
Live Voicemail is a really useful feature that changes how you handle calls by effectively turning your iPhone into a digital answering machine. When someone leaves a voicemail, you can "screen" calls by seeing a real-time transcription as they speak, letting you decide whether the call is worth answering, even if you don’t recognize the number.
This is especially useful if you get a lot of unknown callers or if you’re waiting for something important, like a delivery, a doctor’s appointment, or a job-related call. Instead of guessing or letting everything go to voicemail, you can glance at what they’re saying and pick up if it matters.
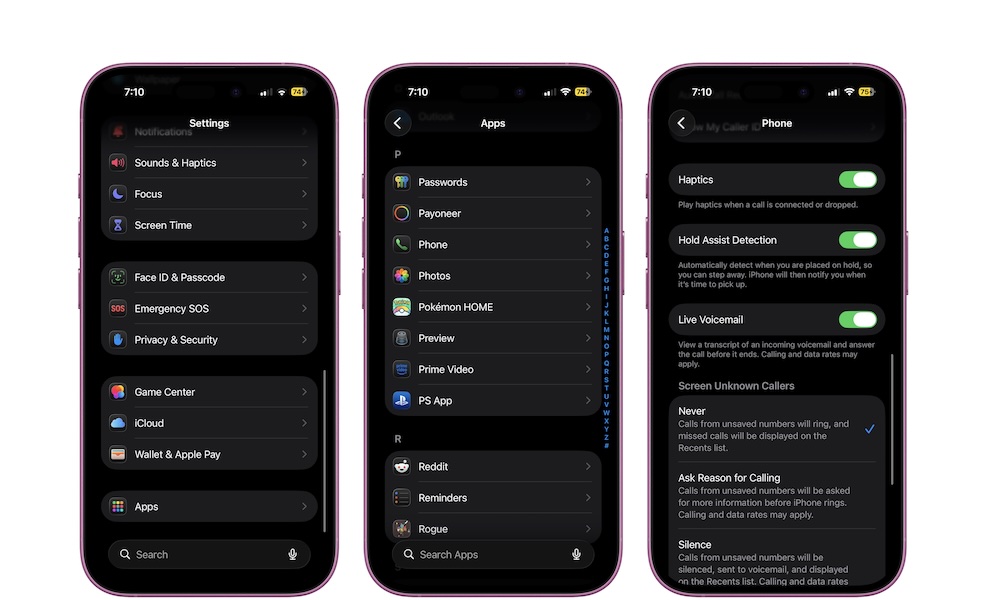
Here's how to start using Live Voicemail:
- Open the Settings app.
- Scroll down to the bottom and go to Apps.
- Tap on Phone.
- Scroll down and turn on Live Voicemail.
Pro Tip: Live Voicemail can also save you a few bucks each month, as it eliminates much of the need to pay for a separate voicemail service with your carrier. With Live Voicemail enabled, your iPhone actually "answers" the call and records the message locally, which means your carrier isn't involved at all. That said, it can only do this when your iPhone is powered on and has cellular coverage. If you can't answer the call, neither can your iPhone, so you may want to keep your carrier voicemail service as a fallback if having an always-available voicemail box is important.
StandBy
StandBy turns your iPhone into a desk or nightstand display while it’s charging in landscape mode. When it’s enabled, you can easily glance at the clock, widgets, photo displays, and more while you’re at the office or at home. It’s the kind of feature you don’t care about until you place your phone on a charger at your desk or bedside table and realize it can be useful even when you’re not holding it.
StandBy is available on all iPhone models, but it’s especially useful with an iPhone Pro or the iPhone 17 and iPhone Air, as they all feature an Always On display that will let you glance at all your important information without having to tap your screen.
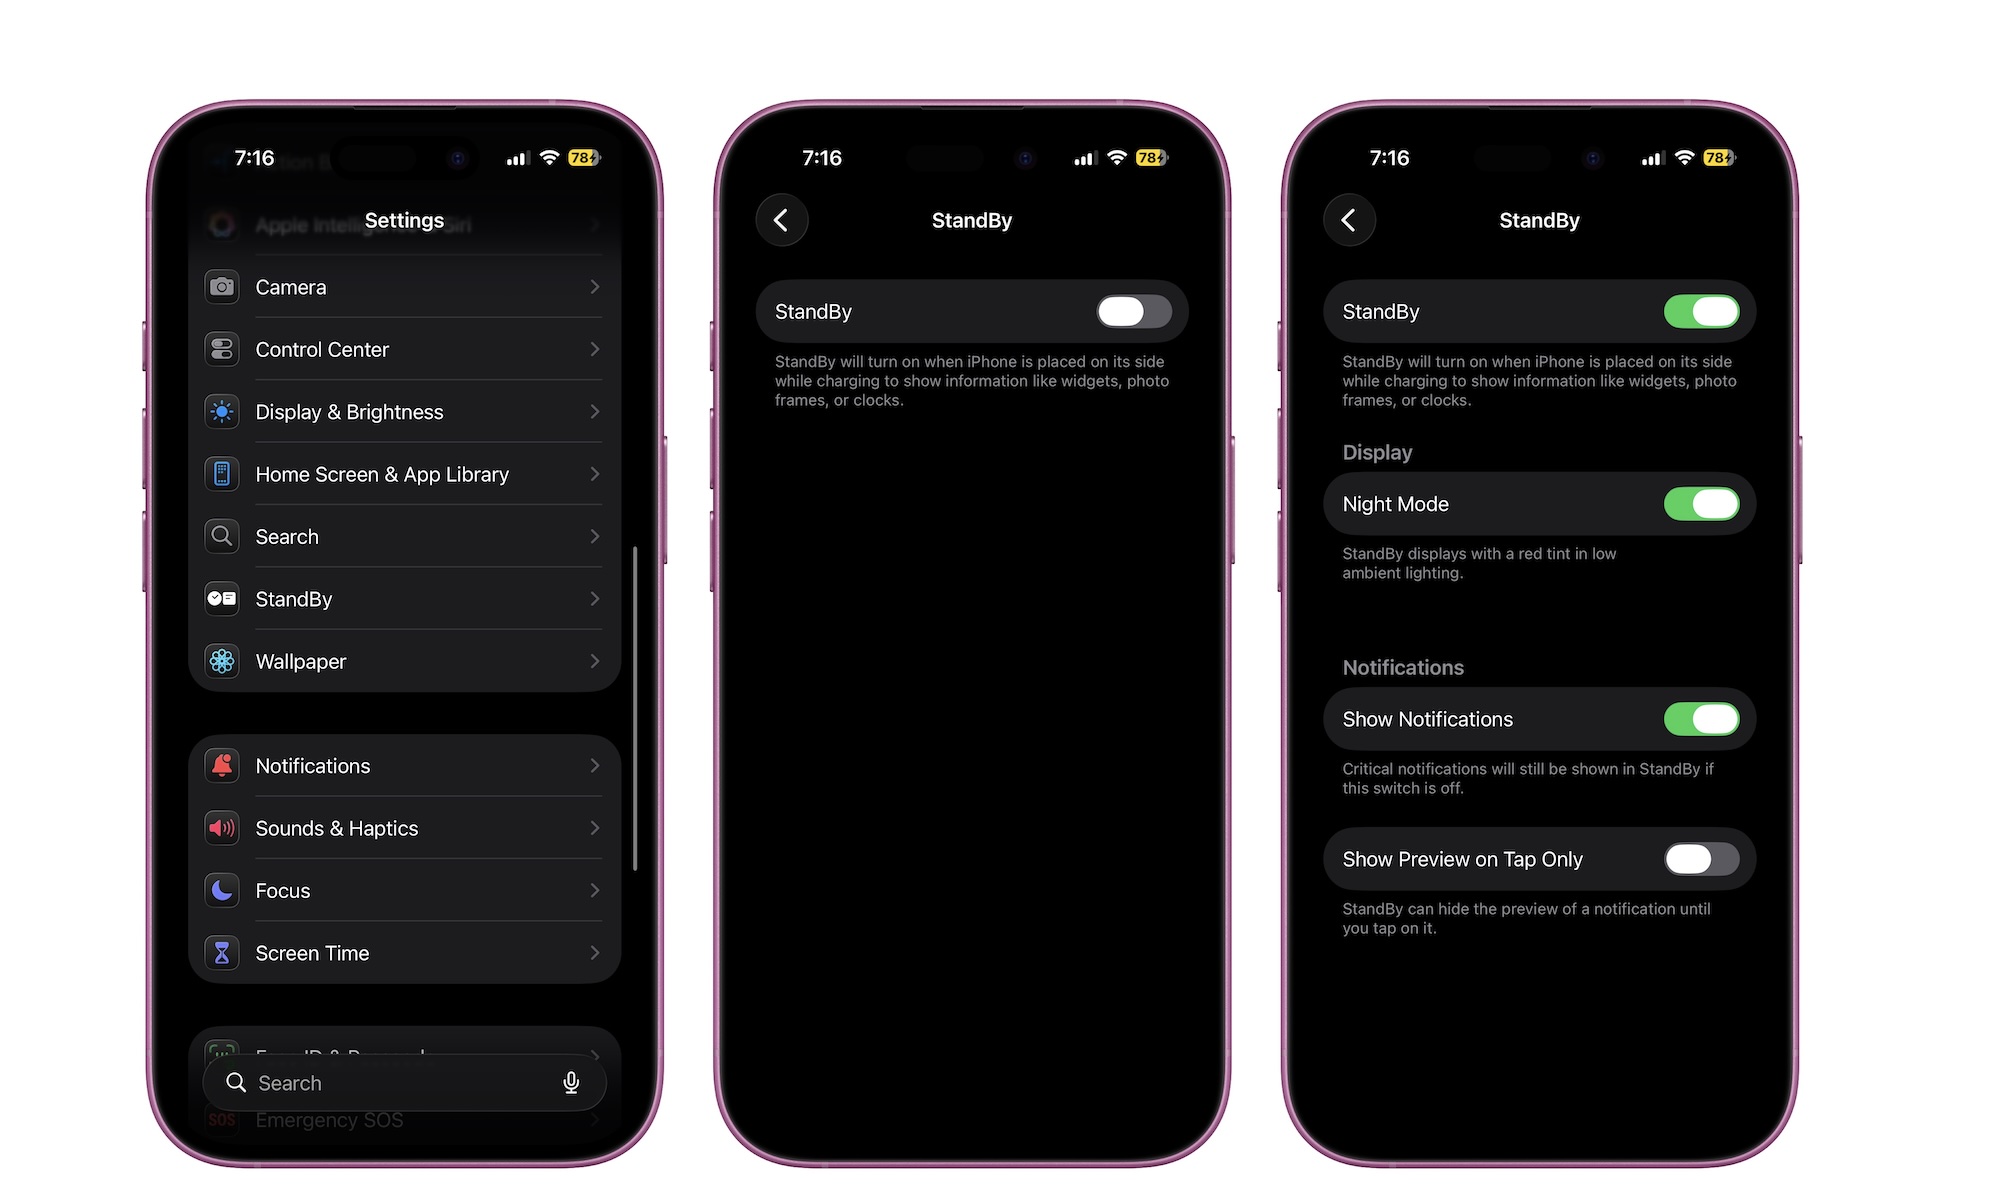
Here's how to enable StandBy:
- Open the Settings app.
- Scroll down and go to StandBy.
- Turn StandBy on
And that’s it. Now put your iPhone on its charger and place it sideways. You should see a StandBy screen pop up. If it doesn’t, just try pressing the side button and give your iPhone a few moments. Once it shows up, you can swipe left or right to switch between three StandBy screens: widgets, photo gallery, and clocks, and swipe up or down to change the widgets, styles, and selections on each screen.
Pro Tip: If you're using officially-certified MagSafe chargers, your iPhone will remember the StandBy layout for each charger, so you can set up a clock view for your bedroom nightstand and a photo gallery for your living room table.
Send Later in Messages
Send Later is a built-in feature that lets you schedule texts, and it’s something that we’ve wanted for years. You can write an iMessage now and have it delivered at a specific time later. That’s perfect for birthdays, reminders to coworkers, and those messages you want to send without being that person who texts at 5 a.m.
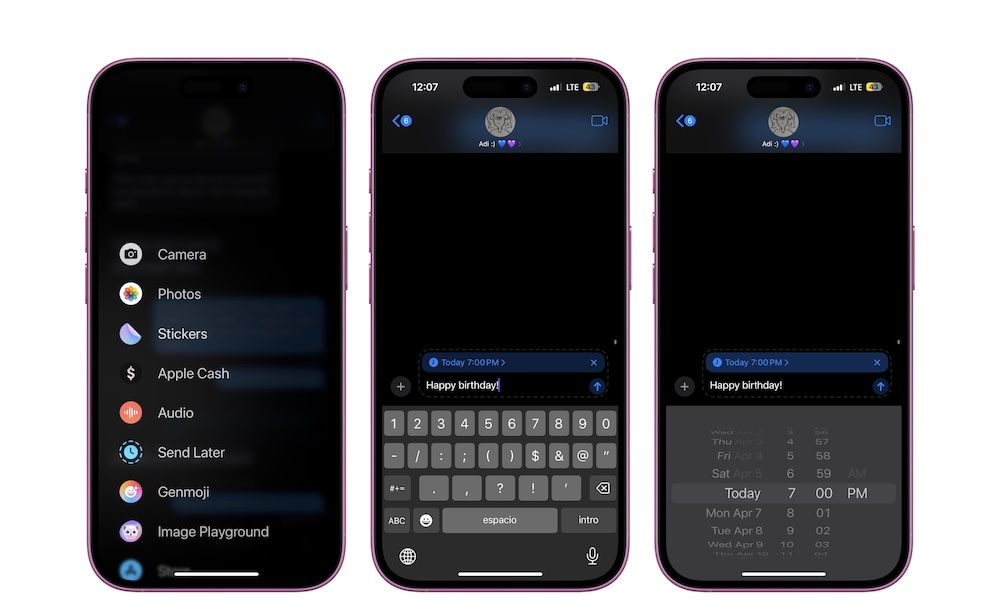
It’s a small feature, but it can save you a lot of time and trouble if you use it properly. To get started, open the Messages app and open the conversation where you want to schedule a text message.
Next, tap the + button on the left side, and then select Send Later. Choose the date and time, and then write your message. Send it and forget about it; your iPhone will take care of the rest.
If you have any birthdays, anniversaries, or big meetings coming up, this is your friendly reminder to schedule a text right now. Your future self will thank you.
Voice Isolation
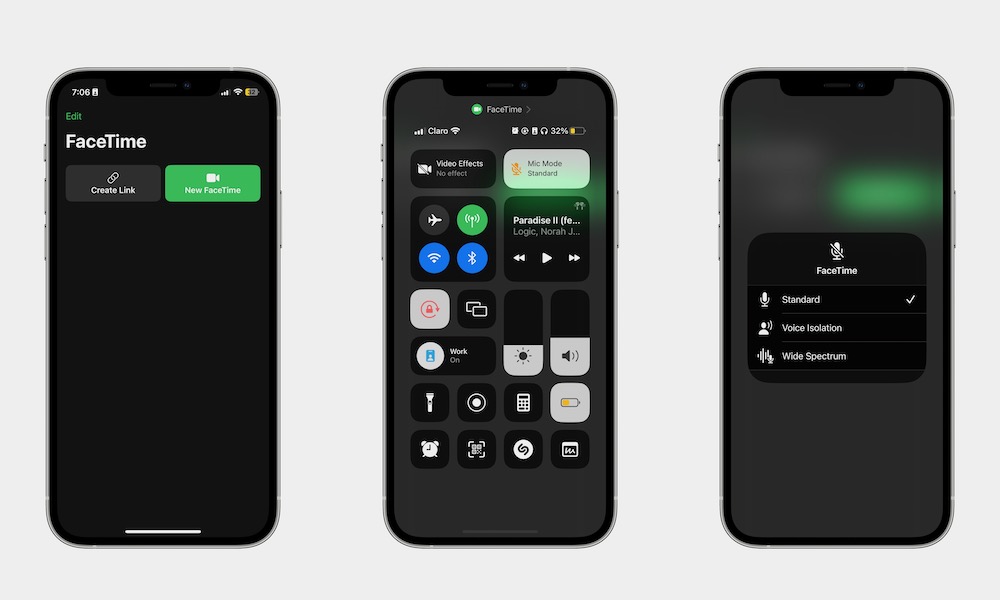
If you take calls in noisy places, Voice Isolation is a must-use feature. It’s a microphone mode that prioritizes your voice and reduces background noise during Phone calls, FaceTime, and supported third-party calling apps. In plain English: you’ll sound clearer, and the person on the other end won’t hear your entire environment.
To start using Voice Isolation, you’ll first need to get on a call. Then, open the Control Center on your iPhone, tap on Mic Mode at the top, and select Voice Isolation. You won't hear a change, but the difference should be immediately noticeable to the other person, especially if you’re in a loud place.
The downside is that if you make sounds with your mouth or want someone to hear something near you, your iPhone will automatically mute those sounds. However, you can turn it on and off as often as you need to by following the steps above.
Background Sounds
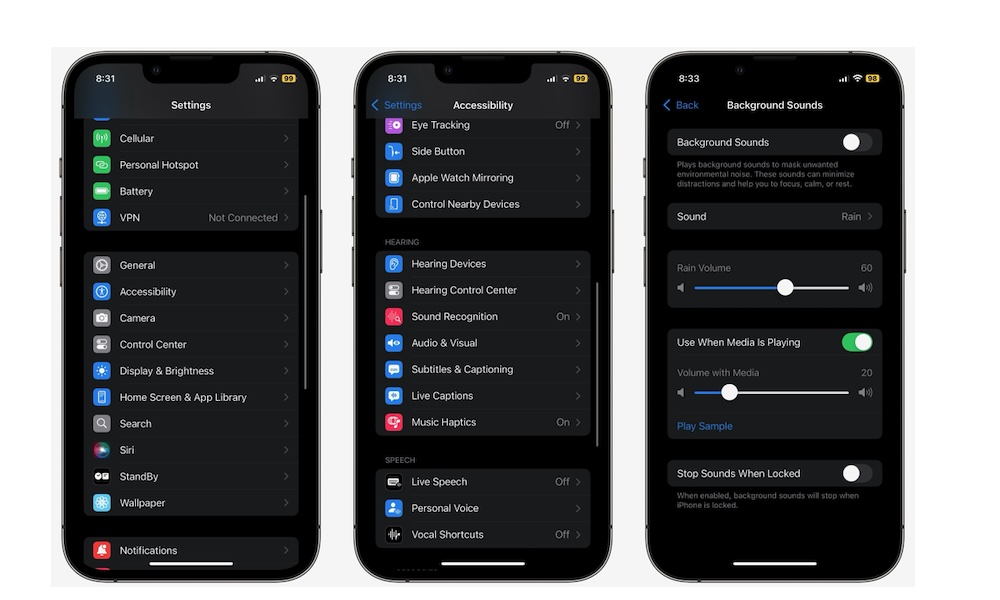
Background Sounds lets your iPhone play ambient noise like rain, ocean, streams, or balanced noise in the background. The best part is that it works system-wide, meaning you can use it while reading, working, or winding down without juggling an extra app.
This feature is great for focus and for quieting down a noisy environment. It can also help if you’re trying to relax at night and don’t want to scroll or play videos. You can turn it on when you want a calmer environment, and turn it off when you don’t.
Here's how to start using Background Sounds:
- Open the Settings app.
- Scroll down and go to Accessibility.
- Scrolldown and under Hearing, tap on Audio & Visual.
- Go to Background Sounds.
- Turn Background Sounds on and then tap on Sounds.
- Choose the sound you like.
You can also adjust other things, like volume or set a timer to stop the sounds. Also, if you want to make it easier to use this feature, you can add the Background Sounds control to your Control Center.
Pro Tip: Background Sounds work particularly well with the AirPods Pro or AirPods 4 with ANC during those times when you really want to cut out all the external noise so you can meditate or focus on what you're doing.
App Privacy Report
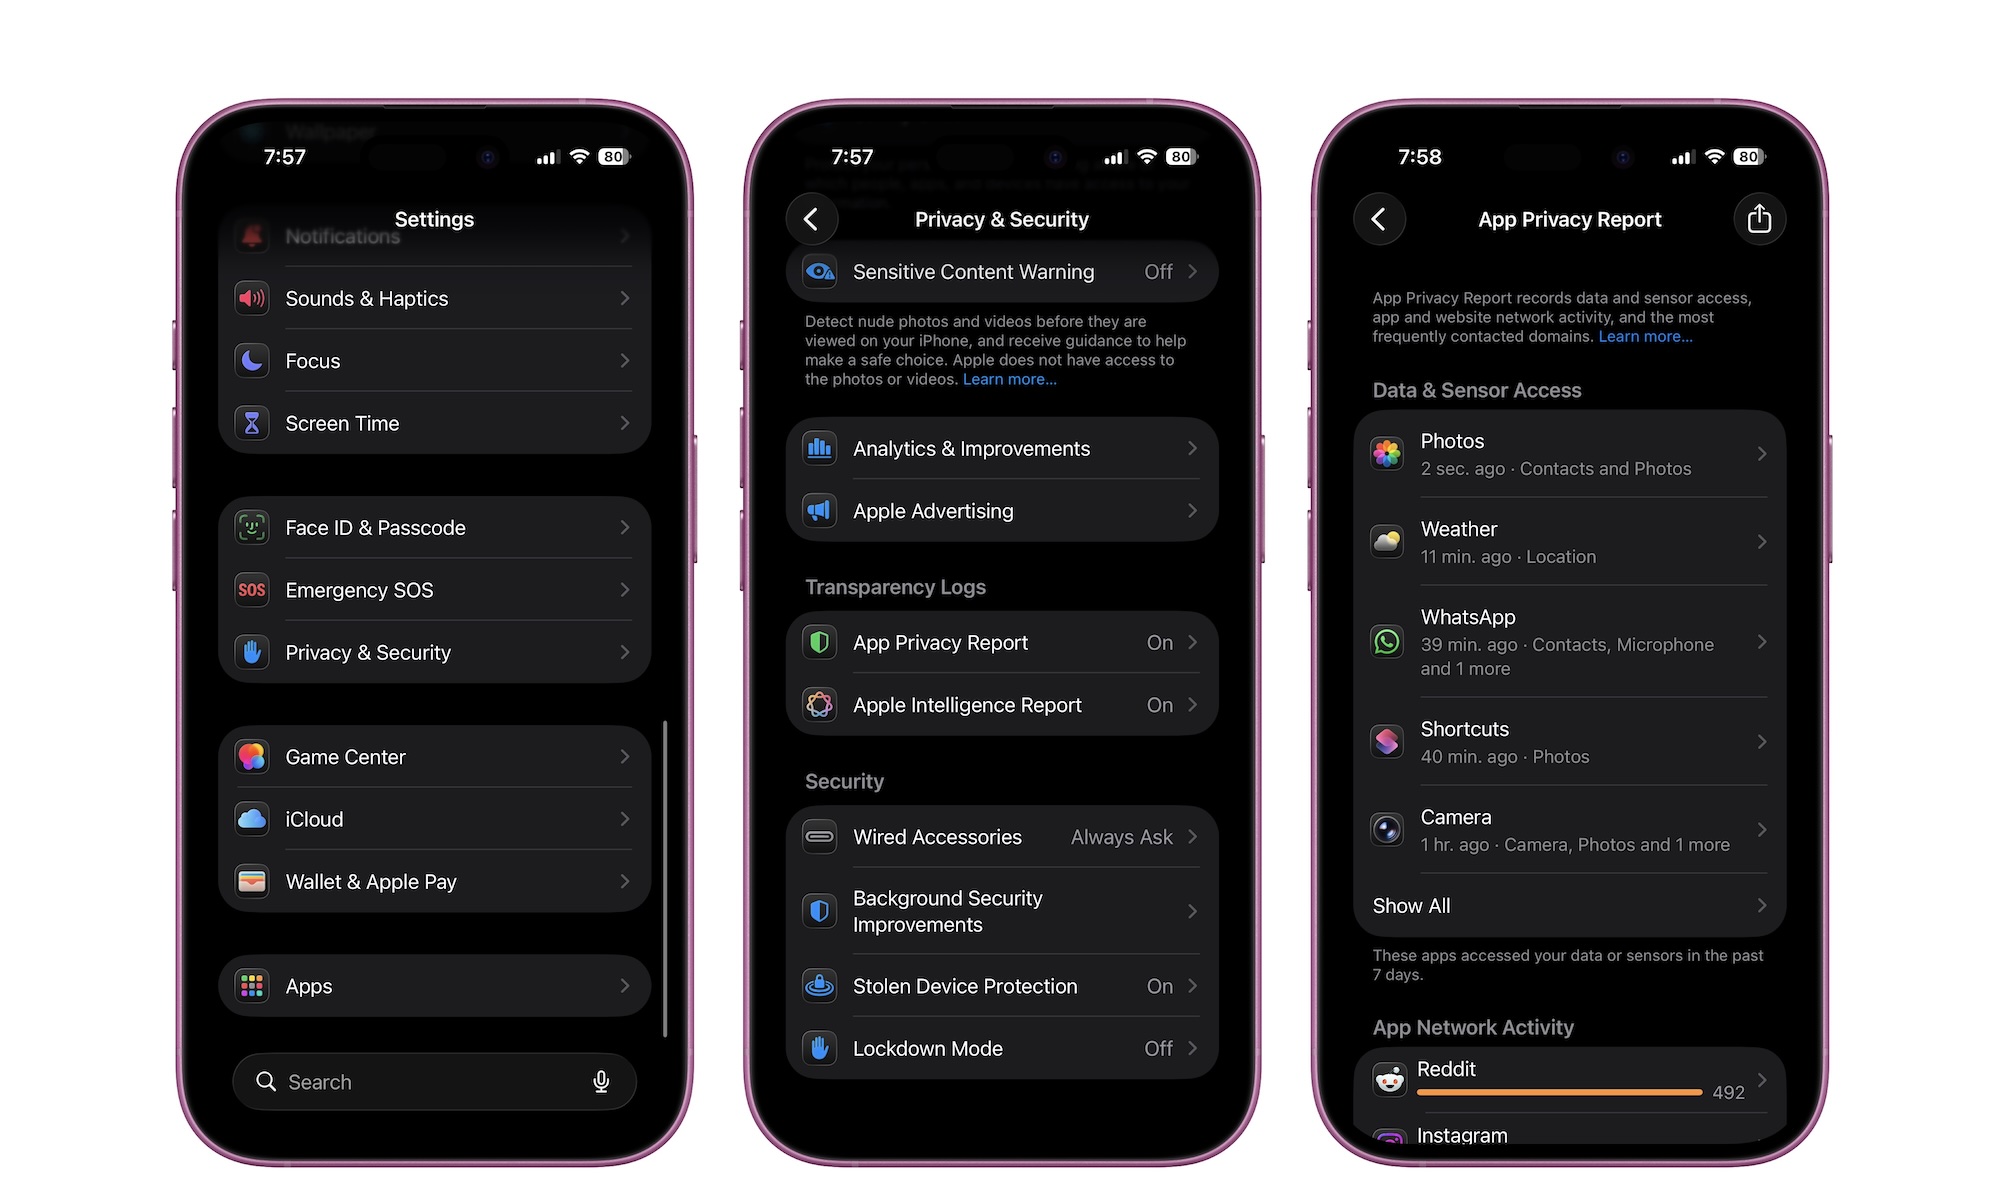
App Privacy Report is a powerful accountability tool. It shows how often apps access sensitive permissions like location, photos, camera, and microphone. It also shows which network domains your apps contact. Even if you don’t understand every technical detail, it’s still useful because you’ll get to learn if your apps are doing what they’re supposed to do.
If an app accesses your location constantly when you only use it once a week, that’s worth questioning. If an app is contacting a huge number of domains, it might be doing more tracking than you want. This report gives you the confidence to tighten permissions without guessing.
Here's where to find your App Privacy Report:
- Open the Settings app.
- Scroll down and go to Privacy & Security.
- Scroll down one more time and tap on App Privacy Report under Transparency Logs.
From there, you can scroll down and take a look at all the data available. You can tap on specific apps to get more information about them, or check your complete Website Network Activity. Again, this might be a bit too technical for some of us, but it’s still worth taking a look at what your most-used apps are doing on your iPhone.
Live Text

Live Text is one of the most practical features on iPhone, and people still underuse it. Your iPhone can recognize text in the camera view or from a picture and let you copy it, translate it, call numbers, open websites, convert currencies, and more. It’s basically doing all the things that you want to do when you take a picture of a specific object to research later.
It’s perfect for Wi-Fi passwords on a router, tracking numbers on a label, meeting notes on a whiteboard, and anything printed that you need to turn into usable digital text.
To get started with Live Text, you first need to make sure it’s enabled on your iPhone. This is how:
- Open the Settings app.
- Scroll down and go to General.
- Go to Language & Region.
- Scroll down to the bottom and turn on Live Text.
Now you can start using it. Simply open your Camera app and point it at text. The Live Text button, which looks like a square with three lines inside, will appear in the bottom right (in portrait mode) or bottom right (in landscape mode). Tap it, and your iPhone will capture the text. Tap or slide the words you can and then copy. You can also tap on Copy All.
Pro Tip: You can also use Live Text in Apple's Notes app to transcribe any text you see into an editable note. To access this, tap the paperclip icon when composing a new note and choose Scan Text. The keyboard will turn into a camera view; point it at the text you want to insert into your note and tap Insert.
Reachability
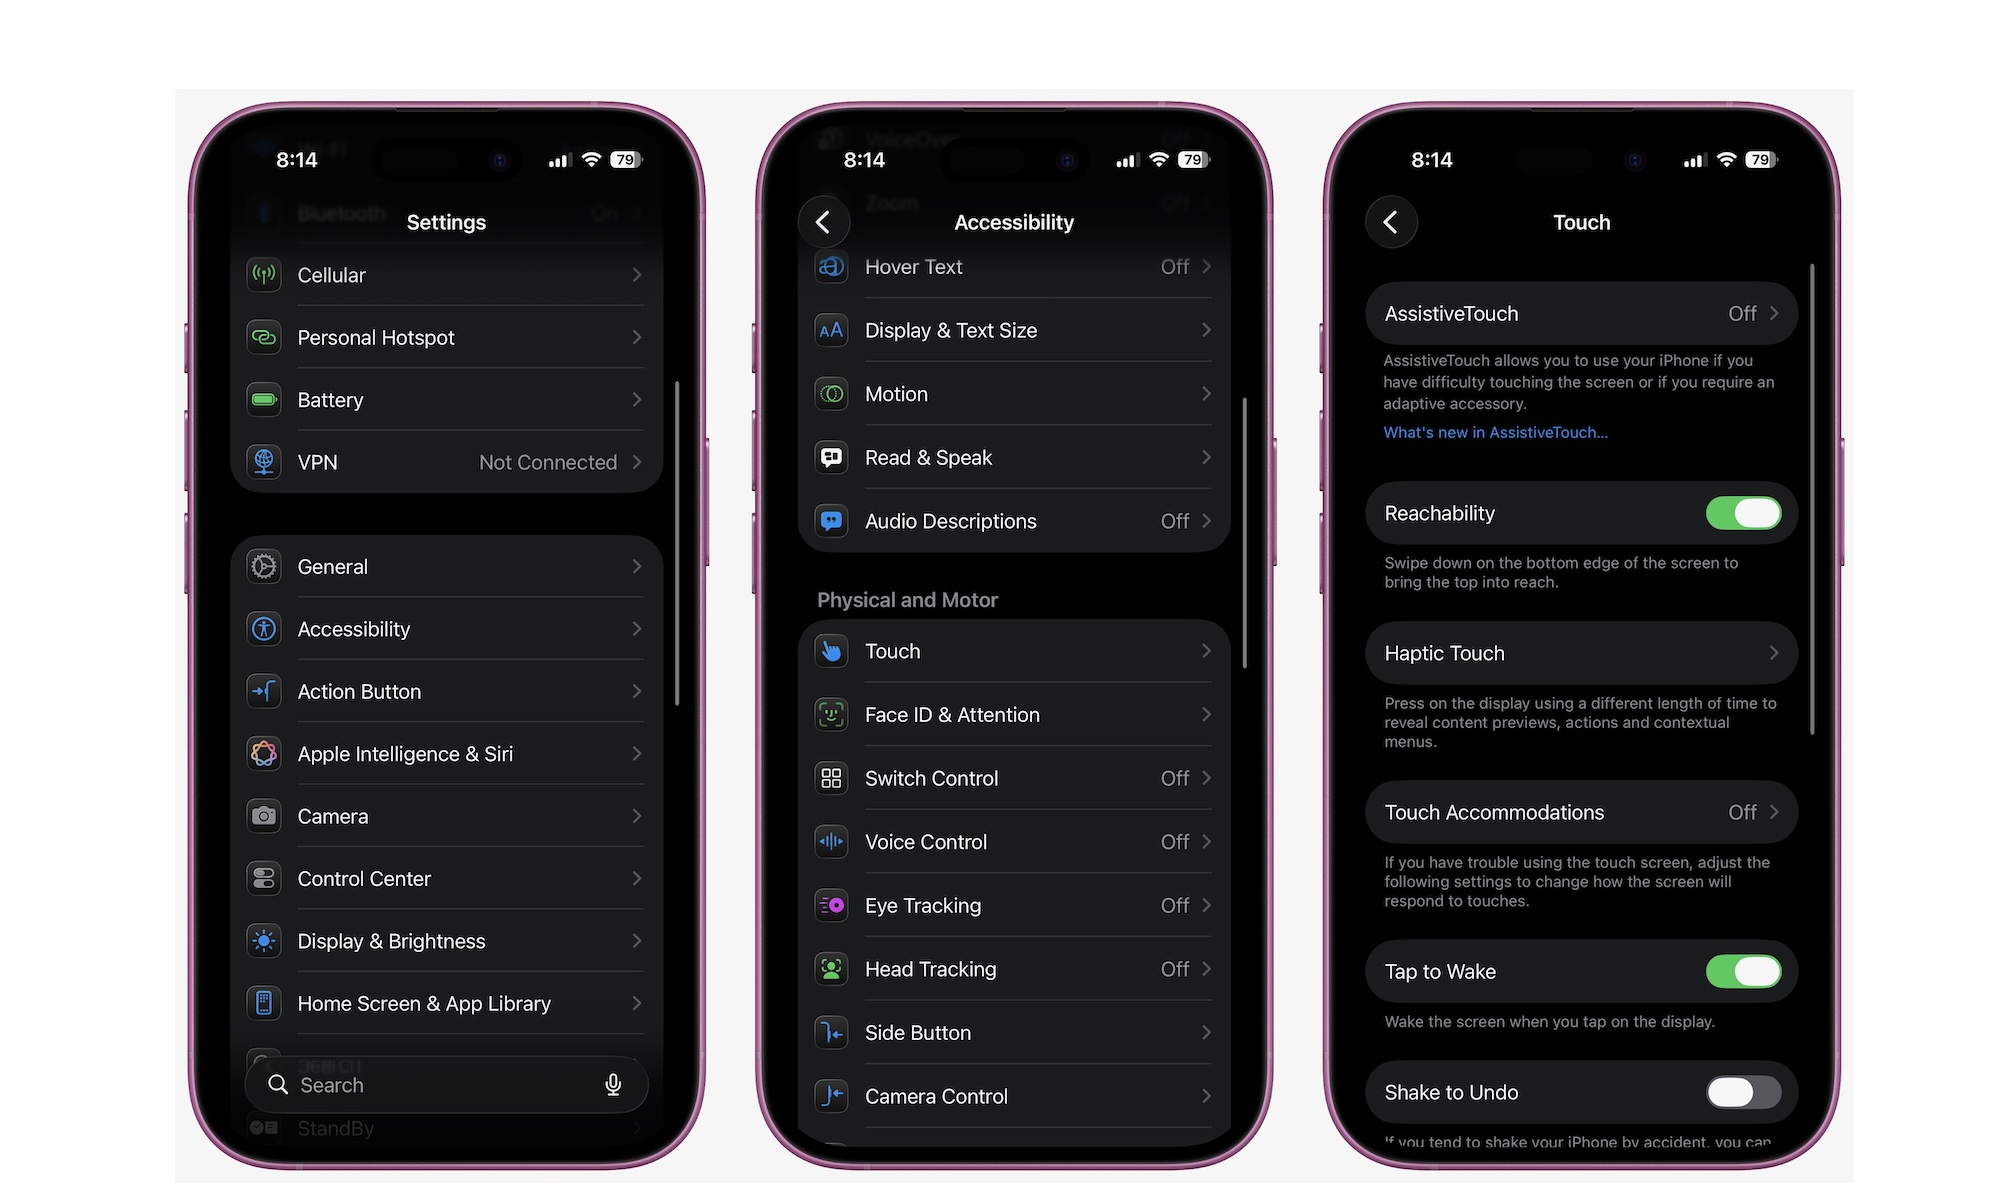
If you have a larger iPhone like a Pro Max, Reachability is one of the fastest quality-of-life improvements you can make. It drops the top half of the screen downward so you can tap it with one thumb. That means less awkward hand gymnastics, fewer accidental drops, and a phone that feels easier to use one-handed.
Once you start using it, it becomes one of those features you stop thinking about because it feels normal. Reachability should be turned on by default, but you can enable it manually by doing the following:
- Open the Settings app.
- Scroll down and go to Accessibility.
- Tap on Touch.
- Turn on Reachability.
Afterward, you can use this feature by swiping down from the bottom of your iPhone. It might be a bit weird at first, but it’ll change the way you use your iPhone once you learn how to use it, and if you find the downswipe too awkward, you can always assign Reachability to a Back Tap.
Check In
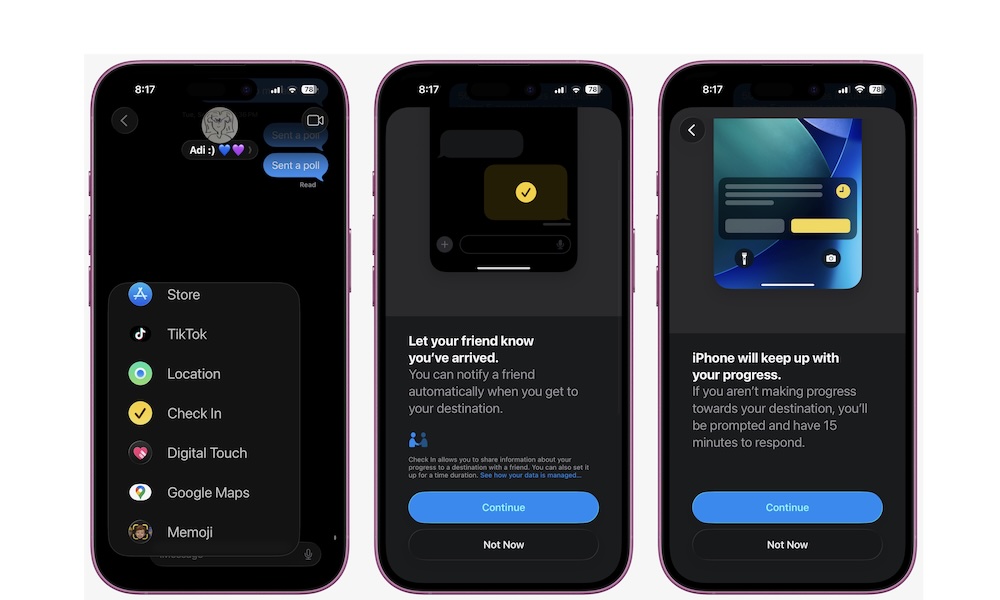
Check In is a Messages feature that can automatically let someone know you arrived safely, or share details if something goes wrong. It’s perfect for late-night rides, solo walks, hikes, travel days, and any moment where you want to give your loved ones peace of mind without constantly sending or asking for updates.
Instead, the other person knows you’re okay, and you don’t have to keep your phone in your hand the entire time. To start using Check In on your iPhone, follow these steps:
- Open Messages and choose a conversation.
- Tap the + button and find Check In (you may need to tap More to see it).
- Choose When I Arrive or After a Timer.
- Once you’re done, tap on Send.
Make the Most Out of Your iPhone
As you can see, there are a ton of iPhone features that you probably didn’t even know existed. These hidden features aren’t hidden because they’re niche; they’re hidden because your iPhone already has a lot going on. But that doesn’t mean they aren’t worth trying. Whether it’s Back Tap or the Reachability feature, there is something out there that can make using your iPhone a bit easier in your everyday life.
Of course, this might be a lot if you’re just getting started. So choose only a couple of features to play around with at first. Once you’ve mastered them, you can choose some more and try to use them daily.