
iCloud+ Custom Email Domains Are Now Available in Public Beta | Here’s How to Set Up a Custom Email Domain
 Hilalabdullah / Shutterstock
Toggle Dark Mode
During its WWDC Keynote in June, Apple touted new premium iCloud+ features such as Hide My Email, iCloud Private Relay, and even improved HomeKit Secure Video support. However, there was also one other pretty significant feature tucked away on its iOS 15 Preview page that it made no mention of at all — the ability to use custom domains with iCloud Mail.
In fact, for several weeks following WWDC, many were left speculating as to exactly what form this would take, as Apple didn’t really say much about it beyond a single sentence buried in the midst of dozens of other upcoming iOS 15 features.
Personalize your iCloud Mail address with a custom domain name, and invite family members to use the same domain with their iCloud Mail accounts.
Although this made it clear that custom domains were coming, many wondered how Apple would go about it, since configuring your own domain name requires more advanced technical knowledge to set up than Apple traditionally expects of its customers.
In fact, it’s this requirement to understand the complexities of things like the Domain Name System (DNS) and the necessary Mail eXchanger (MX) records that are required to set up custom domains to receive mail.
Business-grade services like Microsoft and Google have offered custom email domains for years, but they also expect that these will be run by those with at least some basic “system admin” knowledge.
This led to a belief that Apple might partner with a domain registrar, or even fears that the company could choose to create some very limited set of “custom domains” rather than letting users bring over whatever domain they have.
However, it’s also fair to say that anybody who has already registered their own custom email domain probably has at least a rudimentary understanding of how to set up additional DNS entries, and it’s not like Apple is going to leave users guessing in terms of what those should be when it comes to iCloud+ Mail.
The good news is that Apple has now turned the key on the custom domains on its Beta iCloud site, so anybody can jump in and set up their own custom domain right now — and it works with any domain, and any domain registrar, as long as you’re comfortable setting up the necessary records for yourself.
for iCloud+ Mail
While the feature now appears to be available for anybody who wants to set it up, it’s important to understand that this is still very much in beta.
This means some things may not work properly, and we wouldn’t recommend setting it up with your primary email domain right now unless you’re feeling particularly adventurous.
While the chances of losing emails are slim — the technology behind this has been in place for almost 40 years — there are still things that can go wrong if things don’t get set up properly on Apple’s end.
That said, if you’re willing to give it a try, you can do so by signing in to Apple’s beta iCloud website.
Note that like other new iCloud+ features, you must be on a paid iCloud Storage Plan — even the base 50GB plan — to set this up.
- In Safari, go to beta.icloud.com.
- Sign in with your Apple ID and password.
- Under your name, click Account Settings.
- Scroll down to Custom Email Domain.
- Click Manage.
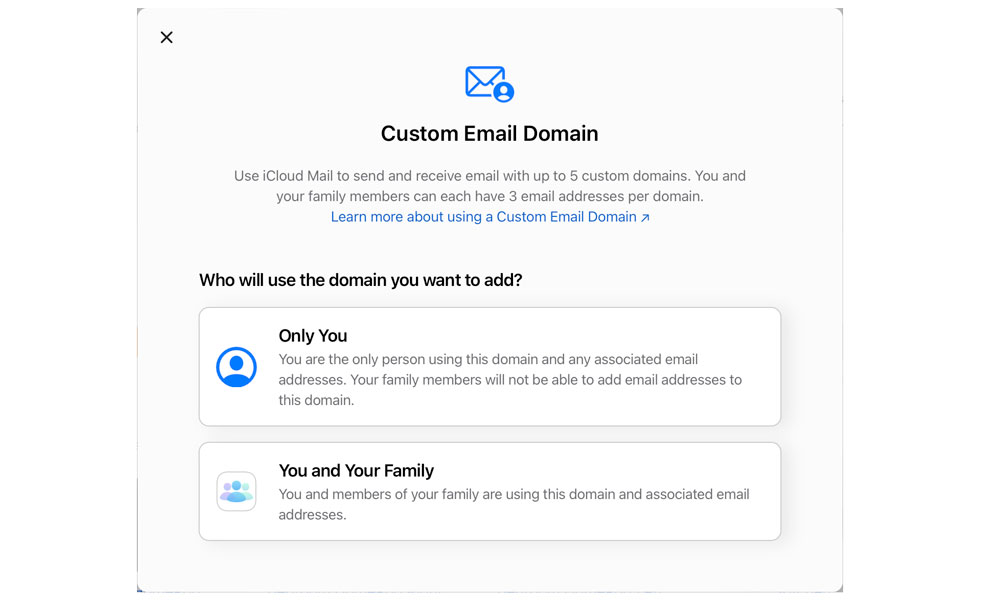
- From the initial welcome screen, choose who will use the Custom Email Domain — either only you, or anybody in your iCloud Family Sharing group.
- From the next screen, type the name of the domain that you want to use with iCloud Mail, and click Continue.
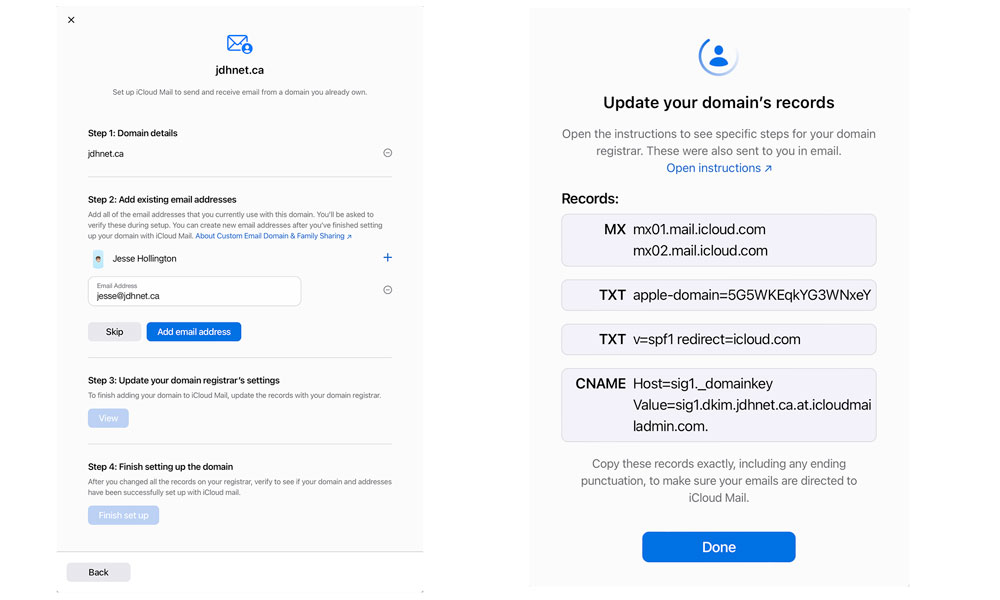
- Follow the instructions to add one or more existing email addresses to your primary Apple ID, or click Skip if you plan to do this later.
- Click View to see the DNS records that you’ll need to add to your domain registrar’s settings. You’ll need to open another browser window and log in to your domain registrar’s website to add these, and the methods will vary between different registrars.
- Once you’ve added or updated the necessary DNS records, return to the iCloud settings window and click Finish set up.
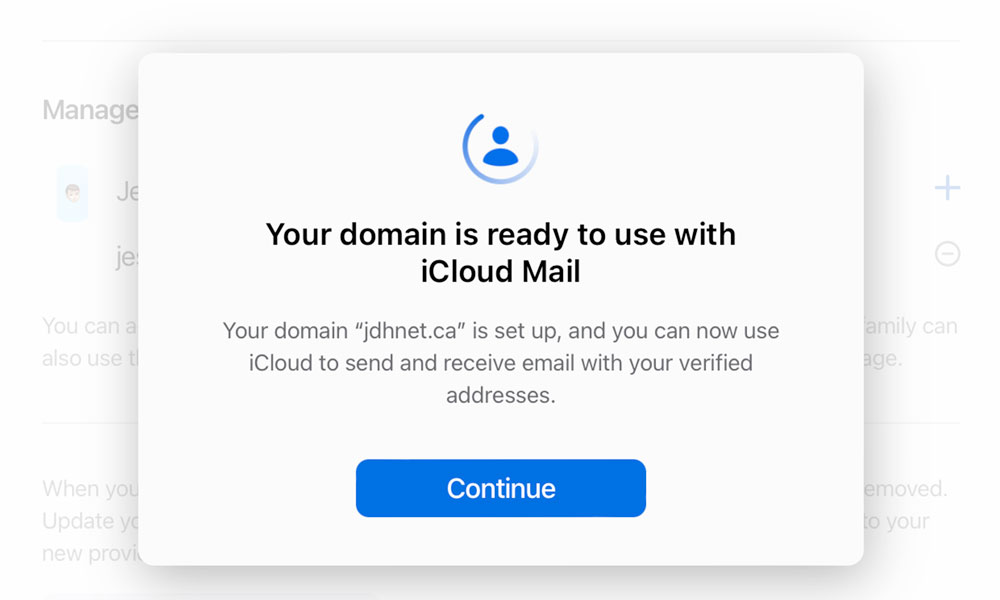
- If you’ve added the records properly in step 9, you should see a confirmation that “Your domain is ready to use with iCloud Mail.” Due to the way that DNS caching works, however, it’s possible the Apple’s servers may not be able to confirm the changes right away. In this case, Apple will let you know that your domain isn’t ready yet, and will notify you once it is.
Also note that in step 8, you will need to verify any addresses that you add that haven’t already been associated directly with your Apple ID.
If you aren’t using your custom domain with another email service, you’ll need to skip this step, finish setting up the custom domain, and then add your addresses later.
If you’re already using your custom domain with another mail provider, be sure to add all of your personal and family member’s email addresses to iCloud as quickly as possible. Once you update your DNS records to point to iCloud Mail, any messages sent to addresses that haven’t been added to iCloud will be bounced back as undeliverable.
Once Apple has confirmed that your domain is ready, you’ll be asked which address you want to use as your default email address. You can choose to stay with your original iCloud address — or any of its aliases — or you can select any of the new custom domain addresses that you’ve set up.
- As Apple notes on the initial setup screen, you can configure up to five custom email domains for a single iCloud account.
- You can have up to three email addresses at each of your domains, and each of your family members can have up to three email addresses at each of your family shared domains.
How It Works
Once you have everything set up, any messages addressed to your custom domain should arrive in the same iCloud inbox as emails sent to your iCloud.com address.
You’ll also be able to choose to send from any of your new custom domain addresses or your iCloud address or any of its aliases. This is also available in the Mail app in the current iOS 15, iPadOS 15, and macOS 12 Monterey betas.
Unfortunately, unlike iCloud Aliases, you can’t add addresses directly from the iCloud Mail settings. Instead, you’ll have to go back to the Custom Email Domain section in your main iCloud Settings page on the web
Along the same lines, if you’ve chosen to use your custom domain with your whole family, each individual family member will need to visit beta.icloud.com and log in with their own account to add their own email addresses in the same way.
If these are existing addresses, they should do this as soon as you have your custom domain set up with iCloud to avoid messages sent to them being bounced as undeliverable.
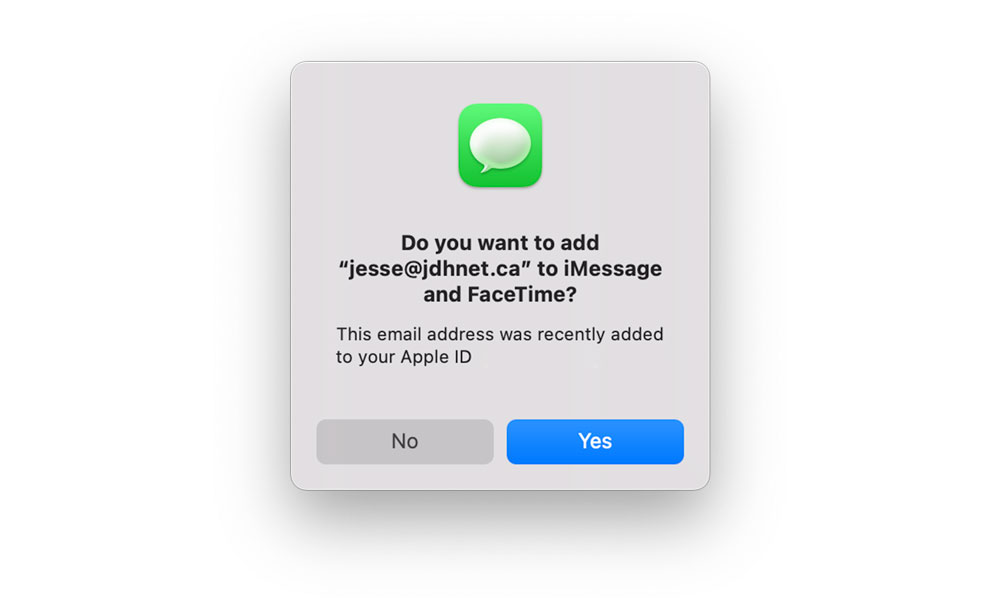
Note that any addresses that you add to your custom domain for iCloud Mail will also be associated with your Apple ID. This means you’ll likely see prompts pop up on your iPhone, iPad, and Mac asking if you’d like to add them to services like FaceTime and iMessage.
Should you wish to stop using your domain with iCloud Mail, likely to switch it over to another service, you can visit the same Custom Email Domain settings, choose the domain you want to cancel, and click the “Stop using this domain” button.
If you plan to use it with another email provider, you’ll also need to visit your domain registrar and update your DNS records accordingly.
As this whole thing is still in beta, there are still likely a few bugs for Apple to work out, and while we had no problem setting everything up for a couple of test domains, we’ve been seeing other users facing challenges getting their own domains moved over.
One of the biggest problems seems to be that you won’t be able to use a custom domain email address if it’s ever been used for another Apple ID. If your current Apple ID uses your custom email address, you can, of course, set this up with a custom domain, but if you’ve ever used it for another Apple ID — even one that’s been deleted — Apple won’t ever allow it to be used again. According to Apple Support, this is intentional, so it probably won’t change once the feature comes out of beta.
Apple also doesn’t have any useful help pages up for this yet. The links on the setup screens to get more detailed information just go to generic iCloud pages right now, so if you’re at all uncertain about how to set up the DNS records that Apple suggests, we’d recommend backing out and trying again later when the full support articles are available.


