
You Don’t Need iCloud+ for ‘Hide My Email’ in iOS 15 | How to Set It Up Now
 Jesse Hollington
Toggle Dark Mode
With this year’s release of iOS 15, Apple plans to add even more privacy features by expanding its iCloud services into a new iCloud+ tier, but while you will need to be paying for iCloud to access these features, the good news is you won’t have to switch everything over to iCloud to benefit from them.
Specifically, it looks like Apple’s new Hide My Email feature won’t require you to use an iCloud+ Mail account to create private addresses that forward to your primary email address.
Since Apple offers its own iCloud Mail service, and the private email addresses created by Hide My Email are clearly “icloud.com” addresses, many users were naturally concerned about this. However, it turns out that Apple has built this feature on the foundation of Sign in with Apple that debuted in iOS 13.
- For those who may not recall, one of the key selling points to Sign In with Apple was to give you the option of creating a virtual forwarding address when signing up for an account in a new app.
- This lets you avoid sharing your real email address with app developers and other online services.
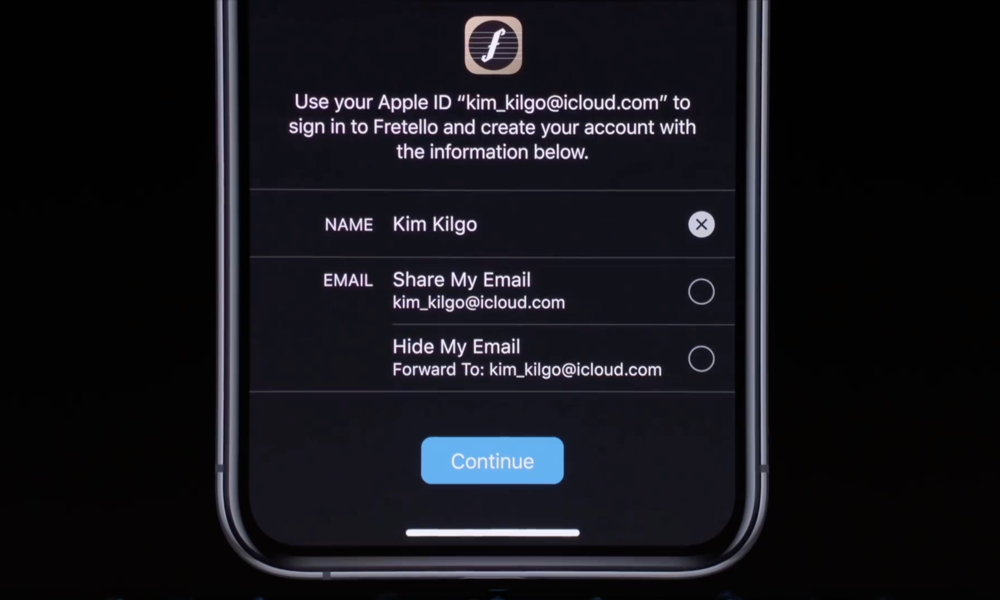
Apple even called the feature Hide My Email from the beginning, both in support documents and in the Sign in with Apple dialog on your iPhone and iPad. So, what Apple is clearly doing here is simply extending it beyond just signing up for apps and services, allowing users to create these addresses on-demand.
That said, the new iOS 15 and iCloud+ version of Hide My Email makes a few other changes. Most notably, the addresses are much friendlier, ending in “@icloud.com” rather than the more cumbersome “@privaterelay.appleid.com” domain that was used for the Sign in with Apple version.
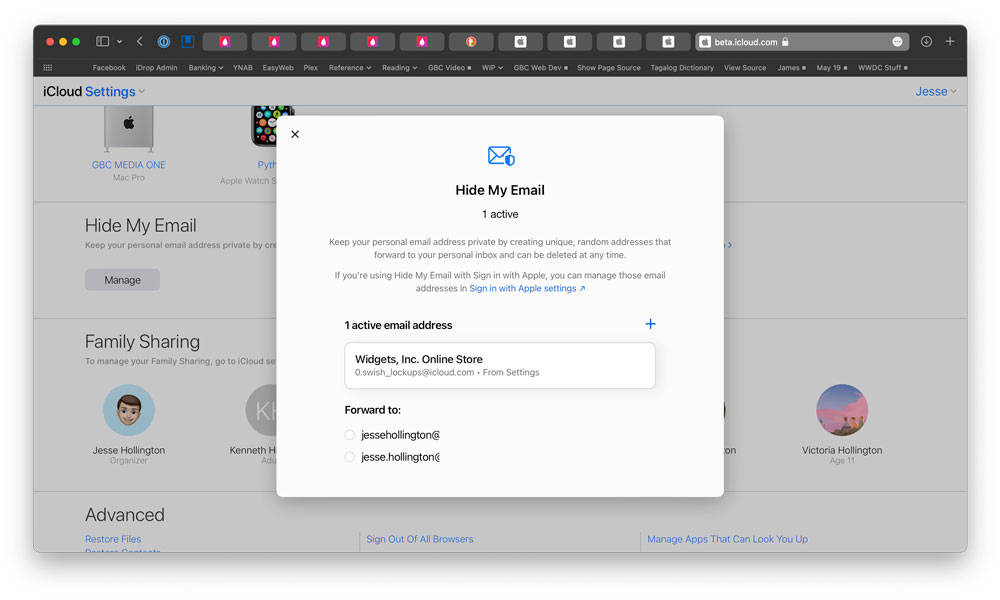
It’s fairly clear that the only major difference here is the domain name, however, as everything has now been integrated and can be found in the same place. The new “Hide my email” section in iOS 15’s settings also lets you manage all the addresses that you’ve added via Sign in with Apple over the past two years.
Previously, you could manage these additional private email addresses by logging into your Apple ID at appleid.apple.com, or in your profile section of the iPhone/iPad Settings app, under Password & Security, Apps using Apple ID. This section is still there in iOS 15, except that apps using a private email address will now take you to the new “Hide my email’ settings to manage all of your private addresses in one place.
How Hide My Email Works
Much like private email addresses created using Sign in with Apple, you will be able to forward these iCloud+ Mail addresses to any email address that’s associated with your iCloud Apple ID.
In other words, even though the private addresses that you create will end in “@icloud.com” you don’t have to forward incoming messages to an iCloud email address to take advantage of this feature.
In fact, if your Apple ID is a different email address, your Hide My Email addresses will all forward to that by default, regardless of whether that’s on Gmail, Outlook, Yahoo, or any other email service. The only catch is that all of your Hide My Email addresses have to forward to the same primary address — you can’t choose different forwarding destinations on a per-address basis.
In fact, you may be able to set up Hide My Email addresses now — even if you’re not yet running any of the iOS 15 or macOS 12 betas, since this is a back-end iCloud feature. Here’s how:
- Make sure you’re on a paid tier of iCloud. Even the $0.99/month 50GB plan will suffice.
- Visit the iCloud beta site at https://beta.icloud.com.
- Log in using your Apple ID and password.
- On the main page, click Account Settings.
- A new Hide My Email section should appear between My Devices and Family Sharing or Advanced.
- Click Manage to access your Hide My Email settings.
- Click the “+” sign to add a new email address.
- Check the randomly generated email address. If you don’t like it, click “Use a different email address” to generate a new one.
- Label your email address and optionally add a note to describe what it’s for.
- Click the Create email address button.
Keep in mind that since this is a beta feature that’s still rolling out, it may not yet appear on your iCloud account. It doesn’t seem to be entirely dependent on iOS 15, as we’ve seen it appearing on iCloud accounts that have not been used with the iOS 15 beta. However, it does seem to show up much quicker if you log into iCloud with an iPhone or iPad running iOS/iPadOS 15, or a Mac running macOS 12 Big Sur.
If you do have a device running iOS 15, however, you can also complete the steps above directly from your iPhone or iPad by visiting your profile in the Settings app and going to iCloud, Hide My Email.
Any Hide My Email addresses that you do create will also start working immediately. Messages sent to any of your private aliases will come in with a name of “Hide My Email” instead of your normal account name. Plus, Apple isn’t taking any shortcuts on privacy here — iCloud+ also generates a random iCloud.com FROM address so that replies travel back via iCloud rather than going directly to the sender.


