
You Can Find Your AirTags (and Much More) with Your Apple Watch | How To
 Jesse Hollington
Toggle Dark Mode
By now, you’re probably familiar with Apple’s AirTags and other Find My network devices, but what you may not know is that Apple has made some pretty nice improvements in watchOS 8 to help you locate your lost items right from your wrist — even when your iPhone is nowhere nearby.
In fact, with watchOS 8, you can now use your Apple Watch to find out where you left your iPhone, or even get a notification to let you know that you’ve left it behind.
It’s actually a pretty big change for the Apple Watch, which was previously limited to finding people who were sharing their locations with you. watchOS 7 basically just had a version of the old Find My Friends app, renamed to Find People.
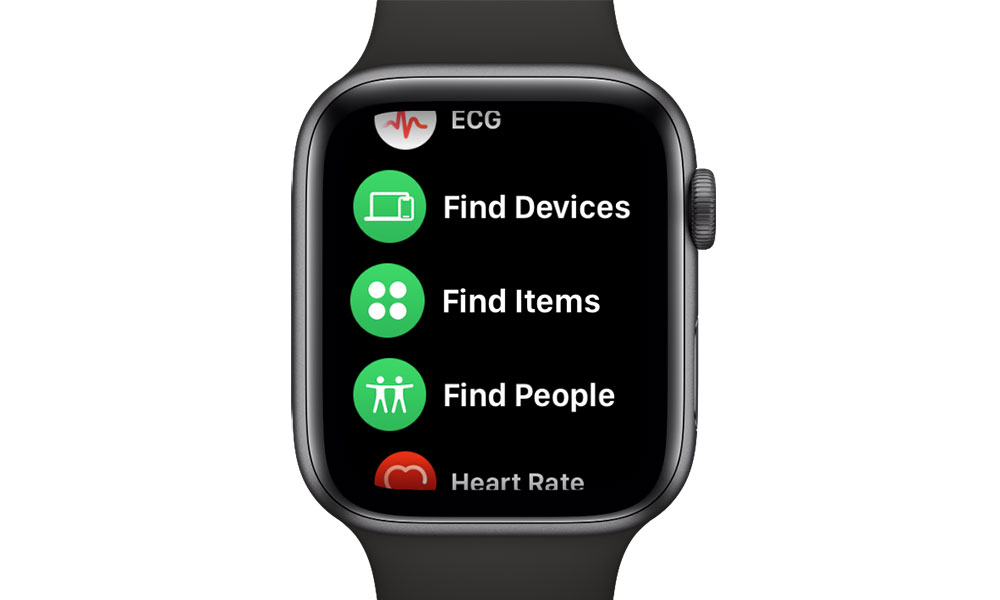
That’s still the case on watchOS 8, which doesn’t offer a unified Find My app like the iPhone and iPad do. Instead, to keep things simple and focused, Apple has left Find People pretty much the way it was before, and added two more category-specific apps: Find Devices and Find Items.
These roughly correspond to the separate sections in the iPhone Find My app, and surprisingly offer most of the features from there. Not only can you find out where your Apple devices, AirTags, and other Find My network items are, but you can also make them play a sound, set up notifications for when you leave them behind, and even enable Lost Mode — all directly from the Apple Watch.
This is especially useful for users of cellular Apple Watch models, since of course you’re more likely to deliberately leave your iPhone behind if you’re going for a run, or even if you’re just hanging out at the beach.
With a cellular Apple Watch, you’ll be able to use the full set of Find My features without the need for your iPhone to be nearby. However, even without cellular service, the Find My app can still be used to locate nearby items, and you’ll also get the full set of Find My features if you’re connected to a Wi-Fi network.
How Find My Works
As with the iPhone Find My app, Apple has divided everything into three, with separate apps for each on the Apple Watch:
- Find People is the most obvious one, as it’s used to find those who are sharing their location with you. While you’re technically still seeing the location of their iPhone, iPad, or Apple Watch, it’s the person you’re looking for, and not their device. This means you’ll also only see the location of whatever device they’ve assigned to share their location from — in most cases, that’s an iPhone and Apple Watch.
- Find Devices covers everything made by Apple that’s registered to your iCloud account and is capable of sharing its location in some way, except for AirTags. This includes not only the iPhone, iPad, and all flavours of Mac, but also AirPods, AirPods Pro, AirPods Max, and even most Beats headphones. The location capabilities differ between devices — Macs don’t have a GPS, for example, so they use Wi-Fi location services instead — but you should see at least a general location provided for everything that’s switched on, and maybe even some devices that are turned off.
- Find Items includes AirTags and all third-party devices that offer support for Apple’s Find My network.
While these divisions are mostly logical, the lines have gotten a bit blurred now that AirPods are effectively also part of the Find My network. You’d expect to find your AirPods Pro and AirPods Max in the Find Items app, but you’ll actually have to go into Find Devices for these.
That’s probably fair, considering that Apple’s older second-generation AirPods don’t support the new Find My network features, and therefore can’t be located in the same way as AirTags. Instead, they simply report the location where they were last connected to your iPhone, iPad, or Mac.
Finding Your Stuff
Regardless of Apple’s logic here, though, when it comes to your Apple Watch, you’ll need to make sure you’re opening the right app for the job. The simple rule of thumb is that if it’s an AirTag or third-party product like a Chipolo ONE spot tag or Belkin’s earbuds, you’ll need to use Find Items. Everything else made by Apple is in the Find Devices app.
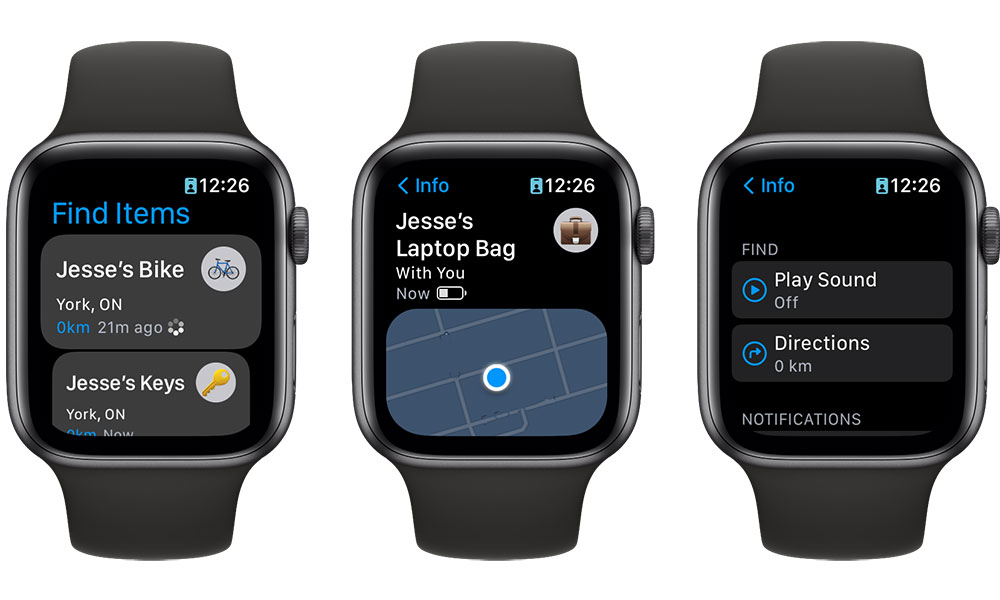
The good news, though, is that both apps work mostly the same way. Opening either one will show you a list of all your devices in the appropriate category, presented as cards that you can scroll through using the Digital Crown.
Each card shows the name of the device, the icon representing it, and how far away it is, and how long ago that location was reported.
Cards in the Find Devices app will show a battery level indicator, where appropriate. This isn’t displayed on the device listing in Find Items, although it is available on the detail view, accessed by tapping on any of the cards.
Distances are shown in your default units — miles or kilometres — but you can scroll down to the very bottom of the listing to change this if you like.
The details for a given item will show you a small map of its location, with the approximate address listed beneath. Scrolling down will show options for playing a sound to help you locate it, or getting step-by-step directions to its location using Apple’s watchOS Maps app.
If you’re part of a Family Sharing group, you can also see a list of family members’ devices by scrolling down to the bottom of the list in the Find Devices app and choosing Show Family Devices.
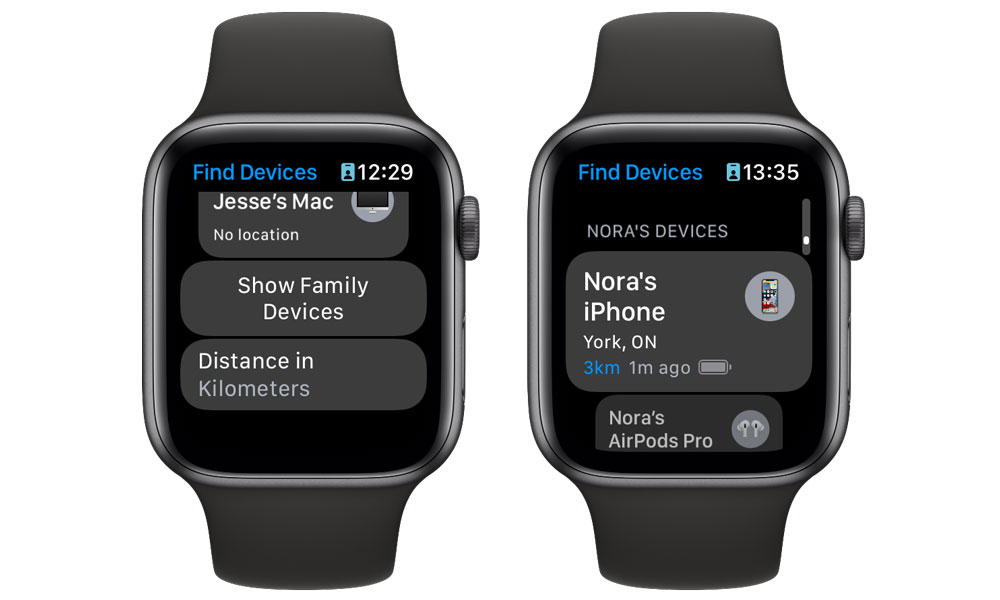
Note that while you’ll see a list here of every device registered to your family members, you’ll only be able to see where they are if they’ve chosen to share their location with you. Device location sharing in a Family Sharing group is an all-or-nothing setting, however — if your family members are sharing their general location with you in Find People, you’ll also be able to see where all of their devices are.
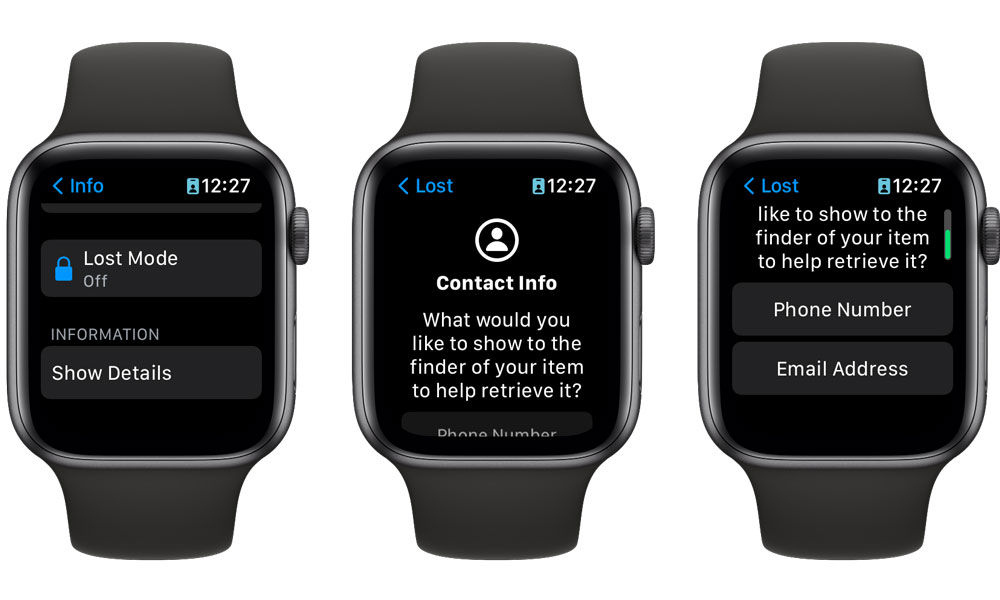
Enabling Lost Mode
The Apple Watch Find Devices and Find Items apps also let you enable lost mode for a missing item directly from your wrist. What actually happens depends on the target device, but the process is similar, regardless of which device you’re putting into Lost Mode:
- On your Apple Watch, open Find Items or Find Devices, as appropriate.
- Locate the device you want to put into Lost Mode, and tap on it.
- Scroll down to the bottom of the details screen and tap Lost Mode.
- Tap the toggle beside Lost Mode to enable it.
- If prompted, choose whether to display an email address or phone number on your device.
- If prompted, confirm that you want to enable Lost Mode.
Putting an M1 Mac into Lost Mode will reboot it and lock it down into Recovery Mode, requiring you to enter your macOS password and Apple ID and password to get back into it. An iPad or iPhone will simply return to the Home screen, with Face ID or Touch ID disabled. In either case, Apple Pay will also be disabled, and you’ll need to re-enter your Apple ID password to reactive it after signing in and disabling Lost Mode.
By comparison, an AirTag, set of AirPods, or other Find My network item simply lets you put in an email address or phone number to help anyone who finds your lost items get them back to you.
You can also disable Lost Mode directly from your Apple Watch by following the steps above. This will re-enable Face ID or Touch ID on an iPhone or iPad, although you’ll still have to reactivate Apple Pay manually by entering your Apple ID password.
Overcoming Separation Anxiety
Your Apple Watch can also let you know if you leave an important item behind, whether that’s your iPhone, or merely a set of keys with an AirTag attached. Here’s how to enable it:
- On your Apple Watch, open Find Items or Find Devices, as appropriate.
- Locate the device you want to set a “Left Behind” notification for and tap on it.
- Scroll down to the bottom of the details screen and tap Notify when Left Behind.
- Tap the toggle beside Notify when Left Behind to enable it.
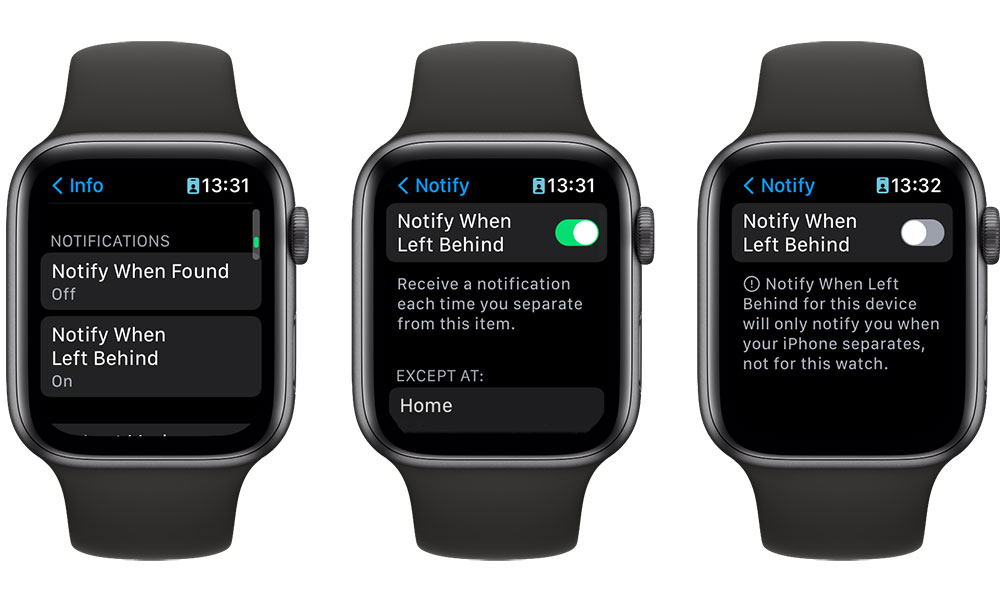
If you’ve previously set up Left Behind notifications from your iPhone or iPad and created exceptions — that is, locations like your home or office where you don’t want to be notified — these will appear in the Apple Watch app. You can remove these exceptions from your watch, but at this point, you can’t add new ones.
Note that Left Behind notifications aren’t supported on the Apple Watch for all types of devices. In fact, at this point they’re mostly limited to the iPhone, AirTags and third-party Find My network items.
For unsupported devices, like an iPad, MacBook, or AirPods, you’ll see a note when enabling the notification, telling you that you’ll only be notified “when your iPhone separates, not for this watch.” As long as you have your iPhone with you, you’ll still get notifications on your Apple Watch if you leave your AirPods or iPad behind, but they won’t work when you’re using your Apple Watch away from your iPhone.
Lastly, there are some devices that simply don’t support Left Behind notifications, in which case the option won’t appear at all. Most of these are pretty obvious, however, such as non-portable Macs like a Mac Pro or iMac.


