
4 Major iPhone Annoyances and How to Make Them Go Away

Toggle Dark Mode
Have you ever found yourself in the awkward situation where you’re literally yelling at your iPhone or iPad, perhaps aggravated beyond your limits by those perky notifications that keep popping up, or all those extra steps that need to be taken in order to perform an action that seems so simple?
Well, chances are you’re not alone in your struggle. There are some pretty annoying features built into iOS, after all — whether they’re enabled by default or on accident. However, the good news is, most of them can be turned off or tweaked in your favor — by simply taking a few minutes to comb through the Settings app and manually make the changes yourself.
Here’s a list of our top 4 most loathed iOS “features” and how you can disable them in a few simple steps.
1. When iOS Asks if You Want to Join a New Wi-Fi Network
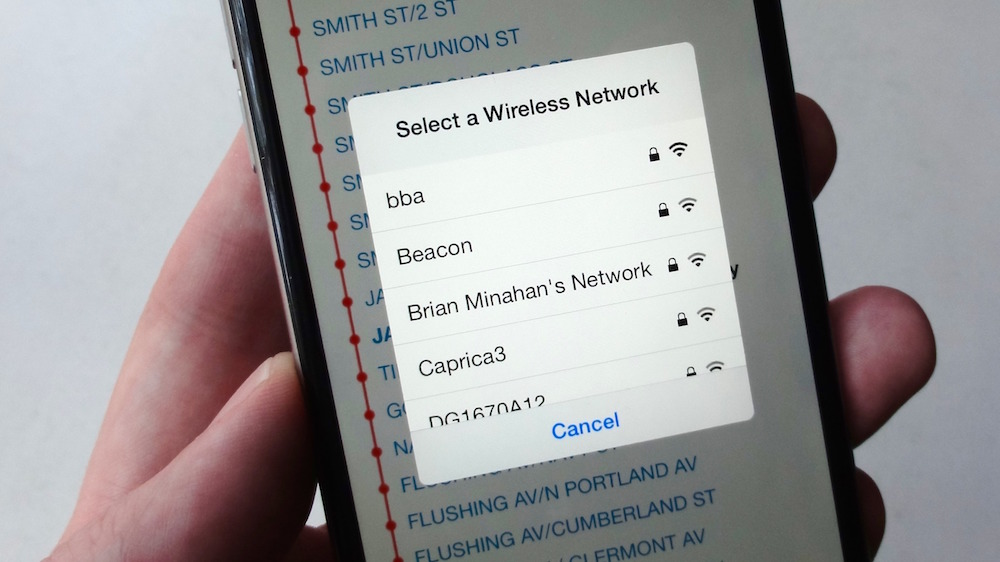
Under normal conditions, your iPhone or iPad will automatically switch between known Wi-Fi networks — such as your home or office, when they’re within range — and 3G/4G LTE (depending on your wireless carrier.) However, by default, if you’re not in range of a known Wi-Fi network, but still have the feature enabled, iOS will push notifications to your home or app screens when available networks are within range — asking if you’d like to join any of them.
And that’s kind of annoying, isn’t it? Especially if you’re in the midst of doing something else, like reading or playing a game while in the car, and you really don’t need a Wi-Fi connection.
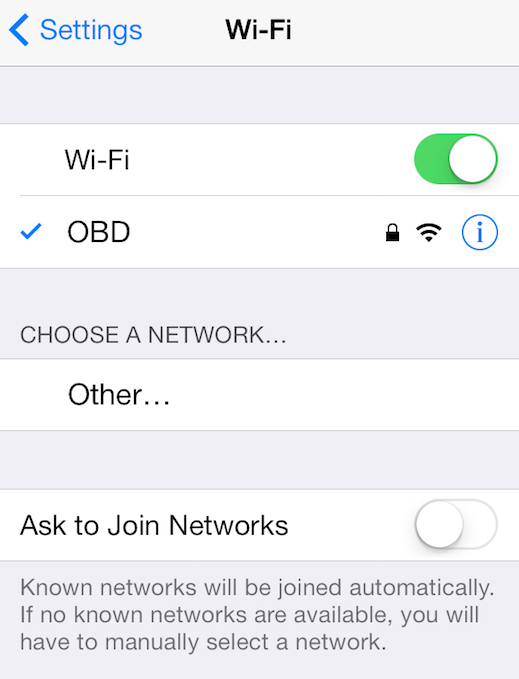
Fortunately, disabling the “Join Wi-Fi Network” pop up notifications are pretty simple. Just go to Settings > Wi-Fi > and then turn off the “Ask to Join Networks” option (as shown above.)
2. When iOS Asks if You Really Want to Delete That Email
In today’s day and age, we’re constantly getting emails that aren’t particularly useful to us. And so, naturally, we would just trash those messages, right? Right … And while iOS has made that easier to do in recent years, with the introduction of swipe to delete or archive gestures in the Mail app, some people still prefer to read the email and then manually press the trashcan icon located in the upper right-hand corner of the screen.
And that’s where the frustration often factors in — iOS, by default, will launch a pop-up notification inquiring as to whether or not you really want to delete that particular message. Really? I guess it’s kind of nice for iOS to double-check and confirm our choice, however, let’s be honest, I don’t think many of us would go out of our way to select Trash if that wasn’t what we actually wanted to do. So the notification, in that sense, is just an extra, unnecessary step to take — and all those precious seconds add up fast.
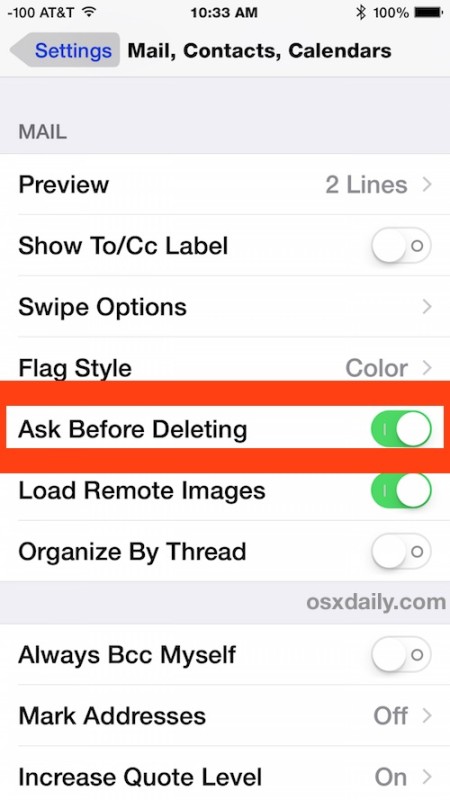
Fortunately, you can easily disable that extra step by going to Settings > Mail, Contacts, Calendars > and then switching the “Ask Before Deleting” toggle in the mail section to off.
3. When iOS Keeps Sending Notifications Even When You Don’t Want Them
Let’s face it — some people just don’t want to be bothered sometimes, when reading a book or playing a game or watching a movie on their iPhone or iPad, for instance. And it’s with that sentiment in mind that Apple originally introduced the “Do Not Disturb” feature alongside iOS 6.
However, even when the feature is enabled, iOS will sometimes send you notifications (for some apps) even though they may be delivered silently — as in, sans the sounds and vibrations, for example. The good news, however, is that the “Do Not Disturb” setting can easily be tweaked to prevent any and all notifications, sounds, vibrations, etc., from popping up — giving you plenty of peace to enjoy that movie or book for hours on end.
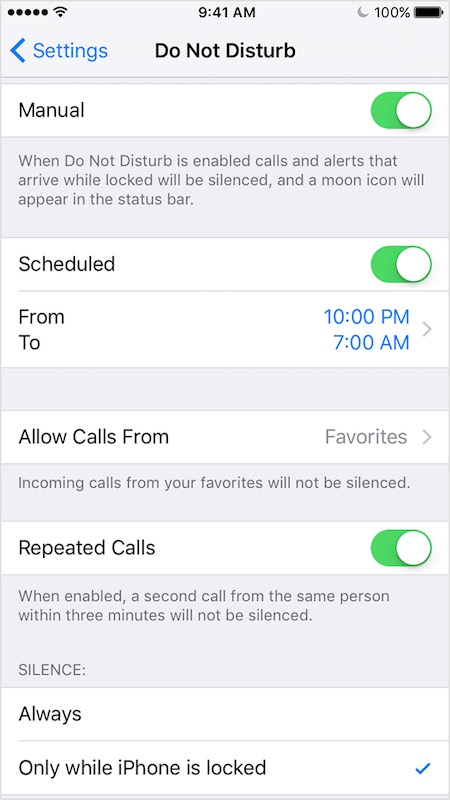
To disable ALL notifications, simply navigate to Settings > Do Not Disturb > then scroll down to the Silence section > and finally, select “Always” instead of “Only When iPhone is Locked.”
4. The “Connect” Button in the Music App
If you’re an Apple Music subscriber, or have navigated the iOS Music app’s user interface before, you’ve likely noticed the “Connect” button positioned in the middle of the navigation menu.
“But what is Connect?” you might be wondering.
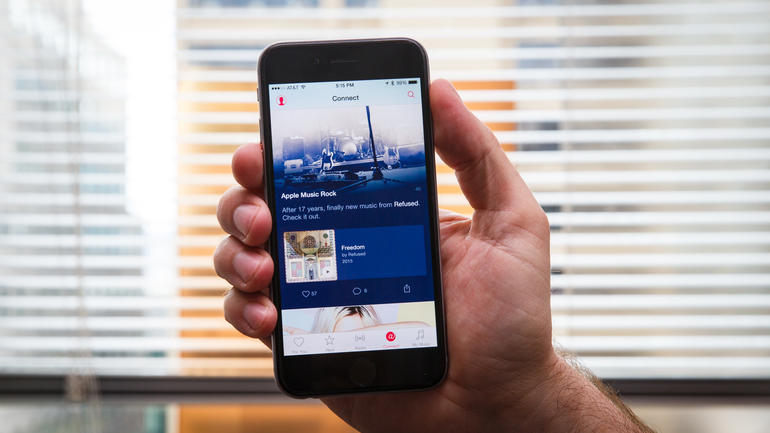
Think of “Connect” as something along the lines of your personal gateway into the lives and current happenings of your favorite musicians and bands. It’s almost like a constant Twitter stream, so to speak, keeping you in the know about the latest and greatest developments taking place in tinsel town.
But what if, like most people, you just don’t care too much about that kind of stuff? What if you’d rather not even see the option to “Connect” with anyone when you simply want to enjoy your Apple Music?
Well fortunately, even despite the obvious omission of an “Edit” option in the Apple Music app, you can still zap that not so little “Connect” button from the icons menu.
Here’s how:
- Select General from the Settings app > select Restrictions > either “Enable Restrictions” (if you don’t have the feature turned on already) or enter your Restrictions passcode (which is user created the first time the setting is turned on.)
- Scroll down until you reach the “Apple Music Connect” setting, then turn the setting off.
- Navigating back to the Apple Music app, you’ll now notice a “Playlists” button in place of the former “Connect”
Learn More: 10 Tricks to Double Your iPhone’s Battery Life


