
From Scraps to Scans: 7 Ways to Master the iPhone Notes App
Even though there are a ton of options for note-taking apps on the App Store, it’s really hard to beat the one that comes with your iPhone. That's because Apple has quietly turned its Notes app into one of the most useful built-in apps on its devices.
If you’re just getting an iPhone, you might not have seen the evolution of this app. What was first a simple app to take notes has become a powerful tool to keep track of everything you need.
Once you spend some time with it, Notes starts feeling like a digital Swiss army knife. It can handle checklists, scanned documents, audio recordings, transcripts, PDFs, Smart Folders, and even more.
There are a lot of things you can do with the Notes app; you just need to know where to get started. The good news is that you don’t need to learn anything complicated to get much more out of it. Start by following this list of 7 tips, and you’ll become a pro user in no time.
Scan Paper Documents Straight Into a Note

One of the most underrated things Apple Notes can do is scan paper documents right from your iPhone.
If you need to save a receipt, bill, letter, signed page, or printed form, you don’t necessarily need a separate scanner app; Notes can handle the job surprisingly well, and it makes the result easy to store alongside any other information in your note.
So, whether you want to scan an important receipt or a doctor’s prescription, here’s how:
- Open Notes and create a new note or open an existing one.
- Tap the Attachments button (the paper clip icon near the bottom of your screen).
- Tap on Scan Documents.
- Point your iPhone at the document.
- Let it scan automatically, or press the shutter button yourself.
- Adjust the edges if needed and save it.
Record Audio and Get a Transcript in the Same Note
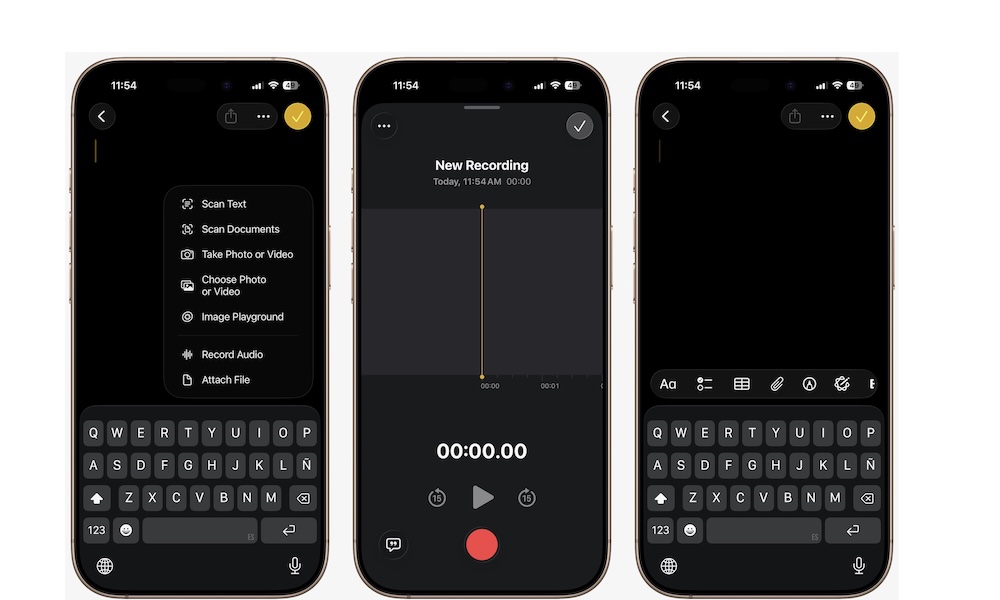
One of the biggest upgrades Apple Notes has gained in recent years is the ability to record live audio directly inside a note and get a transcript in the same place. This makes Notes incredibly useful for lectures, meetings, interviews, brainstorming, and quick voice-based reminders.
The best part is that you get both the full original source recording and a transcript that makes it easier to review what was said without replaying everything from the beginning. That combination makes the app feel much more capable than a simple note app usually does. Here’s how to start recording from the Notes app:
- Open Notes and create a new note or open an existing one.
- Tap the Attachments button (the paper clip icon near the bottom of your screen).
- Tap Record Audio.
- Tap on Record to begin.
- Tap the Stop button when you’re done.
Your note will have the new recording attached. You can tap it to listen to the recording, or tap the transcript button in the bottom left corner to read what the recording captured.
Pro Tip: If you have an iPhone 15 Pro or newer, you can also tap Summary to have Apple Intelligence summarize the recording, which is especially useful if you're using it to capture long meetings or lectures.
Link One Note to Another
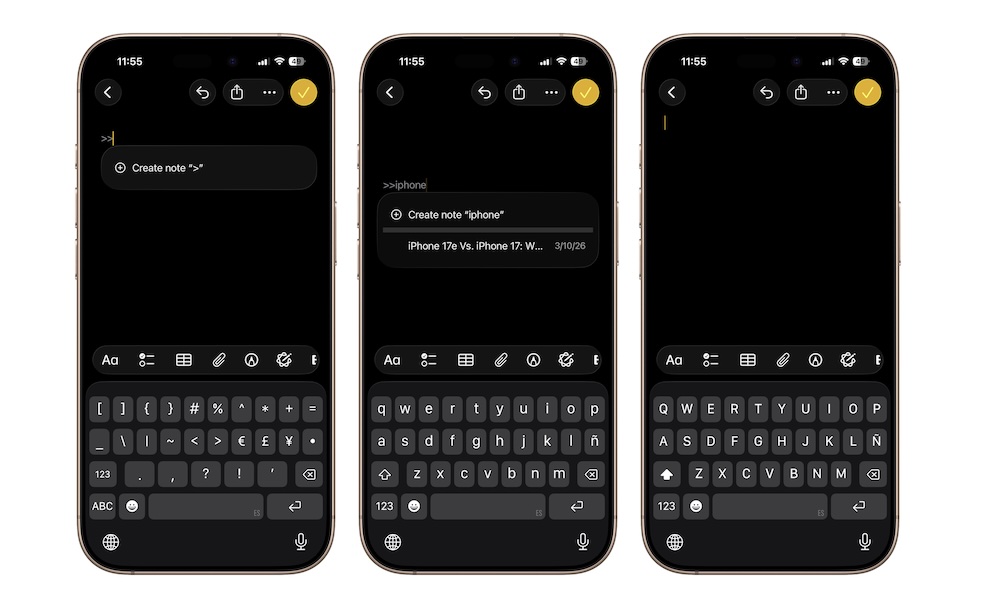
Once you start creating dozens of notes, internal links can make a huge difference. The Notes app can link one note to another, which means you can start connecting related information instead of keeping everything isolated. A travel note can link to a packing list. A work project note can link to meeting notes. A running idea note can link to research or to-do lists.
This is a really cool feature that makes the Notes app powerful enough to compete with the best in the App Store. Instead of stuffing everything into one giant note, you can break things into smaller, cleaner pieces and connect them where needed. That makes your notes easier to maintain and a lot less overwhelming over time.
Here's how you can create internal links:
- Open the note where you want the link.
- Type “>>” and start entering the title of the note.
- Choose the note from the suggestions.
Organize Notes With Tags
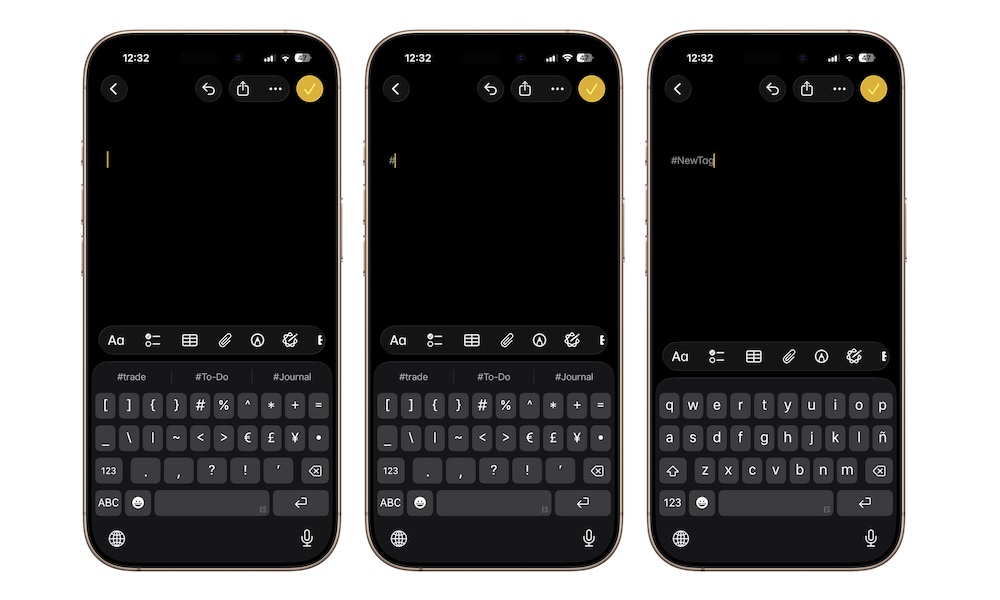
Tags are one of the best tools in Notes if you want more organization without creating tons of different folders. You can add tags like #work, #recipes, #travel, or #ideas anywhere in a note, then use those tags later to filter and group all of your related notes.
All notes can belong to more than one category without forcing you to choose one folder and ignore the rest. That means that a single note could be tagged #travel and #budget, or #work and #meeting. That makes Notes easier to organize without becoming rigid. Follow these steps to get started with tags:
- Open a note.
- Type a hashtag. You’ll notice that your iPhone will give you suggestions right above the keyboard. You can use those, or write down any word #shopping.
- Save the note normally.
- Tap tags later or use the Tag Browser to find related notes.
Tags can’t have spaces, so you can’t have a “#work stuff” tag. This would be saved simply as #work. So try using capital letters or dashes to add extra words to your tags.
Build Smart Folders That Sort Notes For You

Smart Folders make tags even more powerful. Instead of manually moving notes around, you can create a Smart Folder that automatically gathers notes based on specific rules you set when you create it. So if you make a Smart Folder for #work, Notes can keep filling that folder for you as new tagged notes appear.
Notes will be automatically added to your Smart Folder when they meet the exact criteria, so you won’t ever have to worry about organizing them manually.
This is one of the most useful organizational tools in the whole app because it keeps things tidy without adding more work. Once the structure is in place, Notes does the sorting for you. That makes the app feel much smarter and less manual.
Here's how to create your own Smart Folder in Notes:
- Open the Notes app.
- Go to the Folders view in Notes. You might need to tap the back button to get there.
- Tap the New Folder button in the top right corner.
- Tap on Make into Smart Folder.
- Set the rules you want and, when you’re done, tap on the check mark in the top right corner of your screen.
Lock Your Private Notes
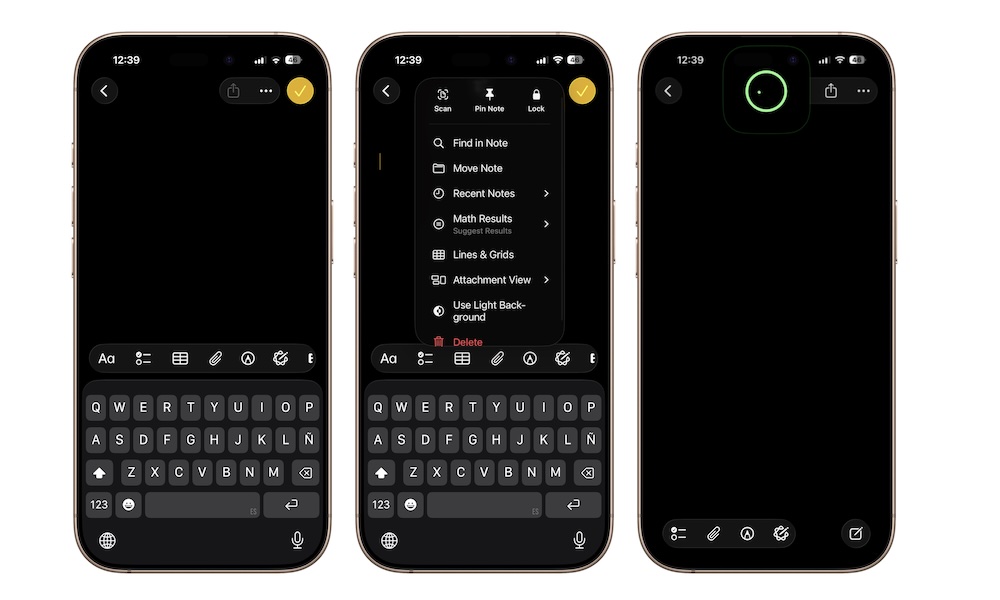
Not every note belongs wide open in your note list. If you keep travel details, private planning notes, personal reminders, or sensitive information in the Notes app, locking certain notes adds an extra layer of privacy. Apple lets you lock supported notes using Face ID, Touch ID, or your passcode.
Of course, you really shouldn’t save really sensitive information in the Notes app. It’s not safe enough for us to recommend it. However, for the things you want to keep private, you still get the convenience of having the note on your phone, but with more protection when someone else is using your device or looking over your shoulder.
Locking a note is pretty easy. Here’s how:
- Open the note you want to lock.
- Tap the three-dot button in the top right corner.
- Tap on Lock.
- Use Face ID to verify your identity.
And that’s it. Your note will be locked automatically. You can unlock it with Face ID or your passcode. Every time you close the app or go back to your Home Screen, the note will be locked. Sure, it might be annoying at first, but it also means it’ll be harder for anyone to snoop into your private notes.
Share Notes and Collaborate With Others in Real Time
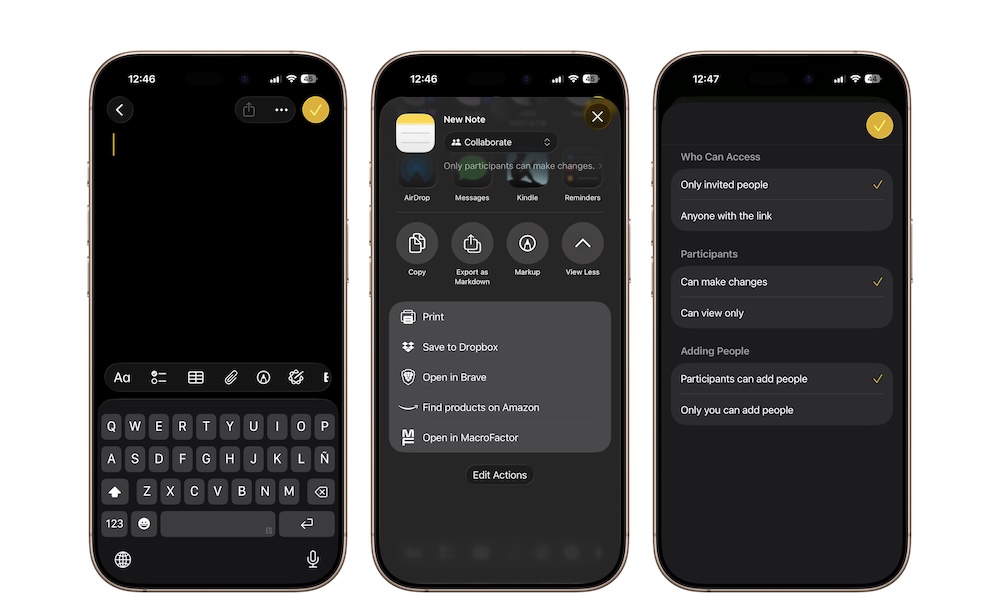
Believe it or not, the Notes app can also be a genuinely useful collaboration tool. You can send a static copy of a note if you just want to share information, or you can invite someone to collaborate on the note or even a whole folder. Once they join, everyone sees updates in real time.
This works really well for shared grocery lists, family planning, trip notes, event planning, or simple team coordination. It’s one of the most handy features in the Notes app that not many people know about or use.
To share a note or folder:
- Open the note or folder you want to share.
- Tap the Share button in the top right corner of your screen.
- Tap below the note’s name and choose between Collaborate or Send Copy.
- Pick how you want to send the invite.
- Let the other person join and edit.
For folders, you’ll have a couple of extra options. If you tap below the folder’s name, you can choose things like who can access your folder, who can be a participant, and who is allowed to add more people.
Master the Notes App
Apple Notes is one of those apps that looks simple at first and then gets more useful the more you learn from it. You can absolutely use it as a quick notepad, but it becomes much more interesting once you start using checklists, scans, tags, collaborations, and all the other features it has to offer.
The tips on this list are great, but they’re just the tip of the iceberg. There is so much more you can do with your Notes app that you will only learn by testing it yourself. So get started with these tips, then continue exploring the app and mastering it for yourself.