
Here’s the Easiest Way to Add Vaccination Cards to Your iPhone
 Jesse Hollington
Toggle Dark Mode
Although dozens of apps are out there that promise to handle COVID-19 proof-of-vaccination cards, most people don’t need to bother, as Apple likely already has you covered.
As long as you’re running iOS 15.1 or later and your local public health authority is using standard QR codes, you can add your proof-of-vaccination directly to Apple’s Health app and your Apple Wallet with nothing more than your iPhone’s camera. Here’s how.

Step 1 | Obtain Your Proof of Vaccination Record
The first thing you’ll need to do is to get your hands on your proof of vaccination record from your public health authority.
How to do this will vary depending on where you live. Many health agencies offer a website where you can log in with the appropriate credentials and download it in PDF form. In some cases, however, you may simply have been handed a paper copy when you received your most recent vaccination.
Regardless of how you get your hands on it, or whether it’s in paper or electronic form, as long as there’s a QR code on it, you should be good to go.
Technically speaking, that QR code has to be using the SMART Health Card standard, but most of the places that are issuing QR-based proof of vaccination certificates have adopted this standard. This includes California, Colorado, Connecticut, Delaware, Hawaii, Illinois, Louisiana, Massachusetts, New Jersey, New York, Rhode Island, Utah, Virginia, and Washington, as well as every Canadian province and territory.
If you’re unsure of how to get access to your COVID-19 vaccination records, the CDC maintains a helpful list of regional immunization registries.
Even if your state doesn’t support SMART Health Cards, you’re not necessarily out of luck, as numerous pharmacies and healthcare providers are also capable of issuing them directly.
Step 2a | Scan Your SMART Health Card QR Code Using Your iPhone Camera
If you have your QR code printed out on paper, or you have a second screen to display it on, such as a Mac, Windows PC, iPad, or even another iPhone, then here’s how to import it into your Apple Health and Wallet apps:
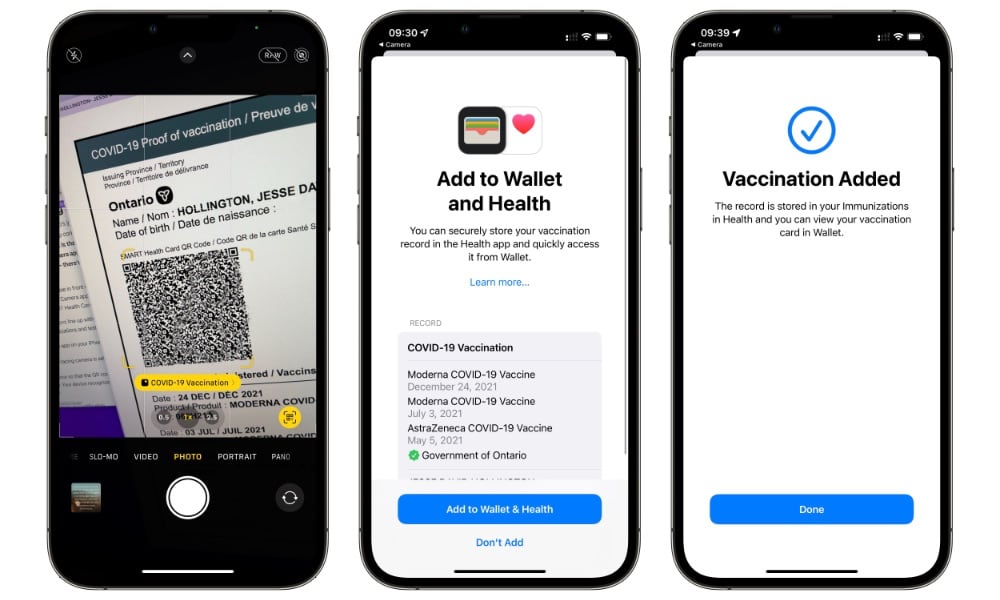
- On your iPhone, open the Camera app.
- Confirm your rear-facing camera is selected.
- Point the camera toward the QR code, and centre it in the viewfinder. You should see yellow brackets appear around it, with a yellow button below that said either Health (iOS 15.1) or COVID-19 Vaccination (iOS 15.2 or later).
- Tap the yellow Health or COVID-19 Vaccination button, as appropriate. A screen will appear prompting you to add the vaccination record to the Health app and Apple Wallet. This will also list all the vaccinations that are embedded in the QR code, the name of the agency that issued the code, and your name and date of birth.
- Tap Add to Wallet & Health to add your COVID-19 vaccination information.
Note that you can also perform the above steps if you’re still running iOS 15.0 — although you really should update to iOS 15.2. In iOS 15.0, the proof of vaccination will only be added to the Health app, but you’ll still be able to pull it up from there — it’s just a lot more awkward.
Step 2b | Scan Your SMART Health Card QR Code Using Live Text
If you’re downloading your proof-of-vaccination on your iPhone and don’t have another device handy to scan it, don’t worry, as the new Live Text feature in iOS 15 has you covered here too, letting you do everything on a single device. Here’s how:
- Open the web page or PDF containing your SMART Health Card QR code.
- Zoom in on the code so that it’s taking up most of your iPhone screen, without being cut off.
- Take a screenshot by simultaneously pressing the volume up and sleep/wake buttons (iPhone X and newer) or the home and sleep/wake buttons (iPhone 8 and older).
- Open the Photos app, locate the screenshot of your QR code, and tap on it to open it.
- Tap the ‘Live Text’ button in the bottom-right corner. The icon will turn blue and the QR code will be highlighted, along with any text that’s in the photo.
- Tap and hold on the QR code.
- Tap Open in Health from the pop-up menu that appears. A screen will appear prompting you to add the vaccination record to the Health app and Apple Wallet. This will also list all the vaccinations that are embedded in the QR code, the name of the agency that issued the code, and your name and date of birth.
- Tap Add to Wallet & Health to add your COVID-19 vaccination information.

Step 3 | Accessing Your Proof-of-Vaccination Card
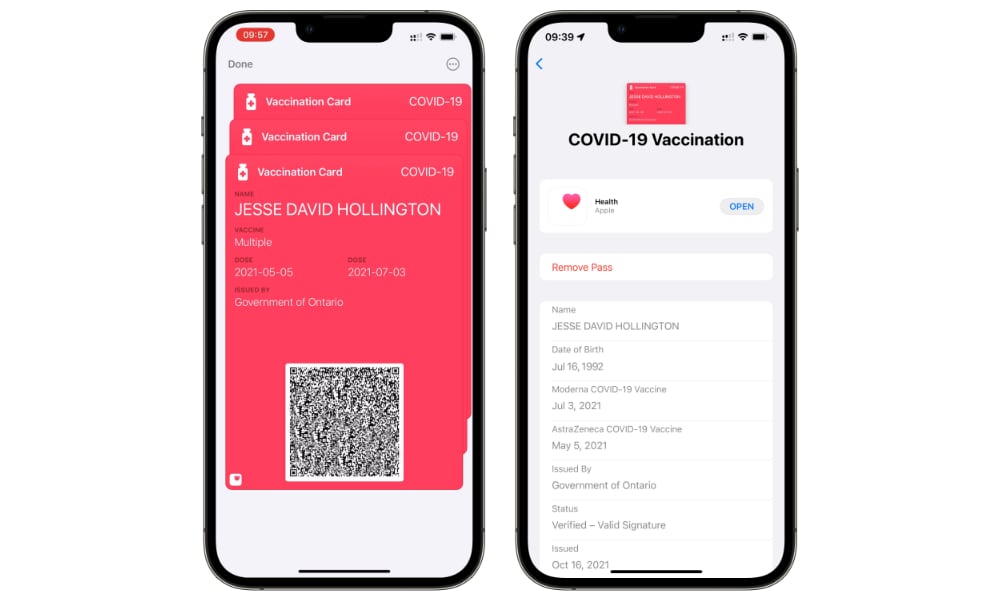
Once you’ve added your vaccination card using either of the above methods, it should appear with your other membership and loyalty card in Apple Wallet, normally at the top of that section, below any payment cards that have been added for Apple Pay.
From here, you can bring up your proof-of-vaccination the same as any other card in Apple Wallet. The normal way of doing this is to simply open the Wallet app from your Home screen, but there’s an even quicker way:
- From anywhere on your iPhone, double-click the side button (iPhone X and newer) or Home button (iPhone 8 and older).
- If you have any payment cards in Apple Pay, this will bring up your default payment method, however you’ll also see your other cards stacked up at the bottom. Tap on this stack to open it.
- Tap on your COVID-19 vaccination card to bring it up, ready to be scanned with an appropriate QR code reader.
As with other cards in Apple Wallet, your iPhone will also automatically adjust its display brightness to make it easier for a scanner to read the QR code. It will return to normal brightness when you close the Wallet app or simply swipe down to dismiss the current card.
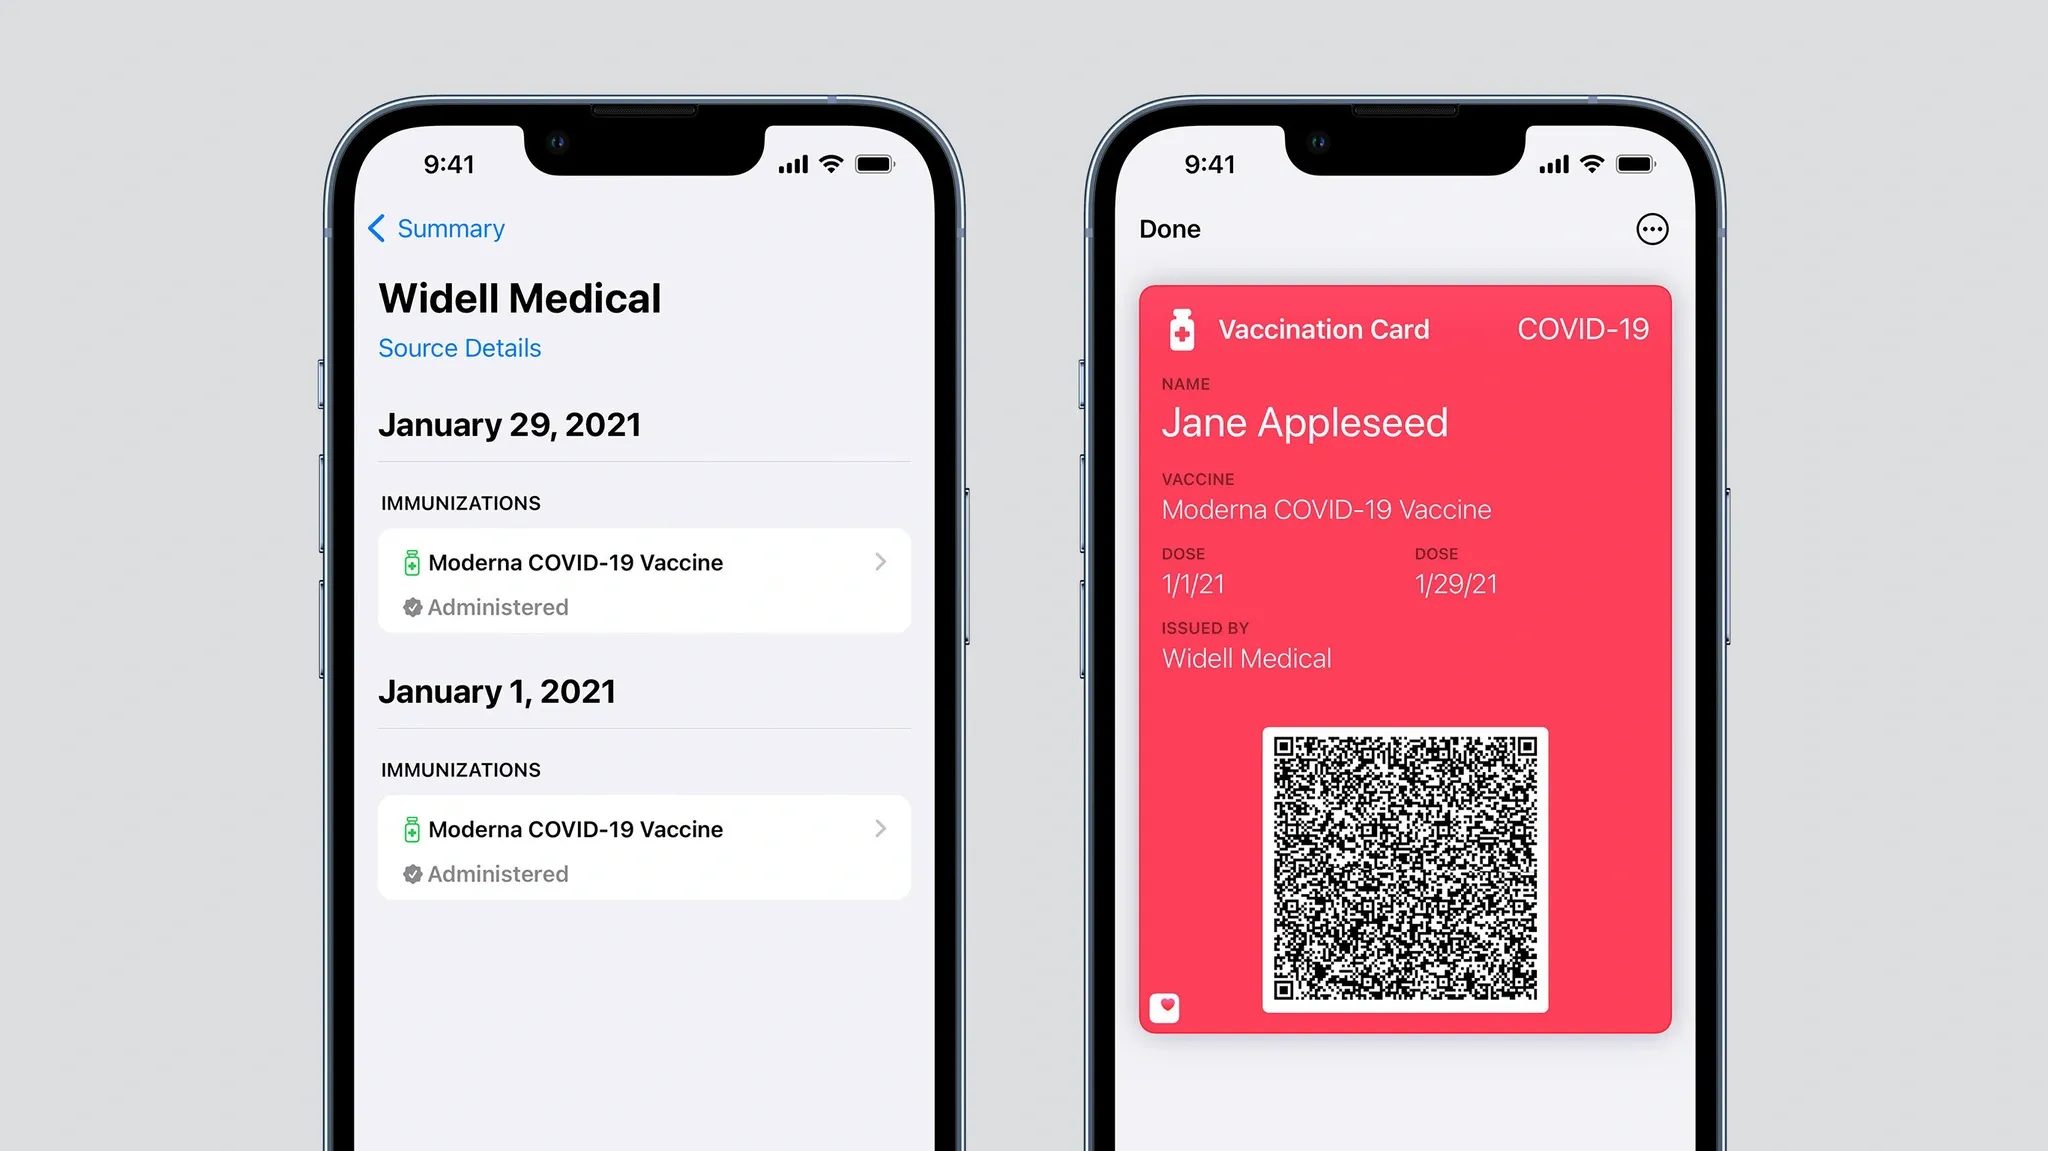
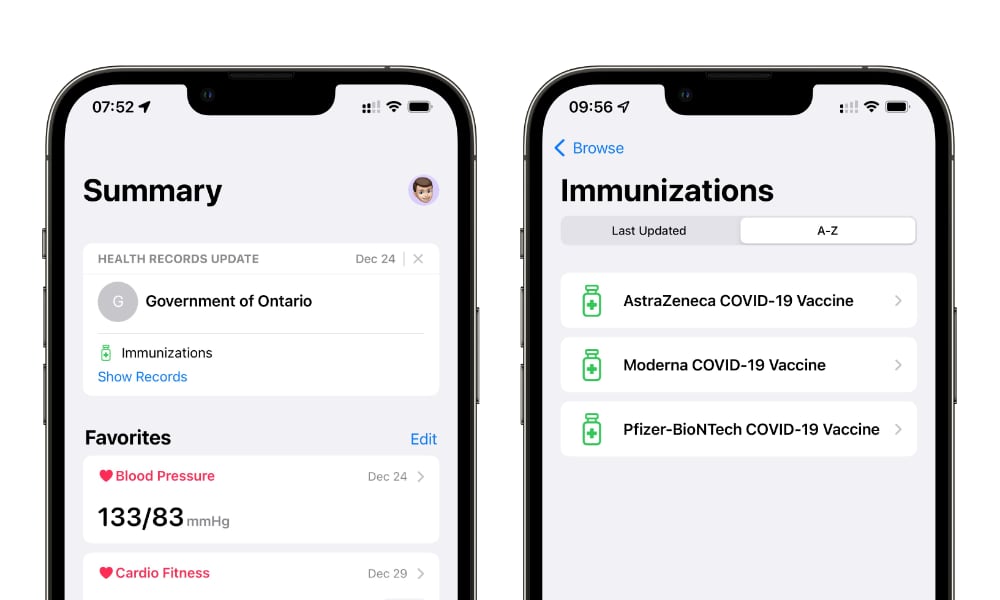
Note that you can also find all of your COVID-19 vaccination records in Apple’s Health app, under Health Records > Immunizations. This is useful if you want to see more detailed information than what’s on your card, but you likely don’t need to worry about these details simply for proof of vaccination.
Updating Your Proof-of-Vaccination Card
If you’ve received additional doses, you can also update your proof-of-vaccination card by following the same steps above and scanning the new QR code for the new vaccination record.
Technically, iOS 15 doesn’t really offer an “update” process. What you’re actually doing is adding an entirely new vaccination record, so you’ll end up with a whole new vaccination card in Apple Wallet.
This may be a good thing if you receive a new SMART Health Card for each individual vaccination. However, many public health agencies update issue a new certificate with a QR code that includes all of your vaccinations. In this case, you don’t need to keep the older card around, so you can remove it once you’ve added the new one.
Removing Your Proof-of-Vaccination Card
If you want to remove your vaccination card, for whatever reason, that’s also easy to do, although there are two different ways to go about it, depending on whether you want to simply take the card out of Apple Wallet, or whether you want to remove your immunization records entirely.
Removing your Vaccination Card from Apple Wallet:
- Open the Wallet app on your iPhone.
- Locate the COVID-19 vaccination card you want to remove.
- Tap on the “More” button in the top-right corner (the one with three dots inside a circle). This will open the full details of the selected Vaccination Card.
- Review the details to confirm that this is the card you want to remove. You can check the “Issued” date by scrolling down to the bottom.
- Tap Remove Pass to remove the current pass from Apple Wallet.
Note that this will only remove the visible pass from Apple Wallet. It will not remove the immunization records from the Health app. However, this can be useful if you simply want to get a card out of the way, but still want to keep the underlying health records on your device.
Removing your Vaccination Card and data entirely:
On the other hand, if you want to eradicate all COVID-19 vaccination records, you’ll need to do that in the Health app, although the Wallet app is still the fastest way to get there:
- Open the Wallet app on your iPhone.
- Locate the COVID-19 vaccination card you want to remove.
- Tap on the “More” button in the top-right corner (the one with three dots inside a circle).
- In the “Health” section at the top, tap the Open button. This opens the Health app with the appropriate immunization record displayed.
- Scroll to the bottom and tap Delete Record.
- Review the warning and tap Delete to confirm.
This will also remove the card from Apple Wallet. If you want to add the Vaccination Card back again later, you’ll need to rescan the original SMART Health Card QR code.
Adding Multiple Proof-of-Vaccination Cards
It’s also worth mentioning that Apple allows you to add Vaccination Cards for more than one person, so you can easily carry proof-of-vaccination for kids, elderly parents, or even a partner who doesn’t have an iPhone.
To add a vaccination card for someone else, just follow the same steps as you would to add your own. The additional card will show up in your Wallet app with that person’s name on it. The cards will be stacked together, but after pulling the cards up, you’ll be able to swipe left and right to switch between them.
iOS Multiple Vaccination Cards Bug
It’s worth noting that we have run into what appears to be a bug in iOS 15.2 and earlier that may prevent you from adding vaccination cards from somewhere else who received all their vaccines at the same time that you did, which could sometimes happen in the case of a domestic partner or spouse. In this case, adding the second vaccination card will show a message that it’s already been added — even though it’s for an entirely different person.
Our educated guess is that iOS 15.1 and 15.2 aren’t looking at the name and DOB information, but merely the immunization details, and flagged it as a duplicate if all those match up exactly. It only appears to be a problem in this one very specific scenario, although in our testing it also looks like it’s been fixed in the current iOS 15.3 betas.


