
Pro Tip: Easily Add a Second Line to Your iPhone without a Third-Party App
 Justin Meyers / Gadget Hacks
Toggle Dark Mode
Your iPhone has all kinds of tricks — and little quirks — up its sleeve. From “hidden” settings to Personal Voice, there really isn’t much your magic pocket companion can’t do — and if not, there’s probably “an app for that.”
One of the most basic features of your iPhone is its ability to handle calls and text messages. It’s a feature that works right out of the box. Simply add and activate a cellular plan, and you’re good to go. But what if you want more than one line on your iPhone? Is there an option for that?

Yes. As long as it supports it, you can have more than one line on your iPhone. You can even have two lines active at the same time.
Why Would I Want More Than One Line?
For many of us, one phone line is all we need, and more than one line may even be confusing. But, if you rely on an extra phone — such as one for work — you might find it a hassle to carry around two separate devices.

Multiple devices take up space and require juggling between pockets and bags. These extra phones fragment our daily activities, calendars, and contacts. All-in-all, it can get confusing and may even result in mistakes such as sharing personal information with professional contacts.
Luckily, there are some options out there, such as software-based telephony apps; but these don’t work with the native Messages app or offer a secondary data plan.
Luckily, your iPhone makes adding a second line a breeze and easy to use, thanks to dual-SIM support on newer iPhone models.
What Are SIM Cards and What Do They Do?
Mobile devices generally rely on cellular networks to achieve connectivity. To do this, each phone uses a SIM card to authenticate with the network.
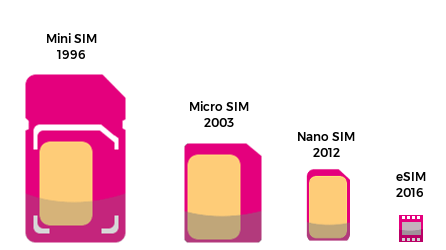
First the boring bit, SIM stands for Subscriber Identity Module and helps carriers identify your device. SIM cards are physical chips that store information your phone needs to connect to a carrier’s network so it can handle calls, send and receive messages, and access the Internet. They’re usually very small and removable so they can be swapped for new numbers or plans.
Many modern smartphones, including newer iPhones, have forgone removable SIM cards in favor of eSIM — an embedded chip that uses software to enable network connectivity.
Many devices can handle multiple eSIMs at once. Supported iPhones can have up to eight eSIMs and use two phone numbers at the same time. This means you can have two lines — such as a personal line and a work line — active at the same time.
Additionally, you can have other lines on standby that you can activate as needed. This means you can buy a line for international travel and activate it instead of your personal line or have a third line for a second job that you swap out as needed.
Using One Phone Instead of Two
Of course, you don’t need to know any of the technical information to get started. As long as you have an unlocked, dual-sim1 iPhone, all you have to do is purchase a plan and activate it in the Settings app on your iPhone.
So let’s dive in!
1. Pick your plan

First off, you’ll need a cellular plan with eSIM support. There are many carriers that offer eSIM plans. You can also check with your existing carrier about adding a second line.
If you have a second phone through your workplace, check with your employer to see if they’ll pay for an eSIM instead. They should be able to convert the existing number.
If you plan on paying for a second line yourself, I recommend a prepaid/standalone plan. It’s often the more affordable option, especially if you don’t plan on using it a lot. If you already have another number, you can usually transfer it.
The table below lists a few of the prepaid plans currently available in the United States.
| Carrier | Talk/Text | Data | Plan Length | Price |
| H2O Wireless | Unlimited | 3GB/mo. | 1 month | $20 |
| Mint Mobile | Unlimited | 5GB/mo. | 3 months | $45 |
| Mint Mobile | Unlimited | Unlimited | 3 months | $90 |
| Tello | Unlimited | 5GB/mo. | 1 month | $19 |
| US Mobile | Unlimited | 20GB/mo. | 1 month | $25 |
| Visible (by Verizon) | Unlimited | Unlimited | 1 month | $25 |
2. Activate your eSIM
Once you’ve purchased your new plan, it’s time to activate it. Your carrier should provide you with a QR code or information needed to activate your plan.
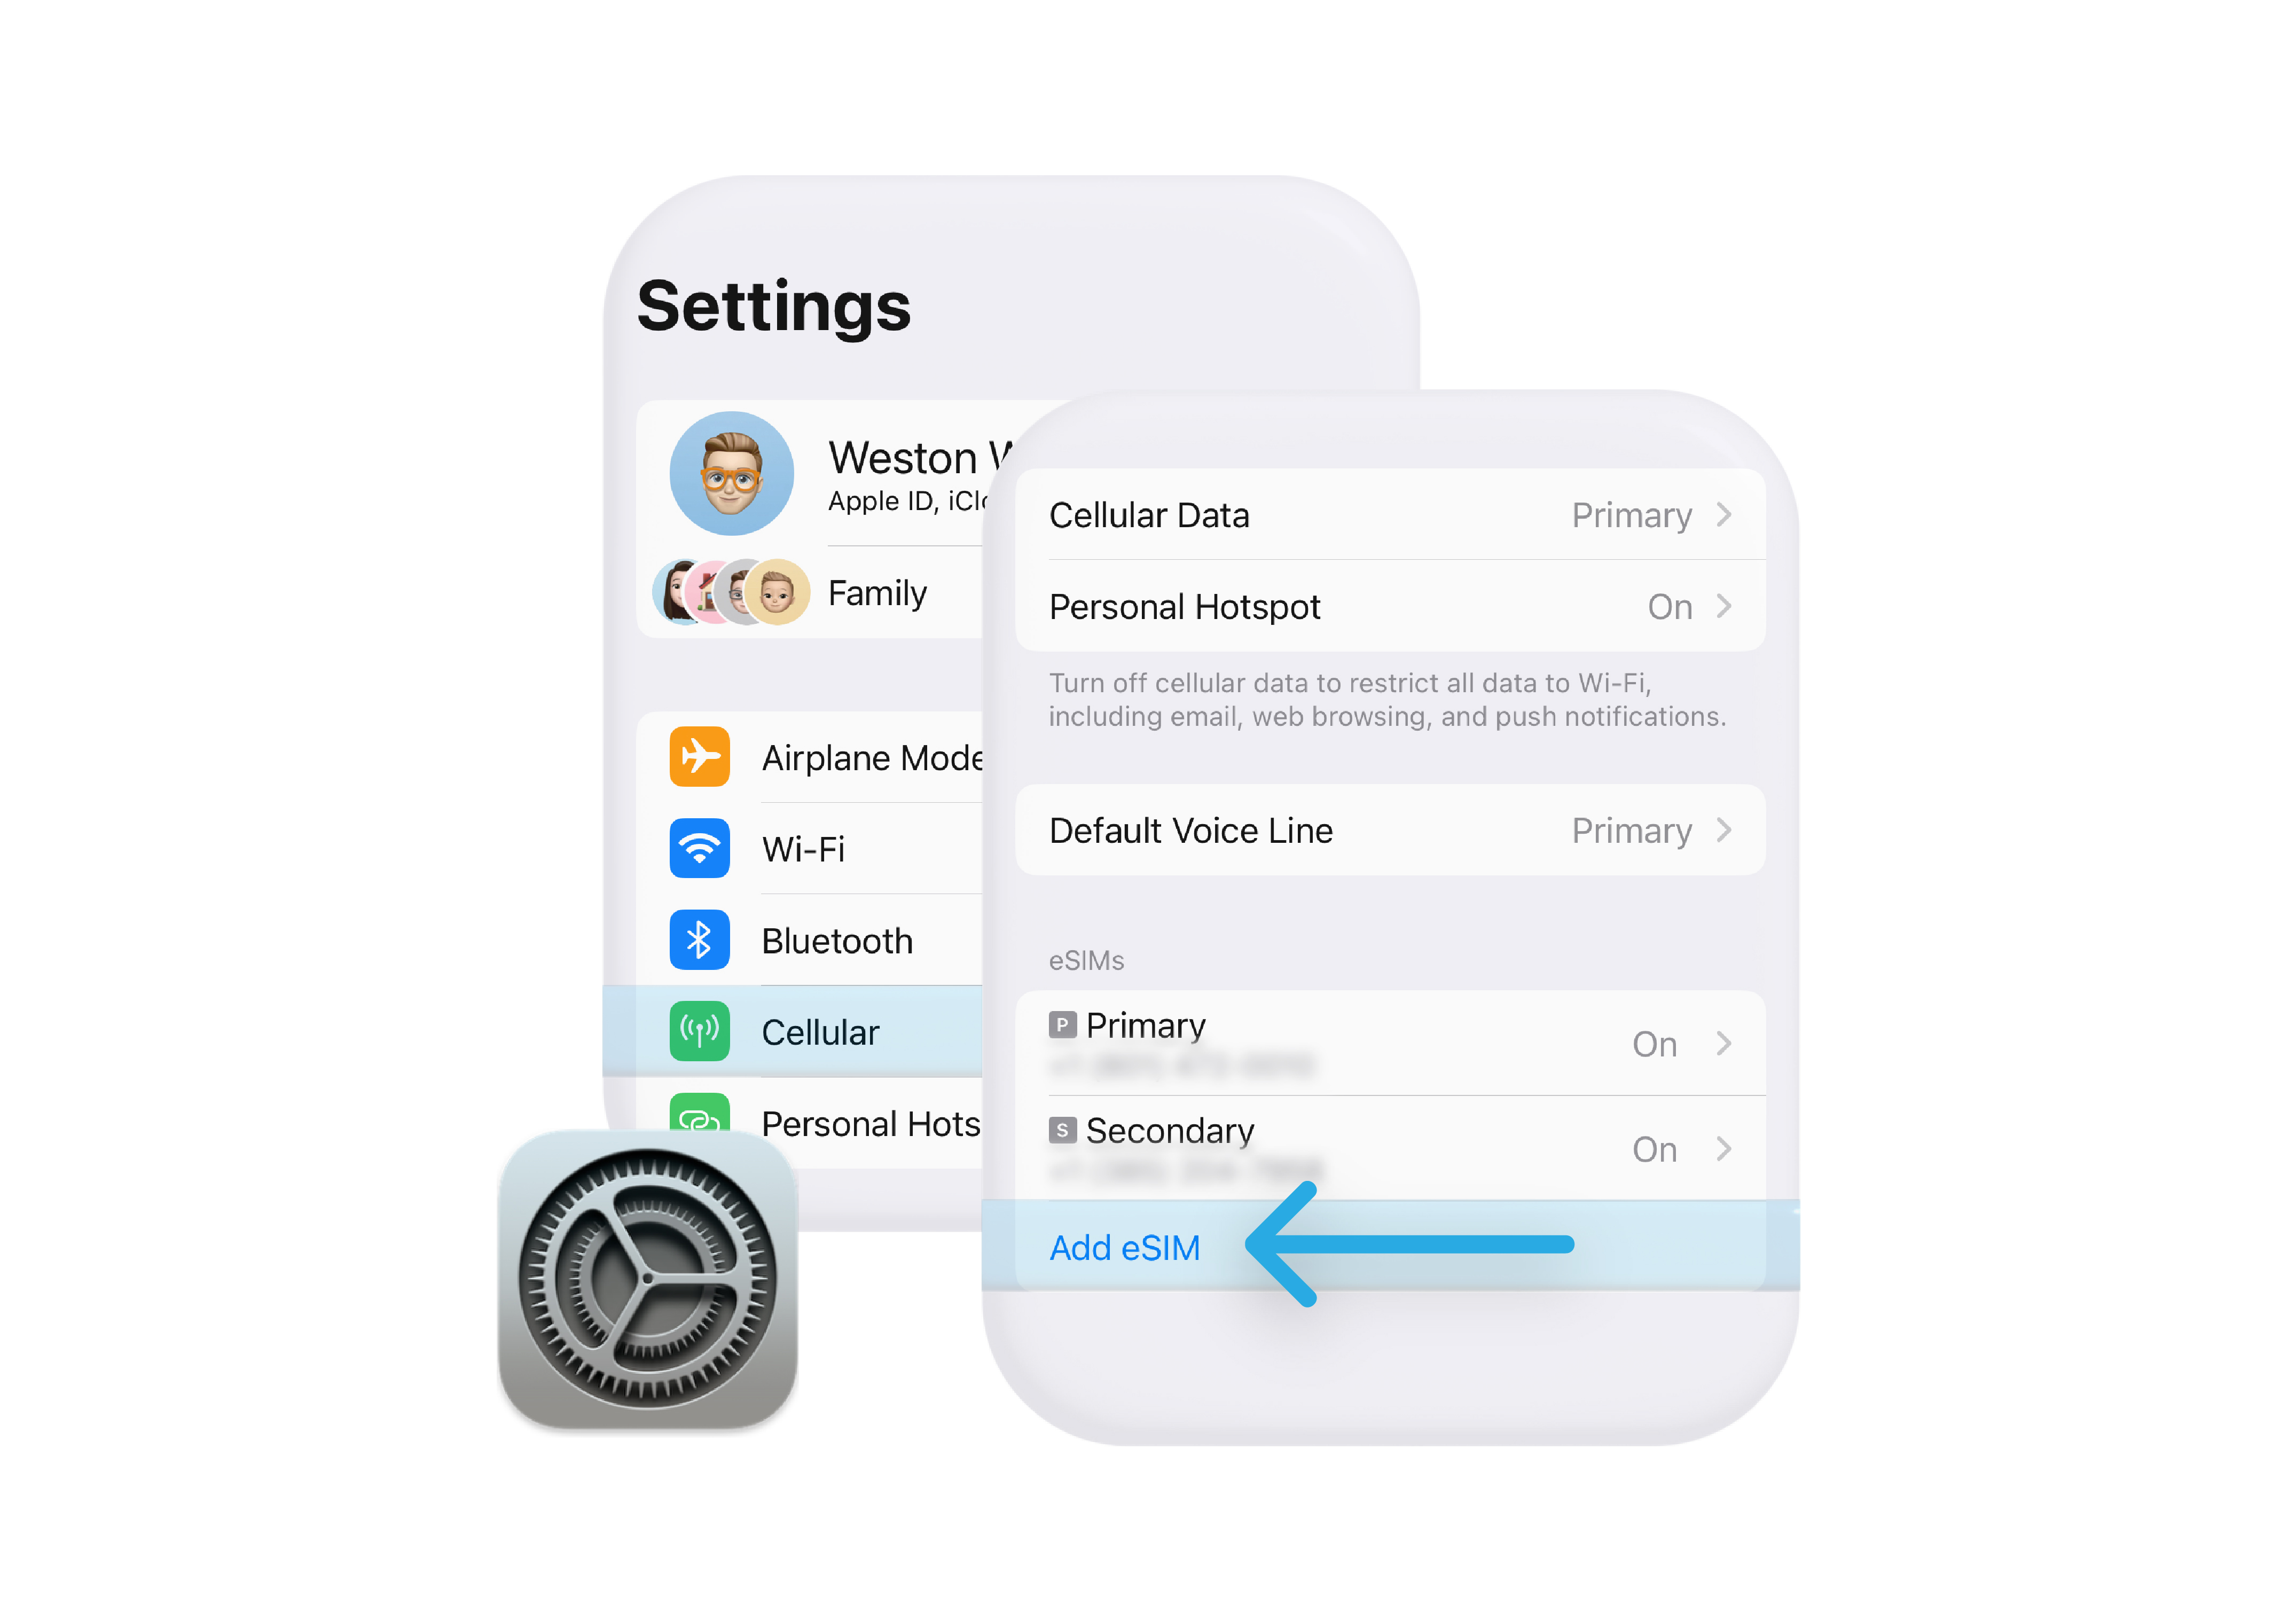
Once you have your eSIM QR card or info, head over to the Settings app and select Cellular, then choose Add eSIM.
You’ll be presented with two options. To add your new plan, choose Use QR Code.
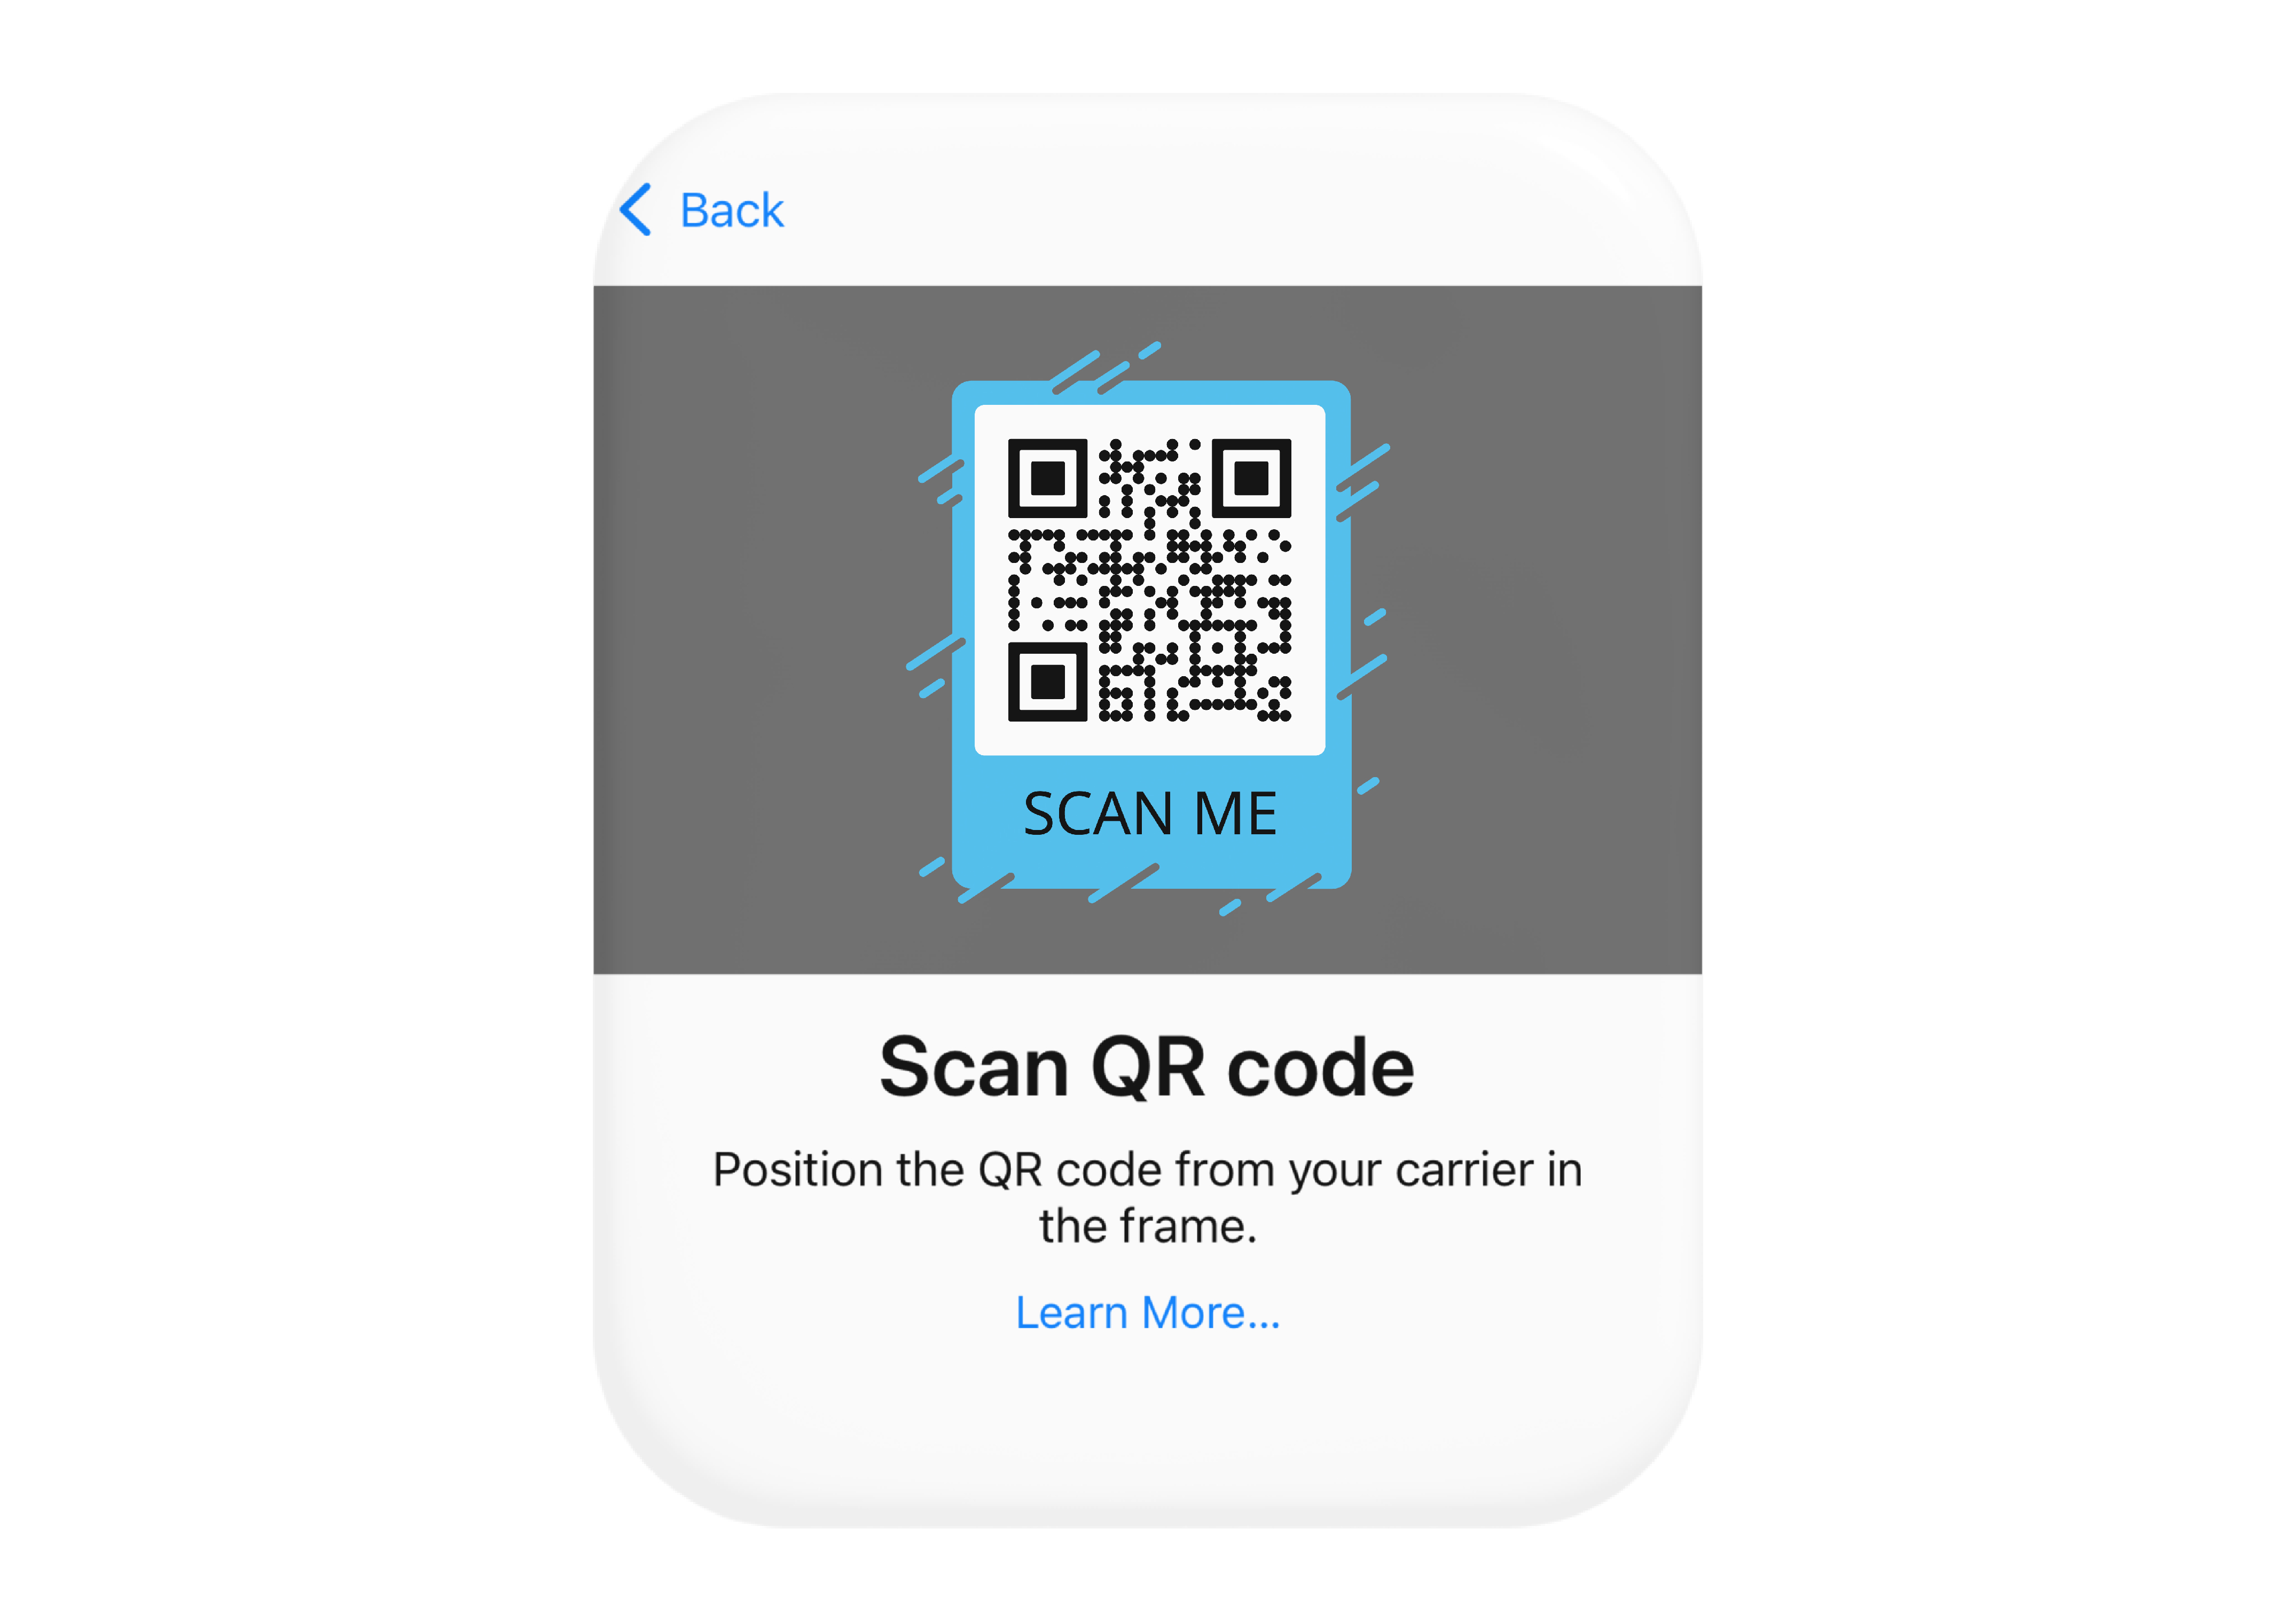
Position the QR code for your new eSIM in the frame—it will be scanned automatically. You can also select a saved QR code by selecting Open Photos.
Follow the onscreen instructions when prompted.
I can’t find my QR code. What should I do?
Not all carriers provide QR codes. You may need to use the carrier’s app or enter the eSIM information manually.
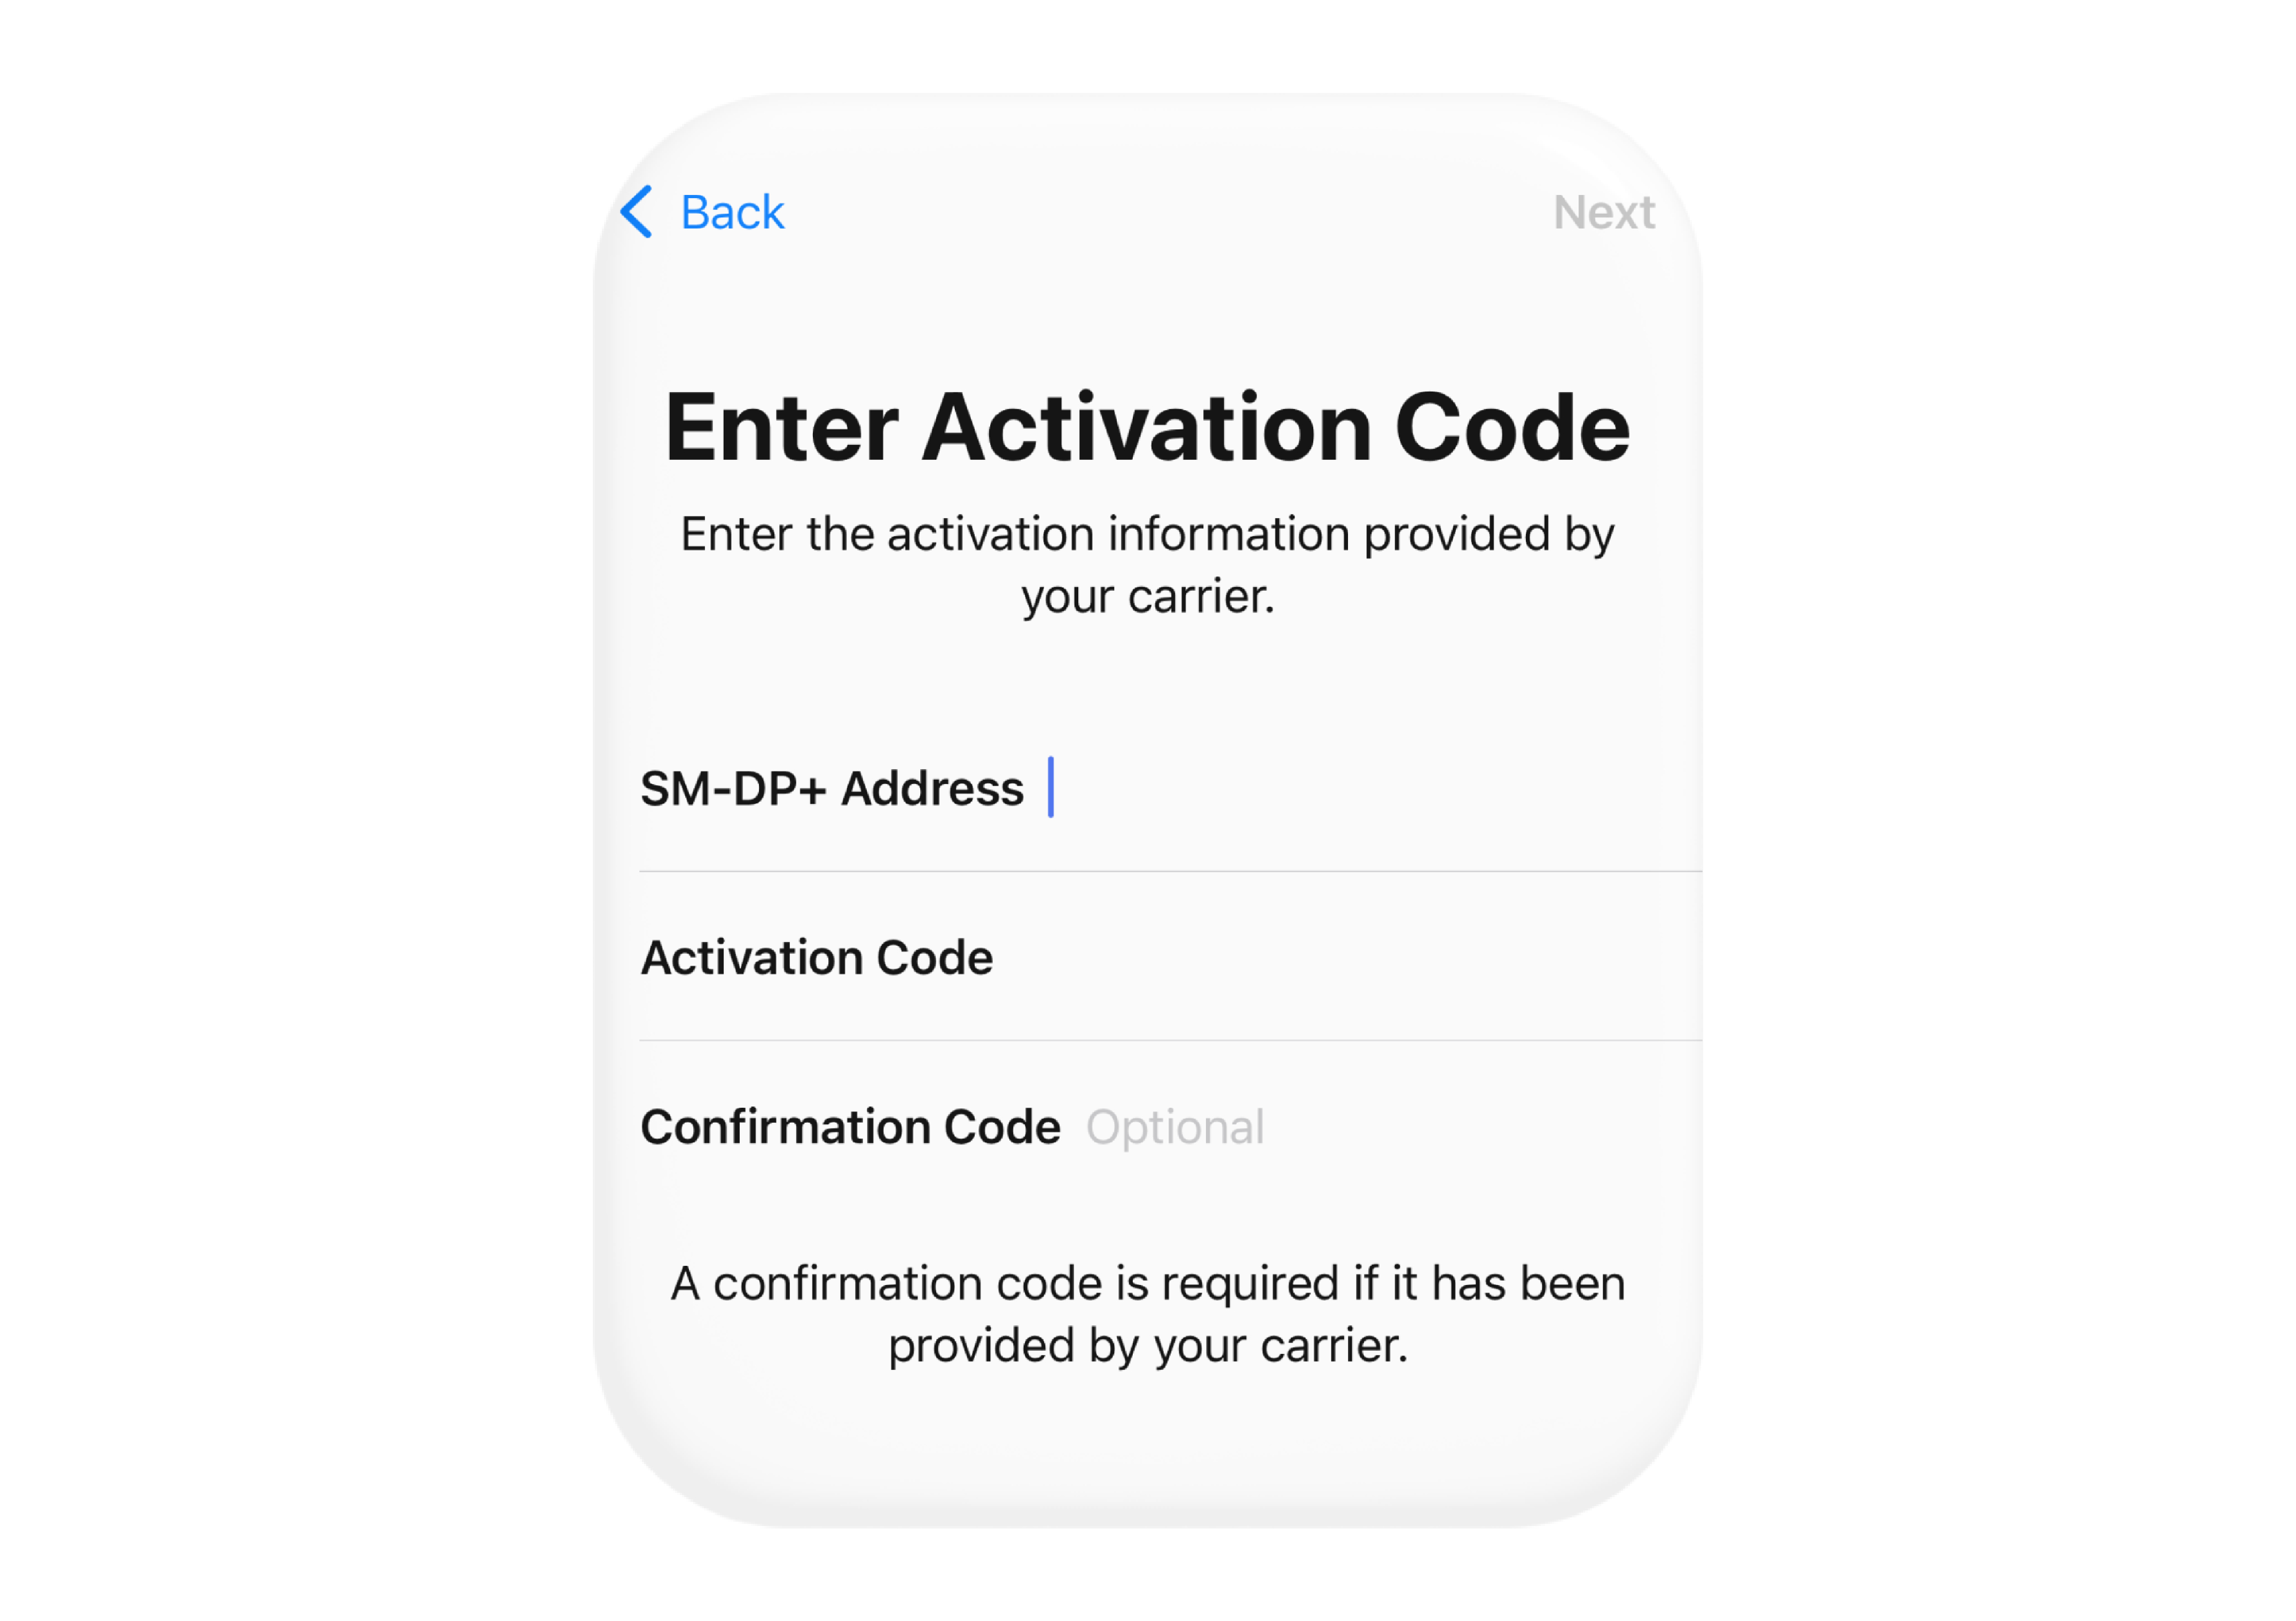
If you can’t activate your eSIM using a QR code or the carrier’s app, go back to the QR setup screen (Settings > Cellular > Add eSIM > Use QR Code). Tap Enter Details Manually and provide the following information:
- SM-DP+ address
- Activation code
- Confirmation code (if provided)
If you don’t have this information, contact your carrier for additional assistance.
3. Configure your new number
It may take several minutes for your new number to activate. Once active, you’ll need to configure it the way you want.
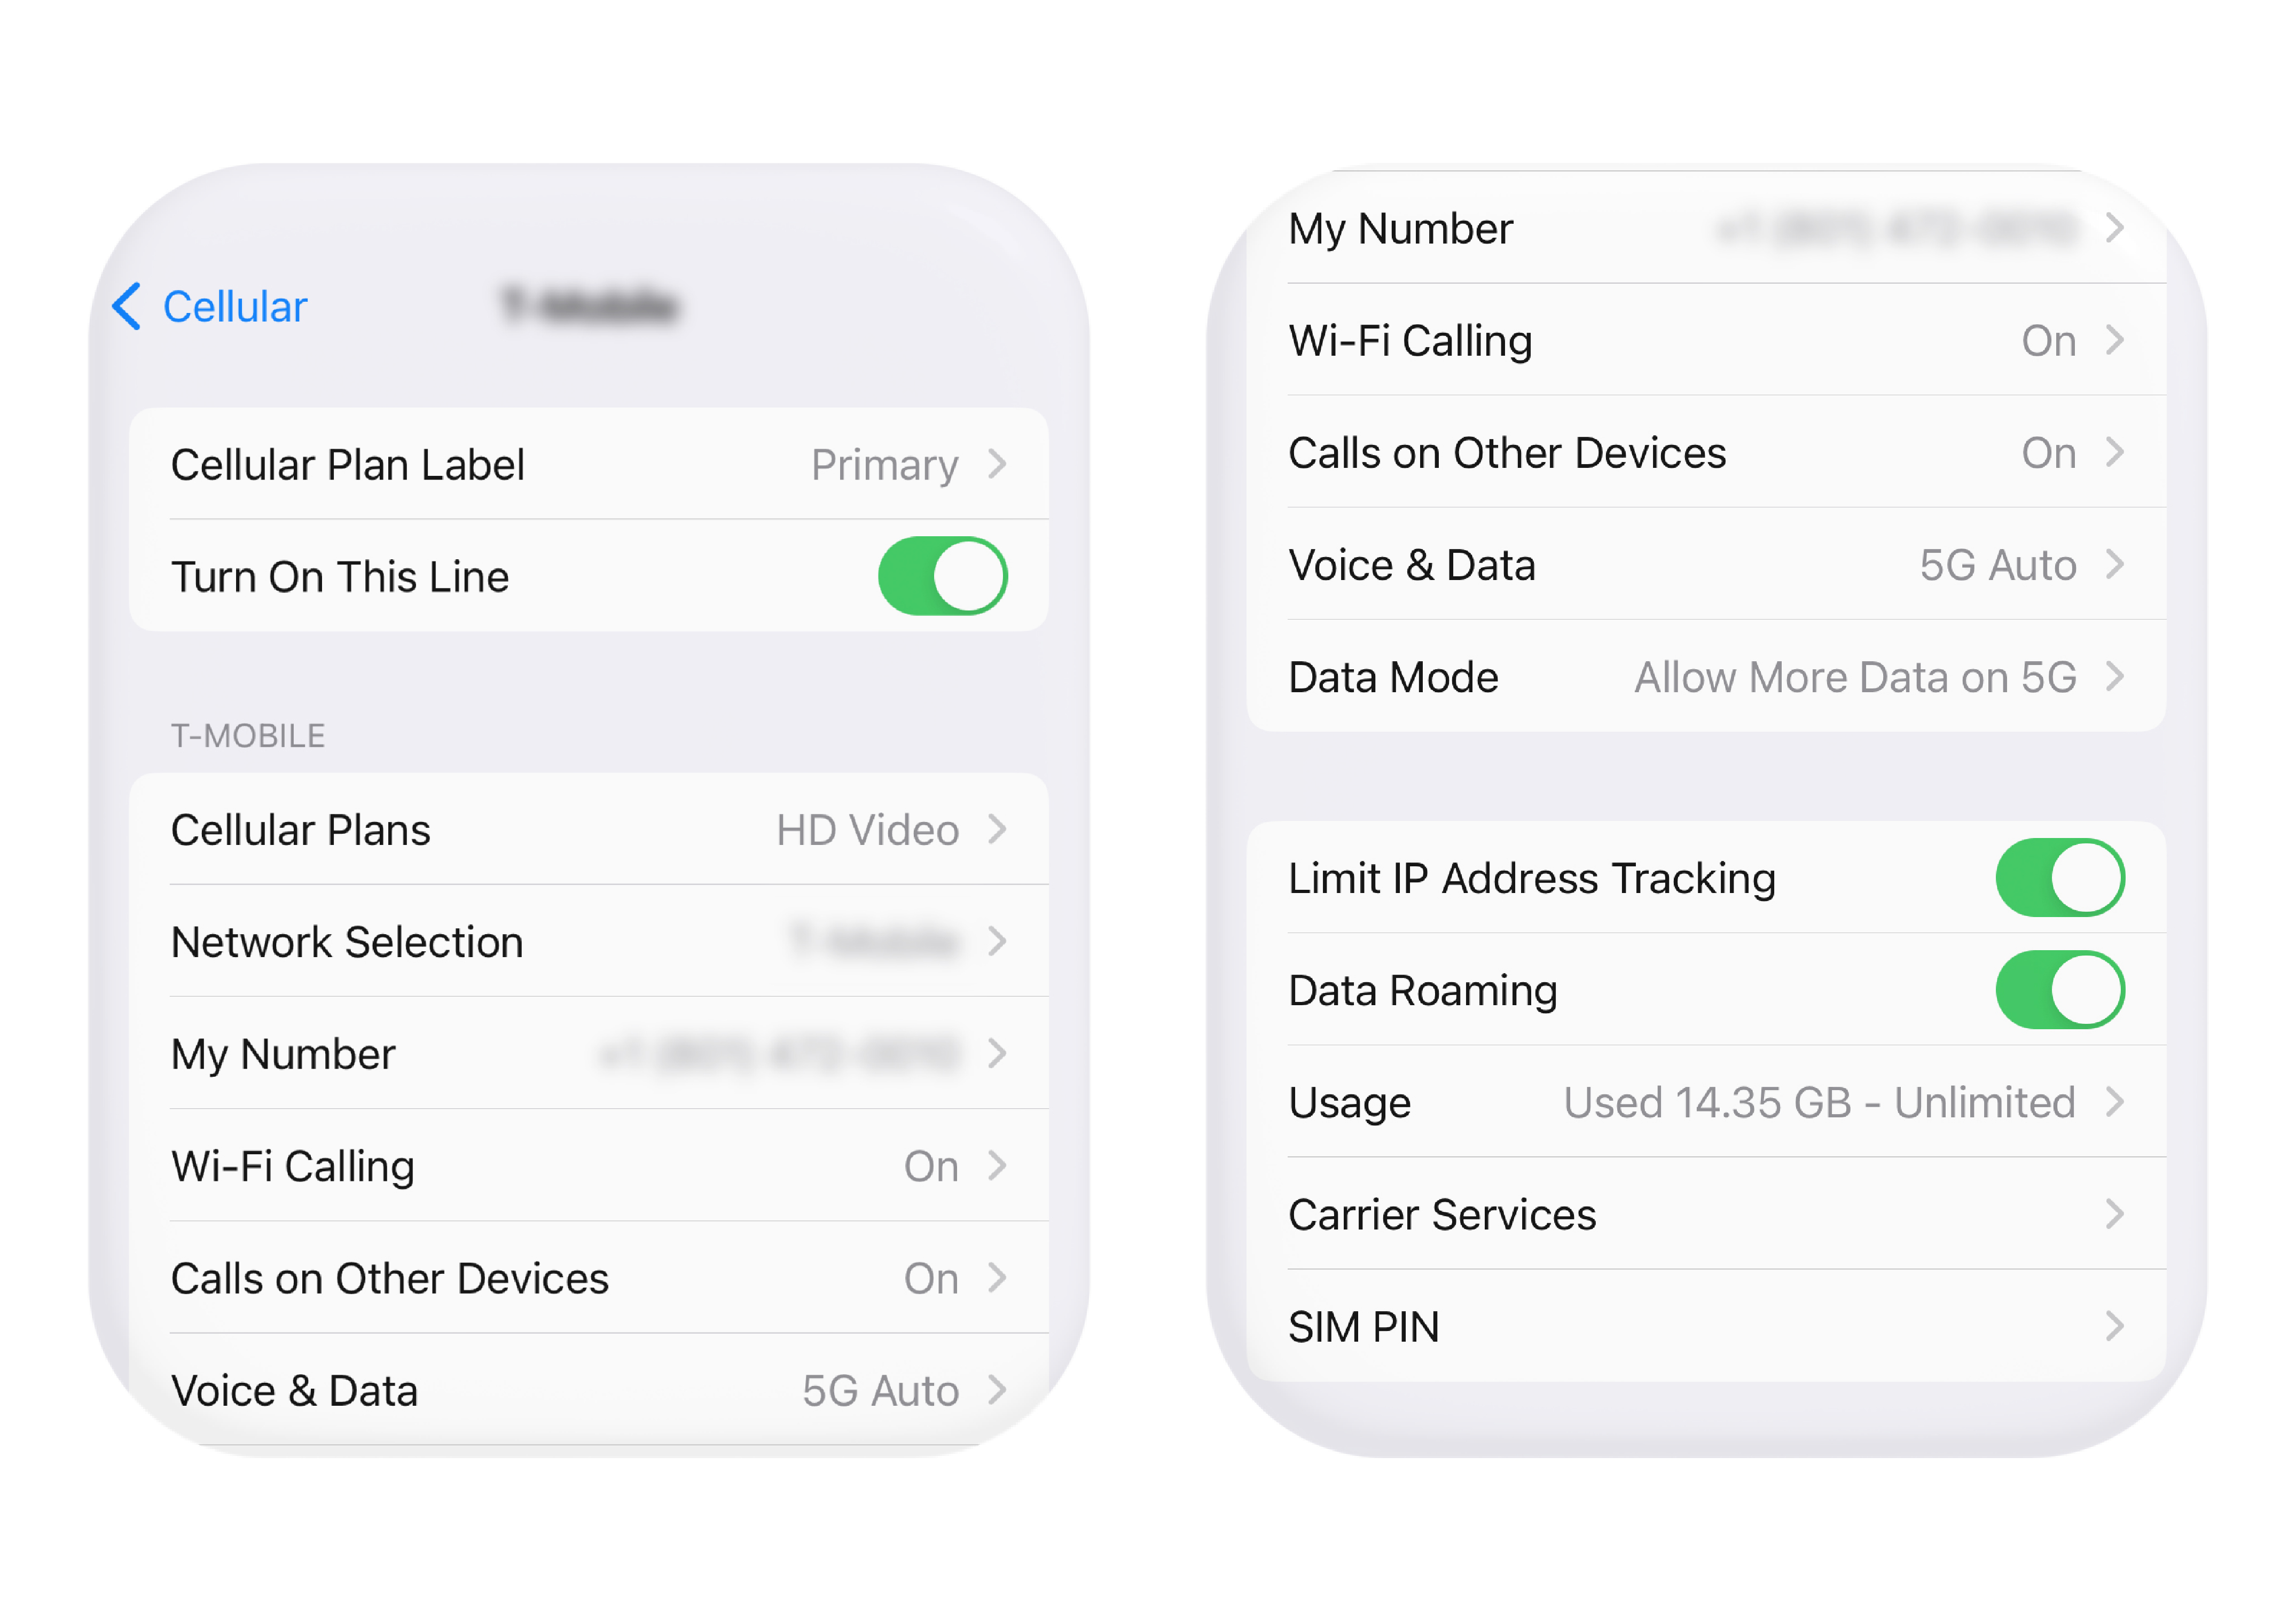
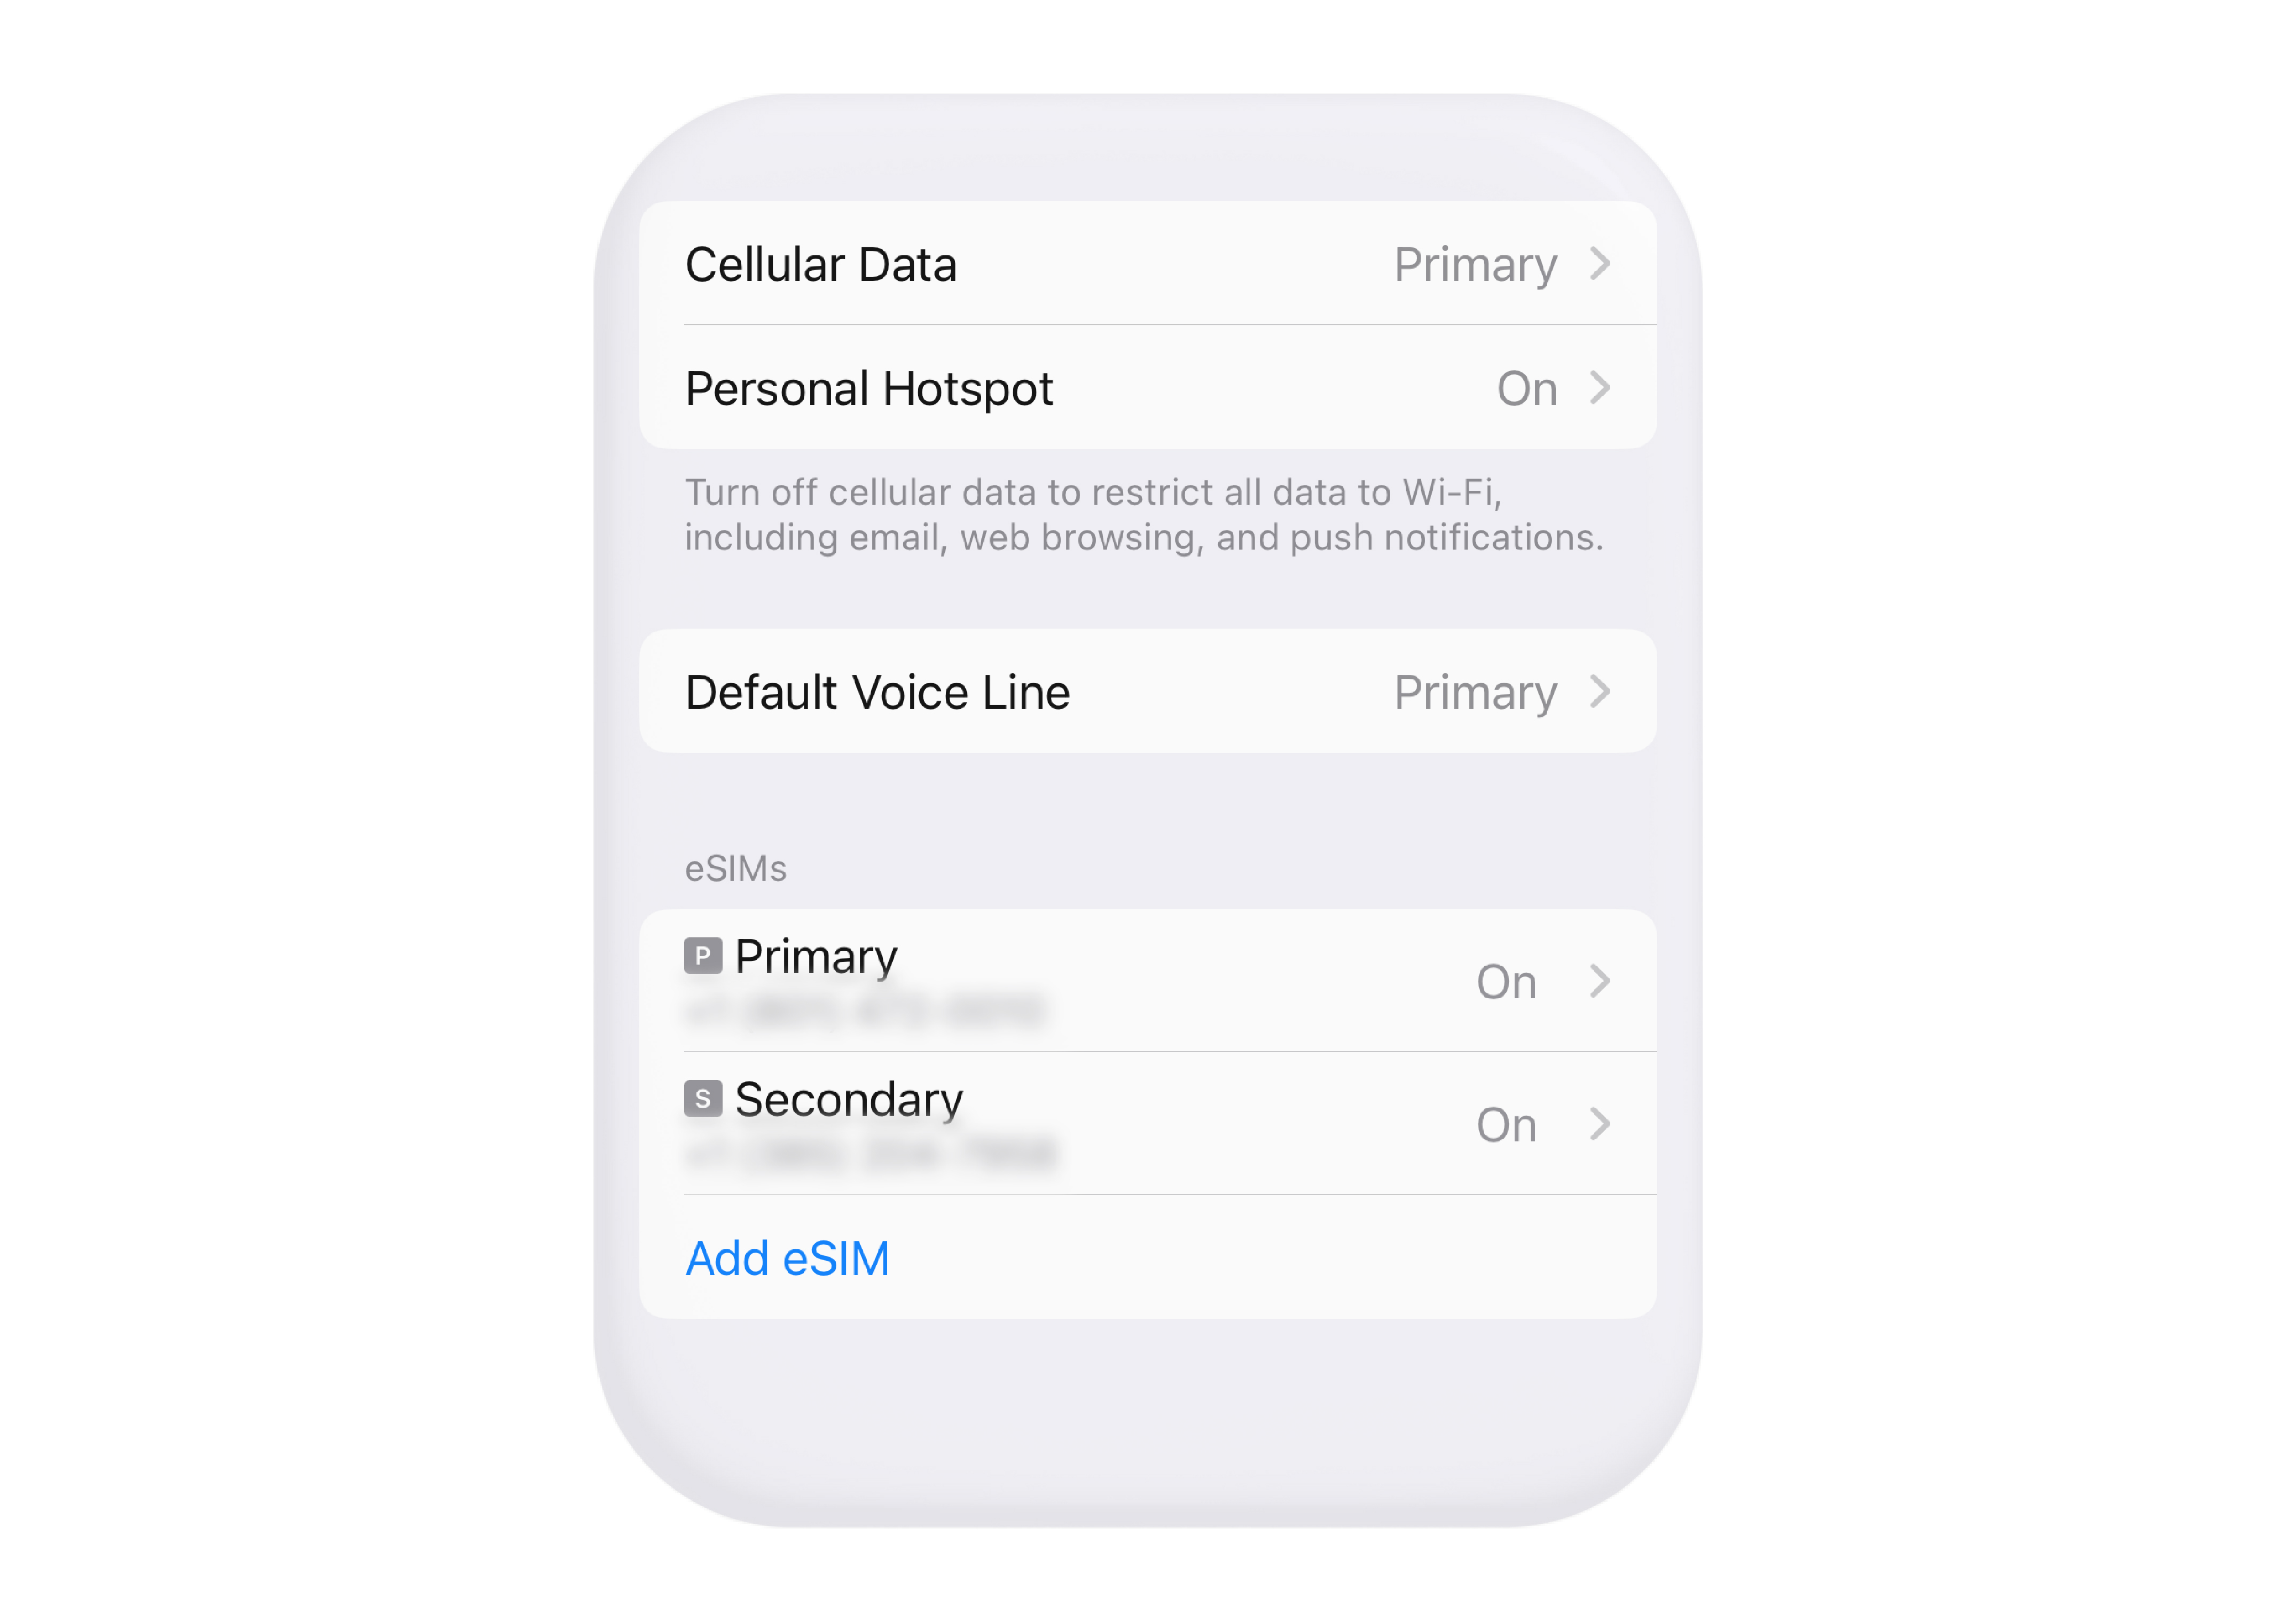
You can have up to eight eSIMs stored on your iPhone, but only two lines can be active at once — including your physical nano SIM card if you haven’t switched that over to an eSIM. By default, the two active lines are shown as Primary and Secondary and identified using square icons with a “P” or “S” next to the number when placing and receiving calls. However, you can change these labels to give your lines more descriptive names, such as “Business” and “Personal,” with lettered icons to match.
Afterward, you may be asked which numbers you want to use for iMessage and FaceTime, as well as which line should be used for outgoing calls and messages by default.
Keep in mind that tying both lines to iMessage will sync the two into one set of conversation threads. If one line is for business, you may want to keep them separate. That said, if one is used for international vacationing, you might want to tie them together so your messages stay in sync.2
You can change your default settings at any time under Settings > Cellular. You can also find the FaceTime and Messages options in the Settings app and choose which lines are tied to these services.
Using Your Second Line
With your second number configured, it’s time to use it.
Both lines will function simultaneously for incoming calls and messages, but the default settings will be used to place calls and send messages. You can easily switch between the two as needed.
Additionally, you can set a specific line to be used with specific contacts.
1. Placing calls from your second line
When placing a call using the dial pad (Phone > Keypad), the current line will be displayed at the top of the display. To change it, just tap the line, select the other one, and then place your call.

Usually, the line used will be saved as the default for future interactions with the contact.
The FaceTime exception
FaceTime calls are placed using your iCloud account, so you can’t choose to place calls over one number or the other. If both numbers are tied to the account, users will be able to receive calls at both numbers.
2. Sending messages
When sending SMS (text) messages, you can choose which line to use for a conversation.
New conversations
When creating a new conversation, you will see a “from” field that lets you select which line to use.
Existing conversation threads
If you have an existing conversation and you want to change which number you’re using, select the name/image of the contact at the top of the conversation. You should see an option for “conversation line,” change this to the line you want to use.
The conversation line you select for messages should be remembered for any future messaging interactions.
What about iMessage?
The Messages app handles two kinds of messaging options: iMessage and traditional SMS texting.
SMS — or texting — is an older technology used to send messages through a carrier. iMessage is Apple’s messaging service and can currently only be used by Apple devices.
The Messages app displays iMessages using blue bubbles and SMS texts using green bubbles.
If the second line is linked to your iMessage account, the thread may be combined into one thread. In some cases, it’s split into a new thread — at the moment it seems a little temperamental.
If the second line is not linked to iMessage, it will simply handle the conversation as a normal SMS-text thread dedicated to the line assigned. You can create two separate SMS threads by sending a contact a message from each line.
3. Preferred line settings
In many scenarios, you may want to only use a specific line for specific contacts. After locating a contact, look for an option above the name showing its default line.
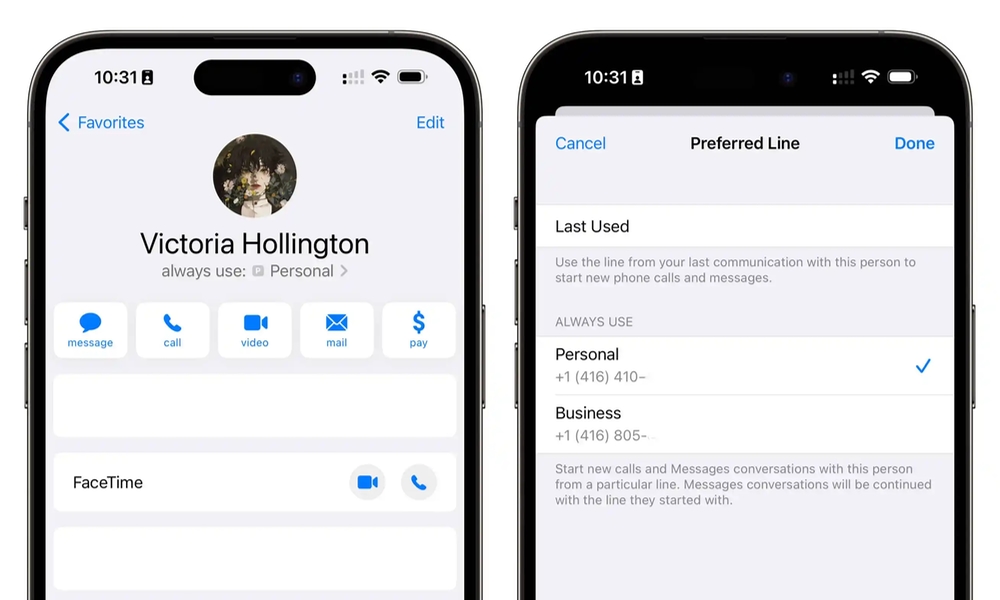
You can choose to use the primary line, secondary line, or the last used number as a default. “Last used,” will always select the most recent line used for calling or messaging the contact.”
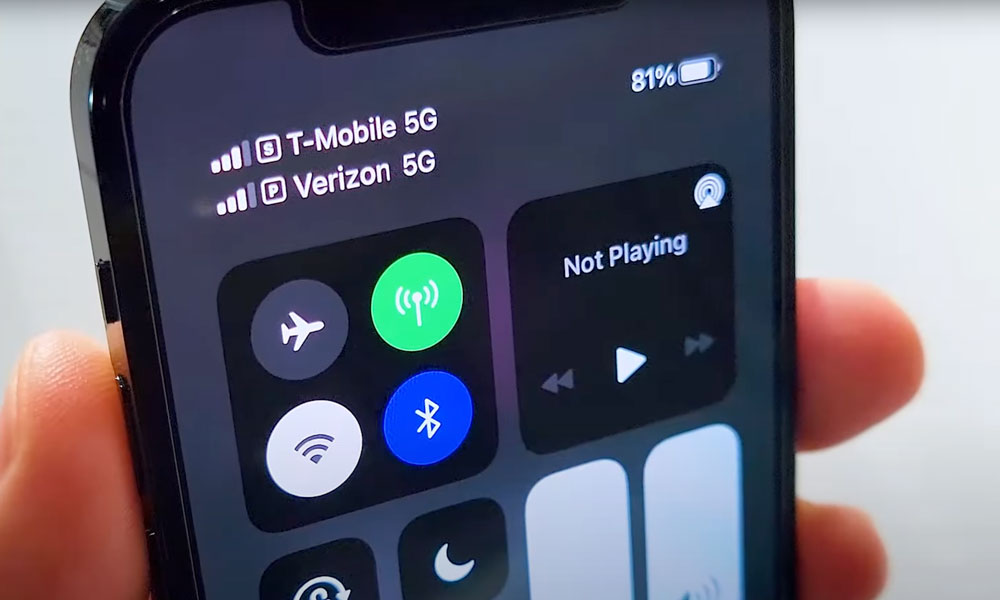
4. Understanding cellular reception when using two lines
Much like using one line, your phone will continue to display its signal strength at the top of the screen and in the Control Center.
When using two lines the indicators are split into two, with the primary line on top and the secondary below it. In addition to bars indicating reception, you’ll also see what type of connection you’re currently using with the line, such as 5G, LTE, or 3G.
Roaming, and other cellular-related options, can be found in the Cellular section of the Settings app.
The Short Version
In summary, adding and using a second line on your iPhone is pretty easy, but it will take a minute to set up and get used to.
Here’s a quick rundown:
How to add and configure a second line
- Purchase a plan from your carrier through an app, over the phone, or in-person.
- Use the provided QR code or activation information to add the line. In most cases, this information can be found in the carrier’s app. Contact your carrier if you need further assistance.
- Name your lines and choose a default. Configure the setting you want to use. And select whether or not the new number should be tied to FaceTime and iMessage.
How to use two lines for calls and messaging
- When placing a new call or sending a new message, be sure to select which line to use. In most cases, your iPhone should remember which line you chose for future contact.
- For existing contacts, find the contact and select which line to use.
- You can check the reception of both lines using the signal indicator. The bars on the top represent your primary line, while the lower bars represent your secondary line. Each line will also indicate its current network specifics (i.e. Wi-Fi calling, LTE, etc…).
1: This article is about dual-SIM iPhones with prepaid eSIMs, it doesn’t apply to iPhones utilizing two nano-SIM cards. Support for eSIM and dual-SIM may vary by country or location, carrier, and device model.
2: Always make sure you understand the details of your cellular plan before using a plan overseas to avoid unwanted/unexpected charges. If you tie both plans to the same iMessage/FaceTime account, be sure to use the correct cellular data to handle your calls and messages depending on your location.


