
How to Manually Backup and Restore Important iPhone Text Messages and iMessages

Toggle Dark Mode
Ever since the dawn of its ‘iCloud’ cloud-based storage platform, Apple has made the otherwise complicated process of backing up and restoring our most precious digital data files easier than ever before. These files include photos, mail, contacts, calendars, notes, and even Safari bookmarks. After all, thanks to iCloud, one can now sync, or subsequently recover, these data files whenever a new version of iOS becomes available or a brand-new iPhone is obtained.
Most notably, however, the only data that would be absent are the iMessages and SMS Text messages that are often saved on our devices at the time of setting them up from scratch or recovering them from a pre-existing backup. And while it is possible to go in and manually save the digital contents on your iPhone, the process can be particularly tricky when you’re talking about setting up a brand new device, or performing a restore on your existing handset.
Even still, we live in a world where if there’s a will, there’s also a way. So if you’re willing to take the time and carry out these extra steps, as outlined below, you can relatively easily back up and restore SMS and iMessages every time you physically upgrade or manually restore your iPhone.
Before you jump right in and get started, though, you’ll first want to make sure that your current iPhone is saved as a backup via iTunes or iCloud — just in case. Also, you should know that this process is more exclusively geared towards those who are updating a brand new iPhone from a pre-existing iCloud backup, as well as those who, for whatever reason, want to restore their device to factory settings and start from scratch — while still being able to hold on to those texts and iMessages that could otherwise end up becoming lost in translation. You’ll also want to make sure you have the following tools and utilities at your fingertips:
- A computer
- iTunes
- Lightning cable
- iBackupBot Software (available for Mac or PC)
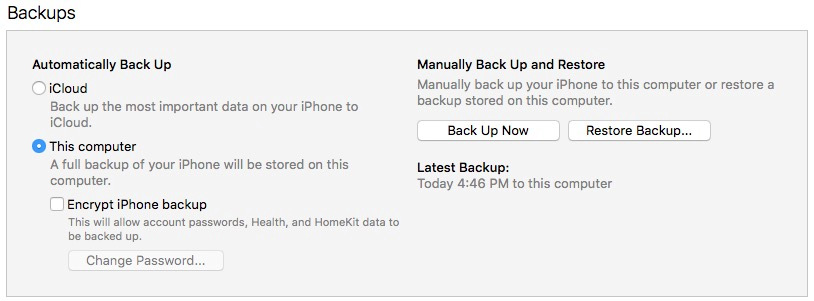
Step 1: Backup the iPhone containing text messages that you want to migrate to your computer via iTunes.
When going about this first step, you’ll want to ensure that you check off the “This computer” option, and also, that the “Encrypt iPhone” backup option is UNchecked.
Be aware that turning off iPhone encryption WILL delete all Health data associated with your iPhone when you restore your backup. If keeping your Health app data is important do not continue with the following steps.
If you want to keep moving on with the process, perform the backup, and then unplug your iPhone once the process is completed.
**Keep in mind: the destination iPhone can either be the same iPhone, or a new one, fresh out of the box. If it’s the same device, for instance, and you simply want to start from scratch, make sure you reset the device to factory default settings after performing the initial backup. If it’s a new iPhone, however, simply navigate the initial setup process until you arrive at the iOS Home screen.
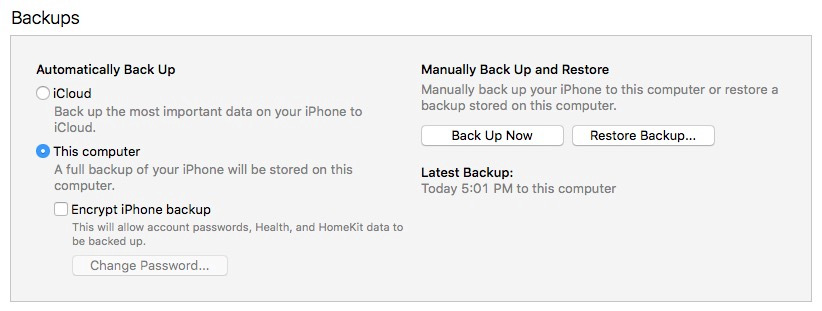
 Step 2: Connect the destination iPhone — whether new or original — to your computer and then open iTunes, at which point you should perform a backup exactly how you did in the previous step.
**Keep in mind: You’ll need to ensure the destination iPhone is connected to your computer, and that iTunes if open, for the duration of the process.**
Step 3: Launch iBackupBot
Next, you’ll want to launch the iBackupBot application on your desktop, and then select the most recent, just-created backup from the “Backups” menu.
**Keep in mind: you can easily verify the backup is the accurate one, simply by comparing the time stamp in iTunes with that of the timestamp in iBackupBot.**
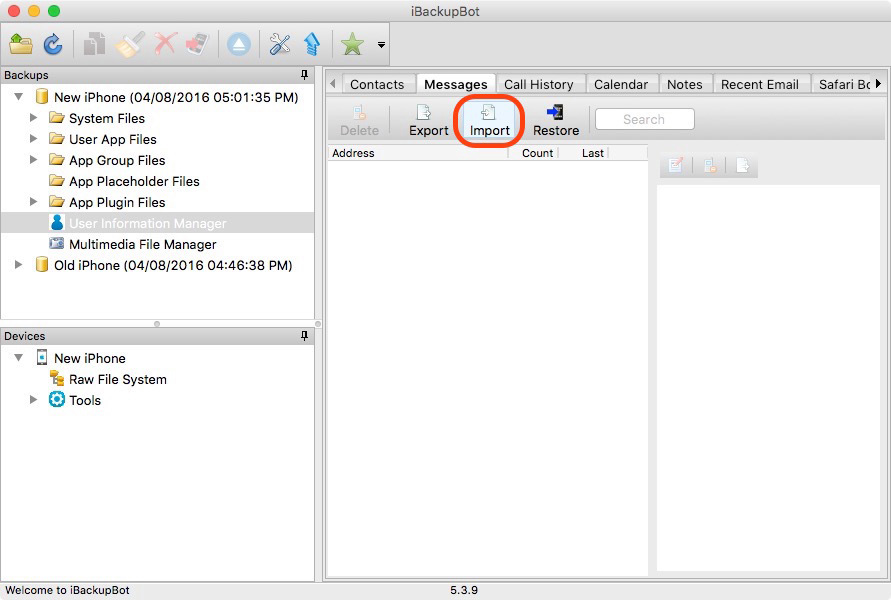
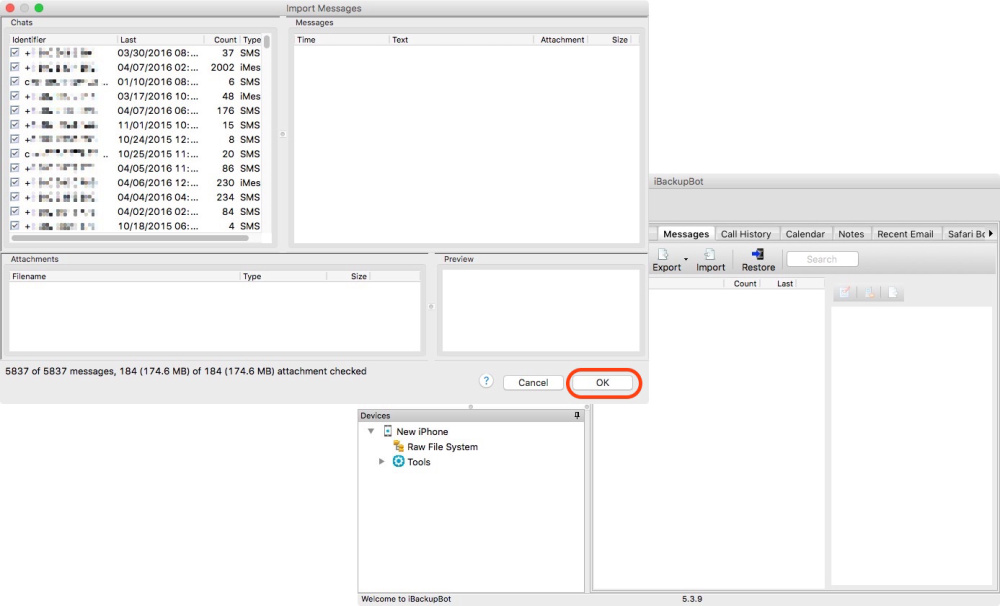
Step 4: Select Import from the Messages Tab.
Step 5: Select the OK option from the Import Messages box.
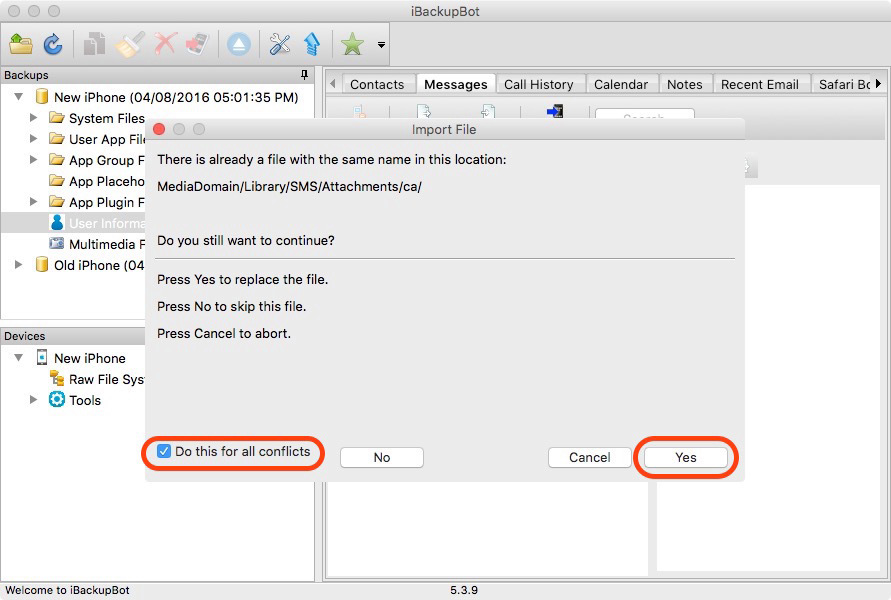
Step 6: From the “Import File” box, select the box indicating “Do this for all conflicts,” and then select Yes.
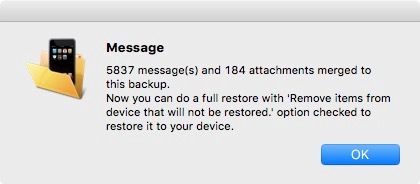
Step 7: From the dialogue box indicating that “Messages and attachments have been merged with the backup.” select OK.
 Step 8: Close out of the iBackupBot application.
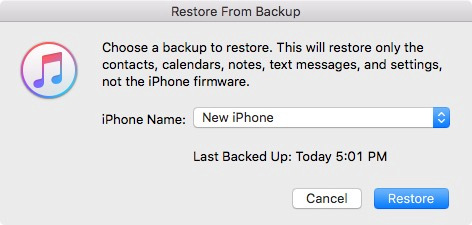
Step 9: Shifting your attention back to iTunes, select Restore Backup > select the same backup created during Step 2 > select Restore.
At this point, your iPhone — including the text messages and iMessages merged via iBackupBot — will be restored from the selected backup. You can open the Messages app, once the backup is complete, to ensure that all of your messages have been migrated accordingly.
**Keep in mind: you may need to restore your contacts from iCloud or iTunes in order to accurately match messages with their corresponding sender — but that’s just in the event of a worst case scenario.**
Also, if for any reason you’re having trouble figuring out this otherwise lengthy process, we recommend watching the following video — brought to you courtesy of 9to5Mac, which walks you through, step-by-step, how to execute the above steps.
So there you have it, folks! The next time you’re ready to update your iPhone to the latest version of iOS, now you know how you can do so — while ensuring that you retain all those precious text messages and iMessages in the process.
Learn More: How to Customize and Give New Life to Your iPhone’s Keyboard
What kind of tips would you like to learn in the future? Let us know in the comments below!


