
How to Fix Your Mac and Make It Run Like a Dream with Built-in Disk Utility
 Farknot Architect / Shutterstock
Toggle Dark Mode
Macs are arguably the best computers in the world. They’re the perfect combination of power and style, and no matter what you need to use them for, they’ll work like a charm. At least most of the time.
No matter which device it is, there will eventually be troubles that appear out of nowhere. Software issues can be fixed most of the time by restarting your computer or updating your apps or operating system, but that doesn’t work every time.
Fortunately, your Mac has programs (to try) to fix itself. We’ve already seen how you can use the Diagnostic Tool if your Mac is having problems, but you can also use Disk Utility for other software-related issues.
What Is Disk Utility?
Disk Utility, much like Apple Diagnostics, is a built-in Mac program that lets you detect and try to repair problems related to your Mac’s disks.
With a feature called First Aid, your Mac scans internal or external disks to find problems related to their formating or directory structure.
These problems can hurt your Mac in many different ways. From apps shutting down unexpectedly to your Mac failing to function altogether.
Of course, you can use Disk Utility for many other things, such as mounting or unmounting disks, creating a partition of your disk, and erasing or formatting your disks completely, among other things.
But for the sake of this post, we’ll only show you how you can use it to scan your Mac’s disks—whether they’re internal or external hard drives—for problems and how you can try to fix them.
Before We Get Started
This isn’t strictly necessary, but we recommend that you create a backup of your Mac before beginning. This is precautionary in case you have damaged files that you’ll need to recover or if your Mac has errors that you can’t repair.
How to Open Disk Utility
If your Mac is working properly, you can find the Disk Utility App on your LaunchPad. It should be in your Utilities or in a folder called “Other.” Launch the app and go to the next step.
If your Mac isn’t starting all the way, you need to access Disk Utility when you’re booting it. Here’s how.
If your Mac has an Intel processor, do this:
- Turn on your Mac.
- Immediately press and hold Command (?) and R.
- Release both keys after you see the Apple logo on your screen.
If you have an Apple Silicon Mac powered with the M1 Chip, you need to do this:
- Turn on your Mac and keep pressing the Power Button until you see the startup options window.
- Click the gear icon labeled Options and then click Continue.
How to Use Disk Utility
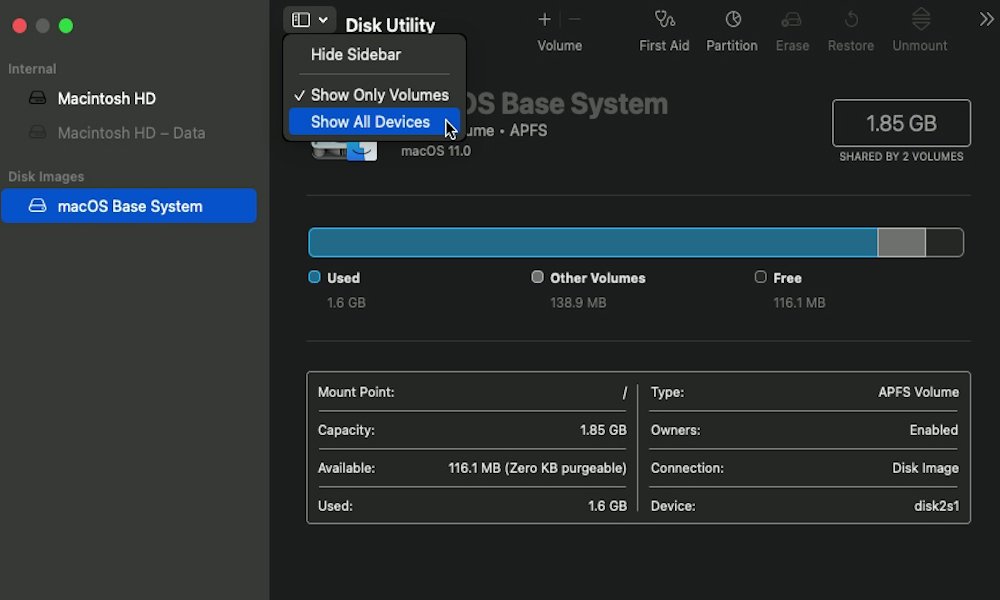
After you’ve launched Disk Utility, you’ll need to see all the devices available on your Mac. To do this, click on View located on top of the window next to Disk Utility and then click on Show All Devices.
After you’ve done this, you’ll be able to see all your disks, containers, and volumes on the left side menu. You’re going to need this in order to find where the problem is located.
Can’t See Your Disks?
If you can’t see any of your disks, whether they’re internal or external, on Disk Utility, you can try to do the following:
- Shut down your Mac and unplug the nonessential devices. This means you need to unplug every device that’s not your mouse, keyboard, power connection, and an external hard drive if you want to scan it as well.
- Make sure that any external hard drive that doesn’t appear is properly connected to your Mac.
- Turn on your Mac again and go to Disk Utility.
- If you can’t still see any of your disks, you’re going to need to contact Apple support for further help.
Start Repairing Volumes, Then Containers, Then Disks
You’ll need to scan each volume, container, and disk individually. This is so you learn where the problem is exactly and where you need to fix it. That way, you don’t need to erase your whole disk if your issue is located in a volume.
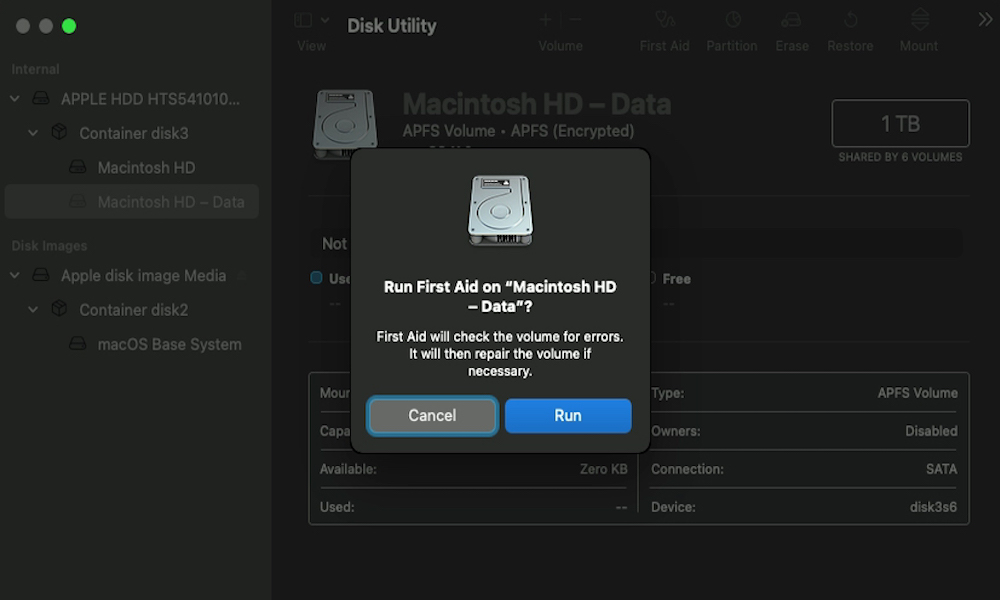
- Start by selecting the last volume of a disk on the left side menu. You’ll know it’s a volume by looking below its name after you click on it.
- After you selected the volume, click on First Aid, which is located at the top of the Disk Utility window.
- Your Mac will ask you to run First Aid on that specific volume. Click on Run. If you don’t see the word run, click the Repair Disk button instead.
- If you can’t click the Run button, click Cancel and move on to the next volume.
- If you need to, enter your administrator password to continue.
After it’s done scanning, your Mac will let you know if your Mac had any issues and if First Aid fixed them or not.
Once you’re done, move on to the next item above the last volume you checked. Keep scanning your volumes, then your containers, and finally your disks.
What Can You Do If Disk Utility Can’t Fix the Issue?
Most of the time, Disk Utility and First Aid will be able to fix any problems your Mac may have. That being said, it’s still possible that your Mac has some issues Disk Utility can’t fix.
If that’s the case, you might need to format your disk. That is, you’ll need to use Disk Utility to erase everything on your disk and start from scratch. Keep in mind that this means you’ll delete all of your files, your settings, and you’ll need to reinstall macOS yourself.
Keep in mind, though, this is a last-ditch effort to fix your Mac’s problems, and you’ll definitively want to make a backup of your Mac first. If you’re not sure, you can always try to contact Apple support for further help.


