
How to Enable End-to-End Encryption for Your iCloud Account
 Cristian Dina / Shutterstock
Toggle Dark Mode
One of the things that Apple does best is security. Once you upload your information to the cloud, you know that data is the safest it can be.
That’s all thanks to how Apple now protects your data with end-to-end encryption, and the best part is that you don’t need to let your iPhone and Apple do all the heavy lifting. There are ways to make your iCloud account even more secure.

Enter Advanced Data Protection, a feature that will make all your data as secure as possible. No one will be able to access it but you. The best part? It’s pretty easy to set up as long as you meet all the requirements. Here’s everything you need to know.
What Is Advanced Data Protection?
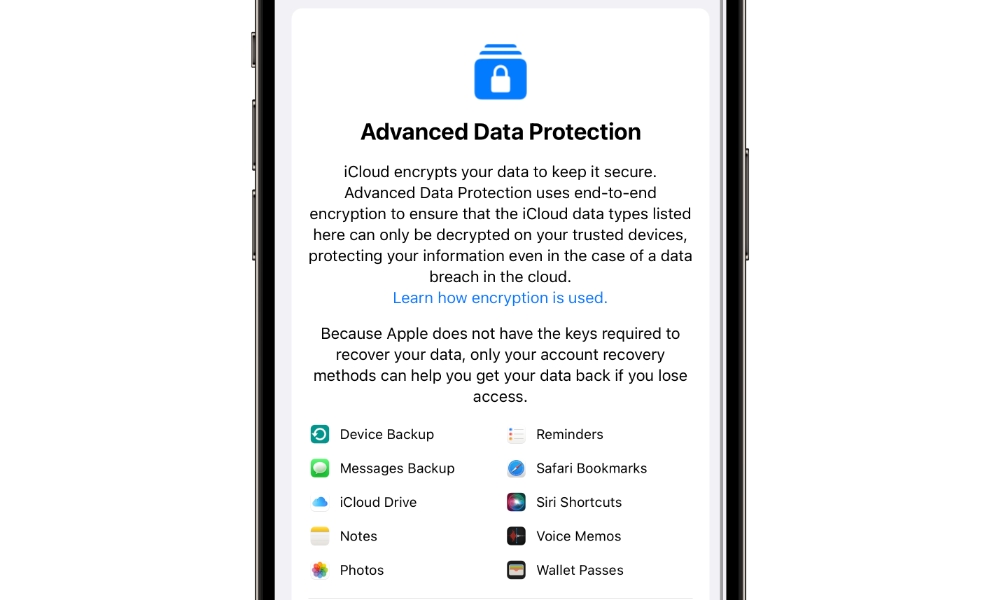
Advanced Data Protection is Apple’s highest level of security for your iCloud account. Due to the security it involves — and the risk of locking yourself out of your data if you’re not careful — this feature is completely optional, so you need to turn it on manually.
One this feature is on, almost all your iCloud data, including Photos, Notes, and iCloud Backups, is completely protected with end-to-end encryption.
Advanced Data Protection is so secure that you’ll be the only one who can access your data. Not even Apple can see it once you enable this feature. That’s why you’ll also need to create a recovery method in case you forget your password.
This is extremely important because if you lose access to your account, the recovery method will be the only way to get in again. If you lose it, that data will be gone, so you need to be 100% sure you want to run this risk before enabling Advanced Data Protection.
What You Need Before Using Advanced Data Protection
Before turning on this feature, you’ll need to meet a few requirements:
- Your Apple ID must have two-factor authentication enabled, which is a very good idea anyway. You can confirm this by going to Settings > Apple ID > Sign-In & Security. If it’s not already on, tap Turn On Two-Factor Authentication and follow the instructions on your screen.
- You need a passcode or password set up on your device. Again, this is something you should have enabled anyway — especially since Face ID and Touch ID make it so easy to unlock your device. If you’re using an iPhone, you can set up your passcode by going to Settings > Face & Passcode (or Touch ID & Passcode) and selecting Turn Passcode On.
- You must have at least one recovery contact or a recovery key set up. If you don’t have one, your iPhone will guide you on how to set up one when you turn on Advanced Data Protection.
- You’ll need to have the right devices for the job. According to Apple’s website, these are the devices you can use. Note that ALL of the devices you sign into your iCloud account from must meet these requirements.
- Any iPhone with iOS 16.2 or later.
- Any iPad with iPadOS 16.2 or later.
- Any Mac with macOS 13.1 or later.
If you have all of these things, then you can move on to the next steps.
How to Enable End-to-End Encryption on your iCloud Account
To use Advanced Data Protection on your iCloud account, you’ll need to have your iPhone, iPad, or Mac with you. Next, follow these steps:
How to Enable Advanced Data Protection on Your iPhone or iPad
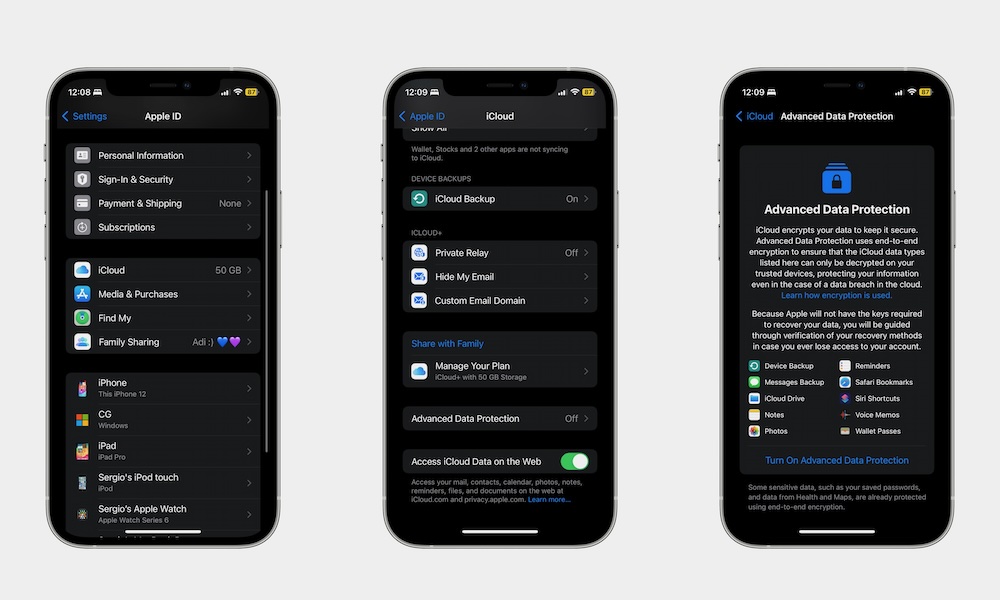
- Open the Settings app.
- Tap on your Apple ID. That is your name at the top of the Settings app.
- Select iCloud.
- Scroll down and go to Advanced Data Protection.
- Select Turn On Advanced Data Protection.
- If you haven’t already, follow the instructions to Set Up Account Recovery.
- If you already have a recovery contact or recovery key, follow the instructions on your screen to finish setting up Advanced Data Protection.
How to Enable Advanced Data Protection on Your Mac
You can also enable this feature on your Mac by doing the following:
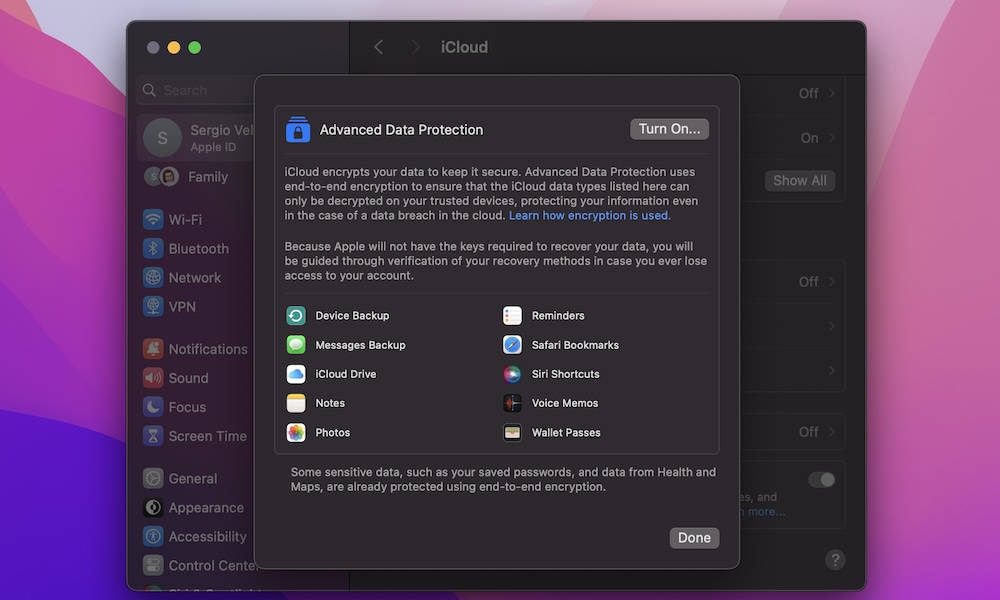
- Click the Apple menu in the top right corner.
- Go to System Settings.
- Click on your Apple ID. That is your name in the top right corner of the settings window.
- Go to iCloud.
- Scroll down to the bottom and click on Advanced Data Protection.
- Click on Turn On.
- If you need to, enter your password for your Apple ID.
- Click on Set Up Account Recovery if you haven’t created one already.
- Follow the instructions on your screen to enable Advanced Data Protection.
That’s pretty much it. However, after you’re done, your iPhone will require you to update all your Apple devices to the latest software update before Advanced Data Protection is turned on.
If you don’t want to or can’t update them, you’ll need to go to Settings > Apple ID and scroll down to remove the devices you can’t update.
If you decide you don’t want to use Advanced Data Protection anymore, simply follow the same steps above and select Turn Off.
Keep Your iCloud Account Protected
While Advanced Data Protection might seem like a bit more than most of us need, this feature is definitely worth keeping in mind. Not only will you protect all your data, but not even Apple will have access to it.
With that said, be sure to create a solid recovery method. If you lose access and your recovery key, you won’t be able to recover your data ever again unless you have it backed up somewhere else outside of iCloud.


