
8 Places to Check to Make Sure Your New iPhone Is Set Up Correctly
 Thai Nguyen / Unsplash
Toggle Dark Mode
As soon as you turn on your first iPhone, it will do an amazing job guiding you through everything you need to do to set it up correctly.
However, most of us really don’t care about that initial screen and probably just go through it as fast as possible. If that’s you, then you may not have explored every feature your iPhone has to offer. Don’t worry, though, you aren’t the only one.

The good news is that we’ve made a checklist to help you ensure that everything on your iPhone is set up correctly so you can use it to its full potential.
Get Blue Speech Bubbles When Chatting With Other Apple Users

Once you turn on your iPhone and add a SIM card, you can text all of your contacts right away. However, you probably already know that there’s a small difference between Android and iPhone users.
When you chat with an Android user or anybody else who doesn’t have an Apple device, you’ll see green speech bubbles for your outgoing messages. However, when you talk with another iPhone user, you should get a blue speech bubble.
However, if you haven’t set up iMessage correctly, you may still see green speech bubbles across all your contacts. Here’s how to fix this:
- Open the Settings app on your iPhone.
- Scroll down and select Messages.
- Enable iMessage.
This will activate iMessage so you can talk to other iPhone users the right way. If you want, you can also tap Send & Receive to choose any email addresses you want to be able to use with iMessage, and whether you’d like new conversations to be sent from your phone number or one of your email addresses.
Add or Update Your Birthday Information
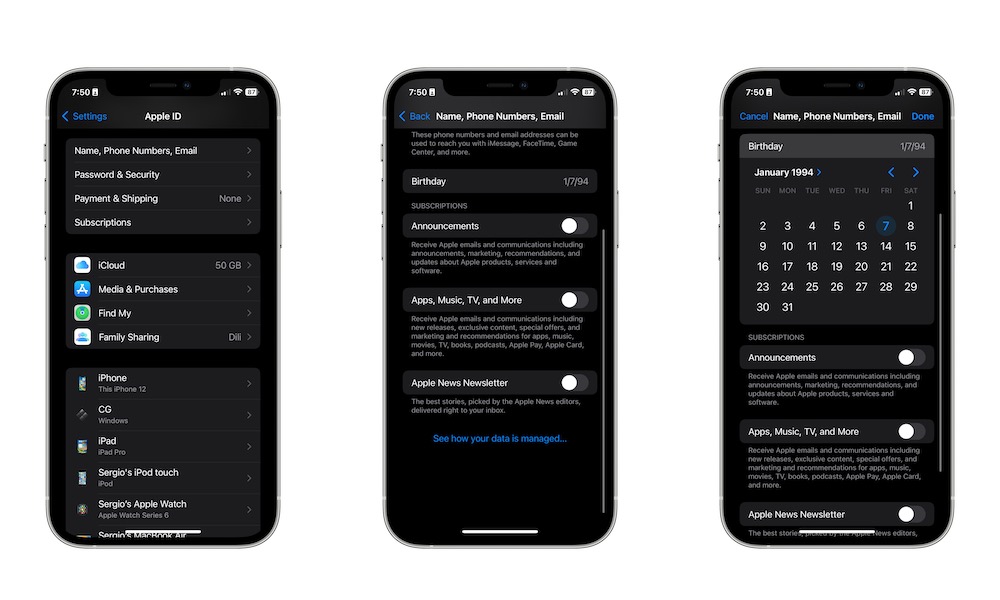
Your iPhone probably asked you to enter your birthday when you first got it, but if you didn’t do it right or you want to change it, you can still update that information in a flash. All you need to do is follow these steps:
- Open the Settings app on your iPhone.
- Select your name at the top of the Settings app.
- Go to Name, Phone Numbers, Email.
- Choose Birthday.
- Enter your birthday.
- When you finish, select Done in the top right corner of your screen.
Did You Set Up Your Medical Information Correctly?
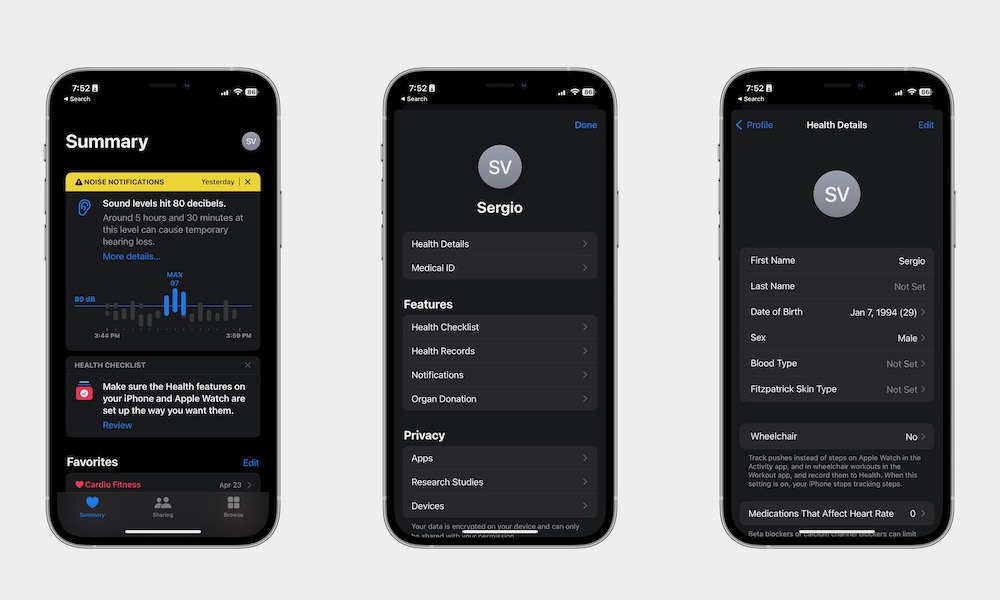
One of the best features your iPhone has is the ability to add your medical information in case of emergencies. That way, anyone will be able to learn about any health conditions you have just by picking up your iPhone.
You can add a lot of details, such as your blood type and any allergies you have, but you should start by entering some basic information about yourself and adding emergency contacts.
To enter your health details:
- Open the Health app on your iPhone.
- Select the profile icon in the top right corner of your screen.
- Go to Health Details.
- Choose Edit in the top right corner of your screen.
- Change all the details you want, and when you finish, select Done in the top right corner.
Next, you should set up your Medical ID by doing the following:
- Open the Health app on your iPhone.
- Select your profile in the top right corner of the screen.
- Choose Medical ID.
- Select Edit in the top right corner of your screen.
- Change all the details you want.
- Scroll down to the bottom and choose add emergency contact.
- Add any contacts you want.
- Select Done in the top right corner.
There are many more details you can add about yourself, so be sure to take some time in your profile to make sure you cover everything you need.
Get Face ID Working
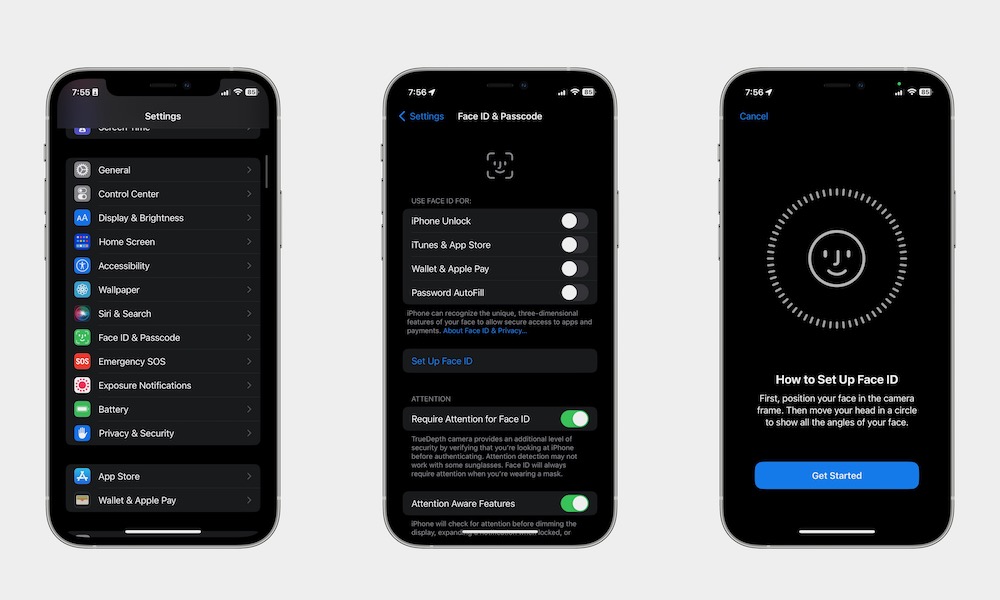
Face ID lets you unlock your iPhone without having to enter your passcode every time. All you need to do is look at your iPhone screen, and the device will do the rest.
Of course, if you didn’t set it up, you won’t be able to use this feature. Fortunately, you can set up Face ID by doing the following:
- Open the Settings app on your iPhone.
- Scroll down and select Face ID & Passcode.
- Enter your passcode when prompted.
- Scroll down and choose Set Up Face ID.
- Select Continue.
- Follow the instructions on your screen to finish the process.
Use the Find My Network to Show All the Devices You Own
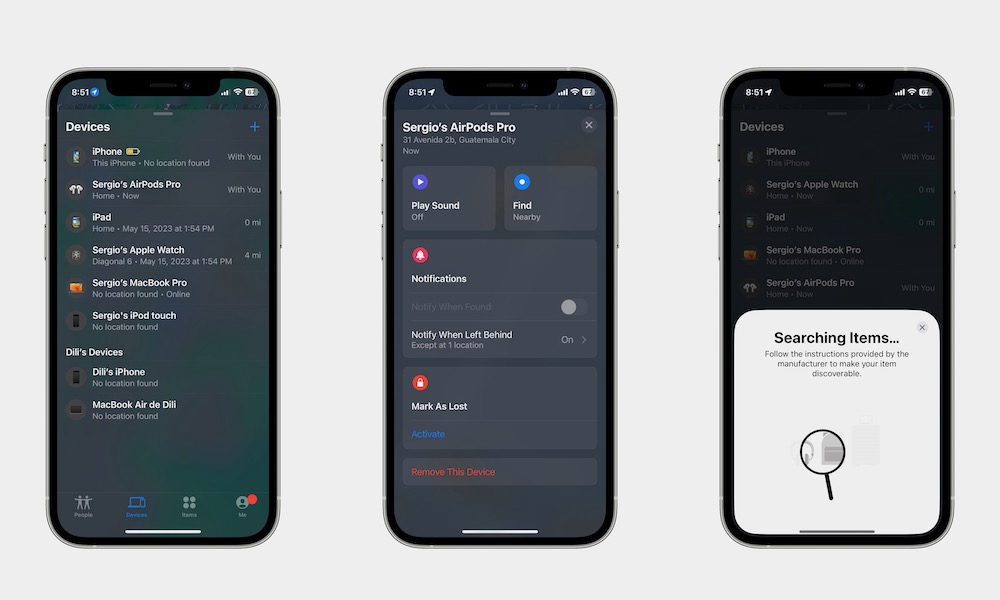
The Find My app is the perfect way to keep all your Apple devices in check. Not only that, but you can also register other supported devices and trackers so you never lose your stuff ever again.
Here’s how to make sure your devices are part of the Find My network:
- Open the Find My app on your iPhone.
- Select the Devices tab at the bottom of your screen. This will show you a list of all the Apple devices you own. You can choose any device to get more options, like playing a sound to find it or getting directions to it.
- If you can’t see any of your devices on your screen, choose the plus icon in the top right corner of the devices menu and select Add Other Item, Add AirTag, or Add MagSafe Accessory, depending on what you want to add.
- Then, give your iPhone a few moments to find the device and follow the instructions on the screen.
Make Sure You’re Running the Lastest iOS Version Possible
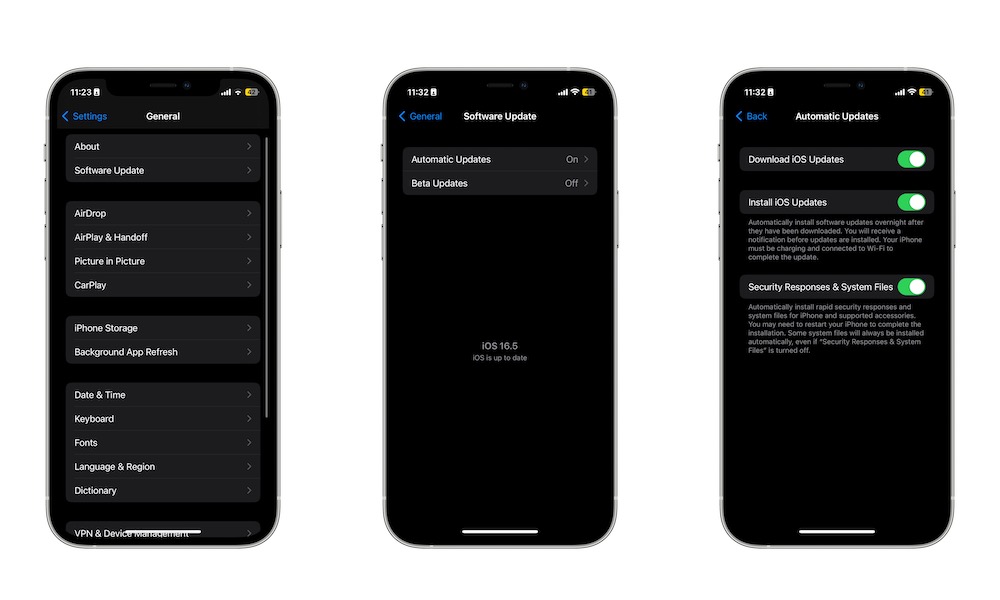
Apple is constantly updating the software for your iPhone to add new features or improve the ones it already has. While your iPhone is capable of updating itself most of the time, sometimes those automatic updates can take a few days or weeks. Fortunately, you can check for updates manually and install any that are available. Here’s how to do this:
- Open the Settings app on your iPhone.
- Scroll down and select General.
- Go to Software Update.
- If there’s an update available, choose Download and Install.
Wait for your iPhone to download the update — and make sure you don’t allow your iPhone to download it with your cellular data — and for the device to restart itself.
If you don’t want to manually check for updates, make sure to select Automatic Updates and toggle on Download iOS Updates and Install iOS Updates so your iPhone automatically updates itself at night as long as it’s connected to Wi-Fi and to its charger.
You can also toggle Security Responses & System Files on. While this won’t update the operating system, you will get rapid security responses installed, which is extremely important to protect yourself.
Did You Forget about Siri?
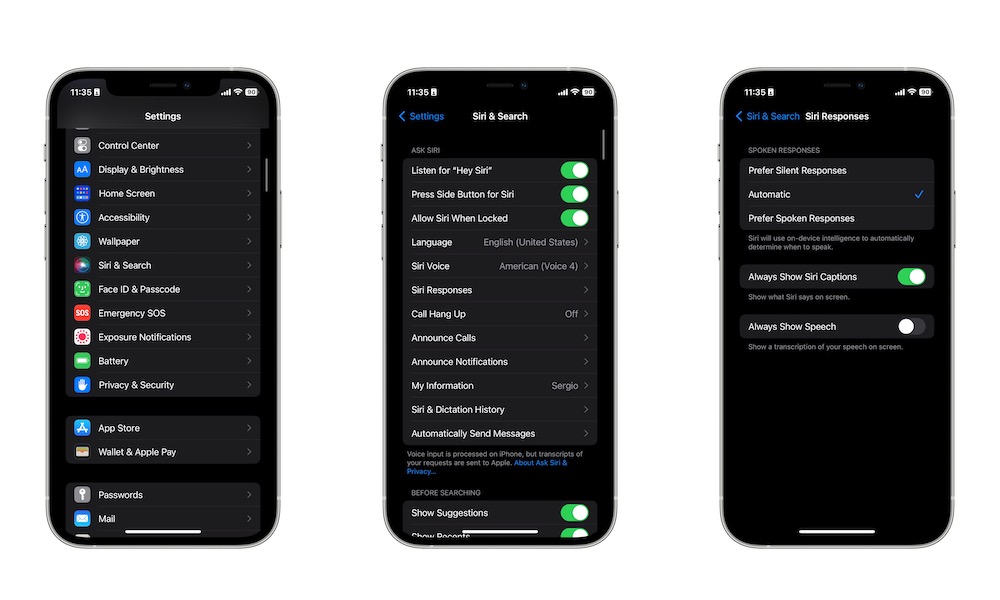
You can set up Siri while you’re setting up your iPhone, which will help you have Apple’s virtual assistant at your disposal just by saying, “Hey Siri.”
However, if you skipped that during the initial setup, you can still do it by following these steps:
- Open the Settings app on your iPhone.
- Scroll down and select Siri & Search.
- Enable Listen for Hey Siri.
- Choose Continue.
- Start saying all the prompts that will appear on the screen.
- Finally, tap Done.
And that’s it! Now you can just say “Hey Siri”, and Siri will appear on top of your screen. Ask Siri anything you want, and it will give you the best response it can find.
Moreover, you can also tap on Press Side Button for Siri when you’re in the Siri settings for those times you’d rather not use “Hey Siri” to trigger it.
Add Your Credit Card to Your iPhone
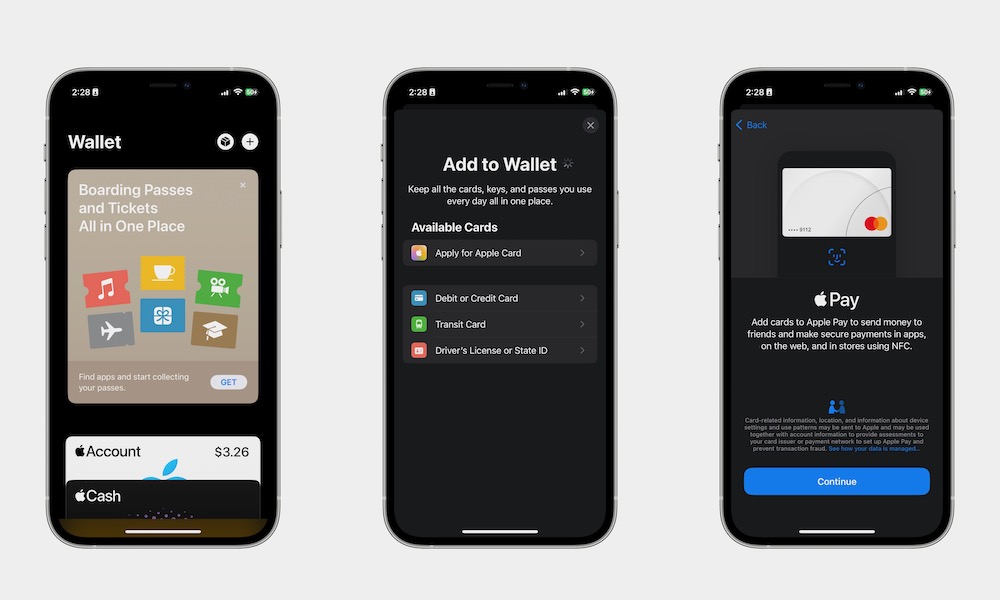
Last but not least, you should make sure you’ve added your credit card to your Wallet app for Apple Pay. This will let you leave your wallet behind and pay using only your iPhone (or Apple Watch if you have one).
Here’s how to add a new credit card to your Wallet app:
- Open the Wallet app on your iPhone.
- Select the plus icon in the top right corner of your screen.
- Choose the document you want to add. Depending on where you live, you may see options here to add Digital IDs like your driver’s license or transit cards. However, in this case, you’ll want to select Debit or Credit Card.
- Choose Continue.
- Scan your credit or debit card with your iPhone’s camera. You can also choose Enter Card Details Manually right at the bottom of your screen if your camera isn’t capturing it or you’d prefer to just punch the details in.
- Follow the steps to complete the setup process, and you’ll be good to go.
Note that some credit or debit cards may require additional verification steps to activate them with Apple Pay, such as a phone call, text message, or confirmation in a banking app. If any of those steps are necessary you’ll be shown additional instructions on how to proceed.
Set Up Your iPhone the Right Way
Did you cover all the items on this list? Then, now you’re ready to use your iPhone to its full potential. This way, you can use your iPhone to pay for anything or to ask a virtual assistant to do something for you.
The sky is the limit, so keep playing around with your iPhone’s settings until you find something that suits you.


