
WATCH: AirPods Pro for Beginners (7+ Tips to Get Started Today)
 Rex Chamberlain
Toggle Dark Mode
AirPods Pro are here, and overall, they’re fantastic. But a lot has changed since Apple’s first and second generation AirPods were released. And so, today, we’ll take a look at the things you’ll need to know to get your new AirPods Pro set up, as well as a few great tips so that you can get the most out of them. Continue reading to learn more than seven tips AirPods Pro owners will need to know to get started.
1 Get Your AirPods Pro Connected
The first step is getting your AirPods Pro connected. If you’re already familiar with AirPods, the experience is similar to Apple’s older models.
- Once you open up the charging case near your unlocked iPhone, you’ll see a little popup on your phone’s display.
- Hit that Connect button. Then it’ll ask you to hold down the button on the back of the case.
- Once you hold that physical button for a few seconds, you’ll be connected. Keep in mind that you’ll only have to complete this process once.
2 Understand Noise Cancellation
Now, what’s fantastic about the new AirPods Pro is that they feature Active Noise Cancellation (which really surprised me how well it works, being in-ear earbuds after all).
Of course, bigger over-ear headphones with noise cancellation work great because their physical design creates a nice, tight seal over your ear. But the AirPods Pro are actually incredible when it comes to noise cancellation, even though they’re just in-ear earbuds.
And by the way, AirPods Pro sound excellent for the price and form-factor.
Since these have Active Noise Cancellation, you’re going to want to get a good seal using the included ear tips. That’s going to help with bass and more when you’re listening to music. A good seal simply enables you to get fuller sound with less outside noise.
Now one of the neat features that Apple has added here is a Ear Tip Fit Test.
- Hop into the Settings app.
- Go to your Bluetooth menu.
- Then hit the information (i) button next to your AirPods Pro.
- Here you’ll see toggles between Transparency and Noise Cancellation as well as the Ear Tip Fit Test. Tap it to begin.
The Ear Tip Fit Test will play a bit of music in your ear, and then it’ll use the AirPods’ microphones to sense whether or not you have a good seal.
If the microphones sense that you don’t have a great seal, it’ll make a recommendation to try a different ear tip. And again, the reason that’s so important is because having that good seal is what’s going to make that Active Noise Cancellation effective.
There are different-sized silicone ear tips included with the AirPods Pro. Apple’s no longer taking the one-size-fits-most approach. You’ll have small, medium, and large options available so that you can achieve the perfect fit.
You may find that one of your ears requires a larger or smaller size ear tip than the other. That’s perfectly normal. Mix and match them to see which combination feels most comfortable.
4 Understand Transparency Mode
Transparency mode, by the way, is an excellent feature. Apple’s done a fantastic job with its implementation compared to some other earbuds that have that also have a transparency feature.
Transparency mode uses the AirPods’ microphones to amplify some of the sounds around you. This really comes in handy when you’re running or walking outside. Transparency mode makes approaching cars more evident, which is great for your personal safety.
AirPods Pro also sound very natural when you’re having a conversation with Transparency mode on. That’s something I’ve really been enjoying.
Force press an AirPod’s stem to toggle Transparency mode on or off. More on that below.
6 Learn the New Controls
There were apparently a lot of people that felt that the old tapping gesture was a bit uncomfortable in the ear. That’s no longer here. Apple actually has Force Touch stems in its latest AirPods.
There are a few different things you can do with this new toggle.
- A single squeeze will play and pause music.
- A double squeeze is going to skip a track.
- A triple squeeze is going to go back a track.
Those are the three main things you can do. And then the final thing is turning on and off that Active Noise Cancellation. If you squeeze and hold the stem, you’ll hear a little sound that will indicate that Active Noise Cancellation has either been turned on or Transparency mode has been turned on.
Transparency mode is something that I’m using every day. Ordering a coffee, having conversations with people, etc. You’ll find many uses over time.
7 More Unique AirPods Pro Features
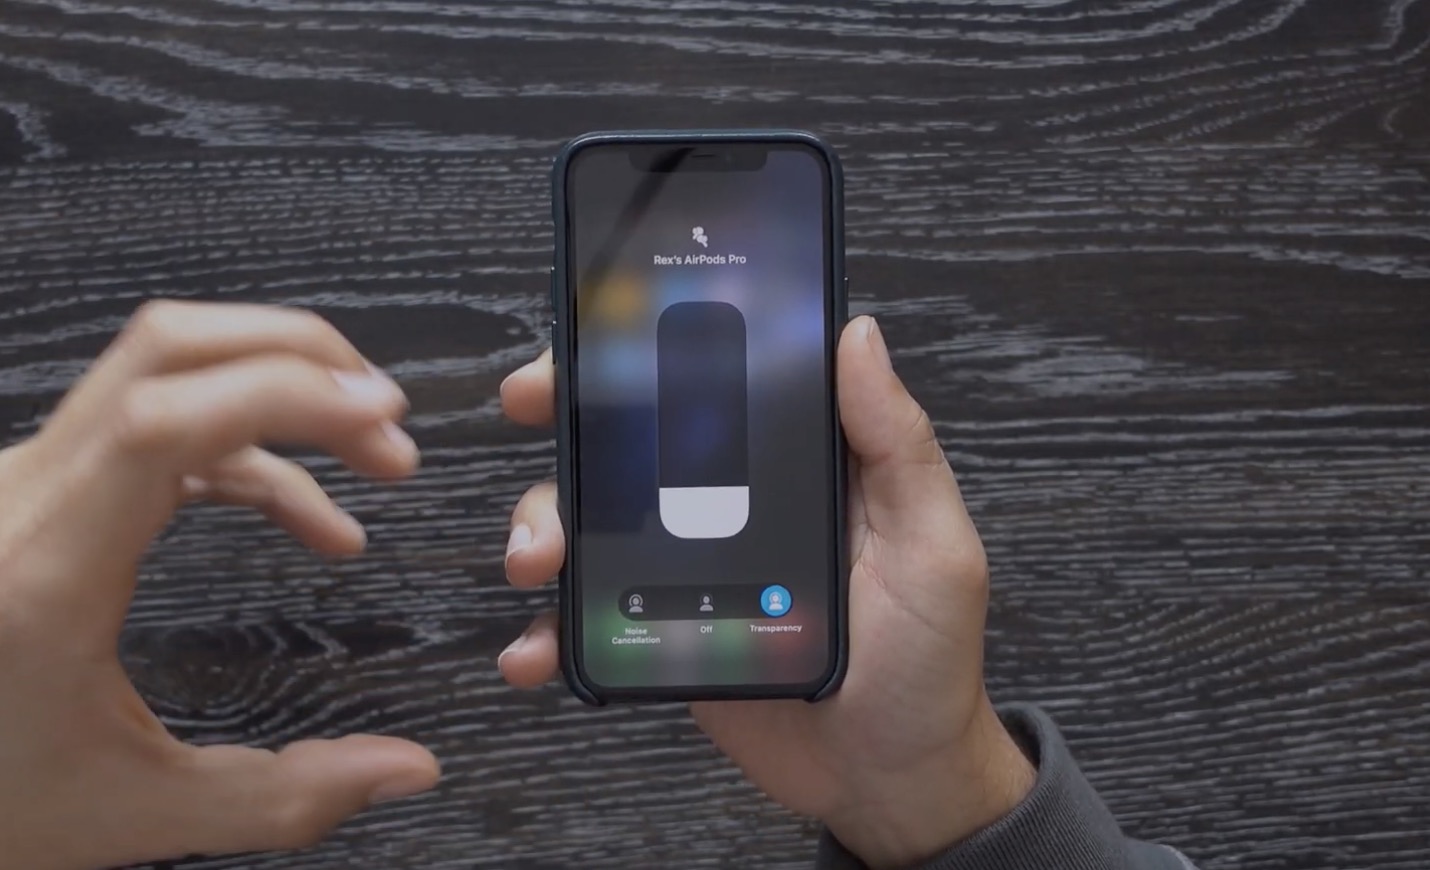
Go to the volume toggle in Control Center and hold down on that. You’ll see that you have Noise Cancellation and Transparency options there as well, which is pretty cool. That’s something to keep in mind if you don’t want to use just the stems for that feature on the AirPods themselves.
You can also access those Noise Cancellation options in the AirPlay menu on the Apple watch. It’s really nice to have those features available there in case you’re using devices other than your iPhone to control your AirPods Pro.
The last thing to mention here is Apple’s H1 chip, which, of course, is in the AirPods Pro. Now, this is what gives you a seamless kind of pairing and switching between devices. With the AirPods Pro, if you’ve got an iPad, MacBook Pro, or other Apple devices, a switch between them is fast and easy using their respective Bluetooth menus or just by holding the AirPods near them.


