
Ready for macOS Big Sur? Do These Things Before Updating Your Computer
 DANIEL CONSTANTE / Shutterstock
Toggle Dark Mode
Apple announced its new software update for Mac computers earlier this year: macOS Big Sur. The update will bring a bunch of changes to the Mac, from new tools and features to a brand new design.
Still, we haven’t heard anything about the official release of this update. Big Sur is supposed to be coming this year, but we haven’t heard much else. That is, until recently.
Apple’s next event is scheduled for November 10th and the rumors suggest we might see the first Apple Silicon Mac computer. If that’s true, we might also see the official release of macOS Big Sur.
This means we still have time to ready our Macs before the Big Sur update. Unlike updating your iPhone or iPad, your Mac takes a bit more work to update.
Sure, you can just press the update button when Big Sur comes. Best case scenario, you update without any issues. But when it comes to your Mac and the data it holds, it’s best to take the necessary precautions.
Here’s what you need to do before updating your Mac to macOS Big Sur.
Make Sure Your Mac Supports macOS Big Sur

Fortunately, Big Sur will be available in a wide variety of Mac computers, including a few older models. Here are all the Macs that’ll support the new update:
- 2014 iMac or later models.
- All iMac Pro models.
- 2013 Mac Pro or later models.
- 2015 Macbook or later models.
- 2013 Macbook Air or later models.
- Late 2013 Macbook Pro or later models.
- 2014 Mac mini or later models.
In late 2012 and early 2013, Apple released a new Macbook Pro lineup, which the company later updated in late 2013. Make sure that, if you have a 2013 Macbook Pro, you have the late 2013 version.
Make a Backup of Your Mac
This is probably one of the most important steps on the list. Whatever you do, it’s always advised that you do a backup for your Mac’s disk. Updates usually go without any trouble, but it’s always better to be safe than sorry.
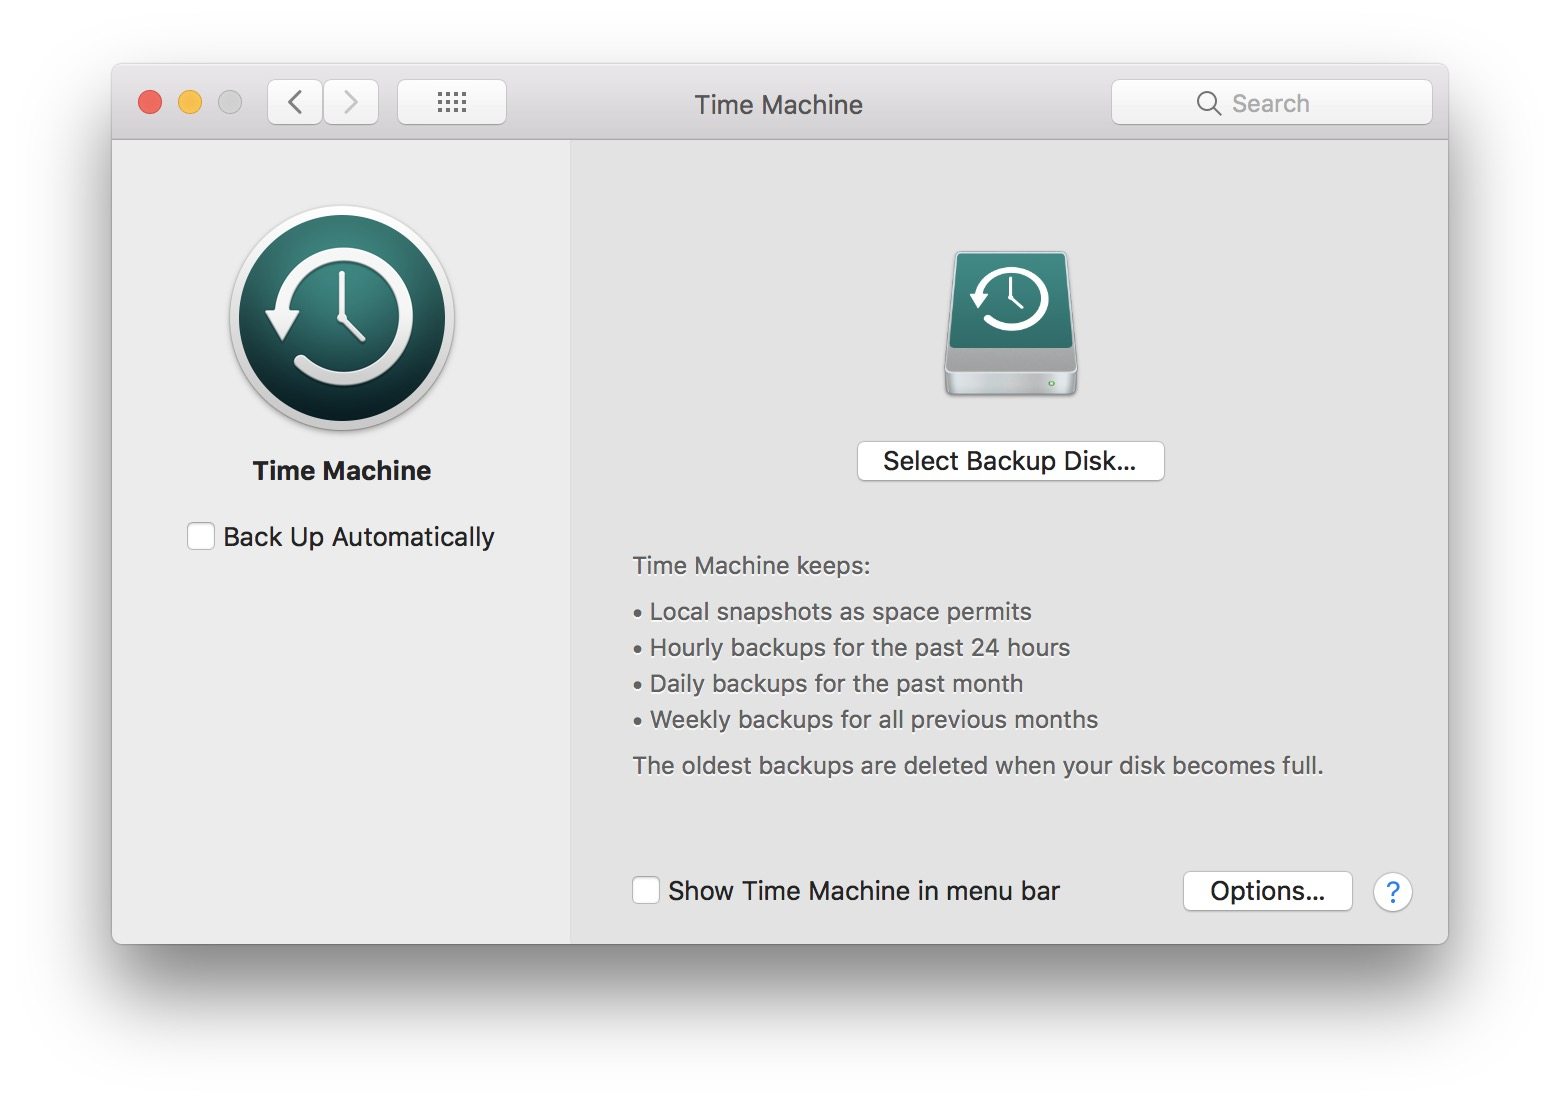
There are a few ways to make a backup, but today we’ll focus on using Time Machine. Time Machine is an app in your Mac that lets you make a backup on an external hard drive or any external drive with enough space to store a backup.
Here’s how you can make a backup with Time Machine:
- Plug in your external hard drive.
- Click on the Apple Menu. That’s the Apple on the top left corner of your screen.
- Click on System Preferences…
- Click on Time Machine. It should be at the bottom of the preferences.
- Click on Select Backup Disk. It could also say Select Disk, Add or Remove Backup Disk.
- Select your external drive.
- Click on Use Disk.
- Start your backup.
It’s possible that your Mac will ask you if you want to use your external hard drive to make a backup with Time Machine as soon as you plug it in. If so, just follow click Use as Backup Disk, and make the backup.
If you don’t have an external drive with enough storage to make a backup, you might want to make a copy of your files and important information with any drive you have available. It may take longer, but you’ll keep your important data safe.
Make Sure That You Have Enough Storage
In order to update your Mac, you’ll need to have enough storage to do so. Your Mac needs to have at least 8 GB of free storage to install macOS Big Sur.
If you don’t have enough space, make sure to delete old files or apps you know you won’t use anymore. Also, you can also get recommendations to optimize your storage right on your Mac. Just follow these steps:
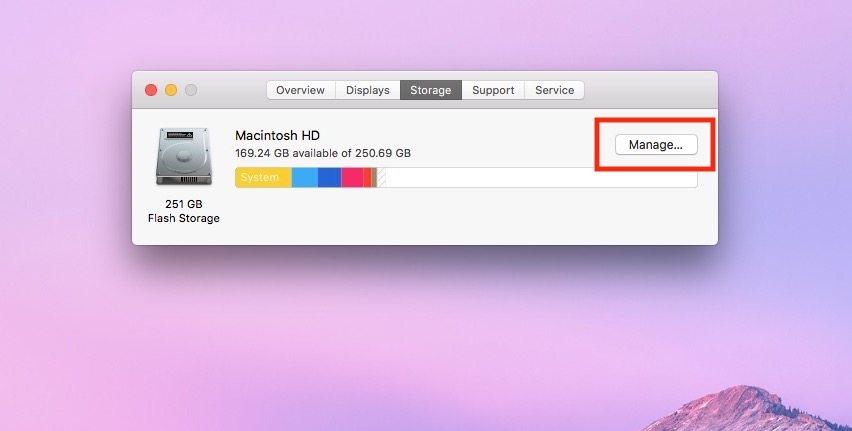
- Click on the Apple Menu on the top left corner.
- Click on About this Mac.
- Click on the Storage tab. From the Storage tab, you can see how much space you have available.
- Click on the Manage button.
You’ll see a few recommendations to have more storage available, like emptying your trash can every 30 days, or to remove old Apple TV shows you’ve already watched. You can also delete apps and files from this window.
Maintain a Strong Internet Connection
This step might be a bit obvious, but it’s still an important one. Make sure you have a strong and stable internet connection when you’re downloading Big Sur.
Not only it will make your download faster, but it’ll also avoid any issues associated with losing a connection in the middle of the installation. A shoddy internet connection won’t kill your Mac, but it’s always better to have a good one.
Check for Any Errors in Your Mac’s Disk
Sometimes, our disks might have tiny errors or problems without us even knowing about them. That is until it’s too late. Having your Mac’s disk error-free is a good recommendation before you try to install Big Sur.
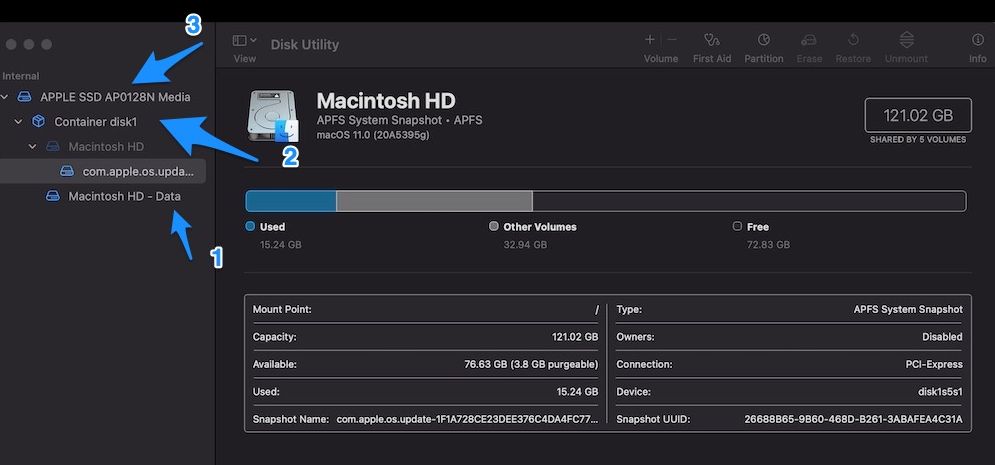
To check for errors, we’ll use an app called Disk Utility. This app will help you scan your disk for errors and fix them. Here’s how you do it:
- Open up Disk Utility. You should find it in your App Library. You can also press Command + Space Bar and search for Disk Utility in the Spotlight Search.
- Click on View and select Show all Devices.
- You should see now all your available disks and storage devices.
- Apple recommends you should start by scanning and repairing Volumes, then Containers, and finally Disks.
- If your Utility Disk looks similar to the \ one in the picture above, then first scan the Macintosh HD – Data Volume.
- Once that’s done, scan your Container Disk.
- Finally, scan your Apple SSD Disk. It’s possible that yours says Apple HDD instead.
Disk Utility will scan and repair all the problems it finds. If the app can’t repair any problems. Now you’re ready to install macOS Big Sur.


