
Having Trouble with iOS 14? Here’s How You Can Go Back to iOS 13
 EverythingApplePro
Toggle Dark Mode
Apple recently released the beta version of iOS 14, and we’ve already had the chance to see many of the cool new features coming to the iPhone this fall. From the small quality of life improvements to widgets on your Home screen, there’s a lot to see and do on your iPhone if you decided to make the early leap to iOS 14.
However, there can also be a lot of issues. Since it’s only in its beta version, and it’s not meant to be used by regular consumers, you might find a few bugs that haven’t been fixed yet.
If these bugs outweigh the new features, you’re probably thinking about going back to iOS 13, at least while Apple fixes all the issues you’ve seen. Plus, iOS 13 still has some cool new features you can try, without worrying about bugs or anything like that.
Basically, the good news is, you can still go back to iOS 13. Albeit, downgrading to iOS 13 takes more steps than just updating your iPhone. But, it might be worth it to go back while you still can and enjoy the old iOS you already know and love. Here’s what you need to do.
What Are You Going to Need?
As I mentioned before, there are a few more steps to going back to iOS 13, and you’ll need a couple more things other than your iPhone. Luckily, these are things you probably already have.
- Your iPhone (obviously).
- A Mac computer with the most recent macOS update available. To check this you need to go to System Preferences, then click on Software Update. You can also use a PC, but you’ll need to have the latest version of iTunes.
- A cable to plug your iPhone into your computer.
A Backup Is Also Important
The method you’re about to learn restores your iPhone to its factory settings, so it’s better if you have an iOS 13 backup already in iCloud. If you don’t have one, you’ll restart your iPhone as if it’s a brand new one.
Chances are, you made one backup before downloading iOS 14, so you could use that when you finish restoring your iPhone. If you didn’t though, you could still use previous backups you have on iCloud.
It’s also worth mentioning that, even if you make any iOS 14 backups, you can’t use them when downgrading to iOS 13, but you’ll be able to restore it when you download iOS 14 again.
If you have a backup file, or you don’t care about backups at all, then we can move on.
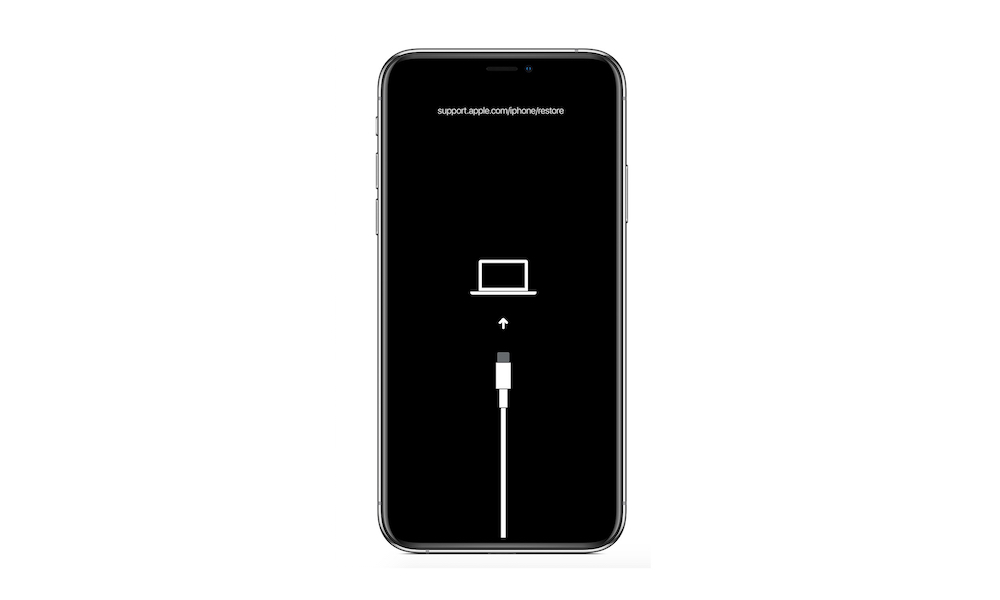
First, Put Your iPhone Into Recovery Mode
The iPhone has something called Recovery Mode, which we’ll use to restore your iPhone to the latest official iOS 13 update available. You’ll know you’re in Recovery Mode when you see your iPhone’s screen black with a white MacBook in the middle and a Lightning cable underneath it.
How do you access Recovery Mode, you ask? Well, it depends on the iPhone you’re using. Follow these next steps:
- For iPhone 6s and 6s Plus, you’ll have to hold the Home button and the Power button at the same time. Keep holding them until you see the Recovery Mode Screen. If this method doesn’t work try first turning your iPhone 6s off, then plug your iPhone into your computer, and then press and hold the Home button until you see the Recovery Mode screen.
- If you’re using iPhone 7 and iPhone 7 Plus, hold the power button and the volume down button until you see the Recovery Mode screen. Again, if this doesn’t work, you can try turning your iPhone 7 off, then plug into your computer and press and hold the volume down button until you see the screen.
- Finally, for the iPhone 8, iPhone 8 Plus, iPhone X, iPhone XS, iPhone XS Max, iPhone XR, iPhone 11, iPhone 11 Pro, and iPhone 11 Pro Max, you’ll need to press the volume up button, then press the volume down button, and finally press and hold the power button until you see the Recovery Mode screen. If it doesn’t work at first, try doing the same process but with your iPhone plugged into your computer.
It’s possible that your iPhone will restart a few times, but you must keep holding the buttons down until you see the Recovery Mode screen.
Restore Your iPhone from Your Computer
Now it’s time to restore your iPhone. So, if you haven’t already, plug your iPhone into your computer and follow these next steps:
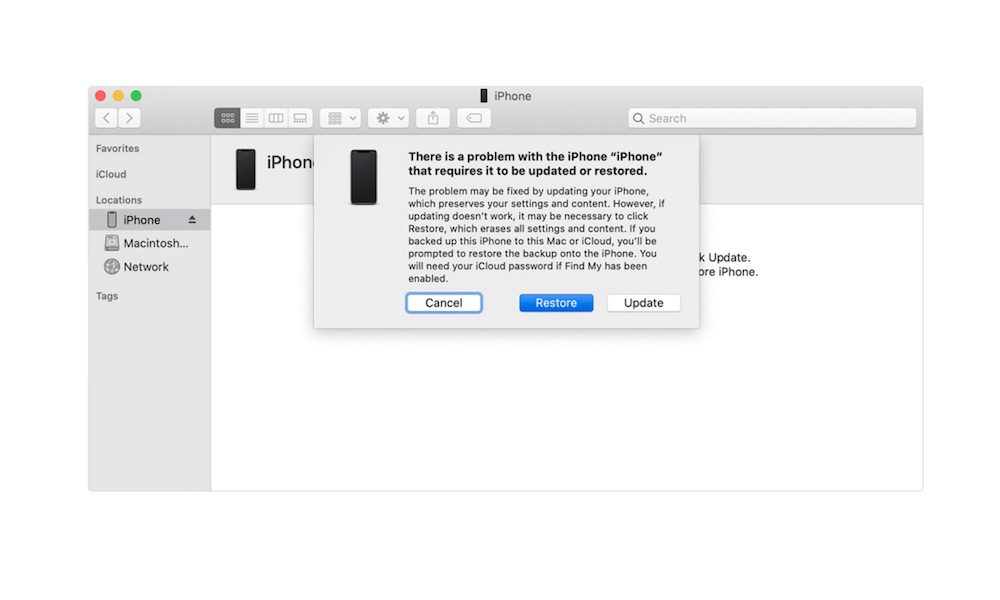
- If you’re running a Mac computer, you can open Finder and check on the sidebar to locate your iPhone. If you’re on a PC, use iTunes to locate your iPhone.
- Click on your iPhone’s name and you should see a pop-up window that says there’s a problem with your iPhone and you should either update it or restore it.
- Click on Restore and your computer will begin to restore your iPhone to its factory settings. You might have to wait a while, and your iPhone’s screen should be black with the Apple logo in the middle and a loading bar below it.
- Once it’s done, you can start setting up your iPhone again, and you’ll have iOS 13.6 on your iPhone again.
How to Get out of Recovery Mode
Let’s say you’re having second thoughts and you don’t want to downgrade your iPhone, but now you’re stuck on the Recovery Mode screen.
To get out of Recovery Mode, you just have to unplug your iPhone and repeat the same process that got you into Recovery Mode in the first place.
Meaning, for iPhone 6s and 6s Plus, unplug your iPhone and press and hold the Home button and Power button at the same time. For the iPhone 7 and 7 Plus, press and hold the Power button and volume down button, and for iPhone 8 and later models, press the volume up button, then the volume down button, and then press and hold the Power button.
Hold these buttons until your iPhone reboots itself and you’re back to the Home screen.


