
Everything You Need to Know About Apple’s Private Relay
 Jesse Hollington / iDrop News
Toggle Dark Mode
Apple’s been trying to improve its privacy settings with each software update we get, and iOS 15 wasn’t the exception. Ever since the 2021 WWDC, Apple revealed that it was going to change iCloud and bring a bunch of new features into the newly called iCloud+.
Among every new iCloud feature is a new privacy feature called Private Relay. Don’t get confused, Private Relay isn’t a VPN, but it does have some similarities. Here’s everything you need to know.

What’s iCloud Private Relay?
Apple’s Private Relay is a new security feature that Apple announced earlier this year exclusive to iCloud+. Keep in mind that if you have an iCloud subscription, your regular iCloud account is now iCloud+.
Private Relay lets you protect some information, like your IP address and your DNS records, from websites and companies, including Apple, to some extent.
For those of us who don’t know, a Coma Name System, or DNS for short, is basically a directory that your computer uses to connect with other DNS servers so that you can visit any website.
Apple is trying to protect that type of data with Private Relay, although it’s not doing it alone.
How Does Private Relay Work
As we mentioned, your data like DNS records and IP address can be seen and stored by your network provider and by the websites you visit. Companies can use this information to build you a digital profile.
Private Relay helps reduce the amount of information any company, including Apple, can learn about you. When iCloud Private Relay is on, your requests and information go through two different relays. Your network provider will be able to see your IP address and the first relay. Apple always operates this first relay.
Your DNS records, on the other hand, will go to the second relay. This data will be encrypted, and only a third party will be able to see this information. This third party will create a temporary IP address so that companies and websites will only be able to see your location in general terms.
For example, instead of saying you’re in California, your IP address might say you’re in the US. The third-party will then decrypt the website you want to enter and request to connect to that site. As of right now, Apple hasn’t specified who this third-party is.
So what is this for? Well, in a few words, Private Relay will ensure that not a single company or website is able to store all your information. Apple and your network provider will see your IP address while your DNS records will be encrypted so no one can see which websites you’re trying to visit.
What’s the Difference Between Private Relay and a VPN
At first glance, you might think that iCloud Private Relay is a Virtual Private Network (VPN) service, but that’s not exactly true. There are a couple of big differences between the two services that can help you tell them apart.

First and foremost, you can’t change your location with Private Relay. Private Relay will change your exact IP address to a more general one, so companies won’t know exactly where you are. On the other hand, a VPN lets you virtually change your location to basically anywhere in the world. That way, you can tell a website you’re in China while you’re sitting conformably on your couch in the US.
Another big difference is that iCloud Private Relay only works on Safari. You can hide your DNS records and your IP address as long as you’re browsing the web with Safari. If you like using a different browser, you’re basically out of luck.
A VPN service works basically on any app and browser. It changes your device’s location so you’ll be in a different place for every app you open, including Netflix and Safari. Google Chrome, you name it.
Overall, Private Relay is an extra layer of protection, but it’s nowhere near as complete as a Virtual Private Network. If you want even more protection, you can use both and try one of the best VPN services you can get for your money.
The Technical Problems With Private Relay
It’s worth noting that, at the time you’re reading this, Private Relay is still in beta, which means that it’s not working perfectly yet. Private Relay was actually down not long ago, and it took Apple quite some time to make it work again.
The other problems are related to the websites and your location. Since it’s fairly new, not every website supports Private Relay. Developers will need to update their websites, but in the meantime, sites might show content or information for the wrong regions.
To avoid these kinds of problems, you can manually turn on Private Relay on your iPhone, which we’ll talk about in just a moment.
Networks or network-based services might have the same problem. For example, suppose a network isn’t compatible with Private Relay, needs to have the ability to audit your traffic, or needs to view your browsing activity. In that case, you won’t be able to use Private Relay.
Finally, let’s discuss location. As of right now, not every country has access to Private Relay. If you live or travel to a country that doesn’t support this feature, Private Relay will stop working until it can be activated again.
How to Turn On iCloud Private Relay
As we mentioned before, you can turn Private Relay on or off as you wish. By default, it should be on once you update your iPhone to iOS 15 and if you’re paying for an iCloud subscription. However, if you want to turn it off or check if it’s already on, just follow these steps:
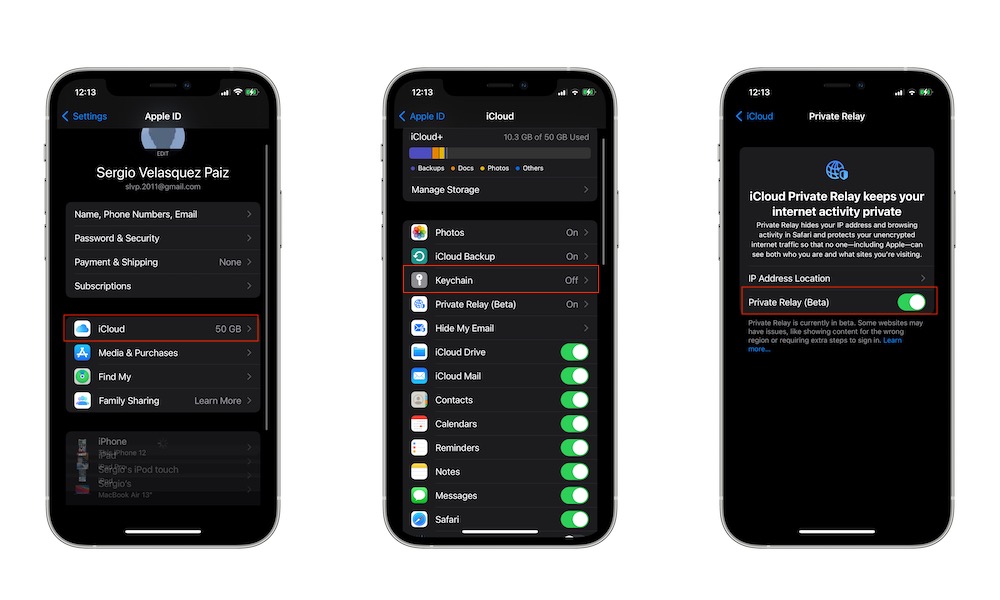
- Open the Settings app.
- Tap your Apple ID at the top of settings. Also, make sure you’re using the correct Apple ID account.
- Tap on iCloud.
- Select Private Relay.
- Toggle Private Relay on or off.
How to Change Your IP Address Location
Private Relay also lets you choose whether you want to show your general location or just want to use your country and time zone. This is meant to help you decide if you want websites to provide you with local content or if you just want to use your country and time zone.
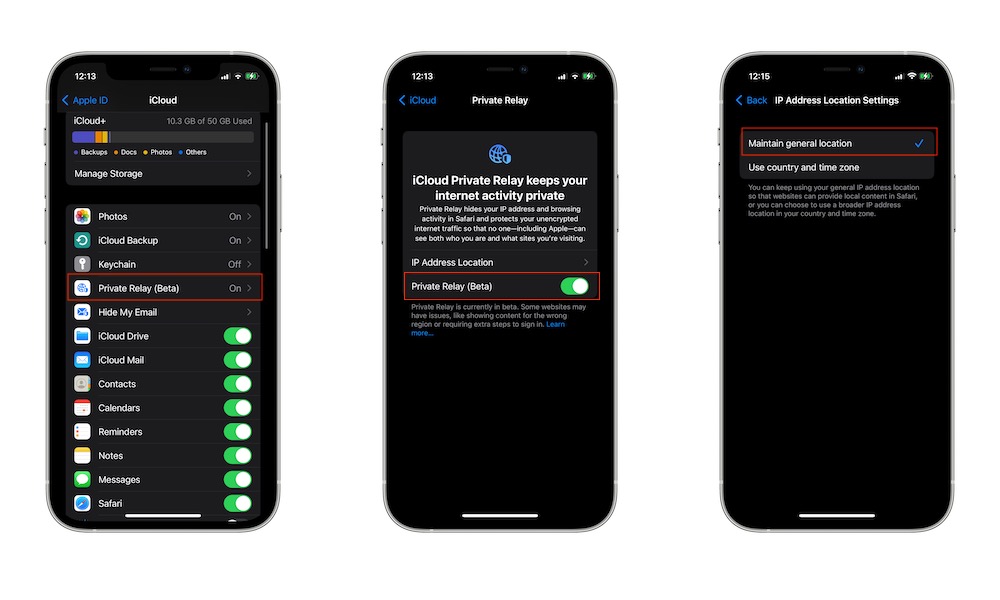
- Open Settings.
- Tap on your Apple ID.
- Tap iCloud.
- Tap on Private Relay.
- Select IP Address Location.
- Select Maintain general location or Use country and time zone.
You can change these settings whenever you want, so you can test and choose which option is best for you.


