
Apple Releases First Public Beta of macOS Big Sur — Here’s How to Get It
 Apple
Apple
Toggle Dark Mode
Apple’s public beta releases have been a bit more scattershot this time around as compared to previous years. The iOS 14 (and iPadOS 14) public betas arrived only two weeks after WWDC, accompanied but the relatively less exciting tvOS 14 public beta, yet a public beta of macOS Big Sur was nowhere to be found, nor was the anticipated watchOS 7 public beta.
While it only took two developer betas for iOS 14 and iPadOS 14 to be released to the public, Apple felt that its other operating systems needed a little more time in the oven before they were ready for a larger audience — something that’s especially true for watchOS, which hasn’t previously been available as a public beta at all, likely due to the inability to revert to an older version if something goes wrong with the beta.
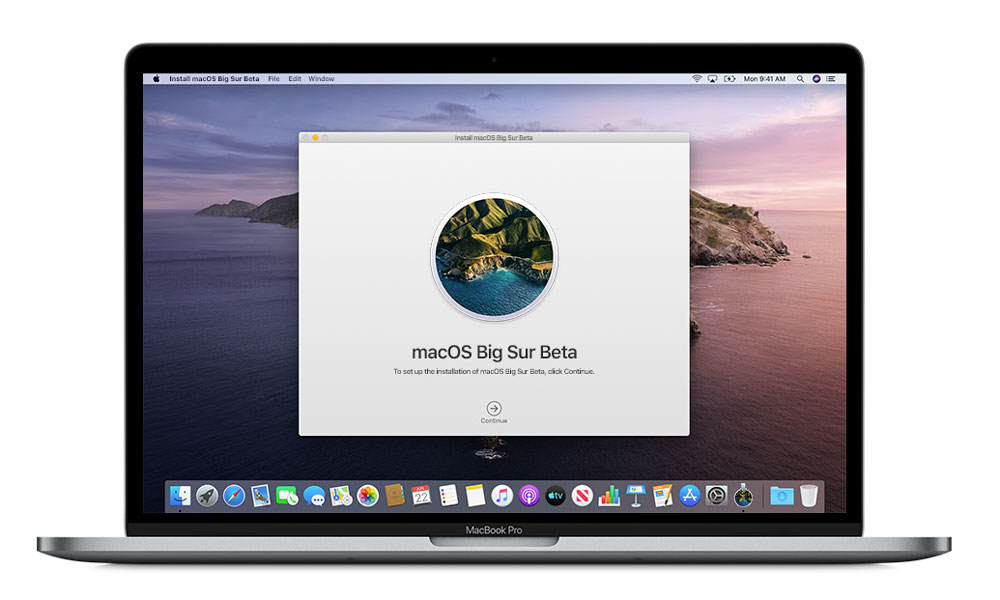
The good news, however, is that although watchOS 7 still remains in public beta limbo for now — it’s listed as “Coming Soon” on Apple’s Beta Software Program page — Apple has dropped the first public beta of macOS Big Sur, giving early adopters who have been champing at the bit an opportunity to try out Apple’s most significant Mac operating system update in years.
Big Sur Is a Big Deal
macOS 10.16 Big Sur brings the kind of massive visual overhaul to the Mac that we haven’t seen in an Apple operating system since iOS 7 completely redesigned the iPhone and iPad user interface back in 2013.
To be clear, unlike iOS it’s not the first time Apple has ever given macOS a fresh coat of paint, but it’s definitely been a while. Mac OS X Sierra did adopt some of the design cues of iOS 7 back in 2013, but only as a course correction from the skeuomorphic aspects of iOS that Mac OS X Lion had brought over in 2011. All in all, the evolution of macOS design has been far more iterative across major versions, with a gradual dialing back of the original glass, pinstripe, and brushed metal Aqua design, rather than a wholesale rip-and-replace — at least until now.
With Big Sur, Apple has ripped the bandaids off entirely, going all-in on a user interface that feels much more like a direct reflection of iPadOS on the Mac — and why not? As Apple moves to Macs that will be based on the same Apple Silicon as its iPhone and iPad devices, it arguably stands to reason that these Macs should come closer to the iPad in other ways as well — especially since these days many more users come to the Mac from the iPhone than the other way around, making familiarity and consistency all the more important across Apple’s platforms.
What Else Is New?
Of course, there’s a lot more to macOS Big Sur than just a massive new coat of paint, and it brings over a lot of the other aspects of the iPadOS user experience too.
For example, there’s now a dedicated Control Center that’s almost identical in conceptual design to the one found on the iPad, although the layout differs a bit to account for the Mac’s entirely pointer-based UI and additional screen real estate. Notification Center has also similarly been cleaned up.
On the other hand, Safari goes beyond what we’ve seen on the iPad, now offering a customized start page and the ability to set a background image — things that it’s clearly borrowed from Chrome and other browsers. Meanwhile, Messages finally gets feature parity with its iOS/iPadOS counterpart, allowing you to do things like send and receive message effects.
How Do I Get It?
Firstly, the usual word of warning applies here: This is a beta, so a lot of things may not work the way you expect. Even more so than on iOS, where everything comes from the App Store, there’s a good chance that some of the third-party apps you rely on may simply not work on Big Sur until they’re updated by their developers, which likely won’t happen until closer to the public release.
Despite the public beta program, Apple specifically recommends against installing the macOS Big Sur Public Beta on your main Mac for exactly these reasons. Of course, you can always go back to Catalina, but that will involve the time-consuming process of wiping your Mac, reinstalling everything from scratch, and then restoring from a backup.
That said, if you have a secondary Mac, or you just really really like to live dangerously, you can now get the macOS Big Sur Public beta by following the steps below:
- Login into Apple’s Beta Sofware Program site.
- Go to the instructions for enrolling your Mac.
- Make a backup of your Mac using Time Machine or your other backup software of choice.
- Download and install the macOS Public Beta Access Utility.
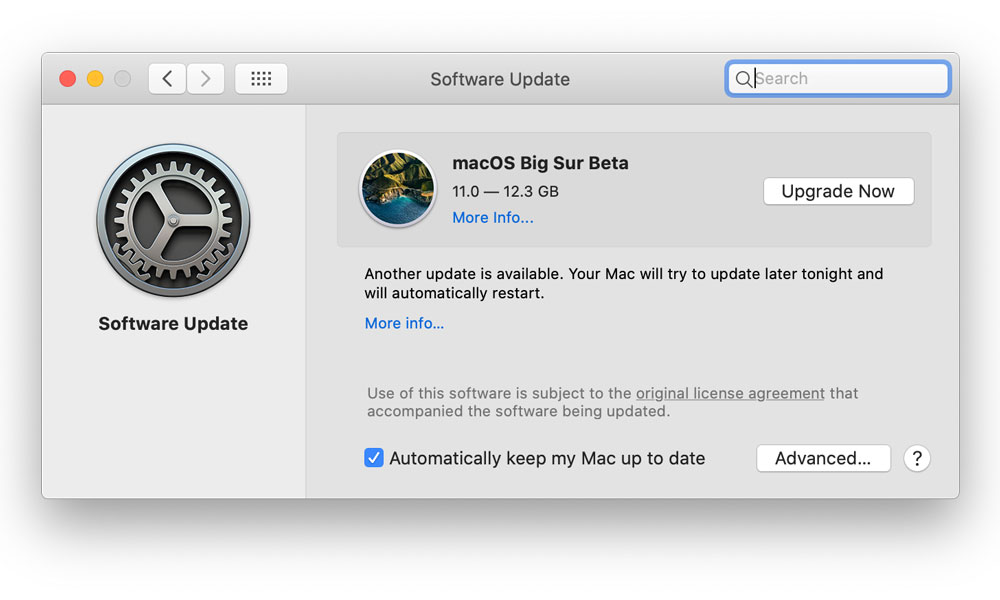
- Open System Preferences.
- Select Software Update.
- The macOS Big Sur Public Beta should appear as an available update.
- Click Download to begin downloading and installing the public beta.
If you’re running macOS High Sierra or earlier, the process is a little bit different, as you’ll need to go to the Mac App Store to find the Big Sur beta, rather than software update.
If you have an older Mac you want to try out Big Sur on, however, keep in mind that not all Macs are going to be compatible with this latest version. As a rule of thumb, you’ll need a Mac from 2013 or later, specifically:
- 2015 or later MacBook (12-inch)
- 2013 or later MacBook Air
- Late 2013 or later MacBook Pro
- 2014 or later iMac
- 2014 or 2018 Mac mini
- 2017 iMac Pro
- 2013 or 2019 Mac Pro
Big Sur drops support for several Macs that were otherwise capable of running macOS Catalina, including all 2012 Macs and the early 2013 MacBook Pro and 2013 iMac.
Installing Big Sur on a Separate Partition
If you don’t have an extra Mac and you still want to try out Big Sur, it’s also possible to install it on a separate partition, assuming of course you have the disk space available to do so. This will allow you to dual-boot between the Big Sur public beta and your current version of macOS without putting any of your apps or data at risk. It’s a nice option that simply isn’t available for iPhone and iPad users, where running a beta is much more of an all-or-nothing affair.
While Apple doesn’t provide detailed instructions on how to do this, it’s really the same as installing any version of macOS on a secondary partition — you simply need to create the partition first, and then when you download and begin the installation for Big Sur, you’ll be able to choose to install it on that new partition rather than over your current macOS version.
Here’s how to set this up:
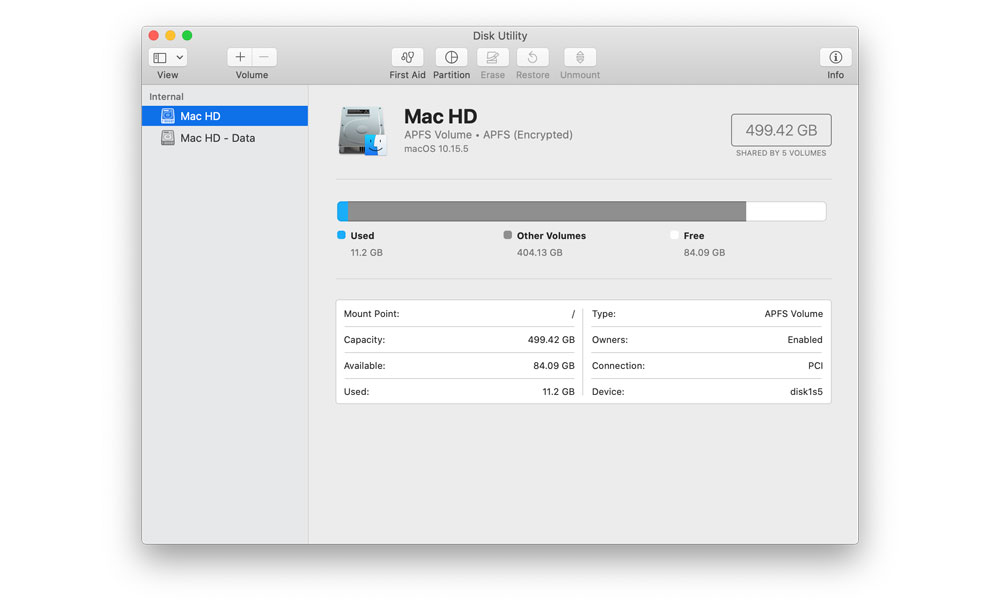
- Open Disk Utility from Applications->Utilities
- Select your main partition from the left side of the Disk Utility window.
- If the partition is listed as an “APFS Volume” (which is should be if you’re using macOS High Sierra or later), click the plus button in the top-left corner to make a new volume. It’s not necessary to specify a size for APFS volumes, as storage is allocated dynamically, although clicking “Size Options” will let you specify a minimum amount of space to reserve for the new volume.
- If the partition is listed as “Mac OS Extended” instead, you’ll need to click the “Partition” button at the top of the disk utility window, and then specifically allocate space for it — we’d suggest at least 20–30GB.
- Follow the same instructions listed above to install the Big Sur Public Beta. During the install process, you should be given a choice as to which partition to install it on, and you can choose the new volume or partition you just created instead of your main one.
Once you’ve installed macOS Big Sur on a secondary partition, you can easily switch between it and your primarily macOS operating system simply by rebooting and holding down the OPT key during startup. This will let you play with Big Sur while still being able to return to your known and stable version of macOS when you actually need to rely on your Mac to do real work.


