
You Can Change the Look of Your AirTag’s Precision Finding Screen Using This Secret Debug Mode (Here’s How)

Toggle Dark Mode
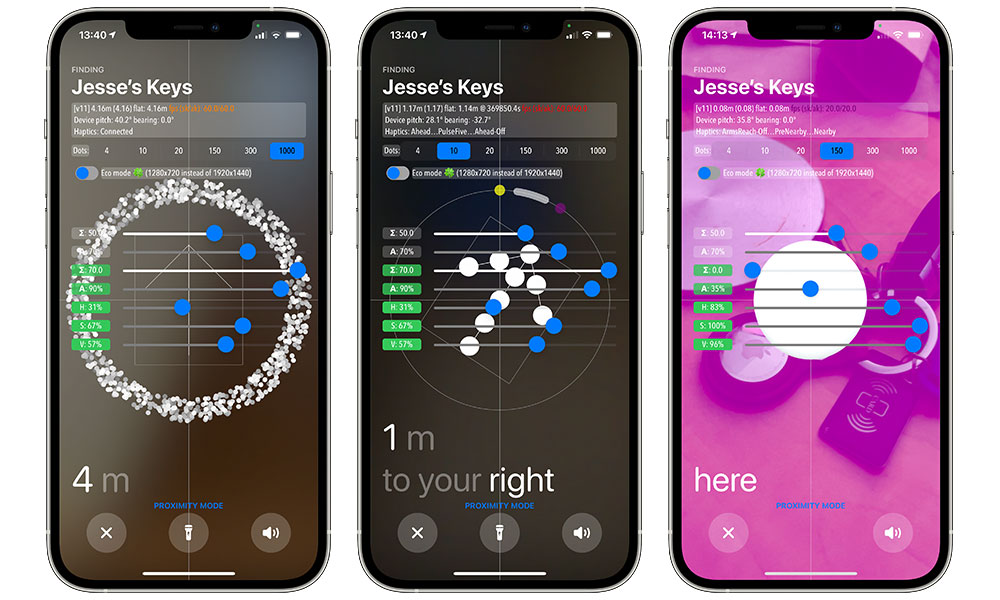
One of the unique features that sets Apple’s AirTag apart from other item trackers is the new Precision Finding mode that’s powered by the U1 chip in the iPhone 11 and iPhone 12. This allows you to not only get a general location for where your AirTag is located, but to actually zone in on its exact location in a room, whether it’s sitting on the coffee table or buried under a couch cushion.
Now it looks like there may be more to the Precision Finding mode than we first expected, with a Reddit user stumbling across a hidden debug mode buried in Apple’s Find My app.
As Reddit user u/cyem explains, they came across the hidden debug mode in a moment of frustration after encountering an AirTag that was failing to pair and show up in Precision Finding.
Funnily enough, I tapped on my name about five times in frustration, and found what appears to be a hidden developer mode. Even more interesting, the arrow appears to actually be working underneath — just not in the normal mode.
u/cyem, Reddit
While the debug mode doesn’t necessarily add any new functionality, it does provide some interesting insight into how Precision Finding works, displaying details such as device pitch and bearing, as well as the status of haptics internal designation for other aspects of the tracking.
There’s also an “Eco mode” toggle, complete with a leaf emoji, that presumably saves power by using a lower camera resolution — “1280×720 instead of 1920×1440.” It’s also possible to specify the number of dots that are included in the circular halo that appears while zeroing in on your item.
How to Access Hidden AirTag Debugging Mode
Here’s how to access the hidden Precision Tracking debug mode:
- Open the Find My app on an iPhone 11 or iPhone 12.
- At the bottom of the screen, tap Items.
- Tap one of the AirTags on your list.
- Tap Find.
- When the Precision Finding screen appears, tap the name of the item five times.
The debug mode appears to be persistent once it’s been enabled, so if you don’t want to see it anymore you’ll need to repeat the above steps to turn it off.
What’s interesting is that this isn’t just a static information mode either. A series of seven sliders also allow you to adjust various aspects, and when the directional arrow appears you can even grab a pair of “handles” on the circle to force it to turn in any direction you want, although it will snap back to the actual bearing of the AirTag as soon as you release it.
However, you can also tap on the “Proximity Mode” text at the bottom to switch into “Interactive Mode” to simulate a nearby AirTag, whether it’s in proximity or not.
In this mode, the arrow will remain pointed in whatever direction you drag it to, and you can drag your finger around the screen to simulate the distance between your iPhone and the imaginary AirTag. Two additional switches also appear to “Ignore bearing in gestures” and “Auto-test UI.”
The actual sliders are a bit more cryptic, however, as they’re labelled only with single-letter identifiers. Most show as percentages, however the two that are prefixed with the Greek Sigma symbol combined only run from 0 to 10 and 0–100 with a single decimal place. The others are labelled with A, H, S, and V.
While you may think that these are used to tweak various aspects of the UWB location settings, it turns out that they’re both more useful and less technical at the same time.
Changing Background Colour
The bottom four sliders, labelled A, H, S, and V, actually combine to determine what the background looks like once you actually get close enough to your AirTag.
The first among these, slider A, determines the percentage opacity of the background. The default setting is 90%, but lowering it to zero will show more of the background camera image and less of the background colour.
The remaining three actually let you adjust the colour of the background, using Hue (H), Saturation (S), and Brightness (V). So if you don’t like the default green, you can opt for a more vibrant fuchsia, or a more dull grey, or just about anything else. Or, using the “A” slider you can turn the opacity down to zero and just keep the camera view live.
Adjusting the Camera View
Speaking of the camera view, the top sliders allow you to adjust the camera blur and overlay opacity (effectively, the reverse brightness), so you can crank these down if you want to get a clearer picture through the camera when searching for your AirTag.
The third slider is a bit more unusual, as it defaults to 70.0, yet when you move it the scale it only works between 0.0 and 1.0 — something that’s likely a bug. It appears to adjust the camera blue when you’re in close proximity to an AirTag. In other words, if you dial down the fourth “A” slider to lower the opacity of the coloured background, you can then slide down the third slider to unblur the camera view. However, because of the oddity with how this slider is scaled, the blur basically turns off, and then you can’t adjust it back upward as the slider stops at 1.0.
Technically speaking, the first four sliders are actually two pairs, with the first two affecting blur and opacity when farther away from your AirTag, and the second two adjusting blur and opacity when in closer proximity.
These settings also appear to persist even if you toggle off debug mode, so they’re actually pretty handy, since if you don’t like the default colours or camera views, you can change them to your own preferences.
Further, if you want to return to the defaults, you can simply tap on the labels to the left of each slider, and it will instantly pop back to its original value.


