
New iPhone User? Here’s How to Make Sure Everything Is Private and Secure
 Hadrian / Shutterstock
Toggle Dark Mode
If it’s your first time using a new iPhone you may also be wondering exactly what’s going on under the hood when it comes to things like location tracking and always being connected to the internet.
The good news is that unlike most competing smartphone platforms, Apple goes to great lengths to protect your privacy right out of the box; by default things like location tracking are basically locked down, and each app has to explicitly ask for your permission before it can even access this data, much less share it with anybody else.
The same also applies to accessing data between apps. Everything runs in its own partitioned off “sandbox” which means that apps can’t access each other’s data except by using specific “doorways” that Apple has built into the iPhone that allow for things like photo sharing. These doorways are policed by the iPhone’s operating system, and nothing is allowed through unless you — the user — explicitly authorize it.
For example, this means that if you install something like Facebook, Instagram, or Twitter, those apps won’t have any access at all to your photos by default. Instead, the first time you try to upload a photo to one of those social media networks, it will have to ask for your permission to access your photos.
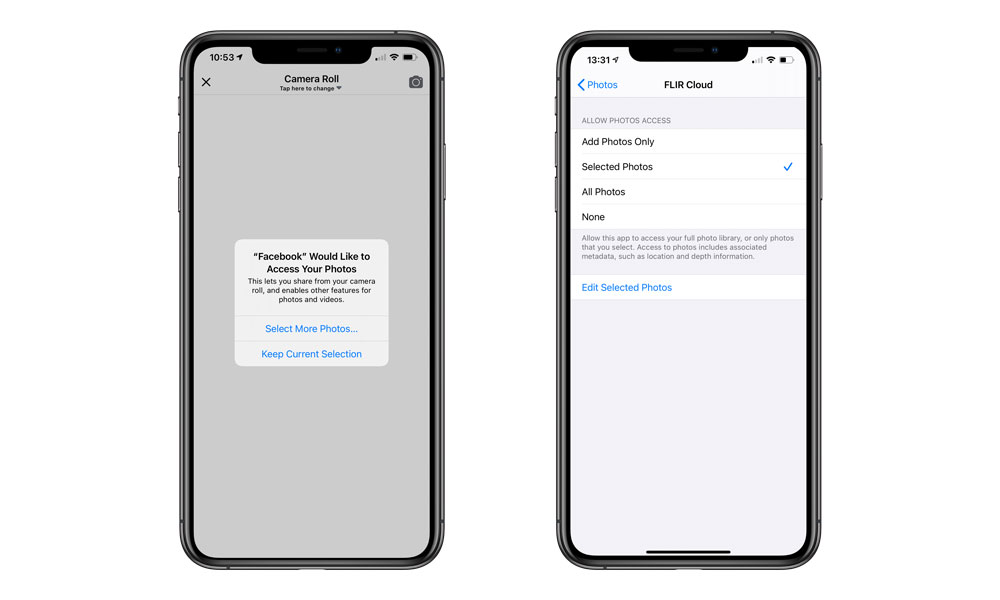
With iOS 14, which comes preinstalled on all new iPhones, you can even choose to only give an app access to specific photos from your camera library, rather than giving it “carte blanche” access to everything. While most apps won’t try and access your photos without your consent, this is a handy security feature whenever you’re uncertain.
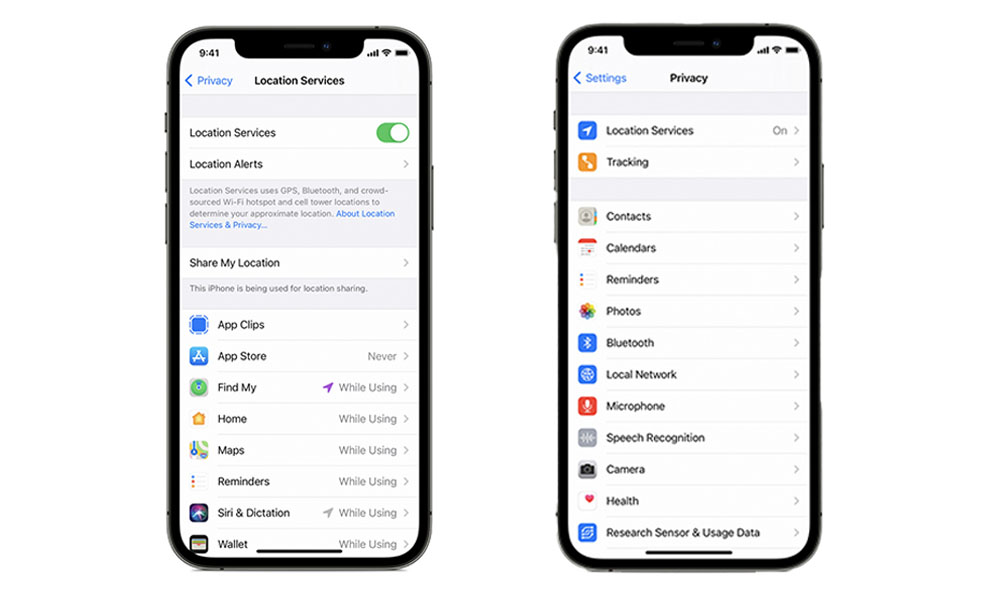
While each app will have to prompt you the first time that it requests access to things like photos, camera, contacts, or calendar, if you change your mind later, or simply want to check what permissions you gave, you can simply go into your iPhone’s Settings app:
- Open the Settings app from your iPhone’s home screen.
- Scroll down to Privacy.
- Tap on the category you want to check (e.g. Photos).
- The list will show all the apps that have requested access to that category of information, and what the access is.
- Tap on an individual app to change the privacy access level.
Location Privacy
Much like restrictions on things like photos and contacts, apps aren’t allowed to use your location without your explicit permission either. The nature of location access, however, means that there are a few things to be aware of here.
Firstly, you have a choice as to when and how often apps can use your location. For example, you may only want to allow an app to use your location as a one-off thing to help enter your current address, such as for food delivery services and ride-hailing apps.
On the other hand, navigation apps that need to send you alerts in the background may need to access your location even when the app isn’t running.
As a result, your iPhone gives you the choice between the following four options for locations access:
- Never: The app cannot use your location under any circumstances, nor will it ask to use your location.
- Allow Once / Ask Next Time: The app will never use your location without your express permission, but it’s still allowed to ask each time it wants to.
- While Using the App: The app can use your location whenever it’s open and running on your screen, without explicitly notifying you that it’s doing so, however it can no longer check your location once you’ve closed it.
- Always: The app will always be able to use your location, even when it’s running entirely in the background on your iPhone.
With iOS 14, you can also now decide whether apps are allowed to use your “precise” location or simply a more general location that identifies your larger neighbourhood. For example, many weather, news and “deals” apps don’t need to know exactly where you are to provide you with relevant information on what’s happening in your area, so turning this off can be a great way to protect your privacy.
Every app needs to ask for location access before it can get this information at all, but once you’ve responded to that prompt, you may need to visit your iPhone’s Privacy Settings to change this option. Here’s how:
- Open the Settings app from your iPhone home screen.
- Scroll down to Privacy.
- Tap on Location Services at the top.
- The list will show all the apps that have requested access to your location and what level of access they have.
- Tap on an individual app.
- With most apps, you’ll see an explanation as to why the app needs location access. This can help you to understand what permissions you may want to grant.
- To change the location privacy access level for that app, simply tap a different option, such as “Never” to disable location access entirely.
- If you only want to provide an app with a more general location, tap “Precise location” to switch that option off.
From the list shown in step 4, you may also see small compass-like arrow icons beside some apps. These indicate which apps are using your location or have recently done so. A grey arrow is shown beside any app that’s requested your location in the past 24 hours, while a filled-in purple arrow is used for apps that are currently tracking your location or have very recently used it.
You may also see a hollowed-out purple arrow, which is a bit of a special case. This generally indicates that the app has asked your iPhone to notify it of your location under certain conditions; it’s a feature commonly known as “geofencing” that’s often used by apps that you set up to notify you when you arrive at, or depart from, a specific location.
If you want to go completely “off the grid” you can also simply toggle Location Services off entirely:
- Open the Settings app from your iPhone home screen.
- Scroll down to Privacy.
- Tap on Location Services at the top.
- Tap on the switch beside Location Services at the top of the screen.
- Tap “Turn Off” to confirm.
This is the “nuclear option” that disables ALL location tracking on your iPhone, including helpful things done by Apple’s own apps such as safety features like locating your lost iPhone; the only exception is that your iPhone will temporarily enable location services to broadcast your location when using the Emergency SOS feature, since it logically assumes that you actually want first responders to know where you are in that case.
Find My
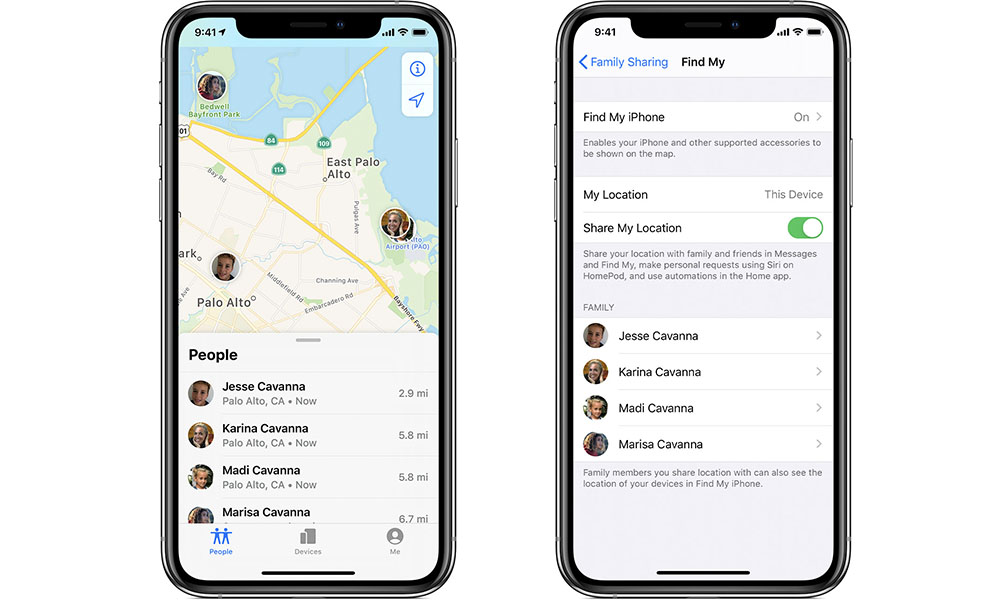
Apple’s iPhones also include a really handy “Find My” feature that will help you locate your device should you lose or misplace it, but it’s also important to keep in mind that if you’re part of a Family Sharing group, other members of your family may also be able to see your device’s location.
This is normally off by default — you still have to share your location explicitly — but here’s how to check this and enable it if you’d like to be able to keep in touch with friends and family:
- Open the Find My app on your iPhone.
- Tap on the “Me” tab in the bottom right.
- Tap the switch beside Share My Location to globally enable or disable this feature. Note that if you have a HomePod that you want to use for Personal Requests you’ll need to leave this one.
- If you’re leaving “Share My Location” on, then tap on “People” in the bottom left to control who you want to share your location with.
- Tap on the name of a family member.
- Scroll down to the options at the bottom.
- Tap Stop Sharing My Location to disable sharing with that family member; if the option says Share My Location instead, then you’re not yet sharing your location with that person, although you can use this option if you’d like to do so.
You may also notice that there’s a “Devices” tap in the middle in the Find My app which can be used to locate your devices and those belonging to other family members. However, this is also controlled by the per-person sharing options noted above, so if a person isn’t sharing their location with you, then you won’t be able to locate their individual devices either.
App Privacy Labels
On top of this, Apple has introduced a new feature to the App Store known as “App Privacy Labels.” These work for iPhone and iPad apps in much the same way as nutrition labels do for food.
This means that when you’re thinking of downloading an app from the App Store, you can now see at a glance what sort of information the developer might be collecting on you, and decide whether you’re okay with that or not.
Of course, Apple won’t prevent you from downloading any apps based on these labels any more than your local Walgreens will stop you from going through the checkout with fifteen boxes of fudgemallows, but at least you’ll be aware of the digital health risks of certain apps.
Here’s how to find the App Privacy label for an app:
- Open the App Store app on your iPhone or iPad.
- Search or browse for the app in question.
- Scroll down past the app description and ratings to find the App Privacy section.
- Tap “See Details” to get the full rundown on that app.
Note that not all apps have an App Privacy Label just yet, as Apple only started mandating it for developers late last year, but all new app updates that are submitted to the App Store are required to feature these labels, so they should start appearing soon for all but the most out-of-date apps.
Apple has even added the App Privacy Labels to its own apps that you’ll find preinstalled on your iPhone — you can find these apps on the App Store even though they’re already installed and read the privacy details there. For those apps like Camera that can’t be removed from your iPhone and therefore don’t have App Store pages, Apple has published the details in a support document.
A Full Lockdown
Apple has also recently shared a new guide on how to really lock things down, intended to provide advice for users whose personal safety may be at risk.
It’s a comprehensive 20-page guide that’s intended to tell you everything you wanted to know — and more — about how to go through a full privacy and security checkup on your iPhone, and it’s definitely recommended reading even if you’re not concerned about being spied on or stalked.
The guide covers all the privacy settings we’ve already mentioned above in much greater detail, while also providing tips on securing your iPhone with Touch ID or Face ID and how to delete unknown third-party apps and other data that could have been snuck onto your device for tracking purposes.


