
How to Scroll Properly on Your Siri Remote and 5 More Tips for Getting the Most of Your New Apple TV 4K
 Apple
Apple
Toggle Dark Mode
Although Apple’s long-awaited refresh to its Apple TV set-top box may seem like a minor refresh at first glance, we’ve already discovered some game-changing new features tucked away inside — many of which Apple was surprisingly quiet about when they unveiled the new device last month.
So, needless to say there’s a lot more to the 2021 Apple TV 4K than you may have initially expected. It obviously packs in better performance thanks to the new A12 Bionic chip inside, plus Apple was quick to tout support for “high-frame rate” 60fps Dolby Vision and HDR video.
Then of course the new second-generation Siri Remote, which replaced the controversial edge-to-edge touchpad with a new combination set of d-pad and touch-sensitive controls that offers a much better user experience, plus a sturdier aluminum design and new mute and power buttons.
Not all of this is as intuitive as it arguably should be, however, so if you’ve just gotten a new Apple TV 4K, or you’re thinking about getting one, here are a few tips for getting the most out of your new home entertainment device.
Scrolling on the New Siri Remote
Personally, I wasn’t nearly as opposed to the old Siri Remote as many other folks were, but I also can’t argue for even a moment that the new one is a massive improvement in everything but pure aesthetics — the old one may have looked nicer, but the new one is far better in every other possible way.
Apple’s industrial designs have become legendary, but only because more often than not they strike the perfect balance between form and function. Unfortunately, however, the first-generation Siri Remote was clearly an example of one of Apple’s rare but infamous missteps where it went too far.
The new Siri Remote brings back the proper design balance of combining “how it works” with “how it looks,” and arguably the best part of the new experience is the big circle at the top, which allows you to interact with your Apple TV content in several ways.
Firstly, you can still swipe around just like you could on the old Apple TV remote, but if you find that too imprecise, the clickpad allows for more tactile and intuitive four-way navigation.
Unfortunately, the coolest feature that Apple talked about — the ability to run your finger around the clicked as an iPod-style click wheel to scrub through a video — has turned out to be the most confusing because of the way it’s been implemented.
It turns out that accessing this feature isn’t as simple as just sliding your finger around the outer rim. Doing this will result in odd behaviour where the scrubbing bar in whatever you’re watching will jump back and forth.
Instead, you have to rest your finger on the clickpad for about a second to let the Siri Remote know that you intend to shift into click wheel navigation mode.
One of the first folks to figure this out and report it was Chris Welch of The Verge, who clearly jumped through more than a few hoops before he realized what was going on, including factory resetting his Apple TV 4K.
But I must confess something: I had an embarrassing few hours where I couldn’t figure out how to make this work. Eventually, I learned the trick: after pausing a video, you’ve got to rest your finger on the D-pad momentarily before you start circling around it. An animation will pop up in the progress bar (with a little dot that indicates where your finger is) to let you know you’re in jogwheel mode. If you just pause the video and immediately start the circular movement, it doesn’t do the right thing. Don’t be like me and unnecessarily factory reset your Apple TV 4K because of this.
Chris Welch, The Verge
Since the clickpad also forms part of the normal swipe-based touchpad surface, it’s somewhat understandable why this works the way it does. Without switching into the click wheel-like mode, movements around the circular d-pad are interpreted as directional changes — up, down, left, and right — rather than scrolling.
However, it’s still more confusing than it needs to be, and we’re hoping Apple fixes it somehow in a future software update, so it’s a bit more accessible and intuitive — or in the very least provides some getting started tips, so users aren’t left guessing as to why it’s not working as expected.
To be fair, Apple has updated the Apple TV user guide with more detailed instructions, but of course, most people don’t bother to read manuals.
Swipe left or right to scrub backward or forward in time. For more precise control, rest your finger on the outer edge of the clickpad ring until a ring icon appears onscreen, then circle your finger counterclockwise or clockwise around the clickpad ring.
Fast Forward and Rewind
The new clickpad naturally offers more precise control over the skip-forward and skip-back options. While these were available on the original Siri Remote, you had to make sure you were pressing the very edge of the touchpad to avoid doing something else, like pausing the video.
With the new Siri Remote, they’re now handled by the left and right clickpad buttons, so there’s basically no room for error.
However, this was so finicky with the original Siri Remote that you may not even realize that it’s long been possible to rewind and fast-forward in a more traditional manner. This was done by holding down one side of the touchpad on the Siri Remote instead of just clicking once, so the same applied to the clickpad.
To enter continuous rewind or fast-forward mode, press and hold on the left or right side of the clickpad ring. This will start in 2X mode, but you can increase the tracking speed by clicking again to cycle through 2X, 3X, and 4X speeds.
Turn off the Touch Pad Entirely
Now that Apple has added the clickpad to provide button-based navigation, those who find the touchpad to be more distracting than useful can now disable it entirely. Here’s how:
- Open the Settings app on your Apple TV.
- Select Remotes and Devices.
- Select Clickpad.
- Choose Click Only.
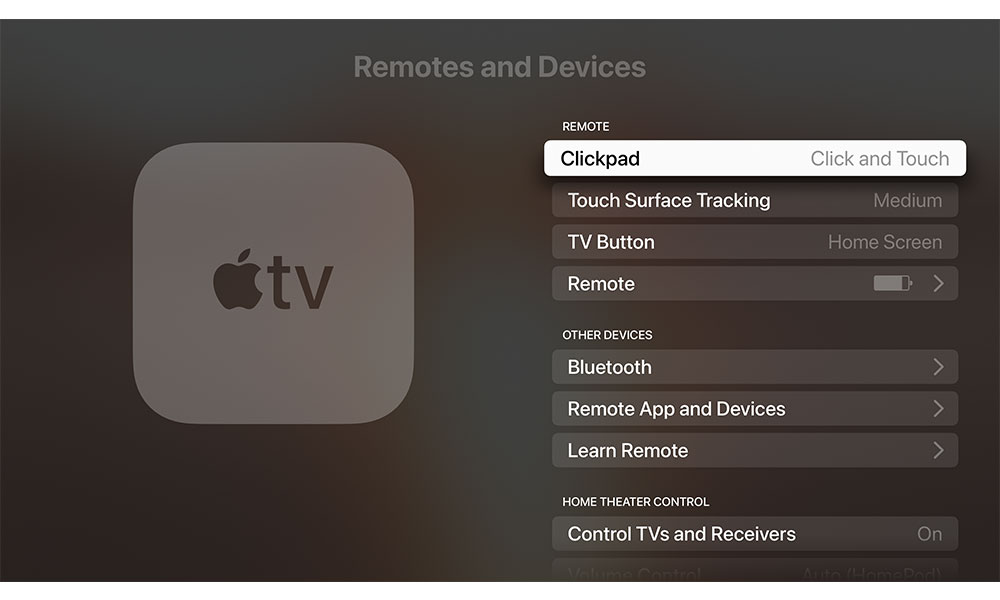
This mode will disable all touch and swipe gestures on the new Siri Remote entirely, including the aforementioned clickpad scrolling mode. Instead, all navigation will be handled by pressing up, down, left, and right, and pressing the centre button to make selections.
Use Your HomePods as Default Speakers
This is actually a feature that was introduced in tvOS 14.2 last fall, but it’s even more useful on the new 2021 Apple TV 4K thanks to support for eARC (more on that in a moment).
While you’ve been able to use any AirPlay 2 compatible speakers — including a HomePod and HomePod mini — with an Apple TV for years, this required manually selecting the speaker(s) as AirPlay destinations in the Settings or in the Control Center. With tvOS 14.2 or later on an Apple TV 4K, you can now set a HomePod — or a stereo pair of HomePods — to act as your default speakers.
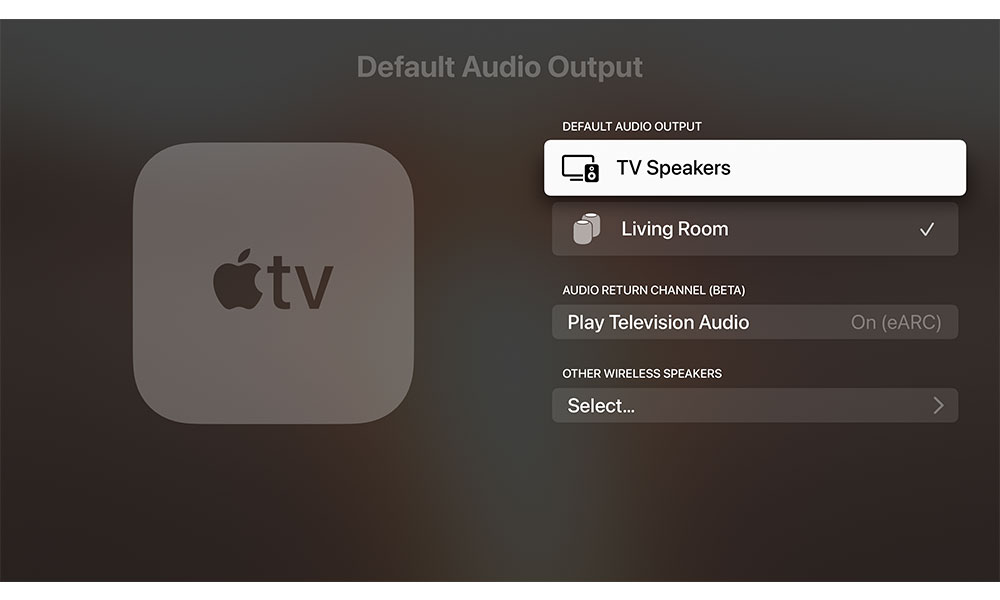
If you have a HomePod assigned to the same room as your Apple TV in the Home app, you should be prompted to do this during the initial setup process. If that doesn’t happen, however, or if you add a HomePod later, here’s how to set it up manually:
- Open the Settings app on your Apple TV.
- Select Video and Audio.
- Select Default Audio Output.
- From the list of speakers, choose your HomePod(s).
Note that this only works with the original, full-size (and now discontinued) HomePod, and it’s only supported on the 2017 and 2021 Apple TV 4K, not the 2015 Apple TV HD.
What’s particularly cool about this, however, is that when Apple says Default Audio Output, it means it. Your HomePod(s) will be used for every bit of audio that emanates from your Apple TV, replacing the wired HDMI audio output. In fact, if you look at the Control Centre, you’ll see that the AirPlay icon doesn’t light up when using HomePods as your default speakers.
Further, when playing Dolby Atmos content on your Apple TV 4K, you’ll also get a full immersive home theatre experience, which is especially awesome if you’re using a stereo pair of HomePods.
Hear Audio from Other HDMI Devices via Your HomePods
As great as it was to use a pair of HomePods for watching content on your Apple TV, your other home entertainment devices like a smart TV, PlayStation, or DVD player couldn’t benefit from this — until now, that is.
The addition of ARC support on the latest 2021 Apple TV 4K is the piece of the puzzle that allows HomePod users to ditch their existing AV receiver, soundbar, or other speakers entirely, since it’s now possible for ALL HDMI audio to play back through the Apple TV — and by extension, though your HomePods.
The best part of this is that it just works — and it works brilliantly well, with no latency or sync problems. Of course, you’ll need an ARC or eARC port on your TV, and you may have to toggle it on in settings, but it’s a “set-once-and-forget” kind of setting. Here’s how to enable it:
- Make sure your Apple TV is connected to the HDMI ARC or eARC port on your TV. Most TVs only offer ARC/eARC on a single port.
- Open the Settings app on your Apple TV.
- Select Video and Audio.
- Select Default Audio Output.
- Make sure your HomePods are selected — for obvious reasons, ARC/eARC can’t be used with your TV speakers.
- Under Audio Return Channel (Beta), select Play Television Audio.
- Acknowledge the prompts by clicking OK to continue.
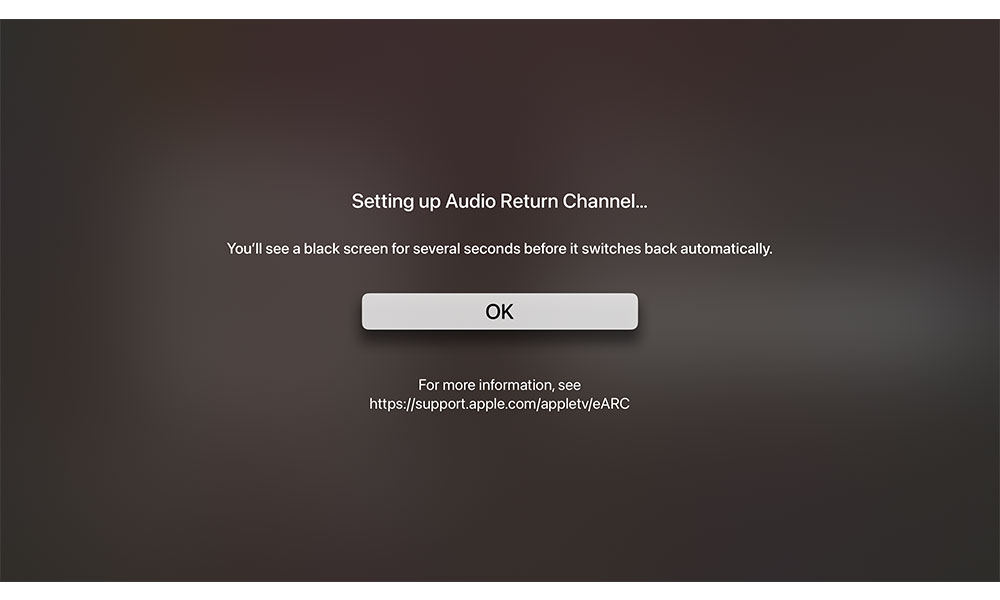
Once enabled, you’ll see either “On (ARC)” or “On (eARC)” beside Play Television Audio, depending on which one your TV supports.
ARC is the original Audio Return Channel standard that allows for audio to be played back through the Apple TV, however since its bandwidth is limited to older compressed multi-channel audio formats like Dolby Digital and DTS 5.1, eARC was developed to provide the bandwidth needed for features like Dolby Atmos.
Unfortunately, you’ll be limited to whatever kind of ARC port is found on your TV, but the good news is that even if you’re stuck with ARC, this won’t affect the playback of Dolby Atmos audio directly from your Apple TV, as this still streams directly to the HomePods and has nothing at all to do with ARC.
Play YouTube Videos in 4K 60fps
The new 2021 Apple TV 4K offers up another pleasant surprise: the YouTube app is ready out of the gate to support full HDR 4K 60fps playback.
While the new A12 Bionic processor is obviously the power behind this, we were delighted to see that YouTube’s tvOS app already supports it.
When Apple opened the doors for YouTube to enable 4K streaming on the Apple TV last fall, it not only took until October before it began rolling out, but it was also limited to 30fps, even though the 2017 Apple TV 4K did support SDR 4K video at 60fps.
However, it seems that the ability to handle 60fps HDR has been in the YouTube app for a while, since with the debut of the new 2021 Apple TV 4K, it pretty much just works.
Sadly, it remains exclusive to the new Apple TV 4K. The 2017 model is still limited to 30fps, even on SDR videos.


