
How to Make the Most of Accessibility Shortcuts on Your iPhone
 Apple
Apple
Toggle Dark Mode
One of the things that makes the iPhone stand out is its many accessibility features. Sure, you can find accessibility features in most devices nowadays, but the iPhone is packed with some amazing options that just don’t work as well on other devices.
The best part about them is that anyone can use them. Whether you need accessibility features to control your iPhone or you just want to make the most of some great features, all of us can make the most of our iPhones with these powerful features.

But if you don’t want to keep your accessibility features on at all times, you can use Accessibility Shortcuts instead, which will help you trigger any of these features at a moment’s notice.
Keep reading to get started with the Accessibility Shortcut and get a few tips on which features to try first.
What Is the iPhone’s Accessibility Shortcut?
As you can probably guess by its name, the Accessibility Shortcut is a helpful tool you can use to quickly trigger any accessibility feature you need.
With it, you can instantly open a specific accessibility feature or see a list to choose the one you need for whatever you’re doing at the time.
To use Accessibility Shortcuts, you’ll first need to enable the feature from your iPhone settings. Then, it’ll be as easy as triple-pressing the side button to trigger your shortcut. To make the accessibility feature disappear, you’ll need to triple-press the side button one more time.
How to Add Features to Your Accessibility Shortcut
As we mentioned, the first step to start using the Accessibility Shortcut is to add the features you want to access. Unfortunately, not every accessibility feature is available to add to your shortcut, but there are a handful of options that make it worth your while.
Here’s how to add features to your Accessibility Shortcut:
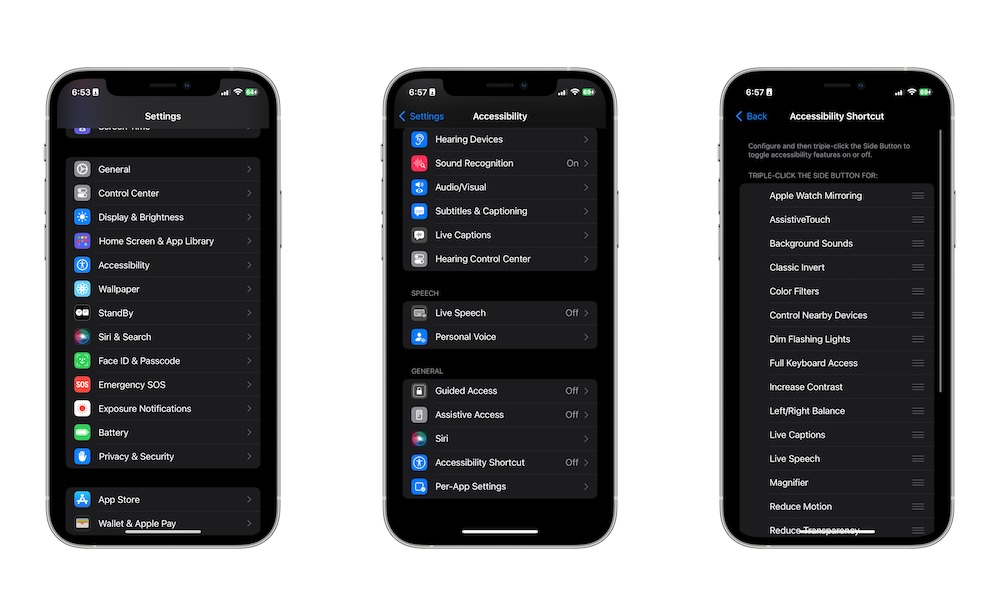
- Open the Settings app.
- Scroll down and tap on Accessibility.
- Scroll down to the bottom and select Accessibility Shortcut.
- Tap the feature you want to add to your shortcut. You’ll know you add them when you see a checkmark on the left side of their names.
And that’s it. You can add as many features as you want — if you really want to, you can add all of them.
How to Rearrange the Features in Your Accessibility Shortcut
If you only add one accessibility feature to your shortcut, triple-pressing the side button will automatically trigger that single feature.
However, you can also add two or more features, in which case you’ll see a pop-up menu showing you a list of all your shortcuts available.
Of course, this can get messy, which is why it is a good idea to rearrange your shortcuts, so you have your most used features at the top of the menu. Here’s how:
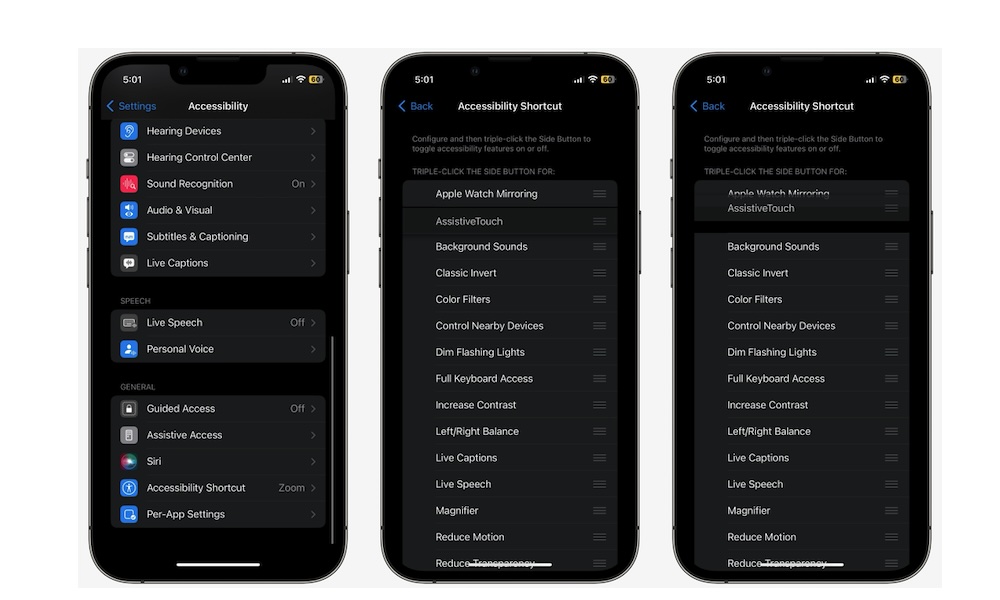
- Open the Settings app.
- Scroll down and tap on Accessibility.
- Scroll down to the bottom of the page and go to Accessibility Shortcut.
- Press and hold the three lines next to the shortcut’s name and then drag it up or down to move it on the list.
Recommended Features for Your Accessibility Shortcut
Now you know how to use the Accessibility Shortcut, and if you already use an accessibility feature, you probably know what you want to add to your shortcut.
But if you’re still trying to figure out which other features you can use, here are five recommendations to help you get started.
1. AssistiveTouch
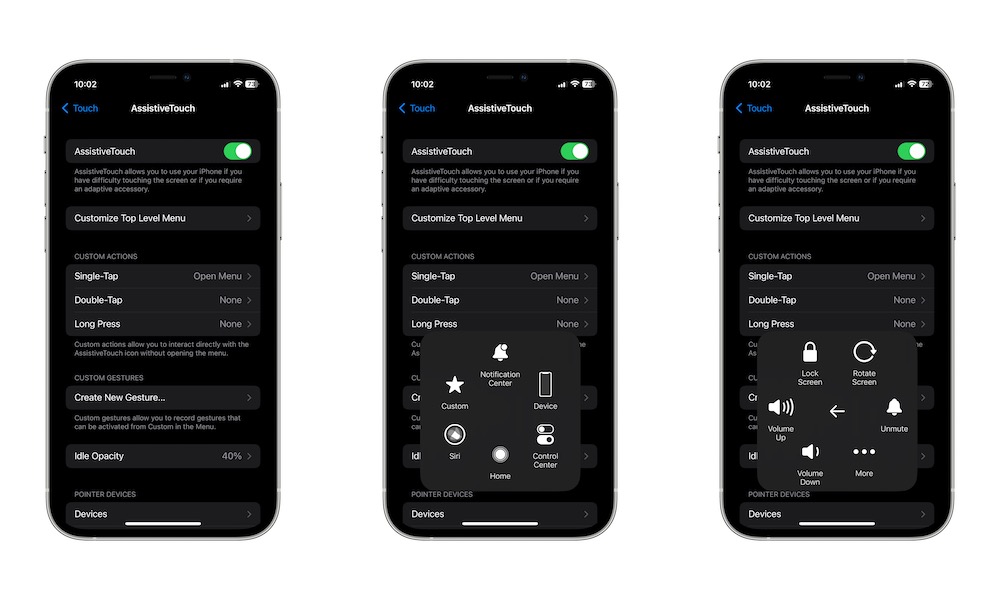
AssistiveTouch is a powerful feature that lets you have a digital menu with a bunch of quick actions you can access from your screen. With a single tap, you can access your notifications, take a screenshot, and so much more.
While using AssistiveTouch’s default layout is already pretty helpful, you can also customize it by going to Settings > Accessibility > Touch > AssistiveTouch > Customize Top Level Menu.
2. Magnifier
Magnifier is a cool accessibility app that lets you use your iPhone’s camera as a magnifying glass. It’ll help you see things more clearly, and if you really need it, it can even help you describe objects in front of you.
Besides enabling Magnifier in your Accessibility Shortcut, you’ll also need to ensure the Magnifier app is still installed on your iPhone. It comes preinstalled by default, but if you’ve removed it for some reason, you can re-download Magnifier from the App Store.
3. Live Captions

Whether you have hearing problems or you’re in a place where you can’t hear the other person’s voice in a FaceTime call, the Live Captions feature will be your best friend.
This feature automatically generates captions in real time of what the other person is saying. That way, you can read instead of listening to the other person in a video call. At the time of this writing, Live Captions is still in beta, so don’t expect this feature to be perfect.
5. Zoom
This feature’s name explains everything you need to know. When you trigger it, your iPhone will automatically zoom in on anything on your screen, which is perfect for reading an article when you don’t have your glasses on or the font is just too small.
6. Speak Screen
If you’d prefer listening to an article instead of reading it, you can use Speak Screen. When you trigger this accessibility feature, your iPhone will start to read everything that’s on your screen out loud.
Granted, your iPhone’s robotic voice isn’t that compelling at first, but you’ll get used to it. And it’ll be a great way to “read” an important file on your way to school or work.
Make the Most of Accessibility Features
The iPhone’s accessibility features are the best, making it possible for everyone to enjoy what an iPhone has to offer.
And to make it even better, the Accessibility Shortcut puts some of the most useful and important accessibility features at your disposal when you actually need them.
Whether you need help controlling your iPhone or just want to make the most of these features, be sure to use your accessibility shortcuts to make your life easier.


