
Tips and Tricks to Get the Most out of the New Widgets in iOS 14
 Jesse Hollington
Toggle Dark Mode
For many iPhone users, the greatest new feature to come to an iOS update in years is the addition of home screen widgets, which promises to offer a whole new level of versatility and customization to the iPhone experience.
It’s undoubtedly something that a lot of iPhone users have been looking over to their Android counterparts with some sense of envy, and to be fair it really does seem to fit into the “what-took-Apple-so-long?” category, but regardless of the reasons, the feature is now here, and it’s been done in such a way as to offer a fair bit of flexibility for the advanced user without getting in the way of the iPhone experience that many users are already comfortable with.
First and foremost is the fact that you don’t really have to use widgets. If you’re somebody who just likes rows of icons on your home screen, and doesn’t want other information cluttering things up, you can safely ignore the new feature and just keep calm and carry on using your iPhone as you always have.
For those who are eager to explore these windows into a new reality, however, there’s a lot to like here, and third-party developers have already been eagerly embracing the new widgets with their own solutions.
Some Caveats
To be clear, it’s not all sunshine and roses, and while widgets on the iPhone are a great leap in the right direction, there are still a few important limitations to be aware of.
Firstly, just like app icons, you still can’t just place a widget anywhere you like on the home screen. Apple insists that icons and widgets “flow” in such a way that there are no empty spaces. Why Apple is so stubborn in this regard is anybody’s guess, but the important thing is that if you’re having trouble dropping widgets anywhere on your screen, don’t worry, it’s not just you.
The other catch is that the new home screen widgets are actually less interactive than the older Today screen versions. Elements of widgets can be tappable, but only for the purpose of bringing you right into the appropriate place in the app.
So, for example, you can tap on a task in Reminders or Things to open the app and be brought right to that task, but you won’t be able to tap on a checkbox in the widget to simply complete the task like you could in the old legacy Today screen widgets. The good news, however, is that the older style of widgets are still technically supported if you prefer to use those — you’ll just have to swipe over to the Today screen and scroll down past the new widgets in order to see them.
Similarly, widgets can’t resize themselves to display more or less information. You can choose to drop a widget onto your home screen in one of three sizes, but it will always be constrained to that size. In fact, you can’t even switch an existing widget to a different size — you have to basically remove it and add another one in the correct size.
Getting Your Widgets Where You Want Them
While in some ways Apple has made the widget system fairly easy for new users to grasp, there are some advanced and very useful tricks that aren’t readily apparent.
Chief among these is that adding a widget to your home screen may be a frustrating experience if you follow the normal instructions. You probably already know that you can bring up the list of widgets by tapping and holding on your home screen to put it into jiggly mode and then tapping the plus button in the top-left corner to see a list of widgets. Once you’ve found a widget that you like, tapping the big blue “Add Widget” button will drop it onto the current home screen, displacing everything that’s already there to make room for the new widget.
However, what’s far less obvious is that you can actually drag-and-drop the widget from the preview screen to place it exactly where you want it without having to mess around later. Here’s how.
- Go to the home screen where you want to add a new widget.
- Tap and hold to enter jiggly mode.
- A plus button should appear in the top-left corner. Tap it.
- Scroll through the list of widgets and apps to select the app you want to add a widget from.
- Swipe left and right on the previews to find the exact version of the widget you want to add.
- IGNORE the “Add Widget” button.
- Instead, tap and hold on the widget to pick it up, and then begin dragging it with your finger.
- The widget preview screen will disappear, returning you to the home screen. Place the widget where you want it, and then release your finger to drop it there.
This single trick will probably save you tons of frustration when it comes to adding widgets to your home screen, since the “Add Widget” button always drops the widget at the top of whatever your home screen is on, which is often not where you want it to go.
Building Smart Stacks
The above trick is especially handy when using the Smart Stack feature, which allows you to stack several widgets on top of each other and scroll through them.
You can build a Smart Stack by dragging any two same-sized widgets on top of each other, and you can add a new widget to a Smart Stack in the same way — drag and drop an individual widget on top of an existing Smart Stack. The only catch is that for obvious reasons the widgets have to all be the same size. There’s also no way to combine Smart Stacks by dragging two Smart Stacks on top of each other.
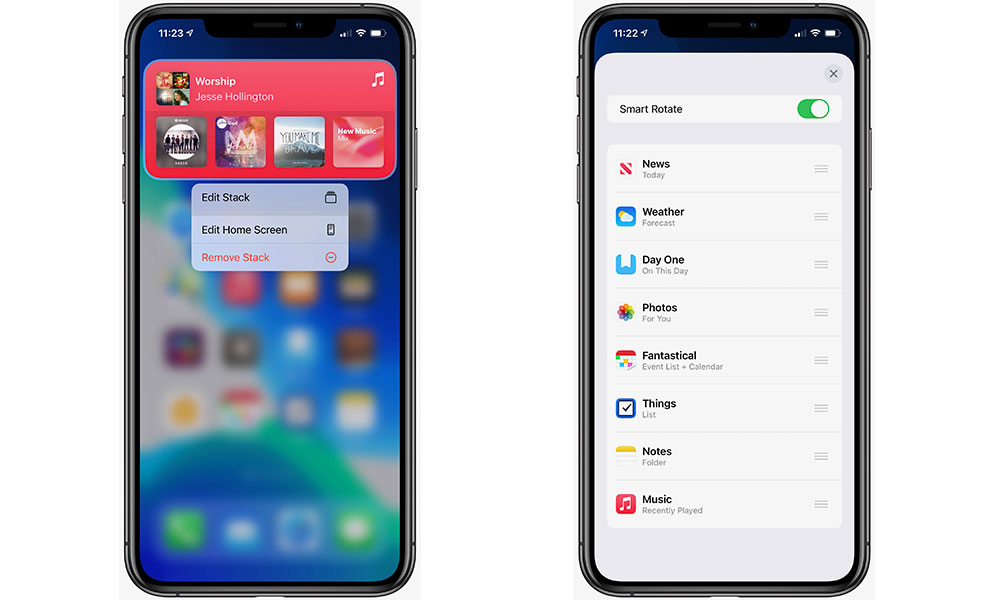
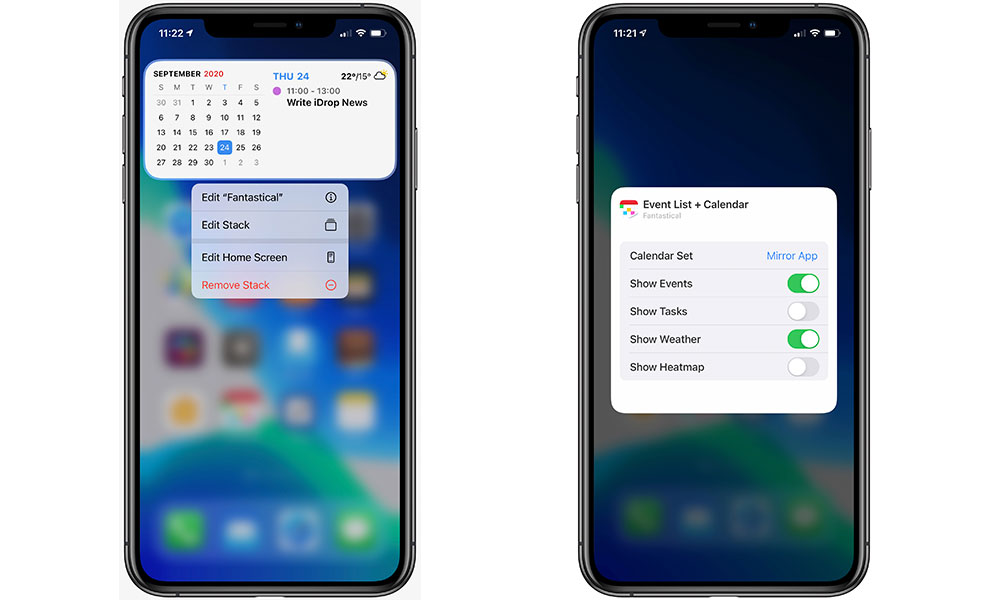
You can edit a Smart Stack by tapping and holding on it and tapping “Edit Stack” from the menu that appears, but for whatever reason Apple has not provided any way to add new widgets to a Smart Stack from here. You can only remove widgets or change the order in which they appear as you scroll through the stack.
So the only way to add new widgets to a Smart Stack is by dragging and dropping, and this is where the earlier tip about adding widgets comes into play; instead of using the Add Widget button and then having to take the new widget and drag it up onto your Smart Stack, you can save that step entirely by just dragging the widget directly from the widget preview and dropping it directly onto the Smart Stack.
Note that you’ll also see a “Smart Rotate” option when editing a Smart Stack. This allows iOS to decide by itself when to display a given widget from the stack, based on factors like the time of day, your location, and other recently used apps.
Like most of Apple’s Siri Assistant AI tools, it’s unclear exactly how it makes these decisions, but we’ve found it to be fairly accurate when it comes to the basics — things like showing us the weather when we get up in the morning, or bringing up our calendar or task lists when we’re about to start our workday.
However, if you’d prefer the widgets in your Smart Stack to remain where you left them, you can switch this option off and just swipe up and down to move through the content of your Smart Stack manually.
Deeper Customization
Smart Stacks can be especially useful when you consider that you can add multiple widgets for the same app, which could be used to provide different views.
For example, in a weather app like Carrot, you could have one widget in your stack to show you the current conditions, while another could show you the seven-day forecast, or you could use multiple widgets in the same stack to show you different lists from Reminders, different topic categories from Apple News, or any other set of possibilities.
Much of this is possible thanks to the fact that most widgets offer an extra layer of customization that also may not be obvious right away. When you add a widget from the gallery, you get to choose a general style and size, but many widgets also offer an extra step to allow you to select which content the widget displays.
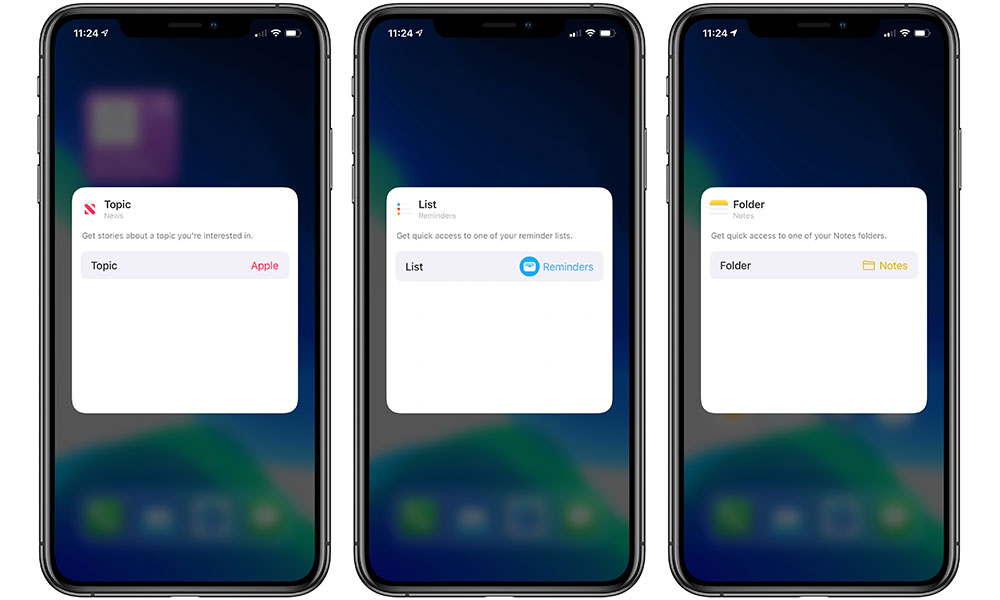
Even Apple’s own built-in widgets offer some basic customizability. For example, the Reminders widget allows you to select which list you want shown in the widget, while the News widget lets you choose a topic that you’re interested in reading news from, and the Notes widget lets you pick a folder that you want to see notes from. Even the Weather widget lets you choose which location you want your weather displayed from.
Since you can add multiple widgets, and each one has its own settings, this allows you to mix-and-match them for your needs, either in a Smart Stack or even as multiple widgets on the same screen.
For example, if you’re a frequent traveller, you could have a screen or stack of weather widgets showing you the conditions in all of the locations you care about, or you can set up a home screen full of news widgets to get caught up the daily headlines across several different areas of interest.
Even better, however, is that many of the third-party widgets have taken this customization to a whole new level, allowing you to not only select the source content for a widget, but even to tweak some of the display settings.
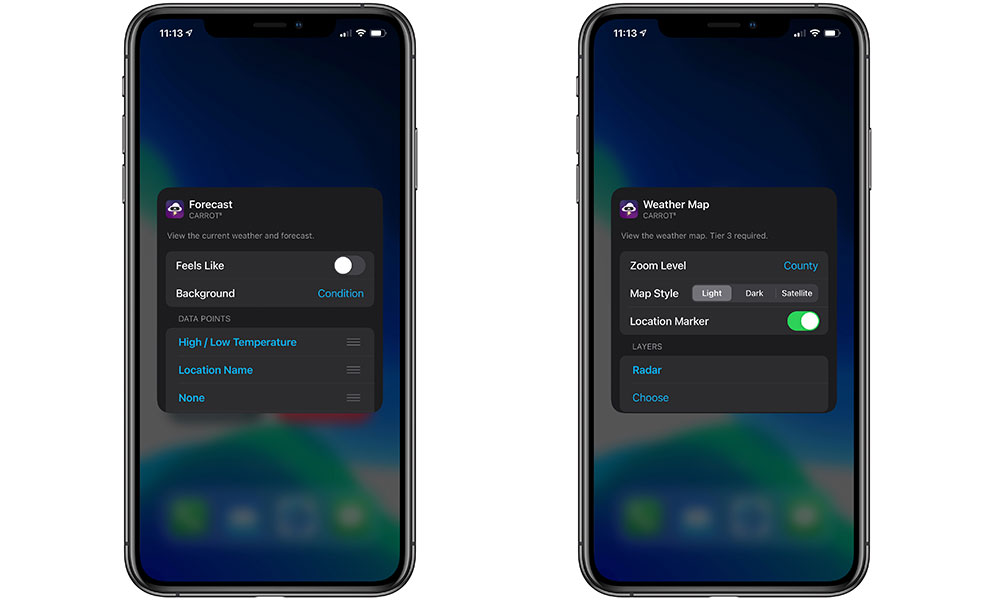
For example, the popular weather app Carrot will let you choose what background colour or pattern you’d like displayed, whether to show the actual or “feels like” temperature, and up to four other data points that can be included on the widget, such as wind speed, precipitation, visibility, air quality, and much more.
Similarly, calendar app Fantastical has not only added a dozen new widgets in a nice collection of different sizes and styles, but also allows you to customize each widget to decide whether it should only show certainly calendar sets, events, or tasks, as well as offering options for displaying the weather in the widget and a “heat map” in monthly calendar views that shows how busy each day is.
The unfortunate thing is that many of these settings aren’t obvious. You may have added a great new widget to your home screen and not even realized that you can tweak it further to your liking, but while it may not stand out, it’s actually fairly easy to access the settings for any given widget.
- From the normal home screen view (not jiggly view), tap and hold on the widget that you’d like to adjust settings for.
- Tap “Edit <widget name>” (in some cases this may simply say “Edit Widget”). Note that not all widgets have settings, so this option won’t appear in all cases.
- The widget will flip around to show the settings that are available for that particular widget.
- Customize the settings to your liking.
- When finished, tap anywhere else on the screen to close the settings.
It’s really that simple, and the key thing to remember is that each widget has its own independent settings. So if you add two otherwise identical versions of the Fantastical Event List + Calendar widget, for example, each one can be configured separately to show different information.
Each size and style of a widget can also have entirely different settings available. For example, Fantastical only includes a heat map setting for widgets that offer a monthly calendar view, while Carrot’s weather map widget naturally provides a completely different set of options from its forecast widget.
So whenever you’re adding a new widget, be sure to pop into the widget’s settings to explore what’s available. Chances are that you’ll be pleasantly surprised at the flexibility and power that many third-party widgets have hidden in there.


