
How to Ensure the Best Security in iOS 9

Toggle Dark Mode
Apple recognized that security needs to be a priority when it comes to mobile iOS devices. With new iOS updates, come even more security measures that you will learn to appreciate every day. Keeping your iOS devices and Apple ID secure are essential for protecting all of your personal information and private documents.
Also, it is important for you to take active steps to ensure that your iOS security features are enabled and working to your best advantage. Find below steps you can follow to make it easier for you to access all of your information while also making it significantly harder for anyone else to.
The iCloud feature on your iOS device secures your data by storing it in an encrypted format while also protecting it from unauthorized access. Using the iCloud is a great way to ensure that all of your stuff stays secure and in one place; and with the new iOS update, getting your information just got even easier. Finally, there’s an app for accessing your iCloud Drive files in one place. In iOS 9 you now have an optional iCloud Drive app instead of just using a specific app for a specific file type. After your update to iOS 9, you can enable the iCloud drive easily with a few clicks.
- Go to the Settings App
- Scroll until you find the iCloud listing and select
- Tap on iCloud Drive
- Set the “Show on Home Screen” switch to “on”
- Press the home button to return home
A white icon with the iCloud Drive logo will now be present on your home screen. Once you open this app, you can expect to find your stored files available for viewing and editing. Even if you forget to enable the iCloud Drive app after updating, iOS will ask you if you would like to enable it. If you chose to do this but don’t want the icon on your home screen, you can follow the above steps to disable the app.
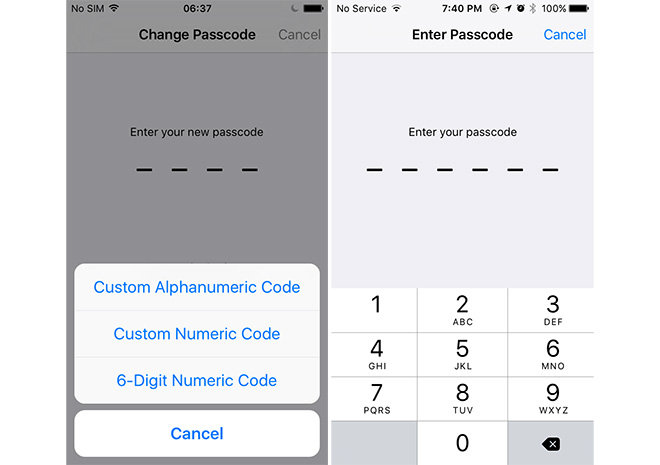
The new iOS update came with a small (but potentially huge) tweak that was aimed at improving the security for your iOS device. Maybe you want to increase the security on your iPhone by making your passcode a little longer. It makes sense that six digits are harder to crack than just four, and now it will be even harder for a potential thief to figure out your code. When you first install iOS 9, it doesn’t force you to choose a six digit passcode. If you do want to enable a six digit passcode, follow these easy steps.
- Go to Settings App
- Select Touch ID & Passcode
- Enter your current PIN code if/when you are asked
- Find Change Passcode
- Enter your current code again
- Enter a new six-digit code twice
There will also be a link called Passcode Options that is just above the number pad when you are entering the passcode. When you click on this you will be able to create an alphanumeric code, a custom numeric code, or a choice between four-and-six digit passcode. After this you should be able to use your six digit passcode. Simply press the home button to exit the Settings app and next time you login to your iPhone you will need to put in your six numbers. Note, that if you use Touch ID then you will hardly notice the difference since you can still use this in lieu of inputting your passcode on most occasions.
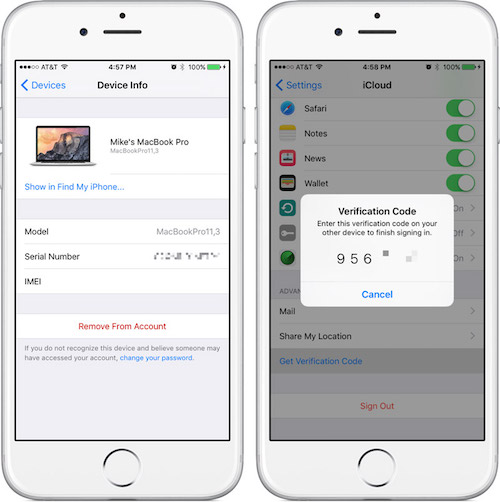
On top of needing to enter a six-digit pin to access your iOS device, there is also a new feature on the iOS 9 called two-factor authentication. Basically, this means when you sign in from a new browser or a new device you will be asked to input a verification code. This code will automatically be displayed on your other iOS devices or sent to your phone beforehand. Once you enter the code you can quickly be signed in and make sure other unauthorized users can’t access your account. For example, if someone gets a hold of your information and tries to sign in on another device, they won’t be able to without the verification code.
If you happen to forget your password, all you will need to do is provide a verified phone number where you can receive a text or phone call regarding your account. Apple will then review your case and contact you at the number you provided when your Apple ID is ready for recovery.


