
How to Crop and Resize Photos on iPhone and Mac

Toggle Dark Mode
We have reached the point where most people rely on their iPhone as their primary camera. The experience of taking excellent photos is simple, but editing those photos afterwards can be a bit more challenging.
If you are posting photos on a blog, sharing them via social media or just backing images up to iCloud, cropping and resizing are both important things to understand how to do. Generally, most people are more familiar with cropping images. However, resizing pictures can be crucial in certain circumstances. For example, if you are uploading images to the web, resizing an image to make it smaller will allow the picture to load significantly faster while losing very little in terms of image quality.
How to Crop and Resize Photos on iPhone
Cropping an image is a fairly simple task primarily because it is built in to the iPhone’s default Photos app.
- To crop a picture, open it up in the Photos app.
- Tap the ‘Edit’ button at the bottom of the screen to the left of the trashcan.
- Tap the ‘Crop/Rotate’ button to the right of the word ‘Cancel’.
- Here, a white frame is placed around the image, which you can drag and manipulate any way you want, ultimately selecting the portion of the image you’d like to keep.
- There is also a button depicting rectangles layered on top of one another which allows you to set the ratio of the crop. For example, you can lock the ratio to 3:4 or 5:7, which comes in handy if you plan to print the photo in the future.
- Click Done to save the image.
Changing the size of an image is a bit trickier and requires the use of a third party app. There are plenty of photo editing apps that can do the trick, but I recommend Pixelmator for the iPhone. It is the most powerful photo-editing app on the iPhone, but remains easy to use
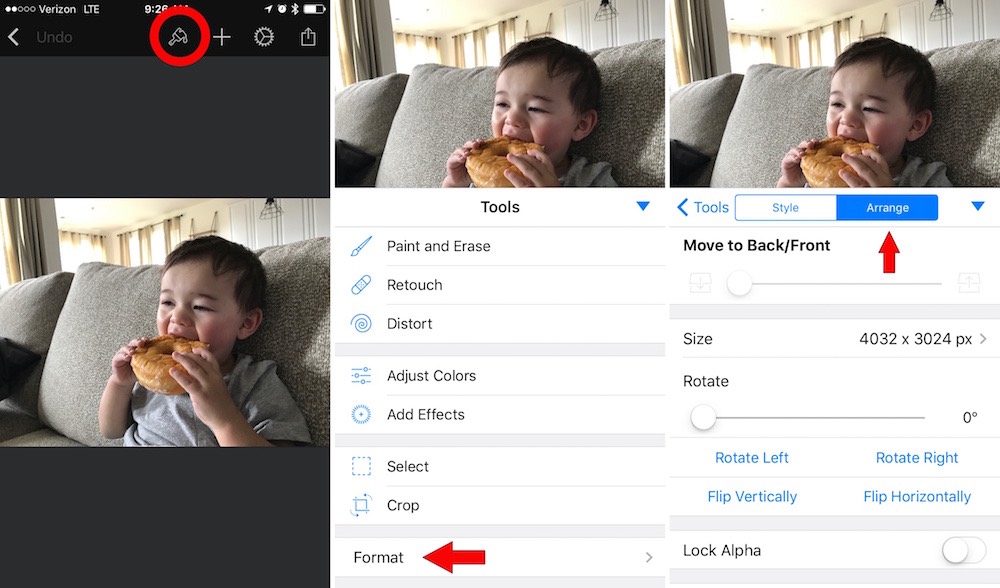
- To resize an image, open a picture in Pixelmator, tap the paintbrush and then select Format at the bottom of the menu.
- Next, tap Arrange and then click on Size. Here you can resize your image to make it smaller and more web-friendly.
- I recommend always keeping the Constrain Proportions turned on to prevent the image from being distorted when you change the size.
How to Crop and Resize Photos on a Mac
Cropping an image on the Mac is very similar to the iPhone.
- Simply open a picture in the Photos app and tap Edit.
- Choose the crop button on the right panel.
- Drag or manipulate the white square to achieve your desired look.
Changing the size of an image is easier on the Mac.
- In the Photos app, drag the picture you want to resize to the Desktop and then double click on the image to open it.
- The picture should open in Preview. Next, click the Tools menu at the top of the screen.
- In the drop down menu, select Adjust Size. Here, you can manipulate the image size to your hearts content. Just make sure to save your changes once you’re finished editing by pressing the Command + S keyboard buttons simultaneously.


