
Here’s How to Use a Mouse in iPadOS
 Nikias Molina / YouTube
Toggle Dark Mode
One of the more interesting new features in iPadOS is mouse support, particularly because Apple kind of snuck the feature in and didn’t announce it at WWDC.
Presumably, that’s because iPadOS still doesn’t have full-fledged mouse support — instead, it’s an accessibility feature that’s part of AssistiveTouch.
But still, it means you can use a mouse with your Apple tablet. And that’s still a big deal.
The Mouse Feature
As we mentioned, mouse support in iPadOS is an Accessibility feature. That means that when you activate it, you won’t get a regular cursor. Instead, the pointer is meant to mimic the touch of a human finger.
That means you may not be able to get the full functionality of a traditional computer cursor with iPadOS mouse support in its current form.
On the other hand, this is a big win for accessibility and could even bump up the productivity of iPad users who are used to workflows on laptops or desktop computers. It could also open the door for more traditional mouse support in a future version of iPadOS.
It is worth noting that this mouse support feature is also accessible in iOS 13 as part of AssistiveTouch. Not that using a mouse on an iPhone is very practical, but it’s there if you need it.
How to Use a Mouse on iPad
Pairing a mouse to your iPad is fairly simple, but it’s a bit buried. Here’s how to find the option.
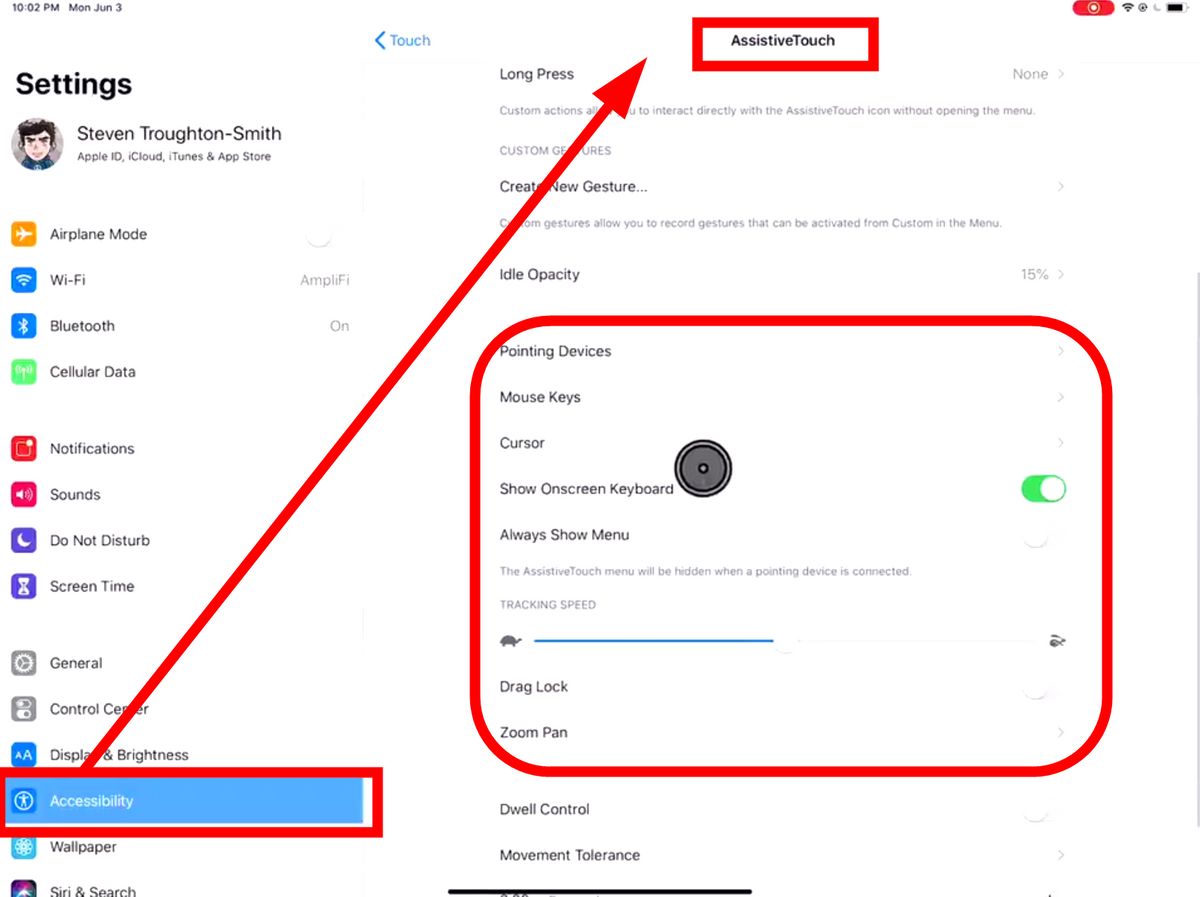
- Open Settings and navigate to the relocated Accessibility menu.
- Tap on Touch and then AssistiveTouch.
- Tap the toggle next to AssistiveTouch.
- Then, tap on Pointing Devices under the Custom Gestures subheading.
- For simplicity, we’ll assume you’re using a Bluetooth mouse. In the Pointing Devices menu, you should see a Bluetooth section.
- Put your mouse into pairing mode. At this point, it should show up under the Bluetooth menu.
- Tap on the mouse’s name to pair it to your iPad.
The process is basically the same for wired mouses. Just physically connect the mouse to your device’s Lightning or USB-C port. It should show up under the Pointing Devices submenu in AssistiveTouch.
In the AssistiveTouch menu, you can also adjust certain preferences and settings related to your mouse.
- Tapping on Cursor lets you edit the cursor size and color.
- The Tracking Speed bar lets you adjust how fast the cursor moves around the screen.
- You can also control the cursor using a keyboard’s numeric keypad. You can set up this feature in the Mouse Keys section.
If you’d like to add a zoom window that interacts with your cursor, go to Settings > Accessibility > Zoom and toggle it on. Go back to AssistiveTouch and tap on Zoom Pan.
Once you get it all set up, the only thing to do is to try it out and see if you like it. As we mentioned, it won’t work exactly like a cursor on macOS. But you may find that it helps speed up your workflows or increases the accessibility of Apple’s tablets.


