
Empty the Trash on Your iPhone

Toggle Dark Mode
You’ve probably already heard of the Trash can or Recycle bin before on your computer before, right? This is a digital trash where your most recently deleted files go before they’re permanently erased from your computer.
Likewise, this is usually the first place you go to when you need to free up some space on your devices. Trash, or some variant of it, can be found on most operating systems, including all Windows computers. You can even find Trash on any Mac computer.

But what about your iPhone? Does your daily driver also come with an easy-to-access app where you can simply delete all files permanently? And if not, what should you do about it?
Does Your iPhone Have a Trash Bin?
The short answer is, unfortunately, no. Your iPhone doesn’t have a Trash bin like your Mac or Windows computer does.
As weird as it sounds, Apple decided to keep the deleted items separate in each respective app. While that makes the process of deleting old stuff a bit more cumbersome, it’ll also help you keep some items safe before deleting them permanently.
Most of Apple’s first-party apps will still automatically delete anything older than 30 days, but if you don’t want to wait that long to free up some space on your iPhone, you’ll have to go through a few more steps. Don’t worry, though; it’s actually easier than it sounds.
As we mentioned, you’ll need to visit each respective app to get rid of any recently deleted items. The app you go to will depend on what you want to get rid of. But here are the most basic apps you can check first.
1. Permanently Delete Your Pictures
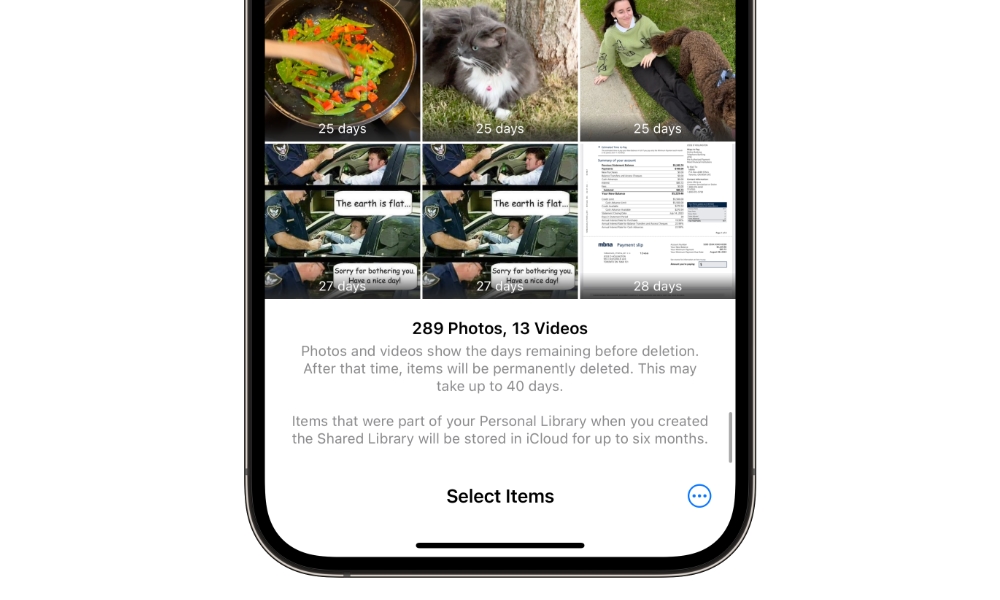
Whenever you delete a picture or video from the Photos app, it doesn’t instantly go away. Instead, your iPhone will keep it safe for at least 30 days in a Recently Deleted album. After that, the picture will be gone forever (unless you have it backed up somewhere else, of course)
Of course, these photos and videos will take up storage until they’re permanently deleted, and in some cases, it can take up to 40 days before your iPhone automatically cleans them out. Fortunately, you can speed up the process by manually deleting these pictures permanently. Here’s how:
- Open the Photos app.
- Tap on the Albums tab at the bottom of your screen.
- Scroll down to the bottom and tap on Recently Deleted.
- If necessary, unlock your Recently Deleted album with Face ID, Touch ID, or your passcode.
- Tap on Select in the top right corner of your screen.
- Optionally, select the specific pictures you want to get rid of permanently; if you don’t select anything here you’ll have the option to remove ALL of your recently deleted photos and videos.
- Tap the three-dot button in the bottom right corner of your screen.
- Select Delete (if you selected one or more photos in step 6) or Delete All.
- Tap on Delete From All Devices to get rid of the pictures and videos permanently.
Just like anywhere else in the Photos app, you can select multiple photos by swiping to the left or the right to select the first three pictures of the same row and then swiping up or down until you’ve selected all items you want to remove. However, you don’t need to go through that if you just want to empty your Recently Deleted album entirely; just don’t select anything you’ll see a Delete All option instead.
2. Delete Your Recently Deleted Files With the Files App
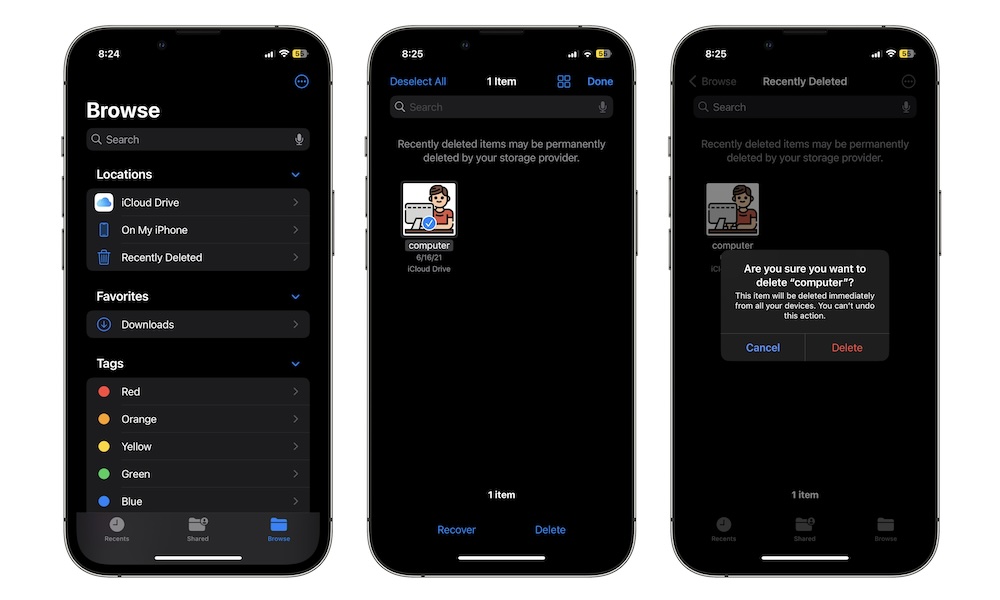
The Files app is one of Apple’s apps. This one will help you find and open any file that’s stored on your iPhone or safely stored in iCloud.
And just like the Photos app, when you delete a file, your iPhone will store it in its recently deleted folder in case you want to retrieve it in the next 30 days.
But if you want to delete these recently deleted files right away, here are the steps you need to follow:
- First, make sure you have the Files app installed on your iPhone. If not, follow the link and download it for free (It’s installed by default, so it should be there unless you removed it at some point).
- Tap on the Browse tab in the bottom right corner of your screen.
- Tap Browse in the top left corner of your screen.
- Select Recently Deleted.
- Tap the three-dot button in the top right corner of the screen.
- Tap on Select.
- Select all the files you want to get rid of. You can swipe up or down with two fingers to select multiple files. Alternatively, you can choose Select All in the top-left corner to select everything in your Recently Deleted folder.
- Tap on Delete at the bottom of your screen.
- Tap Delete one more time to confirm your decision.
3. Get Rid of Old Emails Permanently
Another way to delete your “Trash” on your iPhone is to get rid of the mail you no longer need.
Yes, just like other apps, Apple Mail will store your deleted messages in case you want to take a look at them again. Of course, not all of us want that, so it’s best to delete them permanently like this:
- Open Mail.
- Tap on Back or Mailboxes in the top right corner of your screen.
- In your inboxes, find the Trash folder.
- Tap on Edit in the top right corner of your screen.
- Select all the mail you want to delete permanently. As with the Files app, you can swipe up or down with two fingers to select multiple emails, or simply choose Select All in the top-left corner to select everything in your Trash folder.
- Tap on Delete at the bottom of your screen.
- To confirm your choice, select Delete All.
4. Delete Older Messages
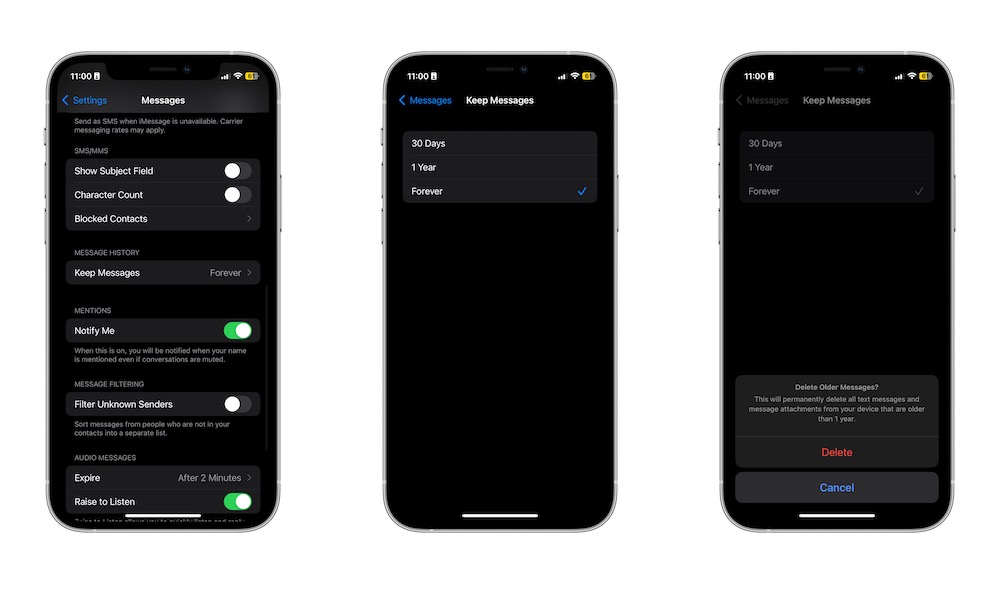
Your iPhone lets you automatically get rid of older messages in the Messages app. That way, you’ll only have your most recent texts at the ready while keeping your storage clean.
Here’s how to tell your iPhone to automatically delete older conversations in Messages:
- Open the Settings app.
- Scroll down and tap on Messages.
- Scroll down, and under Message History, tap on Keep Messages.
- Select 30 Days or 1 Year.
And that’s it. Of course, you can also delete any messages you want by going to the Messages app and tapping Edit in the top left corner of your screen.
Then, tap on Select Messages and select all the conversations you want to delete. Finally, tap on Delete in the bottom right corner and then tap Delete again.
5. Get Rid of Your Recently Deleted Notes
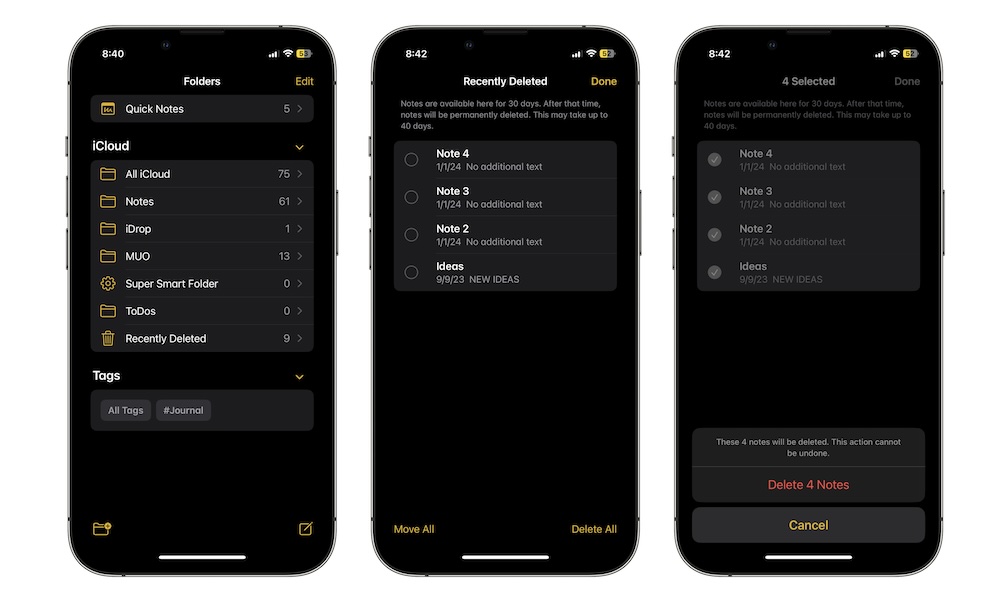
In case you regret deleting a note, you can still find your recently deleted notes in much the same way as in Apple’s other apps.
But if you’re looking to free up some space on your iPhone, these notes do more harm than good. If you want to get rid of them permanently, you’ll need to do the following:
- Open the Notes app.
- Tap on Folders in the top right corner of your screen.
- Select Recently Deleted.
- Tap on Edit in the top left corner of your screen.
- Select all the notes you want to delete. Again, you can select multiple notes by swiping up and down with two fingers, although, unlike the Mail and Files apps, there’s no Select All option; instead, Notes works more like Photos, giving you a Delete All button in the bottom-right corner when you haven’t selected anything yet
- Tap on Delete or Delete All in the bottom right corner, as appropriate.
- Tap on Delete Notes.
As a tip, if there are only one or two notes you want to delete, you can swipe that note to the right and tap the Trash icon.
Besides getting rid of the “trash” on your iPhone, there are also other ways to get more free storage with just a few taps. Here are some tips to get you started.
1. Delete Apps You Don’t Use Anymore
This is the easiest way to free up some storage space in seconds. Simply delete all the apps you aren’t using anymore. To do this, you just need to press and hold the app you want to delete and then press Delete App. Finally, tap on Delete one more time.
2. Clear Your Browsing History
Another quick way to get rid of the trash on your iPhone is to clear Safari’s browsing history. To clear it, you need to go to Settings > Safari > Clear History and Website Data.
Select the timeframe you want and then tap on Clear History.
3. Merge Duplicate Photos
Besides deleting your recently deleted pictures, you can free up some space by getting rid of duplicates. We all have one or more duplicate photos that we forgot about. But your iPhone can find them and merge them for you, so you don’t waste any time. This is how:
- Open the Photos app.
- Tap on the Albums folder at the bottom of the screen.
- Scroll down to the bottom and tap on Duplicates.
- Tap on Select and then choose Select All in the top right corner.
- Finally, tap on Merge at the bottom of your screen and then select Merge Exact Copies.
4. Delete Downloaded Content
There’s no greater trash and waste of space than having a movie stored on your iPhone that you’ve already watched. Sure, it’s great to download your favorite show so you can watch it offline, but it can also consume a lot of space.
The best thing you can do is to go through the streaming services installed on your iPhone and delete any downloaded content you that you no longer need. This goes for apps like Netflix, Disney+, and YouTube, as well as Spotify, Apple Music, and Podcasts.
Get Rid of Your iPhone’s Trash
While your iPhone doesn’t have a trash bin per se, there are still plenty of ways you can get rid of any pictures, videos, files, or content that’s consuming a lot of your storage.
Luckily, following these tips will let you take control of your iPhone storage with just a few taps.


