
Easy Photo Editing Tips and Tricks Every Mac User Should Know

Toggle Dark Mode
If you’re anything like me, then you appreciate the beauty and value of a treasured memory in the form of a photograph; whether it feature the presence of family, friends, beloved pets, or a picturesque landscape.
But when it comes to maximizing that photograph by ensuring that it’s in an ideal file format, adding color, text, visuals, or filters, it’s possible that you may not the most experienced person to consult. Well, we all have a room to learn and grow, right?
![]() And it’s with that sentiment in mind that we present to you a series of tips and tricks to get you started with editing your photos on Mac like a (semi) pro.
And it’s with that sentiment in mind that we present to you a series of tips and tricks to get you started with editing your photos on Mac like a (semi) pro.
No, you likely won’t realize a skill set along the lines of Ansel Adams, but you’ll definitely learn a thing or two about how easy it is to enhance your favorite images using programs that are built-in to Mac OS X.
Preview for Mac
Preview is essentially Mac’s version of Adobe PDF viewing/editing software. You can easily edit a photograph using the software, as well, by adding text boxes, personal signatures, mouse-guided color handwriting, or by resizing and exporting the photo to an alternate format.
Using Preview, you can also add or edit in several different attributes to a photo. When a photo is selected and the app is open, you’ll notice a toolbox icon at top of your image, from which you can select various options.
You can zoom in and out on the photo, add a text box or annotation, add signatures, shapes, or emoticons, and even add some color to the image by adding mouse-guided handwriting or drawings.
Save the Photo as a Share Friendly Image Format
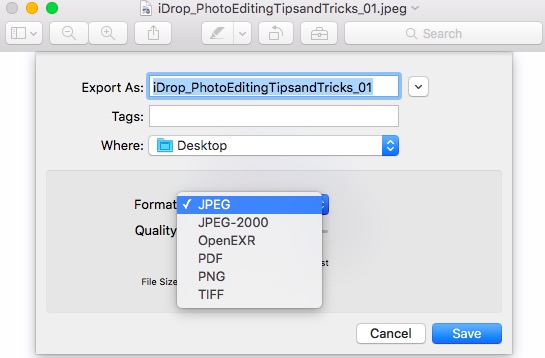 To start things off, say, for instance, that you have a photo in PNG format, but you want to save it under a smaller, more web optimized file format such as .jpg (JPEG).
To do this, or to simply verify that the image is in your desired format, simply right click the image > select Open With > then select Preview (default).
Once the application opens, select File > Export, at which point a sub menu will open, asking what you’d like to name the new file, where you’d like to save it, what format you’d like to export to (JPEG, JPEG-2000, OpenEXR, PDF, PNG or TIFF), and what quality you’d like to export to on a numerical scale (if applicable).
Enhance the Color
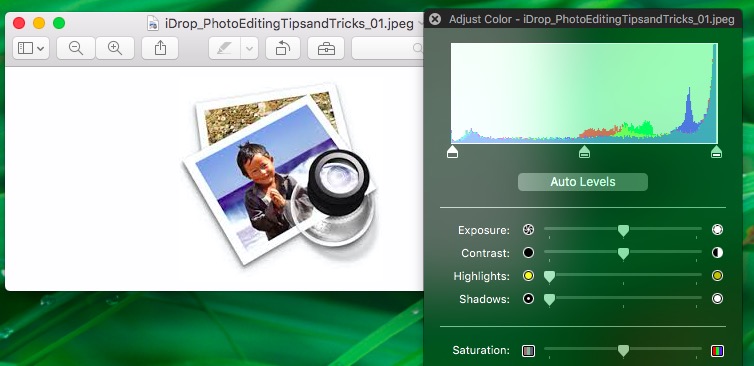 Enhance the color of the photo by clicking Tools in the top menu bar > then click Adjust Color. Slide the Exposure bar to brighten the photo. Slide the Saturation bar to make the photo more or less colorful.
Crop the Image
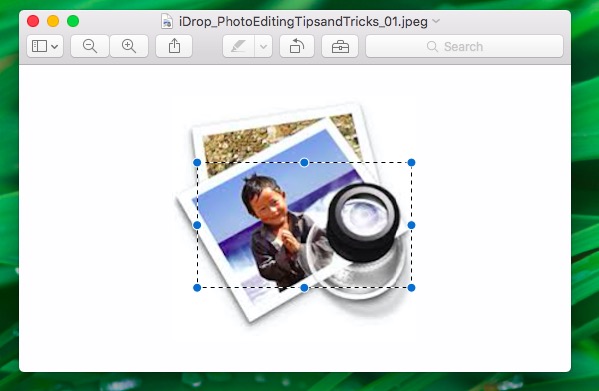 Crop the image by clicking and dragging your mouse on the portion of the image you’d like to keep. Drag the rectangle around the image to select the perfect portion of the photo. Once you’ve selected the part of the image you want to keep, simultaneously hit the Command button, and the K button on your keyboard. This will crop your image. If you are satisfied hit, Command and the S button to save the image.
Share Your Photo
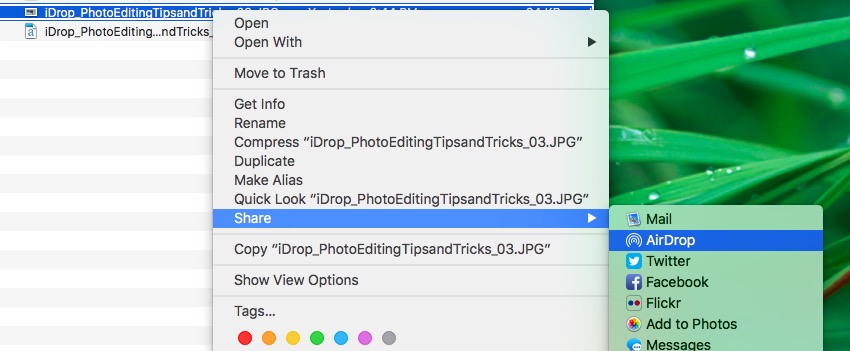 Finally, you can save or share the newly edited image via a number of ways, including Mail, Messages, Notes, Facebook, Twitter, or Flickr. You can even send the photo to the Photos app on OS X, where more comprehensive edits — such as retouching, red-eye reduction — can be applied; or send the photo to your iPhone using Apple’s AirDrop service.
To easily send a photo to your iPhone using AirDrop, make sure both devices have Bluetooth and Wi-Fi turned on, and AirDrop is set to “Everyone” in the control panel. On your Mac, find the image file, right click, click share, and select AirDrop. A popup should appear, allowing you to select your iPhone from the list.


