
Apple Family Sharing and Parental Control Basics
 Apple
Apple
Toggle Dark Mode
Apple’s Family Sharing feature is a life-saver for parents or people who still live with their family. With it, you can easily share pretty much anything you buy on the App Store and so much more.
What’s more, you can even take control of what your kids watch and download with just a few taps.

With that said, if you’ve never used Family Sharing, you probably don’t even know how to get started.
Don’t worry; it’s actually pretty easy to set up. Here are all the basics you need to know about Apple’s Family Sharing.
What Is Apple’s Family Sharing?
As you can guess by its name, Apple’s Family Sharing is a feature that lets you share different types of things with other family members.
With Family Sharing, you can choose what type of things you can share with other members of your family.
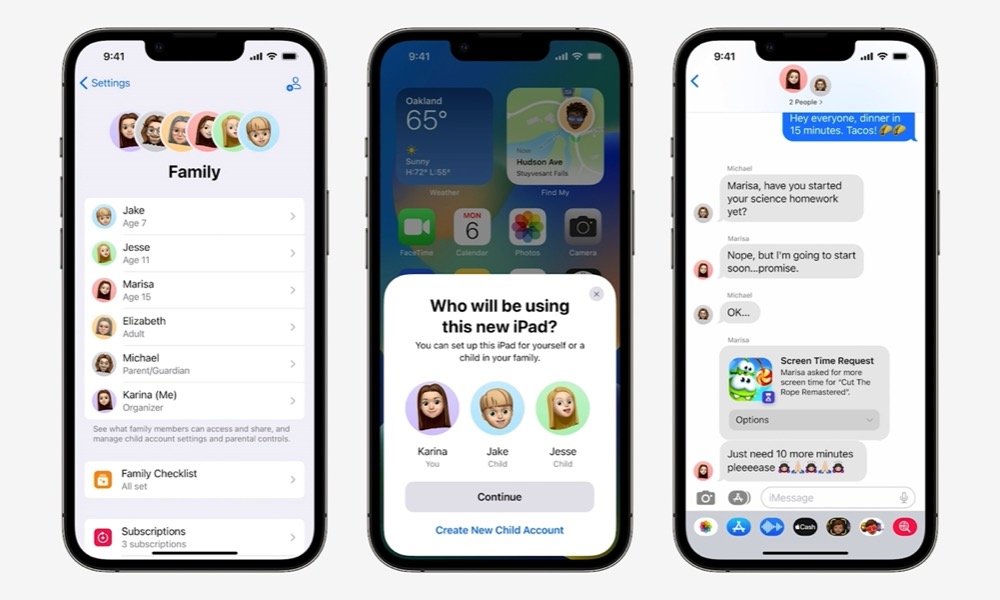
You can add up to five other family members into your own Family Sharing group. Each member can have a specific role that will grant or deny access to specific content.
There are a total of four different types of members. You first have the Organizer, the adult who set up the Family Sharing group. As an organizer, you can invite or remove family members or completely dissolve the group.
There are also the Adult members, who are anyone who is 18 years or older.
Any adult in the group can also become a Parent or Guardian, which is basically a person who can manage the parental controls for children in the Family Sharing group and approve requests to download or purchase apps or in-app content.
The last member is the Child or Teen, which is pretty self-explanatory.
You can be part of only one Family Sharing group at a time, and you can only switch groups twice every year. This is to prevent people from abusing the feature to share apps and other purchased items between multiple “families.”
What Can You Share in Apple’s Family Sharing?

When you add someone to your Family Sharing group, you have the option to share almost anything you buy from Apple.
If you use iTunes or the Apple TV app, other members can see and access the TV shows and movies you’ve bought. Likewise, if you bought a book using the Apple Books store, they can also see and read these books.
The same goes for App Store apps. If you bought a game or an app, other members of your group will be able to download them and use them for themselves. Just be aware that while all purchased apps are shareable (e.g. those you pay to download in the first place) not all in-app purchases or subscriptions can be shared among family members; Apple leaves that up to the individual app developers.
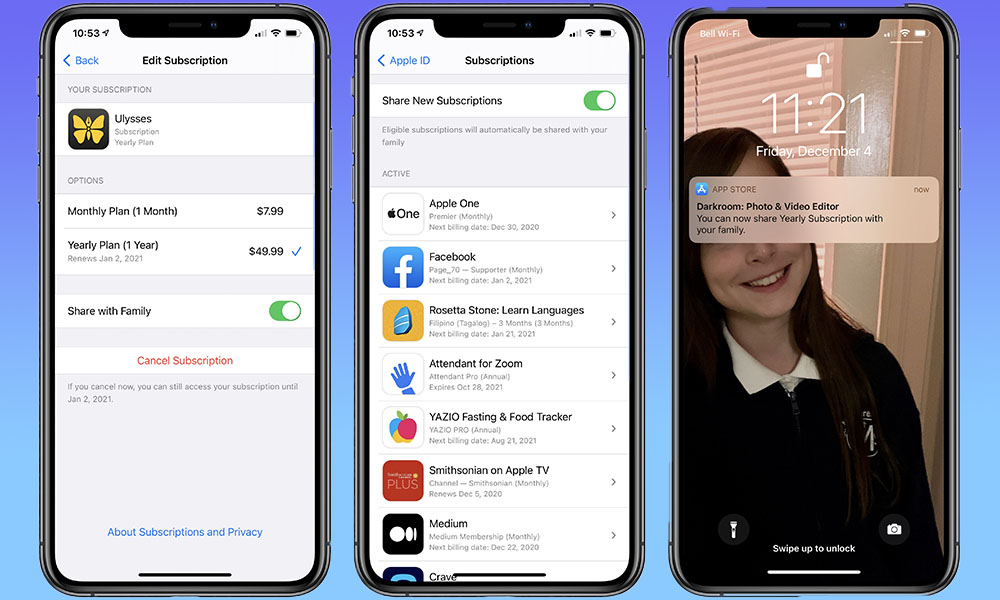
However, all Apple subscriptions are shareable. If you subscribe to an Apple service, all of your other family members will be able to access them as well. These services include:
- Apple Arcade
- Apple Fitness+
- Apple News+
- Apple Podcasts subscriptions
- Apple TV+
- iCloud+
- Apple Music (with the family subscription)
- Apple One
Apple Music works differently from other Apple services because of Apple’s agreements with the music labels that provide the content. Apple offers both a standard Apple Music plan for one user and a family plan that allows sharing with up to five other family members, just like the rest of its services.
The same goes for Apple One, which has both Individual and Family packages. However, the name is a bit misleading since, just like the standalone Apple services, all of the services in an Apple One Individual plan can be shared with your whole family except for Apple Music. Even the lowest 50GB iCloud storage package is now shareable following the introduction of iCloud+ in 2021, although you’ll probably want more if you’re sharing it with a whole family, which is why the Apple One Family plan offers 200GB.
Apple TV Channels such as Paramount+, MGM+, and Starz that you subscribe to through the TV are also automatically eligible for Family Sharing. This is not typically the case for direct subscriptions to those same services, which often have their own sharing plans and requirements.
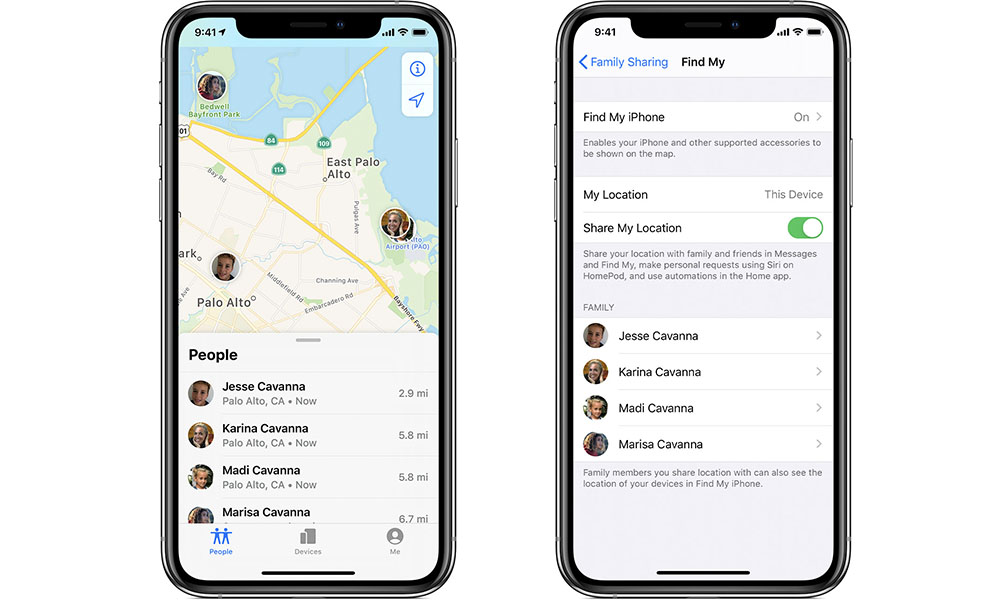
Another benefit of being part of a family group is the Find My network. Members of the same Family Sharing group can see other people’s locations and the locations of each of their devices and can use their own Find My app to locate the iPhone or other Apple devices from other members.
How to Set Up Apple Family Sharing
If you’re ready to get started with Family Sharing, here is what you need to know to set it up.
First, keep in mind that all the members of the Family Sharing group will need to have at least iOS 8, iPadOS 8, and macOS Yosemite or a later software update on their iPhones, iPads, and Macs, respectively. Of course, if you’re running anything older than that, you can’t use most of Apple’s other services anyway.
Also, as we mentioned, they can’t be part of another Family Sharing group.
With that said, here’s what you need to do:
How to Set Up Apple Family Sharing on iPhone
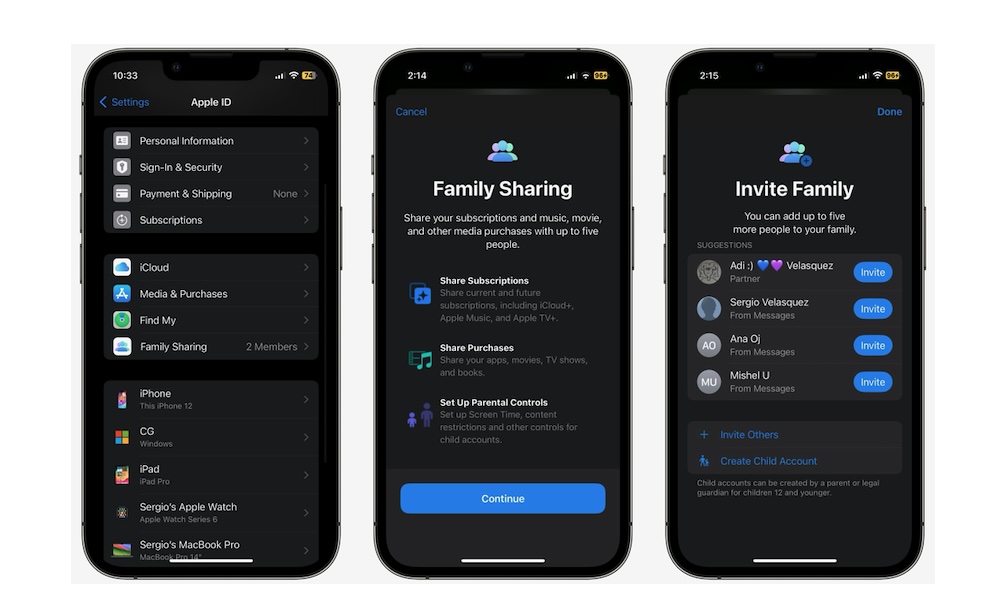
- Open the Settings app on your iPhone.
- Tap on your Apple ID. That is your name at the top of the Settings app.
- Select Family Sharing.
- Tap on Continue.
- Invite all the members you want to be part of your group. Remember that you can only have five other family members. You also have the option to Create a Child Account if you want. This is the only way to create an Apple ID for someone under 13 years of age.
- When you finish, tap on Done in the top right corner of your screen.
- Now, you’ll need to wait for the other person to accept your invitation.
- In the meantime, tap on Family Sharing again.
- Tap on Subscriptions, Purchase Sharing, or Location Sharing, and choose what you want to share with others.
How to Set Up Apple Family Sharing on Mac
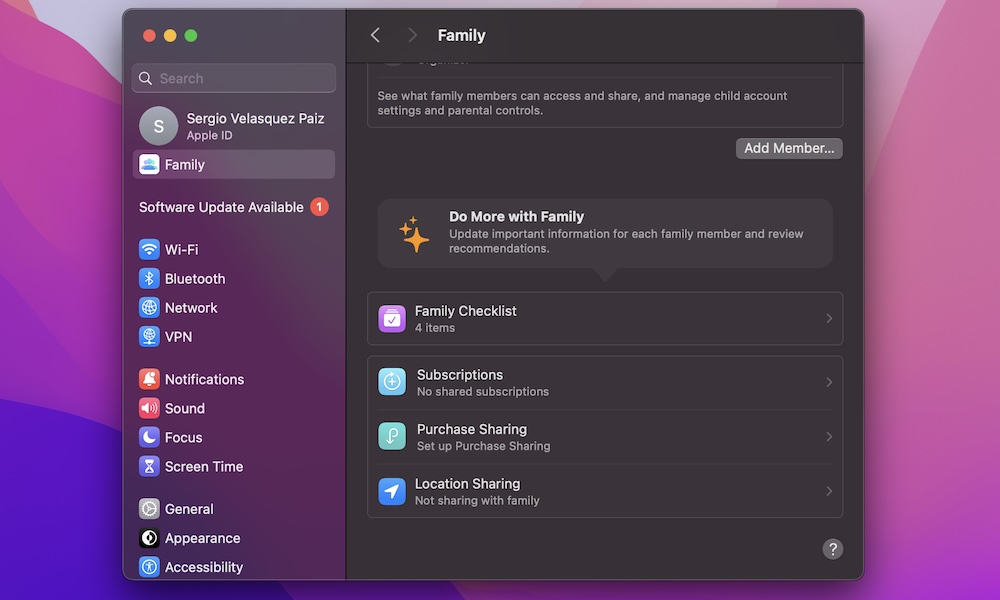
- Click the Apple Menu in the top left corner of your screen.
- Select System Settings.
- Click on your Apple ID. That’s your name in the top left corner of the window.
- Scroll down and click on Family Sharing.
- Choose who to invite to your Family Sharing group. Remember that you can only have five other family members in your group.
- Once you’re done with the invitations, you can go back to Family Sharing and select Subscriptions, Purchase Sharing, and Location Sharing. Choose what you want to share with your family members.
How to Use Parental Controls in Family Sharing
By default, you will be asked to add parental controls when you’re adding a child or teenage account to your Family Sharing group.
With that said, if you forget to do it, you can easily set up parental controls for the child’s Screen Time later, along with ensuring they need to ask you for permission before making any in-app purchase. Here’s how:
How to Set Up Screen Time for a Child Member
- Open the Settings app on your iPhone.
- Tap on Family right below your Apple ID.
- Select the child’s name from the list of members.
- Tap on Screen Time.
- Follow the instructions on your screen to finish setting up Screen Time from your iPhone.
How to Set Up Ask to Buy for a Child Member
As we mentioned, this will require that your child ask a parent or guardian for permission before they can make any purchase or download on their devices. It’s on by default for kids under 13 and can be optionally toggled on for teens. This is how you set up Ask to Buy from your iPhone.
- Open the Settings app.
- Tap on Family right below your Apple ID.
- Tap on the child’s name from the list of members.
- Scroll down and select Ask to Buy.
- Toggle on Require Purchase Approval.
Once enabled, any time the child or teen attempts to purchase something from the App Store, iTunes Store, or Apple Books, a request will automatically be sent to all family members designated as parents or guardians. They’ll be able to open the store page for the purchase request and can choose to approve or decline it from there. Approval also requires confirmation with Face ID, Touch ID, or the parent/guardian’s device passcode.
- Select Ask To Buy.
- Follow the instructions on the screen.
How to Remove Someone From Your Family Sharing Group
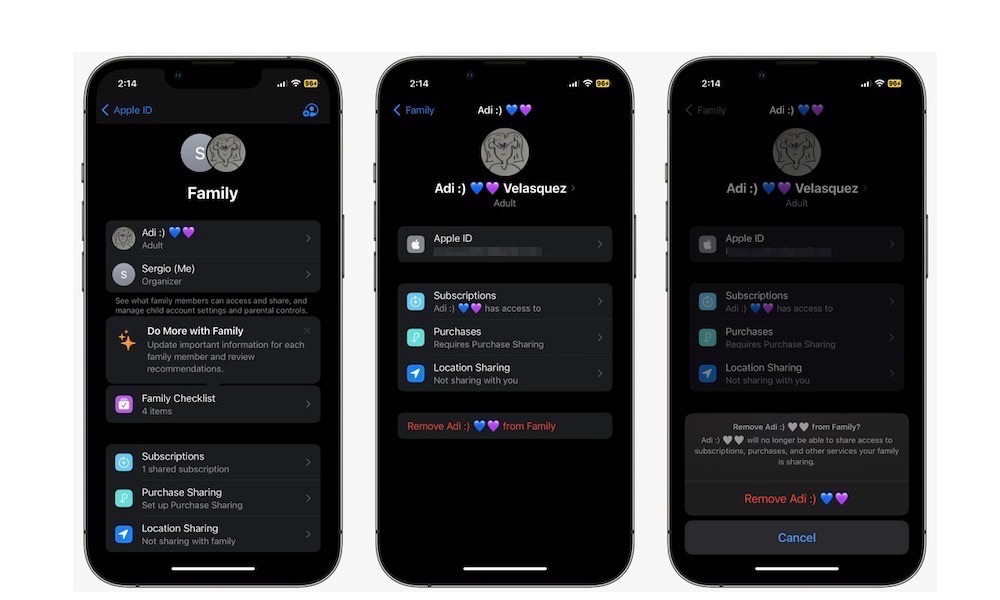
You don’t need to stick with the same Family Sharing group for the rest of your lives. You can easily remove whoever you want from your group just by following these steps:
- Open the Settings app.
- Tap on Family right below your Apple ID.
- Select the person whom you want to remove from your Family Sharing Group.
- Tap Remove from Family right at the bottom of the person’s data.
- Tap on Remove to confirm your decision.
And that’s it. You can then invite another person if you want. If you decide you want to dissolve the Family Sharing group, you can follow the steps above but select your name instead. Then, you need to tap on Stop Using Family Sharing.
Make the Most Out of Apple’s Family Sharing
As you can see, getting started with Apple’s Family Sharing couldn’t be any easier.
You can set it up and invite your family in a matter of seconds. What’s more, you can also choose what you want to share with them, so they don’t have access to all your apps or content.
And when you want to stop using it, removing someone from your Family Sharing group is just as easy.


