
10 Settings You Need to Change to Improve Your iPhone’s Security
 tete_escape / Adobe Stock
Nowadays, it's never been easier to access your personal information. Unfortunately, because of the way we use our iPhones, companies and other people have more options when it comes to stealing data from us.
We're not only talking about cyber attacks; companies are always trying to get more of our data to make money. For this, they ask us to share a lot of personal information when we install and use their apps.
Luckily, Apple lets you manage your privacy settings pretty easily from your iPhone. With just a few taps, you can prevent digital and physical attempts to access the information stored on your iPhone.
Want to know how? We've gathered a list of the most crucial security and privacy settings. Read on for 10 settings you need to change to make your iPhone a bit safer.
Manage Your Location Services
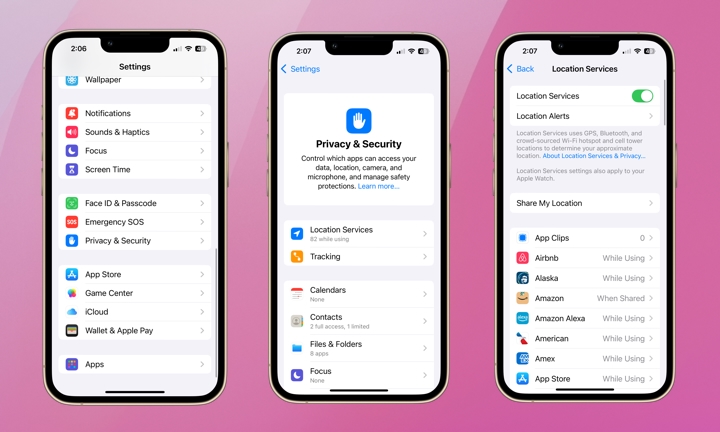
The Location Services section under Privacy & Security is a helpful iPhone feature that lets you see which apps can access your current location. Many apps and games, like Google Maps or Pokémon Go, need this to provide a better service.
However, many apps don't need to know where you are at all times. If you want to stop sharing your location with your apps, here's how to manage Location Services:
- Open the Settings app.
- Scroll down and select Privacy & Security.
- Tap on Location Services.
- Scroll down, go to any app with access to your location, and select Never.
- You can also turn off Location Services at the top of the page. This will prevent any app from using this feature. Just be aware that this also includes built-in apps like Apple Maps.
If you still want to share your location with an app, we recommend that you at least turn off Precise Location, as many apps don't need to know exactly where you are to work properly. For example, local news and weather apps usually only need to know what neighbourhood or city you're in.
Stop Sharing Your Analytics With Apple
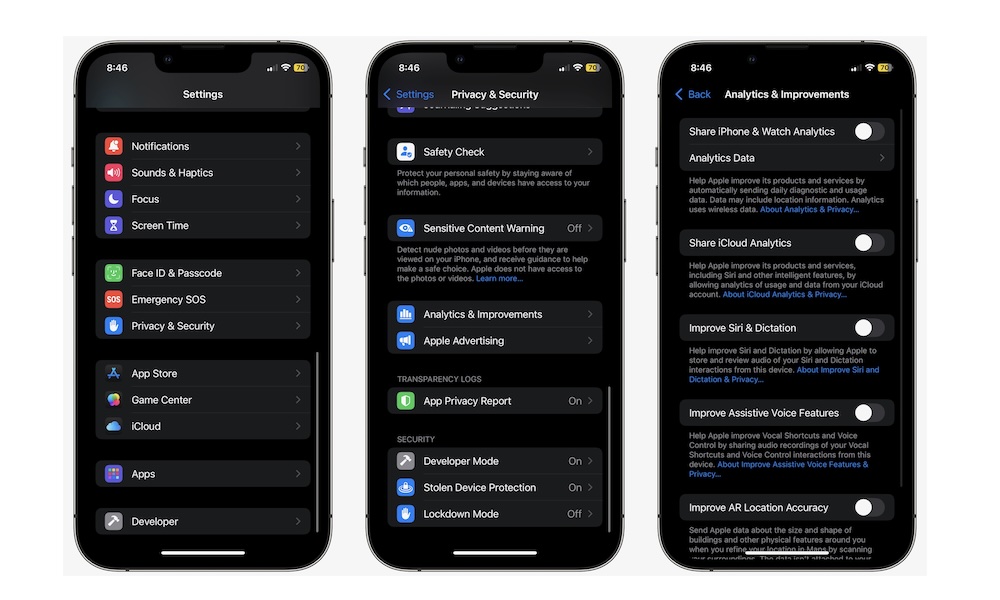
When you first set up your iPhone, Apple asks if you want to share daily diagnostic and usage data, like your location, to help the company improve its products and services. You may also be prompted for this after a major software update.
In all honesty, Apple doesn't need your data to improve its products, so we think it's best if you don't share any data with Apple. Here's how to check that you're not sharing any data:
- Open the Settings app.
- Scroll down and go to Privacy & Security.
- Scroll down again, and tap on Analytics & Improvements.
- Disable any option that's turned on.
Lock or Hide Any App on Your iPhone
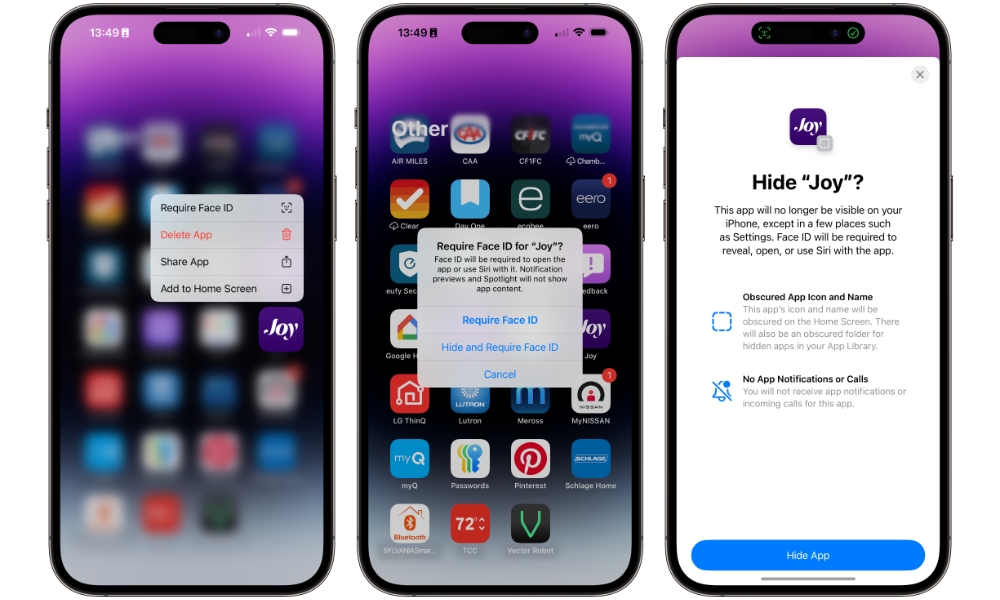
Apple introduced a cool feature in iOS 18: the ability to lock or hide apps from others. When you enable this feature for an app, you'll be required to use Face ID (or Touch ID) or your passcode to open it.
Likewise, if you hide an app, this app will not be visible from your Home Screen or App Library, and you won't receive any notifications from that app. However, the app will still be visible in other specific places, such as Screen Time, in iPhone settings.
To access a hidden app, you'll need to go to the Hidden Album in the App Library.
Here's how to hide or lock an app:
- Press and hold the app you want to lock or hide until a menu pops up.
- Tap on Require Face ID.
- Tap on Require Face ID or Hide and Require Face ID, depending on your preference.
And that's it. Now, you'll be prompted to authenticate with Face ID or Touch ID to use that app. Keep in mind, though, that if those methods fail, you'll typically be prompted to enter your iPhone's passcode instead, so anyone who knows your passcode can still potentially open these apps. You can disable this fallback by enabling Stolen Device Protection, which we'll discuss in a moment.
If you don't want to keep an app locked or hidden anymore, follow the same previous steps and tap on Don't Require Face ID.
Lock Your Private Browsing Behind Face ID or Touch ID
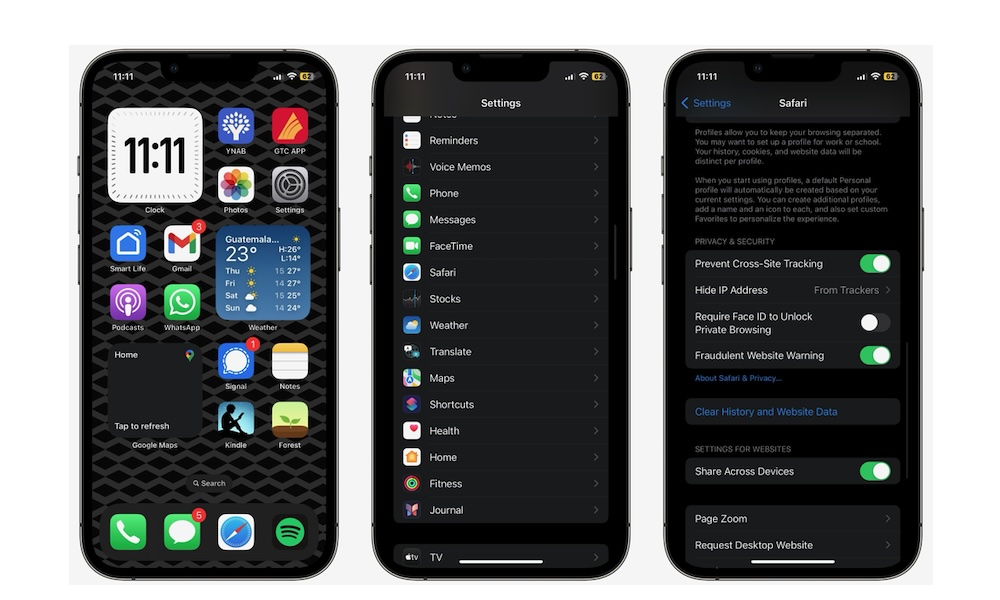
This other privacy feature on your iPhone lets you block all your private tabs in Safari. That way, if you open an app in incognito mode, but decide to exit the app, your iPhone will immediately lock all your private tabs behind Face ID or Touch ID.
To use this feature, you need to follow these steps:
- Open the Settings app.
- Scroll down to the bottom and tap on Apps.
- Scroll down and go to Safari.
- Scroll down again and toggle on Require Face ID to Unlock Private Browsing (or "Require Touch ID" if you're using an iPhone SE).
Like locked and hidden apps, this will fall back to asking for your passcode if biometric authentication fails. However, unlike that other feature, this fallback is still active even if Stolen Device Protection is enabled.
Manage App Tracking on Your iPhone
Another helpful feature Apple introduced a few years ago is the ability to manage app tracking from your iPhone.
By default, Apple prevents developers from tracking your activity across other companies' apps and websites while you use your iPhone unless you give them permission to do so. This data is important for developers and advertisers, as they use it to provide targeted ads and even share your information to make a profit.
Needless to say, you should deny tracking to any app that asks for it, which they're now obligated to do when you first open the app. However, if you don't want every new app to ask if it's okay to track you, you can disable tracking altogether by doing the following:
- Open the Settings app.
- Scroll down and go to Privacy & Security.
- Tap on Tracking.
- Turn off Allow Apps to Request to Track.
When you turn off this option, all tracking requests from the apps you install will be automatically denied.
If you want to keep this option on, you can still check which apps asked you for tracking permissions and disable (or enable) those permissions from here.
Note that disabling app tracking won't prevent you from seeing ads; it just means that an app like Facebook won't be able to show you ads based on products that you searched for in the Amazon app. It also doesn't prevent developers from tracking you across their own apps, so Google Chrome will still know what you're doing in Gmail.
You'll also note this prompt only offers the option to "Ask App Not to Track." Apple has no way of preventing tracking entirely, as there are many ways for less scrupulous developers to find ways around Apple's restrictions, such as tracking you based on your IP address (this is one reason why a good VPN is very helpful for protecting your privacy). You can read more about how this works in our guide on Apple's App Tracking Transparency feature.
Erase Your iPhone's Data After Entering the Wrong Passcode
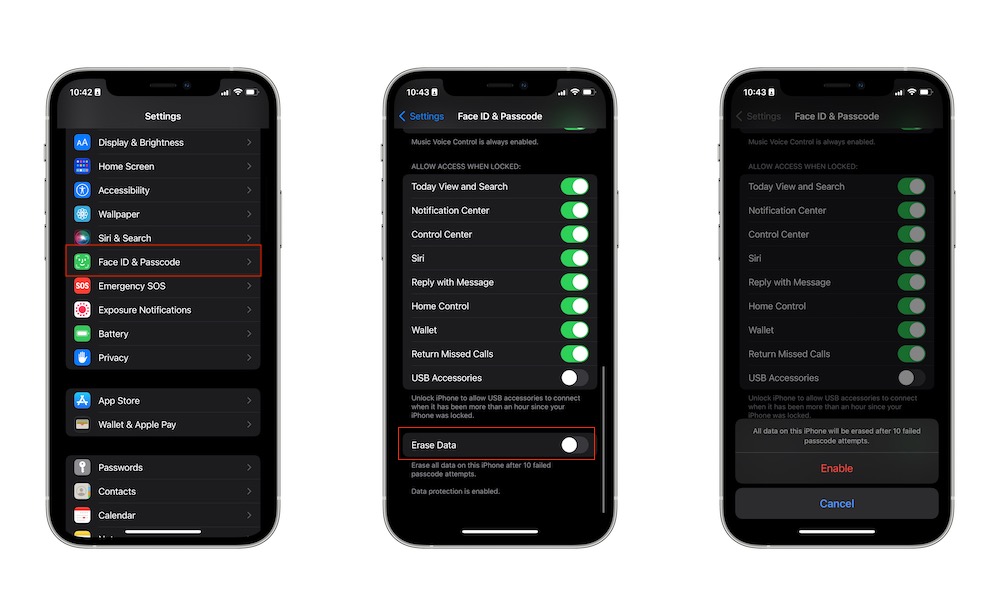
This feature is really helpful in case someone is trying to unlock your iPhone without your consent.
When you turn on this security feature, if someone enters your iPhone's passcode wrong ten times, your iPhone will immediately erase all of its data. Of course, you will still be able to access your backups so you won't lose all your data permanently.
- Open the Settings app.
- Scroll down and go to Face ID & Passcode.
- Enter your passcode.
- Scroll down to the bottom and turn on Erase Data.
Turn On Stolen Device Protection
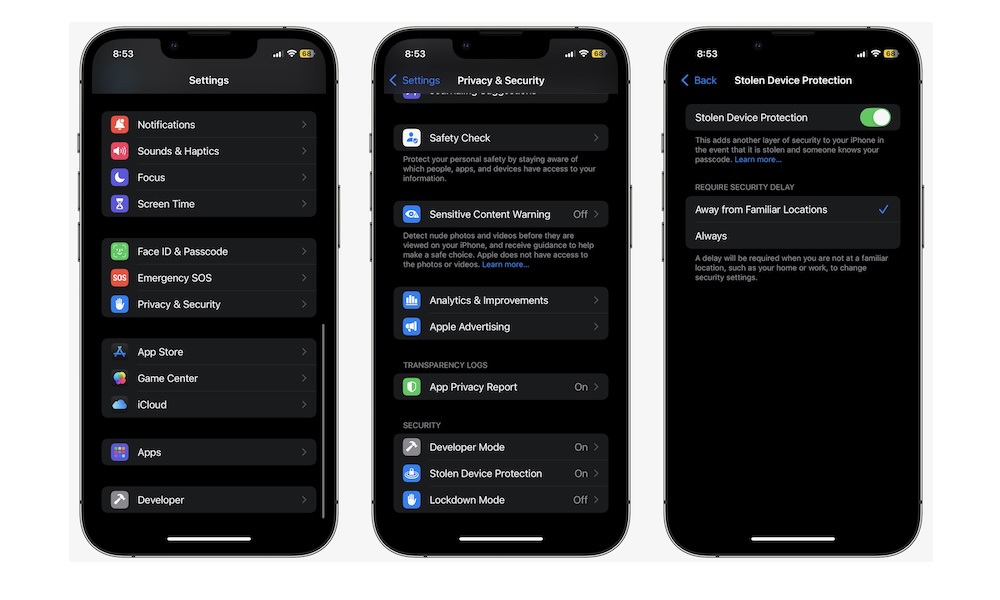
Stolen Device Protection is a relatively new security feature that requires you to use biometric authentication (Face ID or Touch ID) and wait at least an hour before you can change any critical security settings on your iPhone.
That way, if someone steals your iPhone and knows your passcode, they won't be able to change it, turn off Find My, or access your locked and hidden apps. Even if someone can trick you into unlocking a setting via Face ID, they'll have to wait an hour and then convince you to look at your iPhone again to complete the change.
Here's how to enable Stolen Device Protection:
- Open the Settings app.
- Scroll down and go to Privacy & Security.
- Scroll down to the bottom, and under Security, tap on Stolen Device Protection.
- Turn on Stolen Device Protection.
- Under Require Security Delay, choose Away from Familiar Locations if you want to be able to change your security settings without a one-hour delay when you're at a familiar location, such as your home or office. Choose Always if you want to enforce that delay all the time.
While Apple doesn't explain this in the settings screen, the Require Security Delay setting also determines when a passcode will be asked for if Face ID (or Touch ID) authentication fails.
Limit What You Can Access From Your Lock Screen
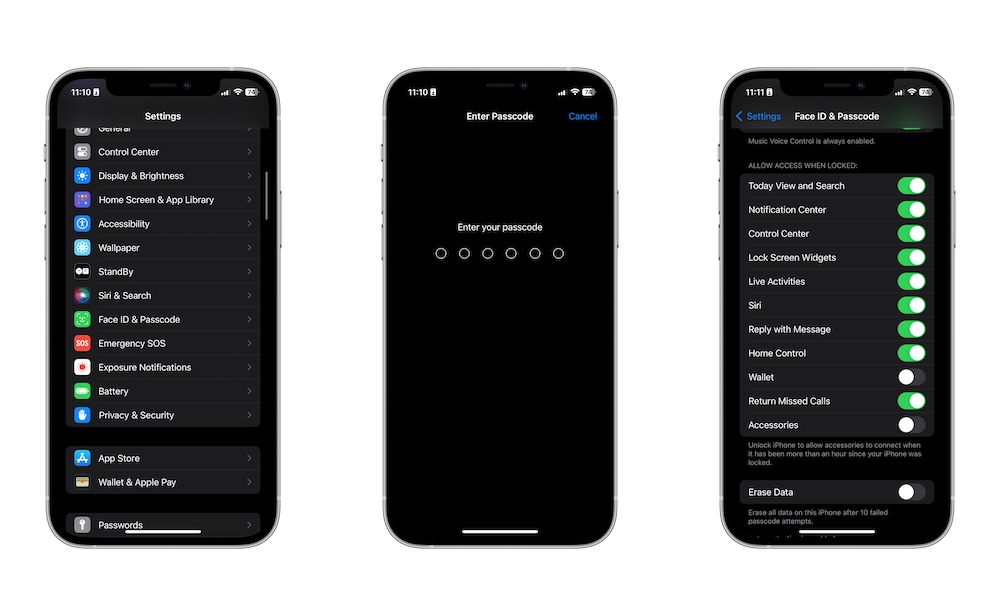
By default, even if your iPhone is locked, you can still access specific features without unlocking it. For instance, you can still see your widgets in the Today View or check your Control Center.
While that's useful, you might not want to let anyone access these options if you aren't near your iPhone. Because of this, you can manage what type of data you allow to be seen when your iPhone is locked. Here's how:
- Open the Settings app.
- Scroll down and go to Face ID & Passcode.
- Enter your passcode.
- Scroll down and under Allow Access When Locked, turn off all the features you don't want to access from your Locked Screen.
If you're using an iPhone equipped with Face ID (which is nearly all of them these days), you'll likely find that you can turn most of these settings off without affecting your ability to access them. That's because your iPhone will scan your face as soon as you wake it up, so by the time you swipe down to open Control Center or access your notifications, it's already unlocked, even if you haven't left the lock screen.
Make Face ID More Secure
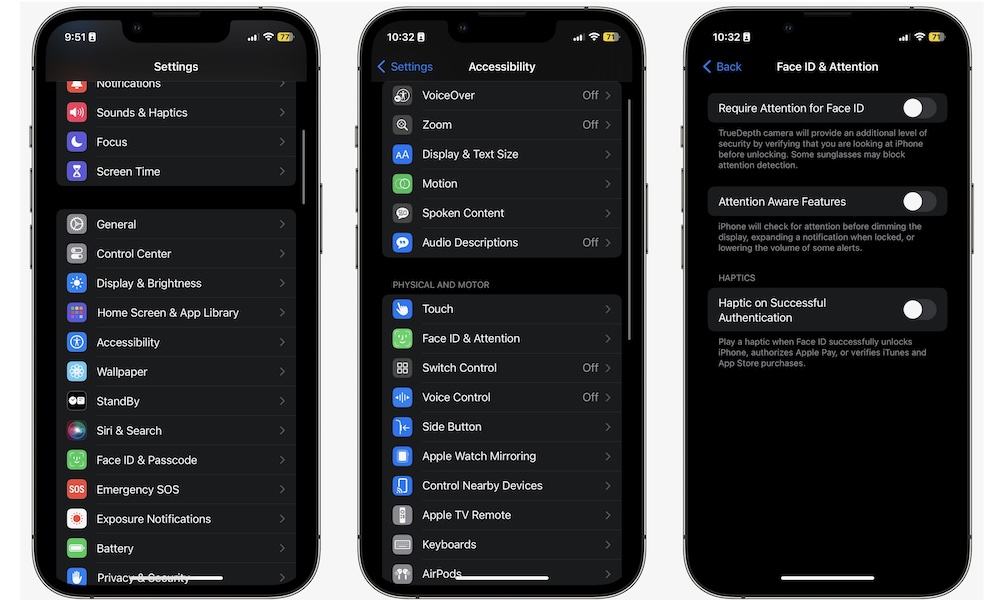
If you have an iPhone with Face ID, you can add another layer of security by requiring it to check that you're actually paying attention.
With this feature enabled, your iPhone will use its TrueDepth camera to ensure you're actually looking at your iPhone when you try to unlock it. That way, even if you're holding your iPhone in front of your face, it will not unlock until you start looking at it.
This is useful in cases where someone wants to try to unlock your iPhone without your knowledge or when you're asleep.
This should be enabled by default, but here's how to make sure you're using this feature:
- Open the Settings app.
- Scroll down and open Face ID & Passcode.
- Enter your passcode.
- Scroll down and under Attention, turn on Require Attention for Face ID.
Enable Two Factor Authentication
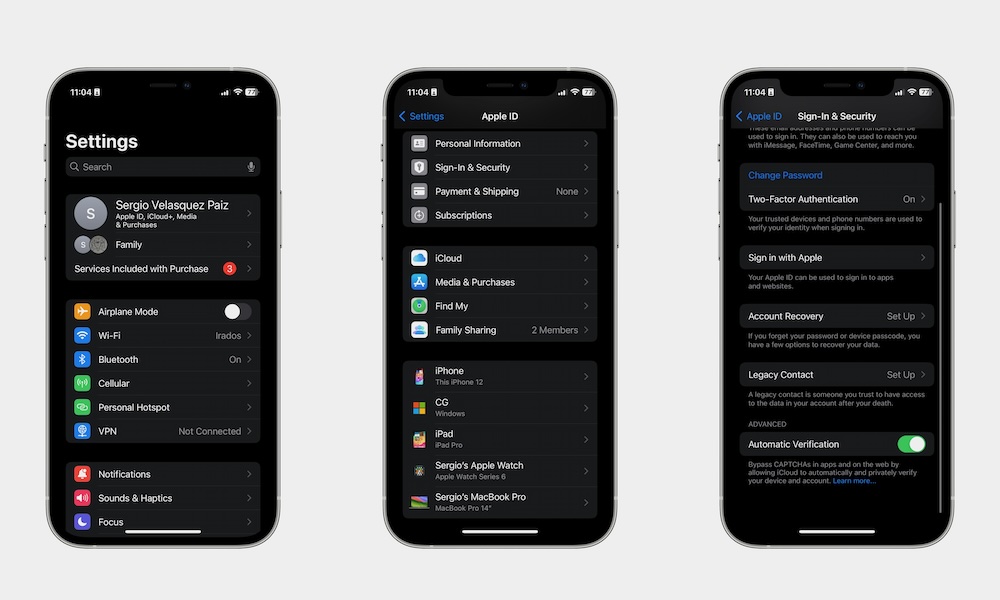
If you have multiple Apple devices, you need to make sure you're using two-factor authentication. With this, Apple will always require you to confirm that you're logging in to your Apple Account (Apple ID) by sending a message to your other Apple devices or sending a text message to your phone number.
To use two-factor authentication on your iPhone, you need to follow these steps:
- Open the Settings app.
- Tap on your Apple Account (Apple ID) at the top of the settings page.
- Tap on Sign-In & Security.
- Under Security, tap on Two Factor Authentication.
- Tap on Turn On Two Factor Authentication.
- Tap on Continue and follow the instructions on your screen.
You can also add a hardware security key to your Apple Account if you want even more protection against potential hackers.
Keep Your iPhone — and Yourself — Protected
Your iPhone has many different security features you can start using right now. That way, no matter where you are or who you are with, you can rest assured that you'll be more protected than before.
Of course, that doesn't mean you are immune to a cyber attack or no one can access your data. There are still ways for companies and scammers to try to get hold of as much data as they can. So, it is also your job to stay safe online and avoid dangerous websites and links that might make it easy for someone to get something from you.