
How to Add Store Rewards Cards (and More) to Your iPhone’s Wallet
 MichaelJayBerlin / Shutterstock
Toggle Dark Mode
You’ve likely used the Wallet app in iOS for your boarding passes — it saves the hassle of printing a pass and saves paper in the process. Plus, all new flight information, like your gate info and boarding time, will be updated in real-time. You’ve got the most current information right in your hands without having to check TV monitors. But have you used it for anything else?
Many users forget how versatile the Wallet app can truly be. Let’s dive into the app to figure out how you can best use it to meet your needs.
What’s the Wallet App?
Originally named Passbook, the Wallet app is one of the many default apps on your iPhone. It allows you to store things like credit cards, reward cards, movie passes, and more. It’s a super convenient way to pay for items, use coupons, and store digital tickets all on your device in one place.
How Do I Add New Items to the Wallet App?
Adding something to your wallet has never been simpler.
- Oftentimes iOS will prompt you with an Add to Wallet option for any applicable card or pass.
- Add to Wallet is available when you launch a mobile boarding pass or when you access the Add a Card section of any Wallet-compatible mobile app.
- Just look for the icon shown below inside of an app, and tap it.
You can also manually add a card to the Wallet app by scanning a QR code.
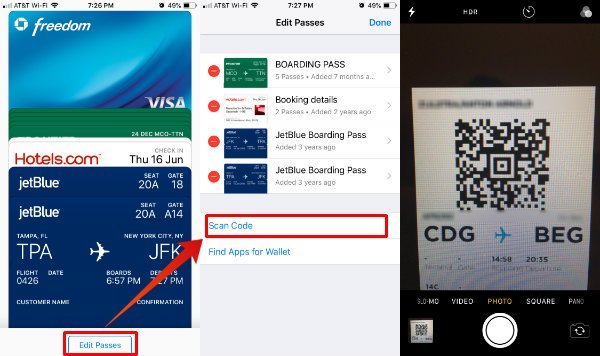
- Scroll to the bottom of your passes and tap Edit Passes.
- Then select Scan Code. This will launch the camera app so you can easily scan the QR code to add your pass.
If a pass or app isn’t supported by Wallet, don’t fret. You can still add it thanks to a third-party app called Pass2U Wallet. Check out Apple’s in-depth help article if you need further assistance.
Tips and Tricks for Using the Wallet App
Just like any default app from Apple, there’s more than meets the eye. The Wallet app has some handy tips and tricks to help you maximize its features.
- Rearrange passes. Tap and hold on any pass to drag and drop it into a new spot.
- Share a pass. Tap the “i” icon to reveal additional information, including the “Share Pass” option. Any pass can be shared via iMessage, AirDrop, or the default Mail app.
- Delete a pass. Expired boarding passes or gift cards can quickly fill up your Wallet. Easily delete them by scrolling to the bottom and tapping the “Edit Passes” button. Then tap the red icon next to whichever passes you’d like to delete.
- Turn on auto updates. Open up a specific pass, then tap the “…” icon in the upper right hand corner. Toggle on “Automatic Updates” to streamline the latest information to your pass.
- Open an app from a pass. When a pass is open, you can tap the app icon in the lower left-hand corner to launch the app.
- Access passes quickly. Go to Settings > Wallet & Apple Pay. Toggle on the “Double-Click Side Button” (on iPhone 8 models and older, it will be Double-Click Home Button) for a way to jump to your passes.
- Suggest passes based on location. Go to Settings > Privacy > Location Services > Wallet and select “Always.”
- Find apps for Wallet. Scroll to the bottom of your passes and tap the “Edit Passes” button. Then tap the “Find Apps for Wallet” to launch the App Store.
The Wallet App Is Much More Than a Way to Pay
Now that you know the ins and outs of the Wallet app, you have a whole new way to organize and optimize your credit cards, rewards cards, movie passes, and much more. It’s the easiest and most convenient way to mobilize your wallet so you’re not stuck fumbling for the right card or pass.
With nearly everything on your device, your physical wallet might even start collecting dust.


