
macOS Big Sur: 10 Common Issues and How to Solve Them
 Onon.su / Instagram
The latest Mac software update, better known as macOS Big Sur, has been out for a few months now. While most of us are still getting used to the new icons and fresh new interface, there are still some minor issues that you're probably experiencing.
If you've recently upgraded your Mac computer to Big Sur, you're probably having a smoother sail than most of us who installed it when it first came out. Still, that doesn't mean Big Sur is flawless.
You might still be experiencing some issues that, while they're not breaking your computer, could be annoying. The good news is that you're not the only one.
Believe it or not, there are some common issues that Big Sur users are experiencing. These issues should go away with future software updates, but as of right now you'll have to fix them yourself.
Continue reading to browse the 10 most common issues from macOS Big Sur and how you can fix them.
Your Battery Is Draining Fast

Some MacBook users have experienced their battery life draining faster than ever. Although, if you recently installed Big Sur, this problem is actually part of the process.
Since your MacBook is doing a lot of work in the background, losing battery faster than normal is to be expected.
That being said, it's something worth checking into if the issue persists for more than a couple of days.
Your battery drain issue is most likely being caused by having some demanding apps running, or your MacBook's battery started to age and has become less effective.
Regarding your apps, you can actually see which apps are draining the energy from your MacBook at this very moment. All you need to do is click on the battery icon on the top right corner of the Menu Bar.
Once you know which apps they are, you can close them.
Of course, you can also see a list of other apps that are creating an energy impact on your Mac. Here's how:
- Access your Spotlight Search. You can do this by pressing the Command Key and the Space Bar at the same time.
- Type Activity Monitor.
- Click on the Energy Tab located at the top of the Activity Monitor window.
- You can see the list of apps that are having a great impact on your MacBook's energy and close them.
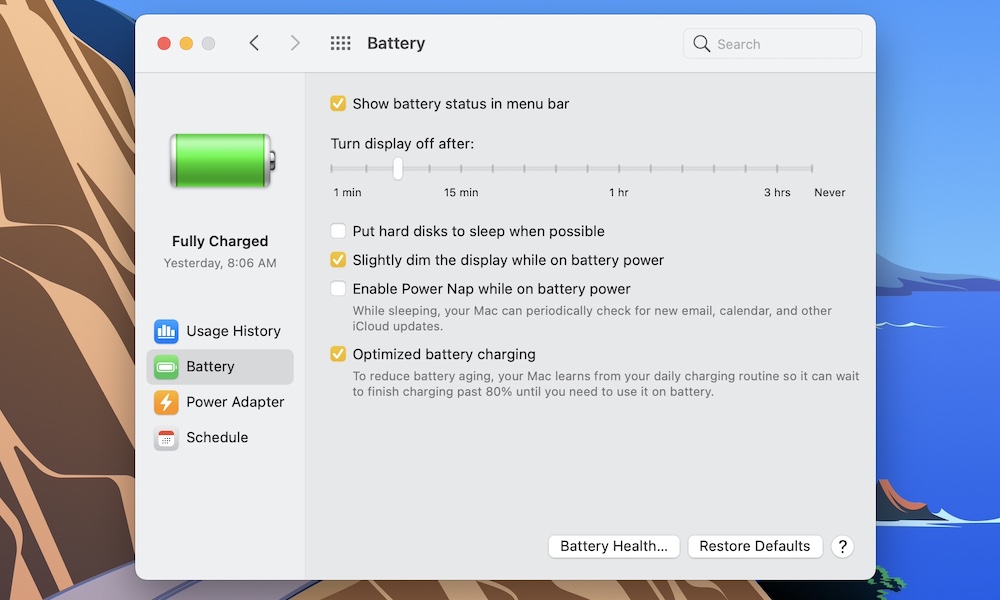
You should also take a look at your Battery Health. If you have an older MacBook, it's possible that your battery isn't performing as well as it used to. Sadly, this is a normal process that happens to every rechargeable battery. Still, it's important that you know what the current status of your Battery is. Here's how to do it.
- Click on the Apple Menu on the top left corner of the Menu Bar.
- Select System Preferences.
- Click on Battery.
- On the left side menu, click again on Battery.
- Click Battery Health... at the bottom of the window.
You'll see what your battery's condition is as well as an option to Manage Battery Longevity which helps to extend the barry lifespan by reducing your MacBook's peak performance.
Your MacBook Is Charging Slower
Another issue some users have complained about is the fact that their MacBook is taking longer to charge. While this isn't new to Big Sur, it's still something we haven't gotten used to.
Despite some complaints, this is actually a feature that helps with your battery's wear and expanding its overall lifespan.
We're talking about Optimized Battery Charging. This is a fairly new feature that helps keep your battery from aging so fast. When this feature is turned on, your MacBook learns your charging habits routines and decides to take longer to finish charging once your battery is past 80% of charge.
Although this is a cool and useful feature, you can actually disable it in case you need to charge your MacBook at the regular speed. Just follow these steps:
- On the Menu Bar, click on the Apple Menu.
- Click on System Preferences.
- Click Battery.
- Again, click on Battery on the left side menu.
- Disable or enable Optimized battery charging.
It's important to note that leaving the Optimized battery charging feature will help your MacBook's battery in the long run. Even if you don't need or want it right now, you should consider turning it on when you also know your MacBook will be connected for long periods of time.
The Menu Bar Keeps Disappearing
After updating to Big Sur, it's possible that some settings changed so that the Menu Bar keeps disappearing if you're not using it.
If that's happening to you and you don't want your Menu Bar to keep hiding, here's how you can fix it.
- Go to the Apple Menu on the menu bar.
- Select System Preferences.
- Click on Dock & Menu Bar.
- At the bottom of the window, make sure that the option Automatically hide and show the menu bar isn't checked.
Unwanted Apps Running in the Background
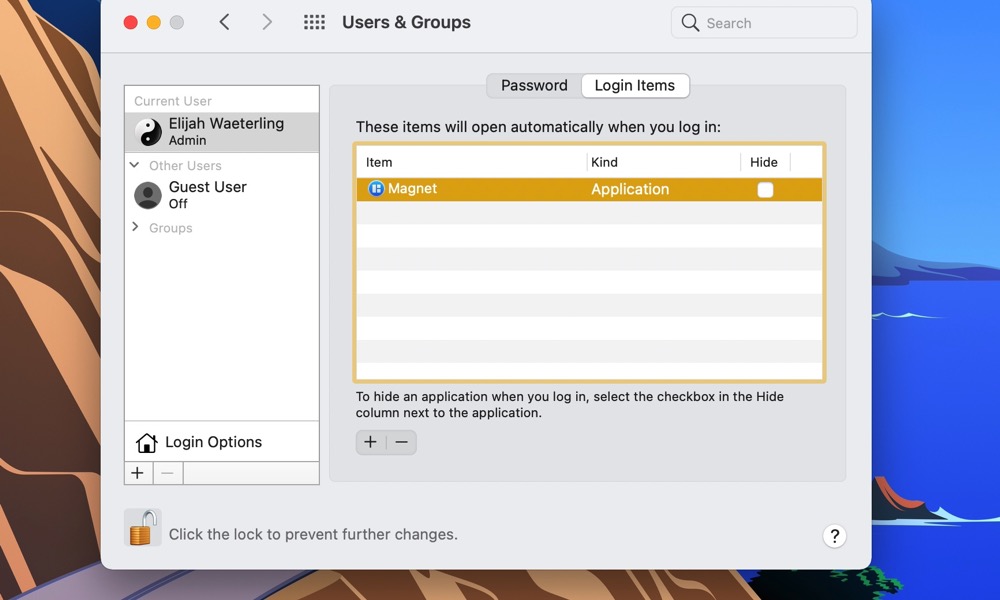
Sometimes after a big software update, some Apps will automatically start launching themselves as soon as you start up your Mac.
While some apps might be useful, others aren't necessary and they only help to reduce your Mac's performance and end up killing your battery life faster than usual.
Fortunately, there's a quick fix to stop apps from automatically running in the background.
- Head over to the Apple Menu on the Menu Bar.
- Click System Preferences.
- Click on Users & Groups.
- Make sure the correct user is selected. You can see all the users on the left side menu.
- Click the Login Items tab.
- You'll see a list of all the items that open up when you log in. Remove the apps you don't want.
Slower Performance
After you installed Big Sur, it's possible, and actually pretty common, that your Mac is running slower than usual. As we mentioned before, that's because your Mac is optimizing itself and it should return to normal speed after a while.
However, if after a couple of days your Mac's still running slower than usual you could try to restart it to see if that fixes the issue.
If that didn't do the trick, there are other things you can do. First, you can disable some apps from running in the background, as we showed you before. Some apps are too demanding to be running in the background and that might cause your Mac to slow down.
You can also check for software updates. If there's an issue with Big Sur that affects performance, Apple will most likely fix it as fast a possible. Having your Mac up to date can help with performance issues, as well as fixing other bugs and security issues you probably didn't know about.
To check for software updates to go to the Apple Menu > System Preferences > Software Update. Your Mac will check for the latest update if there is any and ask you to update.
Finally, you can always go back to the Activity Monitor. It'll let you know which apps are running and show you your CPU and Memory use so you can close the most demanding apps. Here's how you can access the Activity Monitor:
- Go to your Spotlight Search. You can do this by pressing the Command Key and the Space Bar at the same time.
- Type Activity Monitor.
- Click on the CPU or Memory tabs to see your CPU load and Memory Pressure reports.
Finally, you can also try to give your Mac some First Aid by using Disk Utility. This can fix your performance issues and some other issues that you didn't know your Mac had. Here's how you can do it.
- Go to the Disk Utility app. You can access it by using the Spotlight Search on your Mac by pressing the Command Key and the Spacebar and typing Disk Utility.
- Click on View next to Disk Utility and make sure Show all Devices is selected if available.
- On the left sidebar, you should see all your Volumes, Containers, and Disks.
- Select your Volumes, they should be the ones at the bottom and then click on First Aid at the top of the window.
- After you're done with your Volumes, use First Aid with your Containers and then your Disks.
Apple recommends you fix them in that order so you know exactly where the problem was. It's recommended that you start using First Aid from the bottom and work your way up.
Apps Crashing or Running Slow
If you've had any issues with apps that used to work perfectly before, it might be an issue with the app itself and not your Mac.
At first, some apps might experience some problems, like running slower than usual or crashing unexpectedly. Chances are apps will continue to do this until the developers update their apps for Big Sur.
Although, it's possible that an app is ready for Big Sur but you haven't updated it yet. To do this go to the App Store and click on Updates on the left side menu to make sure all your apps are up to date.
On the other hand, if you have a new MacBook or Mac mini with the brand new M1 Chip, it's possible that the apps you're having problems with are still made for the older Intel-based Macs. This is a problem that will be fixed in the future as more developers start working on optimizing their apps for the M1 Chip. Until then, Apple's Rosseta 2 should help you use the apps that haven't been optimized until they're updated.
The Printer Isn't Working Anymore

A printer not working as it's supposed to isn't something new to any of us. They smell your fear and know when you're in a hurry, and there's really nothing you can do about that. But, if your printer stopped working after you updated to Big Sur, then there's a quick thing you can do to fix it.
First, try to restart your printing and give it a go. It's possible that will solve the problem. If it still doesn't work, you might need to uninstall and then restart your printer again. Here's how:
- Go to the Apple Menu on the menu bar.
- Click on System Preferences.
- Go to Printers & Scanners.
- On the left side menu, select your Printer and click on the minus (-) button at the bottom to remove it.
- Reinstall your Printer and try to use it.
Can't Sign In After Updating
It's possible that, after updating, you can't sign in to your Mac for no apparent reason. It's possible that, even if you use Touch ID to sign in, your Mac won't recognize you either.
If you've already tried, and you made sure your user, password, or finger are the correct ones, you might need to reset your Mac's System Manager Controller or SMC for short.
If you're using a Mac Pro, iMac, iMac Pro, or even a Mac mini, turning it off and unplug it for 20 to 30 seconds, and then waiting another 5 seconds before you turn it on should do the trick.
If you're on a MacBook, however, the process takes a little longer than that. Here's what you need to do.
First, make sure your MacBook has a T2 Chip. This is a security chip from Apple that makes your Mac harder to hack into. Most common Mac computers have it, but you still need to figure out if yours has it or not. Here's how:
- Click on the Apple Logo to access the Apple Menu.
- Press and hold the Option key on your keyboard. You should see the Apple Menu change.
- With the Option key still press down, click on System Information.
- On the sidebar, click on Controller. You should see Apple T2 Security Chip if your Mac has it.
Now, with this information, here's how you can reset your SMC.
How to reset your SMC if your Mac has an Apple T2 Security Chip:
- Turn off your Mac.
- Press and hold the Power Button for 10 seconds.
- Wait a moment and turn your Mac again.
How to reset your SMC if your Mac doesn't have an Apple T2 Security Chip:
- Turn off your Mac.
- Press and hold the Shift key + Control key + Option Key + Power Button for 10 seconds.
- Turn on your Mac if it didn't do it automatically.
Wi-Fi Connection Issues
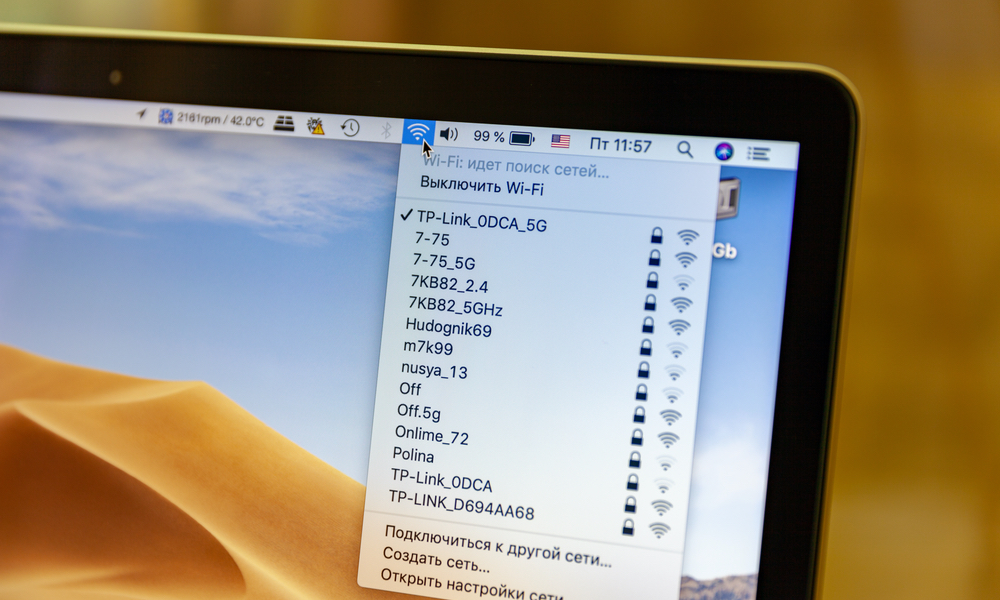
One of the most annoying issues is your Wi-Fi not working properly.
If after you downloaded macOS Big Sur, your Mac can't connect to your Wi-Fi network, here's what you can do.
First, you can reset your router and try to connect your Mac again. If that doesn't work and you can do it, try to connect to another Wi-Fi network. It's possible that your router or Wi-Fi are the problems so you need to do this to rule this out.
If that didn't work, you can try to reset your System Manager Controller, like we showed you in the last step. That usually fixes most minor issues, so you can give it a go and see if that fixes the problem.
You can also try to use the Disk Utility App and use First Aid to fix your Disks, Containers, and Volumes. Here's a quick reminder on how to do it:
- Go to the Disk Utility app. You can access it by using the Spotlight Search on your Mac by pressing the Command Key and the Spacebar and typing Disk Utility.
- Click on View next to Disk Utility and make sure Show all Devices is selected if available.
- On the left sidebar, you should see all your Volumes, Containers, and Disks.
- Select your Volumes, they should be the ones at the bottom and then click on First Aid at the top of the window.
- After you're done with your Volumes, use First Aid with your Containers and then your Disks.
Finally, you can delete your Wi-Fi connections and try to connect again. Here's how you can delete them:
- Go to the Apple Menu on the menu bar.
- Click System Preferences.
- Click on Network.
- Select Advanced
- You'll see a list of all your preferred networks. Click on them and then click on the minus (-) button to remove them.
- Restart your Mac.
- Connect to your Wi-Fi network again.
Bluetooth Connection Issues
You might also experience some issues when connecting to your Bluetooth devices. Fortunately, there are a couple of fixes to this issue.
First, you can try to reset your Bluetooth Module. This will reset all the devices you've connected to your Mac so you can try to connect it again as if it's the first time.
- Press and hold the Option key and the Shift key.
- While pressing both keys down, click on the Bluetooth icon at the top right corner of the Menu Bar. After you click it, you can release both keys
- Click on Reset the Bluetooth module.
- Click on Ok.
- Connect your device
If that didn't work, you can always try to delete your list of Bluetooth devices connected. This is a little more technical but it's equally easy.
- Open up Finder.
- Located Macintosh HD. You can easily find it by right-clicking on the folder's name until you see a dropdown list and click on Macintosh HD.
- Open the Library folder.
- Scroll down and click on the Preferences folder.
- Search for com.apple.Bluetooth.plist and delete. You can also move it to another location in case you want to save it.
- Restart your Mac and try to connect your Bluetooth device again.