
How to Transfer Your iPhone’s SIM to an eSIM (And Why You Should)

Toggle Dark Mode
While most folks are familiar with the trusty SIM card that lives inside an iPhone and other modern smartphones, the mobile world has gradually been shifting gears over to a new form of embedded SIM, or eSIM, that replaces the physical SIM card.
SIM is an acronym for Subscriber Identity Module, and as the name implies, it’s the component in your iPhone that links your device to your carrier’s network. Your SIM card contains information that identifies your account with your mobile provider and the necessary security keys to authenticate your phone and allow it to connect securely to the mobile network.
Physical SIM cards have been around for over 20 years, first appearing as part of the GSM 2G standard at a time when other phones on carriers such as Verizon required phones to be programmed directly by a hands-on service rep. By contrast, using a SIM card untied your physical phone from your carrier plan, making switching phones as easy as moving the physical card over to the new phone. Your carrier didn’t even have to know you were switching phones, much less do anything on their end to facilitate it.
SIM cards were such a great idea that they were adopted as part of the more widespread 3G UMTS standard and have carried on since into 4G LTE and 5G NR technologies. However, the world of SIM cards has gotten more complicated.
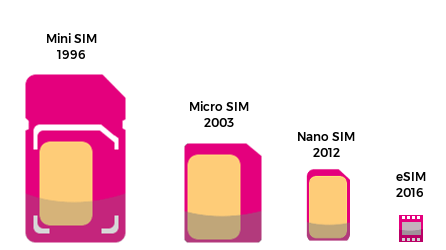
As manufacturers have tried to slim down their phones and make more space inside for other components, newer and smaller versions surfaced, including the MicroSIM that came to the Apple world with the iPhone 4 and the NanoSIM that supplanted it in 2012 when the iPhone 5 came along. That smaller format remains the norm in most modern iPhones and other smartphones, but as you can imagine, moving between smartphones that use different SIM card sizes can be tricky.
It’s not just the size of the SIM card, either. Moving to newer cellular technologies often requires a newer SIM card. For example, if you’re upgrading to a 5G iPhone for the first time, using your 4G LTE SIM may not give you the best 5G performance. If you buy your new iPhone from your carrier, they’ll supply you with a proper SIM card, but if you purchase a fresh 5G iPhone unlocked or a second-hand 5G iPhone, you’ll need to get a new SIM card from your carrier to get the best performance on their network — and many carriers will charge you a small fee for this.
The eSIM standard promises to solve many of these problems by incorporating the SIM card’s electronics directly into the main circuitry of the phone. This addresses the need to save space inside modern smartphones by eliminating the need for a separate tray and slot and resolves issues around SIM card compatibility. Unlike physical SIM cards, which are manufactured at minimum cost, an eSIM is designed to handle all the cellular technologies for whatever phone it’s built into.

Which iPhone Models Use an eSIM?
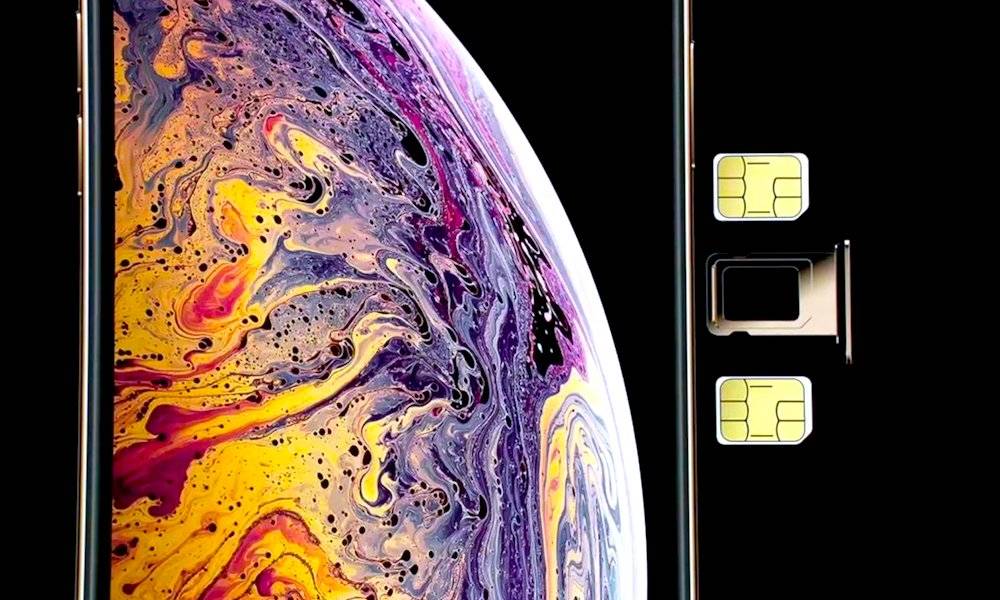
The first Apple device to use an eSIM was actually the cellular-capable Apple Watch Series 3 in 2017, but by 2018 Apple had brought eSIM technology to its new iPhone XS lineup and iPhone XR to support its new Dual-SIM feature.
Except in China, where eSIM hasn’t gained a foothold, the iPhone XS/XR lineup allowed users to provision two lines on the same iPhone using a physical SIM and an eSIM together. The iPhone models built for sale in China had two physical SIM card slots instead, and that remains true to this day.
While the iPhone XS/XR could be provisioned to use an eSIM instead of a physical SIM card, most carriers and users didn’t bother. In fact, many folks didn’t even know their iPhones were dual-SIM capable since an eSIM is easy to miss unless you read the spec sheets or go poking around in your iPhone’s Settings app.
Nevertheless, the Dual-SIM capability was quite handy for those who needed it — as long as you could find a carrier that supported eSIM. Those were few and far between in those early days, but much has changed since then.
The SIM/eSIM combo remained the norm through to the 2020 iPhone 12, but in 2021 Apple snuck in something else new with the iPhone 13: a second eSIM to allow the newer iPhone to be provisioned with two lines without the need for any physical SIM.
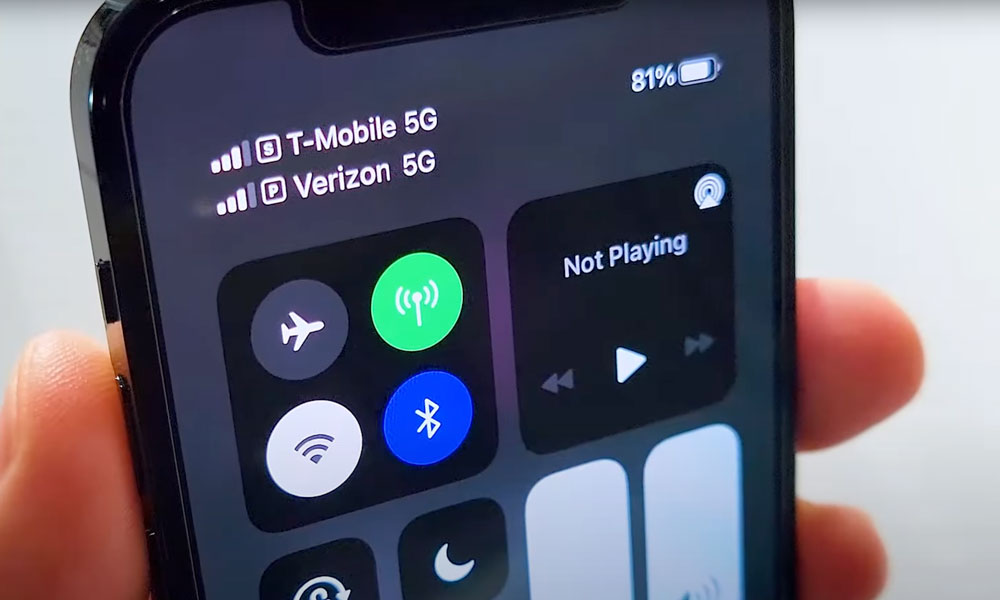
To be clear, this change doesn’t allow you to have three lines active at the same time, but it does let you ditch the physical SIM card entirely and use two eSIM lines. You can also have a physical SIM card and both eSIMs set up simultaneously, allowing you to pick whichever two of those three lines you want to have active.
Then, last year Apple led the way by becoming the first mainstream phone manufacturer to go all-in on eSIM. It eliminated the physical SIM card slot on all iPhone 14 models sold in the United States, requiring customers to switch to eSIM to upgrade to the latest iPhone.
To be fair, Apple did quite a bit of groundwork to make sure the major US carriers were ready to handle this change, and it applied only to the iPhone 14 models sold in the US. Those sold in other countries, including Canada, retained the physical SIM slot and two eSIMs from the iPhone 13 design.
So, if you’re using an iPhone 14 in the US, then you’re already using an eSIM. However, if you’re on an older iPhone or using an iPhone 14 in another country, there’s a good chance you still have a physical SIM inside. There’s nothing wrong with this — your iPhone will work just as well with a physical SIM as an eSIM — but there are some excellent reasons to switch to using an eSIM instead, and it’s not hard to do if your carrier supports the move.
Benefits of Using an eSIM in an iPhone
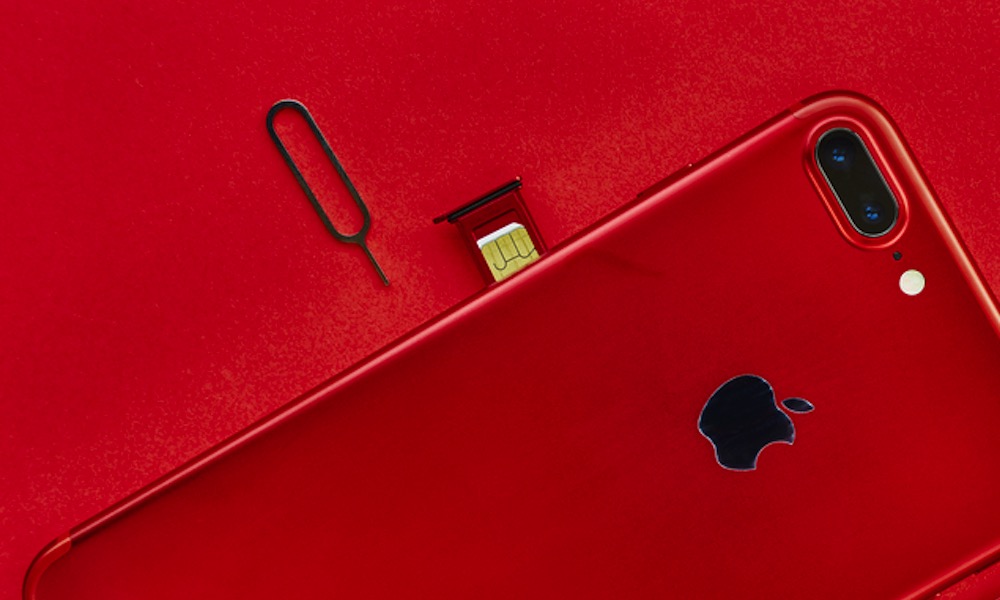
If you’ve ever traveled with a SIM-capable phone, you may be wary about using an eSIM. After all, one of the most significant advantages of a physical SIM is that you can pop it out and replace it with a local SIM from a prepaid plan in your destination country, saving you the often-exorbitant roaming fees that your home carrier may charge for calling and texting abroad.
However, with modern Dual-SIM iPhones, that’s all the more reason to switch to using an eSIM for your primary carrier. Instead of removing your physical SIM card and effectively cutting your phone number off entirely from receiving emergency calls and texts, you can move it to the eSIM, freeing up your SIM card slot for a local prepaid plan.
You can then set your iPhone to use only that local plan for data and calling while still receiving text messages and calls from home without the need for friends and family to know your temporary local number and use international calling or texting to reach you on it.
That said, using a physical SIM card when traveling may not be as much of a requirement as you think. Many foreign cellular carriers support eSIM as well, and in many cases setting this up can be as easy as scanning a QR code from a prepaid card you can pick up at one of their kiosks. That’s much easier than fiddling with a tiny SIM card and tray while traveling through a busy airport.
However, if you have an iPhone 13 or a non-US iPhone 14, moving your physical SIM to an eSIM will give you the best of both worlds. Since those models have two eSIMs, you’ll end up with your physical SIM card slot available, plus the other eSIM. This way, you can set up your iPhone in whatever way is easiest when you arrive at your destination.
Travel aside, using an eSIM is also better for security. Anybody who gets their hands on your physical SIM card can not only rack up phone charges on your account but can also receive your calls and text messages — including one-time codes used for things like password resets. While physical SIM card theft isn’t the only technique used for SIM jacking, moving your account onto an eSIM eliminates this possibility, as there won’t be a physical card for someone to steal.
How to Move Your iPhone’s SIM to an eSIM
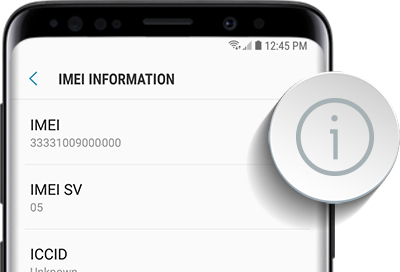
Even though Apple has supported eSIM in the iPhone since 2018, switching over used to be a slightly complicated process that typically involved calling or visiting your carrier and reading out long strings of IMEI and ECCID numbers. It was doable, but it usually wasn’t worth doing unless you had a serious reason to need it.
Thankfully, that’s changed in recent years. Likely in preparation for the new eSIM-only iPhone 14 and its work with carriers, Apple added a simplified transfer process that you can undertake directly on your iPhone without the need for your carrier to be involved at all. Your mobile provider has to support this quick transfer feature, but Apple provides a helpful list of those that do, and new ones are popping up regularly.
Even if your carrier isn’t on that list, it may be worth trying anyway, as there’s likely some time between the carrier adopting the technology and Apple updating its list. For instance, I discovered this week that my carrier, Bell, now supports this feature, despite not being on Apple’s list.
Before we begin, it’s important to note that this is a one-way trip. You can’t move your account from your eSIM back to your physical SIM card. If you want to go back to using a physical SIM card in the future for whatever reason, you’ll need to contact your carrier and have them set that up for you. You’ll also likely need a new SIM card, as most carriers won’t re-provision old SIM cards for security reasons.
Here’s how to transfer your SIM to an eSIM (and find out if you can):
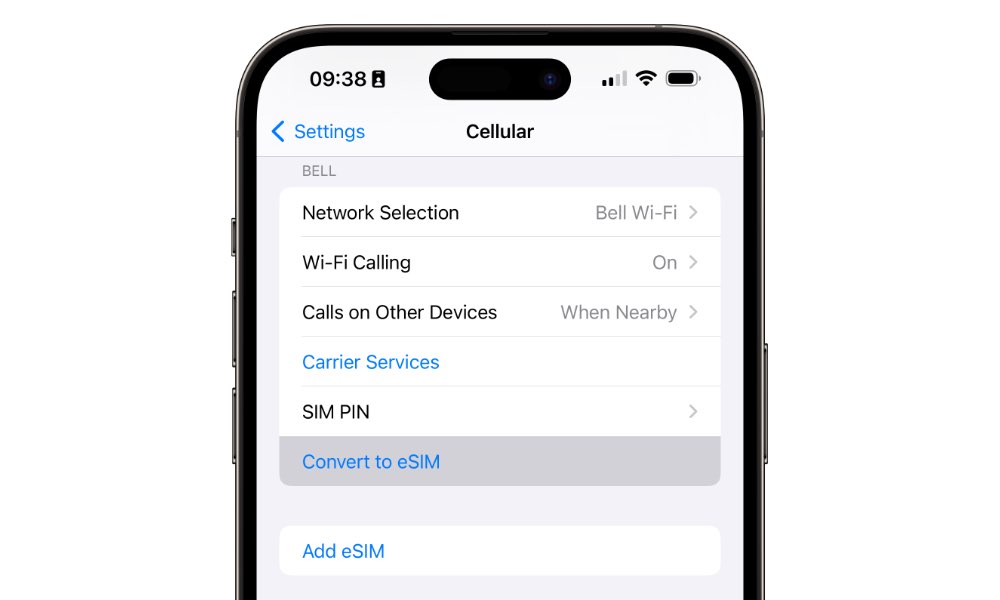
- Open the Settings app on your iPhone.
- Select Cellular
- Choose Convert to eSIM in the carrier section. This should appear below “SIM PIN” and “Add eSIM” (see above). If it’s not there, that likely means your carrier doesn’t yet support this feature, although it also won’t appear if you’re not using a physical SIM, of course.
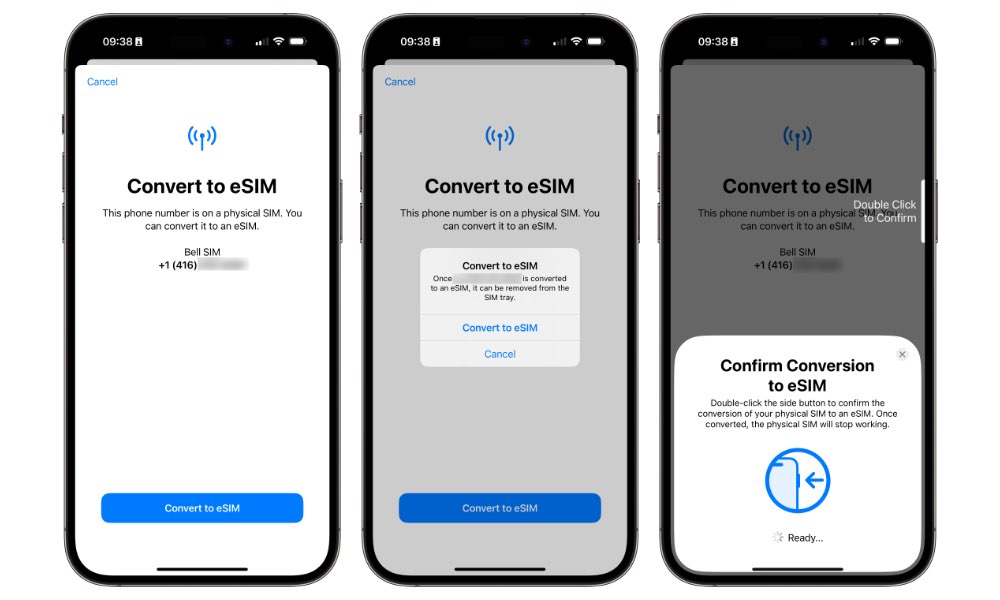
- Read the information on the next screen to confirm your number and carrier matches what it should, and then select the blue Convert to eSIM button to confirm.
- In the pop-up that appears, choose Convert to eSIM again.
- On the next screen, double-click the side button as a final confirmation that you want to move your physical SIM to an eSIM.
- It may take anywhere from a few seconds to a minute or more to activate the eSIM. During this time, your iPhone will temporarily lose cellular connectivity as everything gets moved over. When this finishes, you should see a confirmation screen. Select Done to finish things up.
After you’ve converted your SIM to an eSIM, you’ll see two entries under SIMs. The first one is your new eSIM, while the second will show your same phone number, labeled “Converted to eSIM.” This represents your physical SIM card, which is no longer active and can be removed from your iPhone.
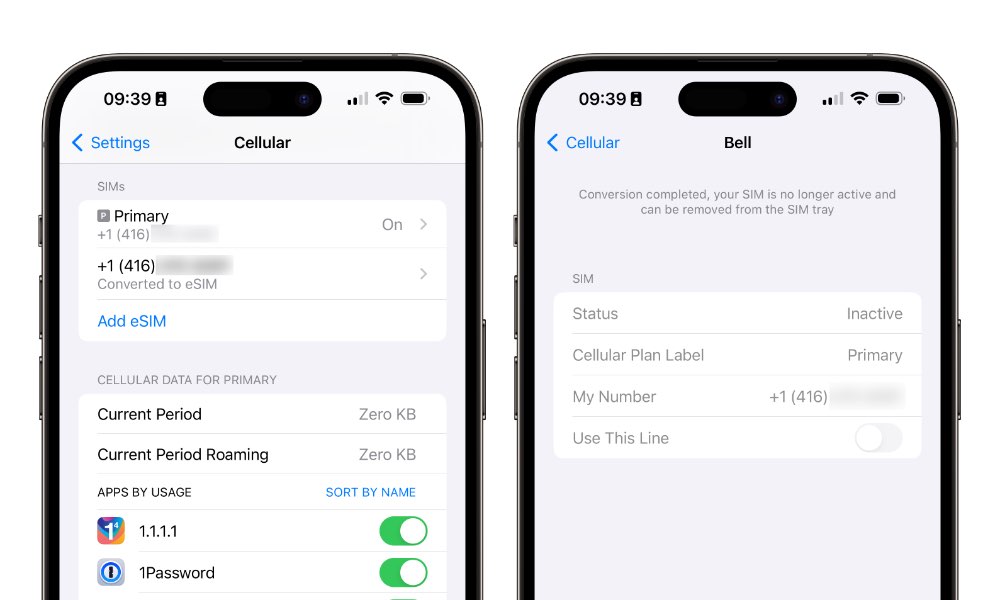
You can leave your SIM card in your iPhone, but there’s no point. Once you’ve moved to an eSIM, your physical SIM card is permanently deactivated, so it can’t be reused. Removing it from your iPhone will get rid of that extra line in your Cellular settings and return you to the simpler view that puts all your cellular settings on the main screen.
Once you move to an eSIM, you’ll also see an option to Turn On This Line. Since you can’t physically remove an eSIM, this switch lets you effectively switch off the eSIM, producing the same result as removing a physical SIM card. There’s also a “Delete eSIM” button, but you’ll want to stay away from that unless you intend to cancel your service and move to a new carrier.


