
How to Convert Images to PDF on iPhone
 Tim Mossholder
Toggle Dark Mode
By default, your iPhone automatically saves all your pictures in a High Efficiency Image File Format, also known as HEIF. This lets you store more pictures without losing their quality.
Depending on your iPhone settings and whether the receiving device supports HEIF, these pictures may be automatically converted to the more compatible JPEG format when shared via AirDrop, Messages, or email. But what if you want to use a different format?

What if you want to share your pictures as PDF files instead of images? Well, your iPhone is also capable of converting images to PDF, albeit in a slightly different way than you’d expect.
Still, once you know what to do, the process is pretty straightforward. Here’s how you can convert any image stored in the Photos app into a PDF file.
First, Make Sure You Have Apple Files
Before you can turn your images into PDF files, you’ll need the right app on your iPhone. Apple Files is the best app for seeing and managing all your files, and it allows you to save images as PDF files.
Apple Files comes preinstalled on your iPhone by default, but you can re-download it or open it from the App Store if you’ve removed it or can’t find it.
How to Turn Images to PDF Files on iPhone
Once you’ve downloaded or located the Files app on your iPhone, we can start with the fun part. To turn one or multiple images into a PDF file, you need to do the following:
- Open the Photos app.
- Open the photo you want to turn into a PDF file. If you want to turn multiple photos into the same PDF file, you’ll need to first tap Select in the top right corner of your screen and select all the images you want.
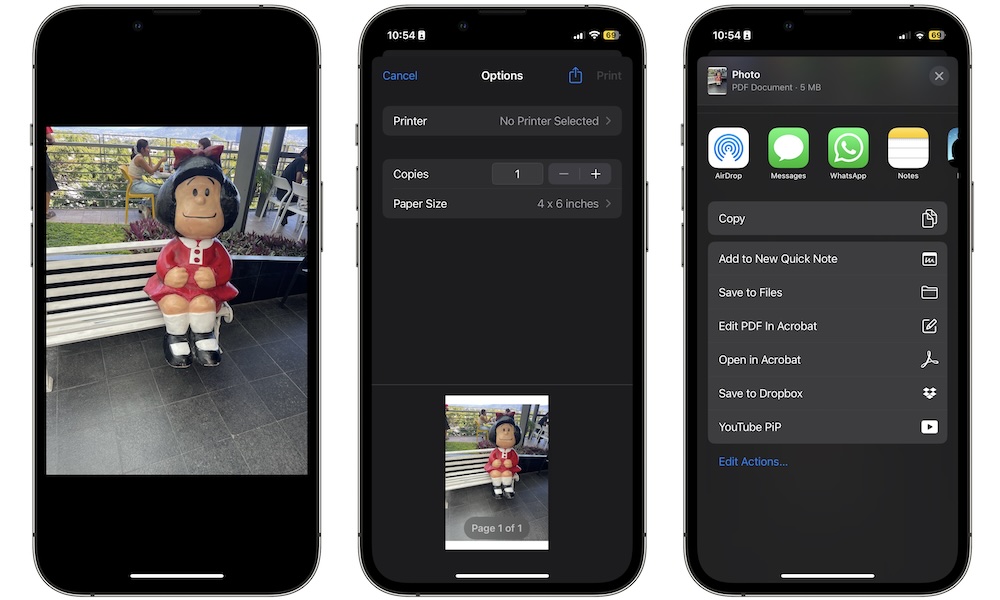
- Tap on the Share button in the bottom left corner of your screen.
- Scroll down and select Print.
- Now, instead of printing the pictures, tap on the Share button one more time.
- Scroll down and tap on Save to Files.
- Select the folder where you’d like to save the PDF of your photos.
- Choose Save in the top-right corner.
And that’s it! Your images will be automatically saved on your iPhone as PDF files.
How to Find Your PDF Files on iPhone
Of course, creating a PDF file means nothing if you don’t know how to find it or use it. Luckily, finding your PDF file is just as easy as creating it.
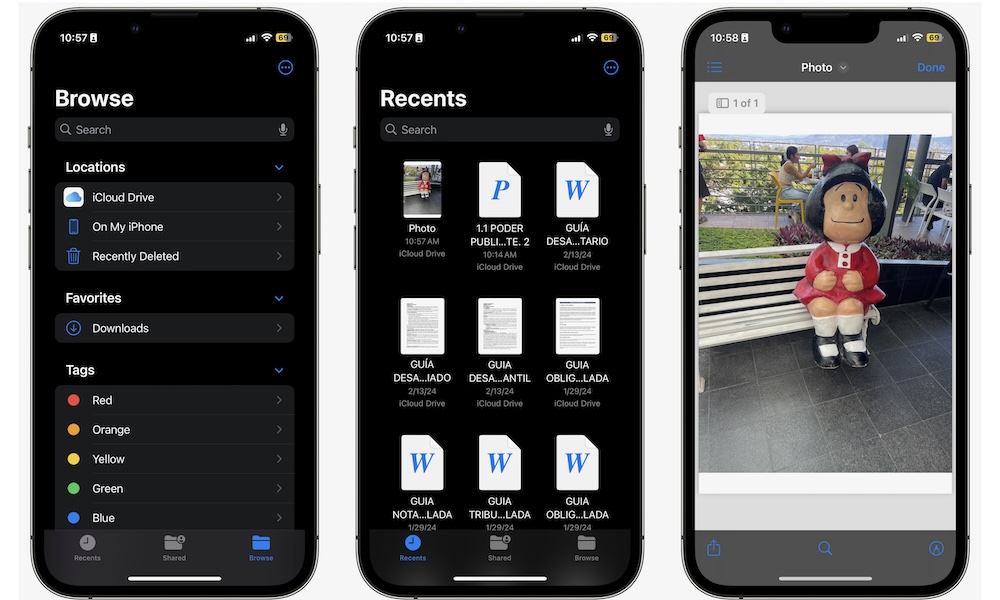
- First, open the Files app.
- Tap on the Recent tab in the bottom left corner of your screen.
- You should see your new PDF file at the top of the Recents list.
Now, you can select it and share or edit the PDF file however you like.
Further, if you chose to save the PDF in an iCloud Drive folder such as Desktop or Documents, you’ll also be able to find it in the corresponding location on your Mac.
Convert Your Images in a Few Steps
As we mentioned, converting your images to a PDF file requires a few more steps, but it’s still just as easy as sharing them.
You can do this as many times as you want, but remember that you’ll also be creating new files to store on your iPhone, so be careful with your storage.


