
How to Backup Your iPhone or iPad Data to iCloud

Toggle Dark Mode
Let’s face it — we’ve all been there once or twice before. We just purchased a brand new iPhone or iPad and we’ve been told something along the lines of “okay, you’re all set and ready to go,” only to arrive home just minutes later and realize that, “no, in fact, we are not ready to go, because where have all my contacts and pictures and email account information gone?”
Seems like something must’ve gotten messed up along the way, right? It’s either that, or, perhaps more likely, you simply forgot to backup your device — and all its intricate applications, settings, and content — to the good old cloud.
Wait, the good old what? you’re likely thinking. What’s a cloud? Those puffy white blobs of moisture that always tend to ornament the sky before it rains?
Well, sort of, but not really. You see back in 2011, Apple first introduced their “cloud-based” remote storage system, dubbed “iCloud,” which has grown over the years to become one of the company’s most robust and user-friendly feature offerings.
Never before in the history of life as we know it has it been easier to push a little button, and poof, send the contents of our phones and tablets to this invisible, magical storage center in the sky. Actually, for whatever it’s worth, the cloud is located on one of Apple’s servers around the country, depending on your location, and is easily accessible by any iOS or OS X powered device, wherever you may be.
Pretty cool, huh? Well, what if I told you that you’d never have to worry again about losing all your contact, content, or applications when activating a new iPhone or iPad? And that your iPhone or iPad can be backed up to your desktop and vice versa? It’s true, friends, I kid you not. And it’s actually a fairly simple process, too, just follow these quick steps and you’ll be on your way to living life in the cloud!
How to Backup Your iPhone/iPad to iCloud
Step 1 – From the home screen, select Settings > and then select iCloud (you should see the email you used to register your Apple ID underneath.)
Step 2 – From the submenu list, select the information that you’d like to be stored in the Cloud — i.e., Photos, Mail, Contacts, Calendar, etc. — by switching the toggles to on.
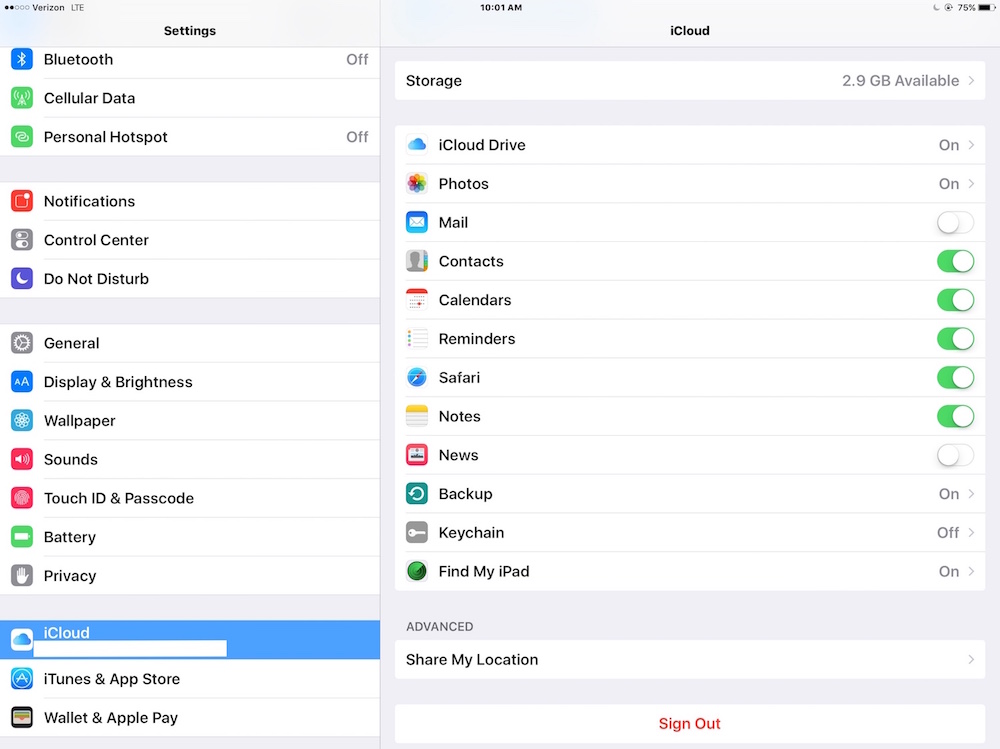
Step 3 – Select “Backup,” the second or third option from the bottom of the list > and then, if you haven’t already, switch the toggle under iCloud Backup to the green on position.
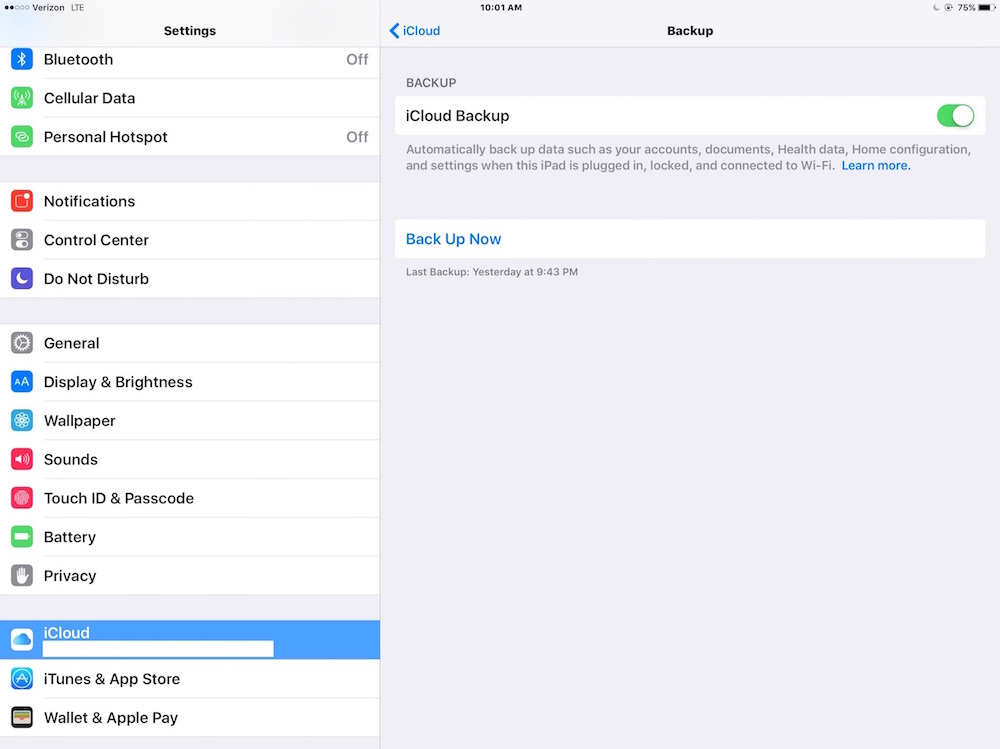
Step 4 – Finally, select “Back Up Now,” and then choose the most recent Back Up from the subsequent menu list.
Each new iPhone or iPad comes with 5 GB of FREE Cloud storage on iCloud, and the device can be backed up at any time, usually in a matter of just minutes. Additionally, for you power users, more storage can be purchased and/or cancelled at any time, with prices ranging from 50 GB for $0.99 cents per month, to 1 TB for $9.99 per month.
Learn More: How to Make Room on Your iPhone or iPad


