
9 Smart Apple Wallet Moves to Make Your Life Easier
 FellowNeko / Shutterstock
Apple Wallet is one of the best Apple apps you can have on your iPhone. This simple and effective app is the perfect way to pay for anything you want with nothing but your iPhone.
However, if you have never used Apple Wallet before, you might not know how beneficial it is. Of course, you need to know how to use it properly.
Believe it or not, the Wallet app can make your life so much easier if you use it correctly. Read on for 9 tips to help you get the most out of the Wallet app.
Add Your Credit or Debit Card
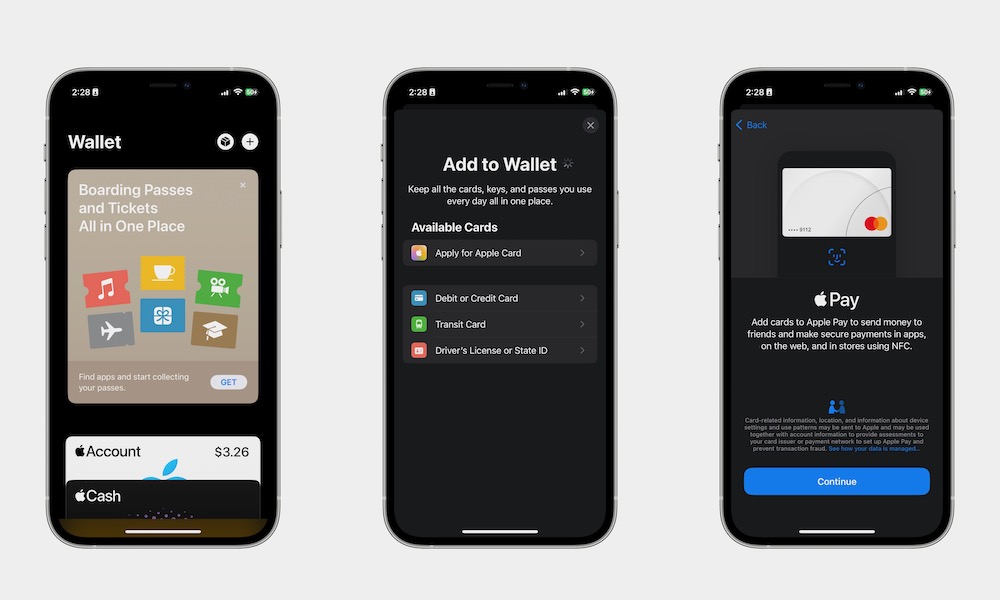
The Wallet app's most basic feature is the ability to add your credit or debit card to your iPhone. This way, you can easily pay for stuff without having your physical card.
Adding your credit or debit card to Apple Wallet is pretty straightforward. Here's what you need to do:
- Open the Wallet app.
- Tap the plus icon in the top right corner of the screen.
- Select Debit or Credit Card.
- Tap on Continue.
- Use your camera to scan your card. Or you can select Enter Card Details Manually.
- Follow the instructions on the screen and agree to the terms and conditions to finish adding your card.
Note that not every payment card is compatible with Apple Wallet. Your bank needs to support Apple Pay, and although most major banks are on board, you'll still encounter a few holdouts. Also, while this works great for credit card and debit card payments, you may still need to have your physical card on hand for ATM withdrawals.
Apply For an Apple Card
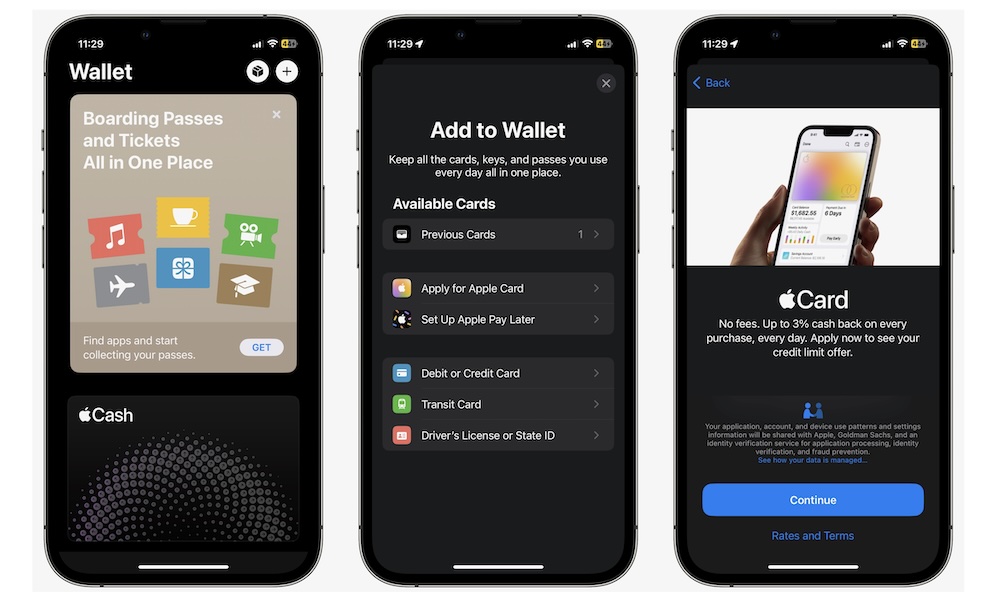
Besides being able to hold your cards, Apple can also give you their own credit cards. This is cleverly called an Apple Card, and you can apply for one directly in the Wallet app — as long as you're a resident of the United States.
Compared to other credit cards, the Apple Card has a few benefits you might be interested in. For starters, there are no fees, and you can get up to 3% cash back when you make a purchase with the app — and even more during certain seasonal promos.
Here's how to apply for an Apple Card:
- Open the Wallet app.
- Tap on the plus icon in the top right corner of your screen.
- Select Apply for Apple Card.
- If you want to, read the Rates and Terms and then tap on Continue.
- Enter your details and be sure that the Apple ID is the one you want to link your Apple Card to. Then tap on Next.
- Follow the instructions on your screen.
Now, it's time to wait for you to get approved. Usually, you should expect around seven to ten business days before you get a notification.
Add Your Driver's License or State ID
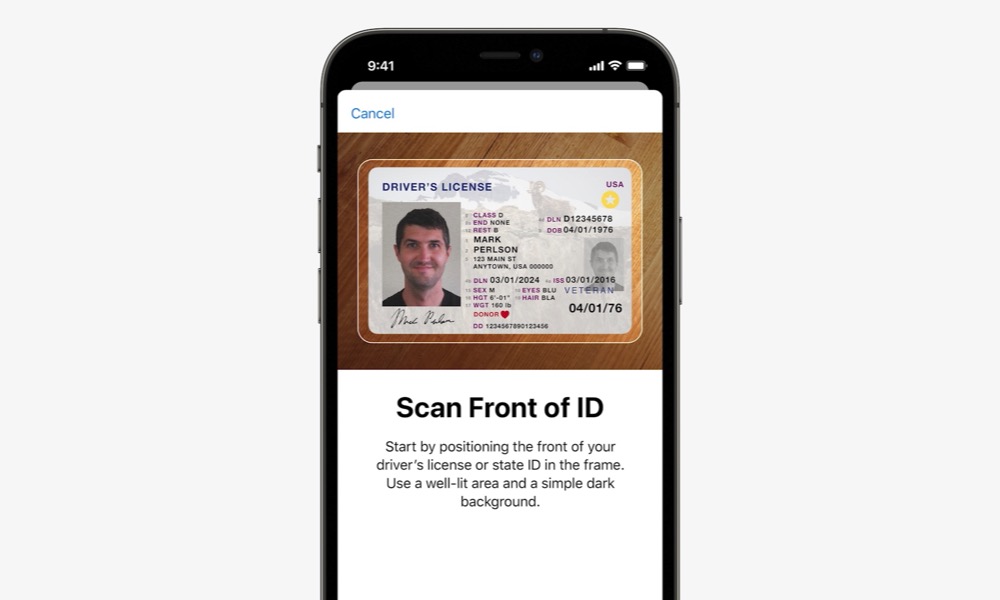
Another cool feature of the Wallet app is the ability to add your driver's license or your state ID. Granted, not everyone can do it, but if you're one of the select few, you'll be able to use your digital license at TSA checkpoints when traveling by air and may soon be able to present it as ID when purchasing age-restricted items, renting cars, and more.
Sadly, most states still won't let you drive without your physical license, but they'll get there eventually.
As of right now, only the people who live in Arizona, Colorado, Georgia, or Maryland can add their Driver's License or state ID. If you live in one of these regions, this is what you need to do:
- Open the Wallet app.
- Tap on the plus icon in the top right corner of your screen.
- Tap on Driver's License or State ID.
- Choose the state your driver's license is registered in.
- Scan your driver's license and follow the instructions on your screen to complete the process.
Once you're done, your state will need to verify your identity. To do this, you'll be asked to make a series of head or facial movements or to take a selfie. If needed, the state might ask for more information.
Afterward, you'll have to wait until your digital driver's license gets accepted.
You Can Also Add Your Boarding Passes
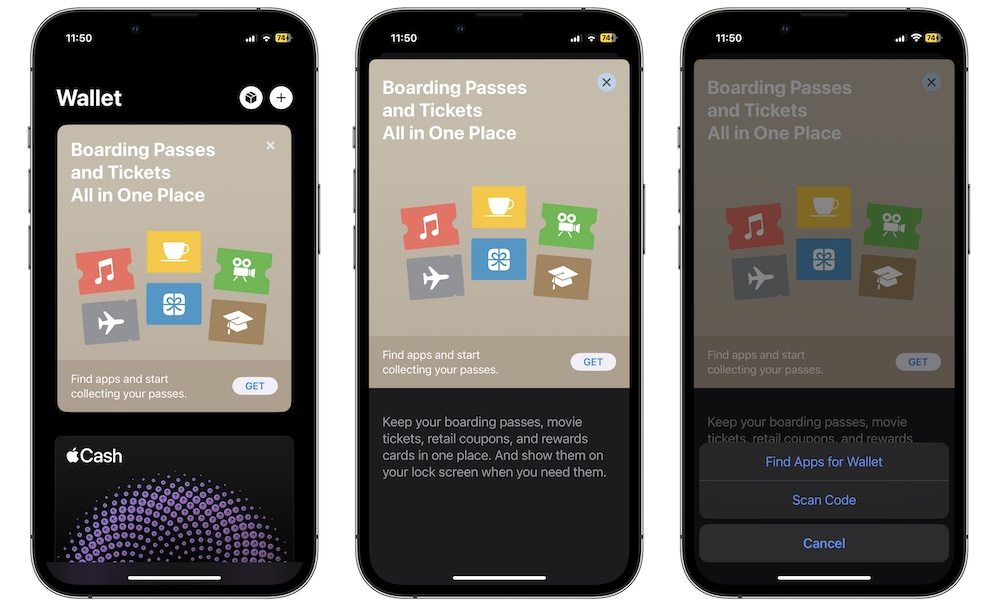
Having to keep track of your boarding passes can be a hassle, especially with everything else you carry with you. But you know what's not hard to keep with you? Your iPhone.
And as it turns out, you can add your boarding passes to your Wallet app with just a few steps.
All you need to do is get the confirmation email with your boarding pass. In the email, you should see an option to Add to Apple Wallet, or you should see a code that you can scan with your iPhone.
Afterward, you'll have your ticket in your Apple Wallet, and you'll be able to use it when you're traveling.
Send or Receive Money With Apple Cash
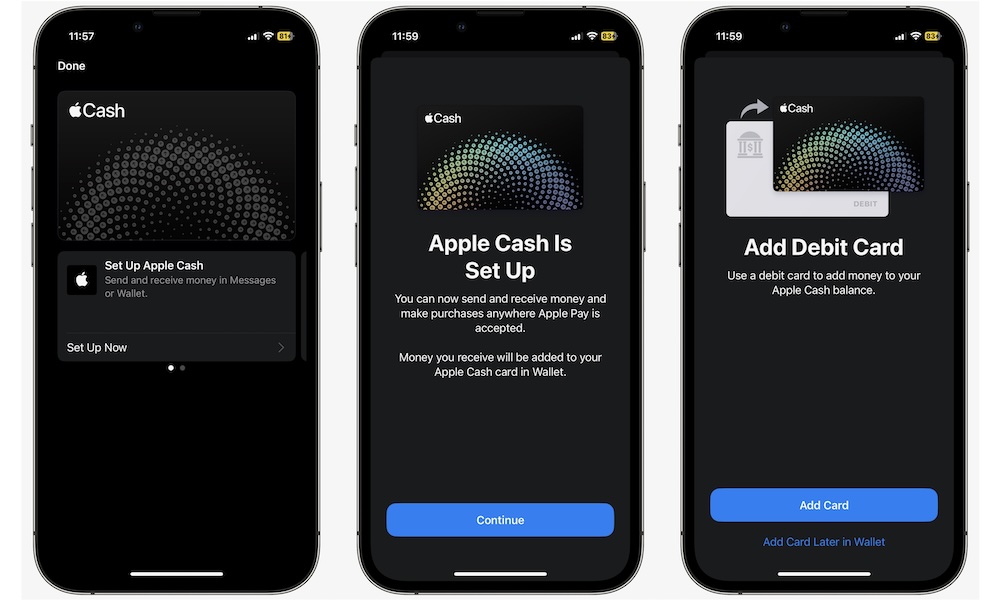
In the US, the Wallet app also has an option called Apple Cash. This feature lets you send or receive money via the Messages app or Apple Wallet. You can also make purchases in any place that supports Apple Cash.
Setting up Apple Cash is pretty easy, and this is what you need to do:
- Open the Wallet app.
- Tap on Apple Cash.
- Under Set Up Apple Cash, tap on Set Up Now
- Tap on Continue.
- Read the terms, continue, and then tap on Accept in the bottom right corner.
- Wait a few moments for your iPhone to finish setting up Apple Cash, and then tap on Continue.
- If you want, you can also add a debit or credit card add money to your Apple Cash balance.
Once it's set up, you'll be able to receive or send payments in a flash. If you receive payments, they'll go straight to your Apple Cash balance. You can also transfer money from Apple Cash to your bank account.
Pay With Your Apple Watch
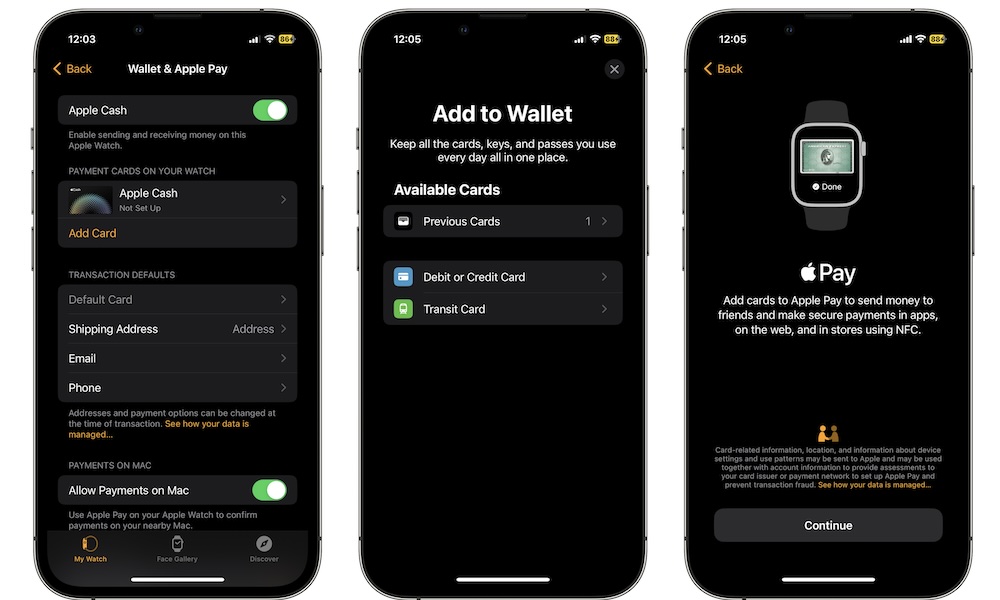
Besides being able to use your iPhone, you can also add your credit or debit cards to your Apple Watch. This will make paying even easier, and it'll come in handy in an emergency or if you don't bring your iPhone with you.
To add a credit or debit card to your Apple Watch, you need to:
- Open the Watch app.
- Scroll down and tap on Wallet & Apple Pay.
- Tap on Add Card.
- Select Debit or Credit Card.
- Tap on Continue
- Scan your debit or credit card, or select Enter Card Details Manually.
- Follow the instructions on the screen.
And that's it. You'll now be able to pay with your Apple Watch — even using a non-cellular model when you leave your iPhone behind.
Let Wallet Use the Cards You Stored in Safari
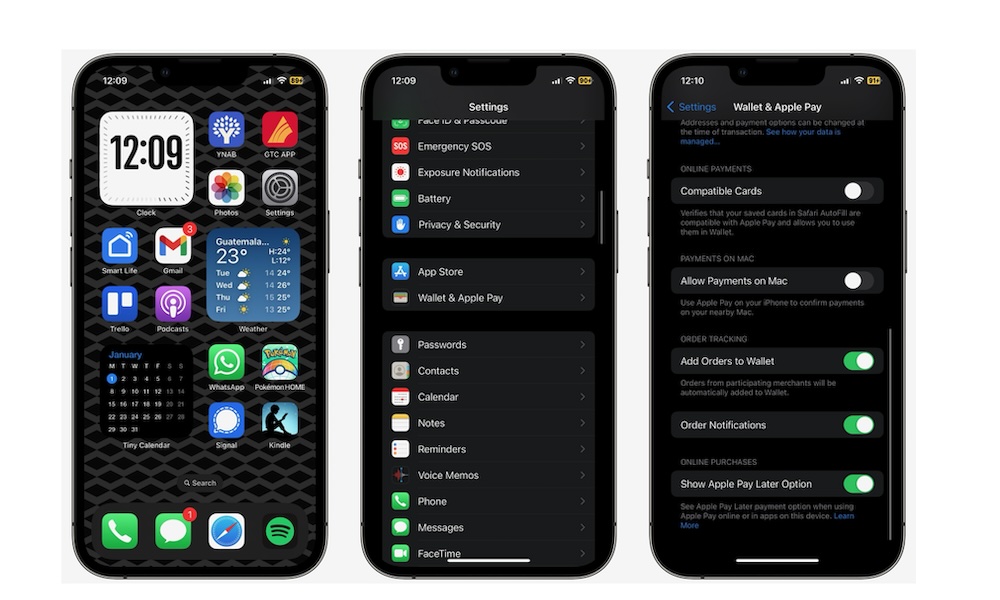
If you've bought something online, chances are you kept your debit or credit card details saved, so it's easier to make a purchase in the future.
Well, with Apple Wallet, you can take it one step further and add those cards you have saved in Safari to your Wallet app. This will make it easier to have all your cards in one place. This is what you need to do:
- Open the Settings app.
- Scroll down and go to Wallet & Apple Pay.
- Scroll down and, under Online Payments, enable Compatible Cards.
As you can probably guess, this will only work if the card you have saved is compatible. If not, you won't see it in your Wallet app.
Quickly Access Apple Pay
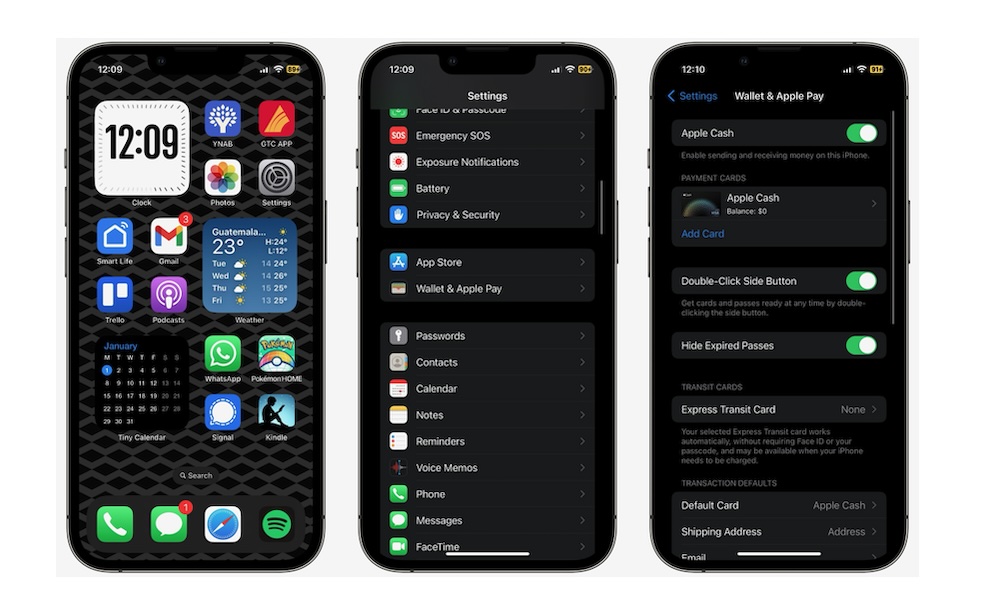
One of the best things about Apple Pay is that you can access it with just the press of a button.
All you need to do is double-press the side button on your iPhone, and you'll see Apple Pay will pop up on your screen. Likewise, you'll also be able to quickly access your tickets and boarding passes, and your driver's license or state ID.
You'll need to use Face ID or Touch ID to be able to pay with Apple Pay, so you can rest assured that you'll be the only one who pays using your debit or credit cards with your iPhone.
Of course, if you don't like this feature, you can also disable it by doing the following:
- Open the Settings app.
- Scroll down and go to Wallet & Apple Pay.
- Disable Double-Click Side Button.
Confirm Your Mac Payments With Your iPhone
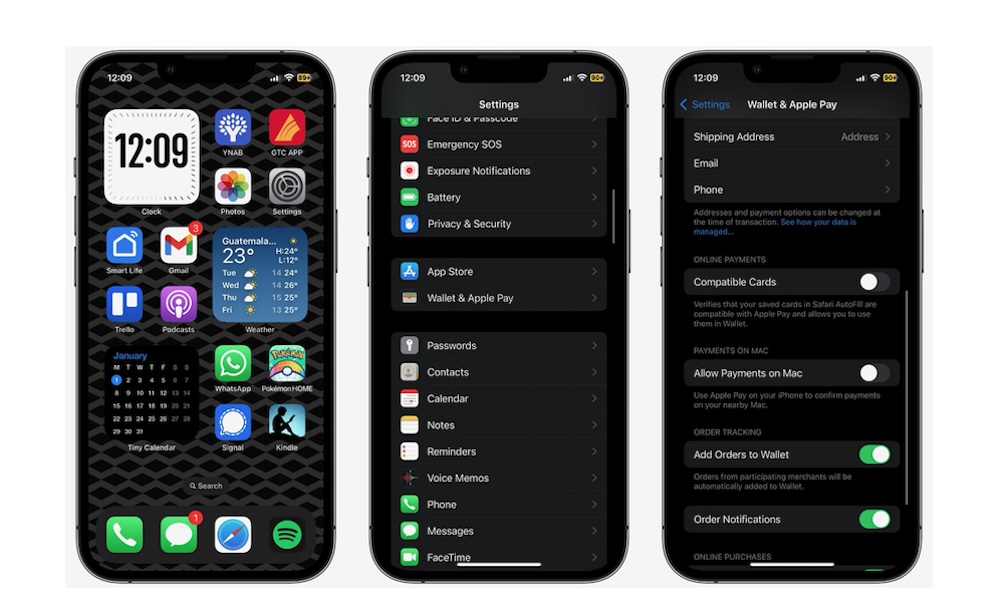
If you want to make buying from your Mac easy, too, you can make it so you can confirm your payments with your iPhone.
To use this feature, you need to:
- Open the Settings app.
- Scroll down and tap on Wallet & Pay.
- Scroll down again and enable Allow Payments on Mac.