
10 Tips To Master Apple Mail on Your iPhone
 Hilalabdullah / Shutterstock
Believe it or not, the Mail app on your iPhone is one of the most powerful professional apps you can use in your everyday life. Apple's Mail app offers many powerful features to help you send polished messages and keep track of the emails that are really important to you.
The Mail app on your iPhone is such an easy way to write and receive all your personal and work-related emails. The app has so many cool features that you don't really need to open your mail on your computer; you can do it all on your iPhone.
Of course, the Mail app can only do so much; you also need to learn how to use it properly. To help you get started, here are 10 powerful tips for mastering the Mail app.
Make Your Own VIP List
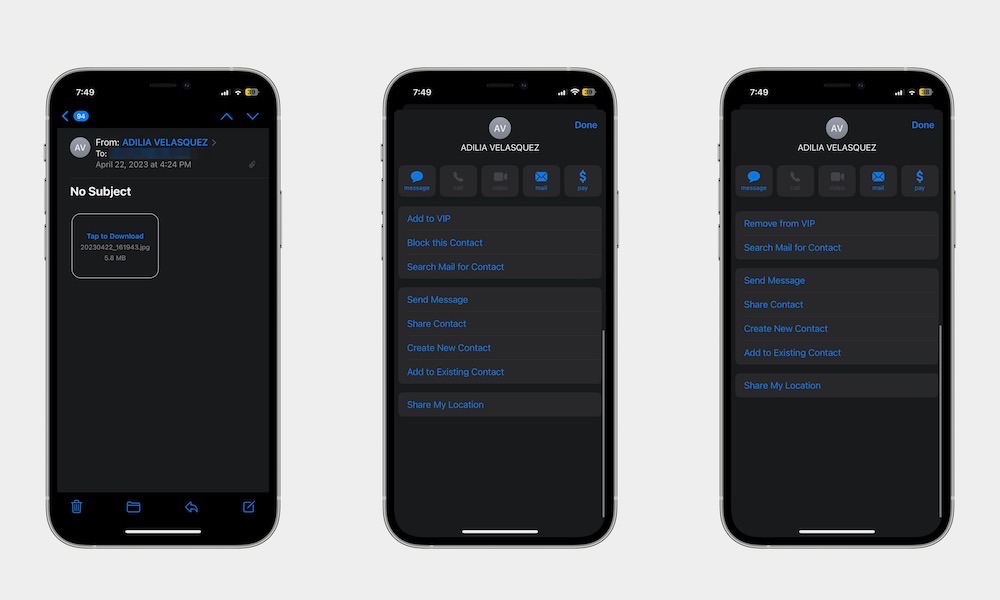
Apple Mail lets you add your important contacts into a separate category called VIP. Email messages from these people will appear in their own separate folder and you can also get special notifications from them (which we'll talk about in just a moment).
To add a new person to your VIP list, you need to:
- Open the Mail app.
- Search for an email that the person sent you.
- Tap the person's name at the top of your screen.
- Tap on Add to VIP.
That's it! You'll find a VIP mailbox listed among your other mailboxes and folders that shows you only those messages you've received from your VIP contacts. You can add as many people to your VIP list as you like, or you can follow the same steps and tap Remove from VIP if you want to take someone off the list.
Never Miss Important Emails Again
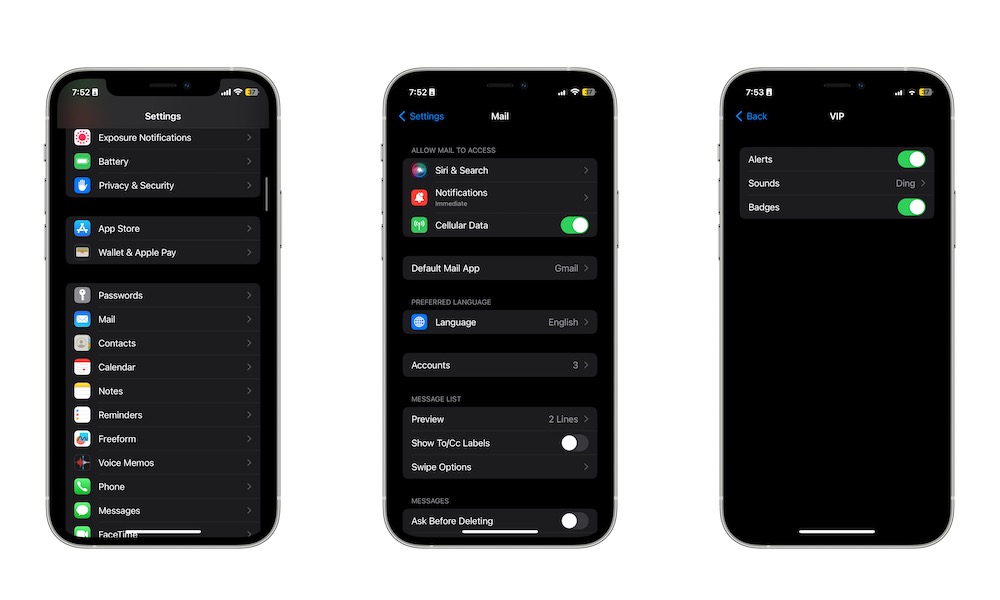
You can also set up a custom notification for your VIP contacts to make sure you never miss an important email. Here's how:
- Open the Settings app on your iPhone.
- Scroll down and select Mail.
- Choose Notifications.
- Scroll down again and select Customize Notifications.
- Select VIP.
- Customize the notifications to your preferences.
What you set here will only apply to messages that come in from contacts that you've added to your VIP list. For example, if you only want to be notified of messages from VIP contacts, you can adjust the VIP custom notifications accordingly and then turn off your default notifications from the main screen.
Change the Undo Send Delay Time
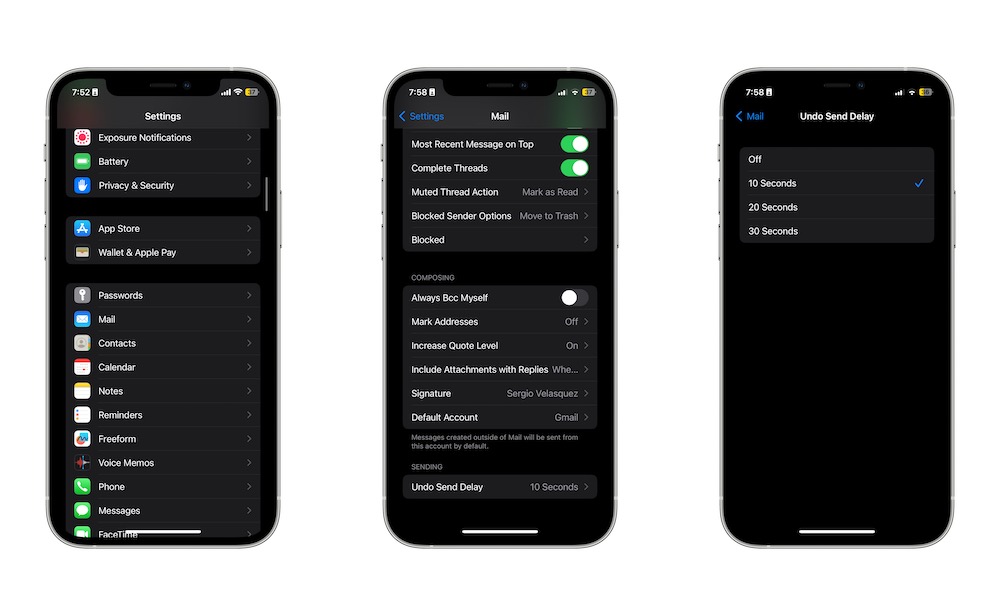
Apple added a useful new feature to the Mail app in iOS 16 that lets you set a delay between when you hit the Send button on an email and when it's actually sent out. This gives you a small 10–30 second window to undo an email you've just sent. If you've ever sent emails late at night, you probably know how this feature can come in handy.
By default, it's set to a 10-second time delay, but you can change it like this:
- Open the Settings app on your iPhone.
- Scroll down and select Mail.
- Scroll down again and select Undo Send Delay.
- Choose the delay time you want.
You can also set the delay to "off" if you'd prefer that your messages be sent immediately like they were before iOS 16 came along.
Learn How to Schedule Emails
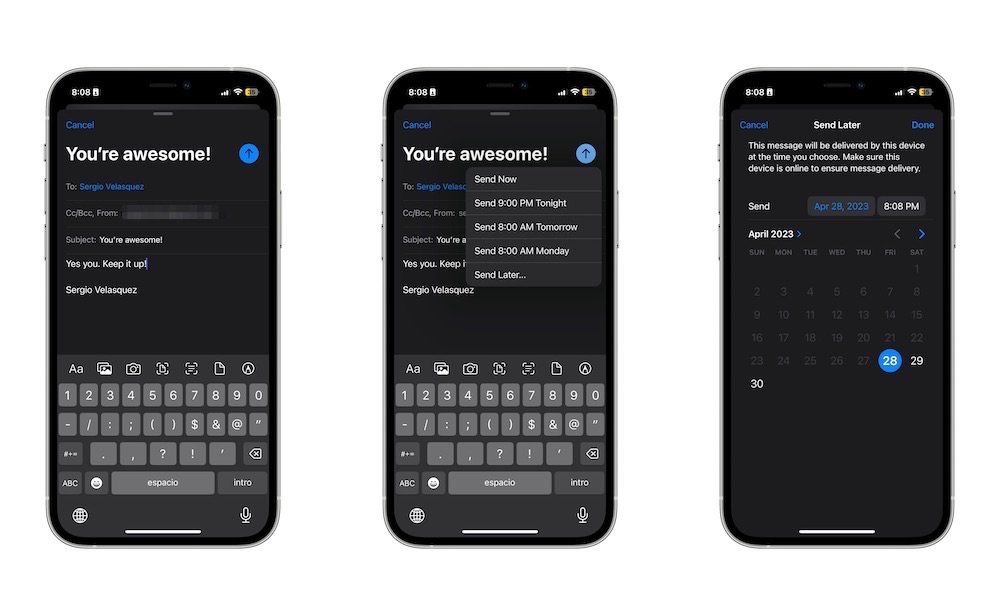
There's no worse feeling than waking up at night because you got an email notification that could've waited until the morning. If you don't want to be that type of person, the good news is that Apple Mail in iOS 16 now lets you schedule your emails to be sent at a later time.
- First, open the Mail app on your iPhone.
- Create a new email by tapping the Compose button in the bottom right corner of your screen.
- After you're done writing your email, press and hold the Send button (the blue button arrow button in the top-right corner of your screen) for a few moments.
- Choose one of the default schedules or select Send Later... to pick a more specific date and time.
Note that, unlike "send later" features offered by webmail providers like Gmail and Outlook, your scheduled message is kept on your iPhone to be sent out at the chosen time. This means that your iPhone will need to be powered on with a data connection available when it's time for the message to go out.
Set Email Reminders
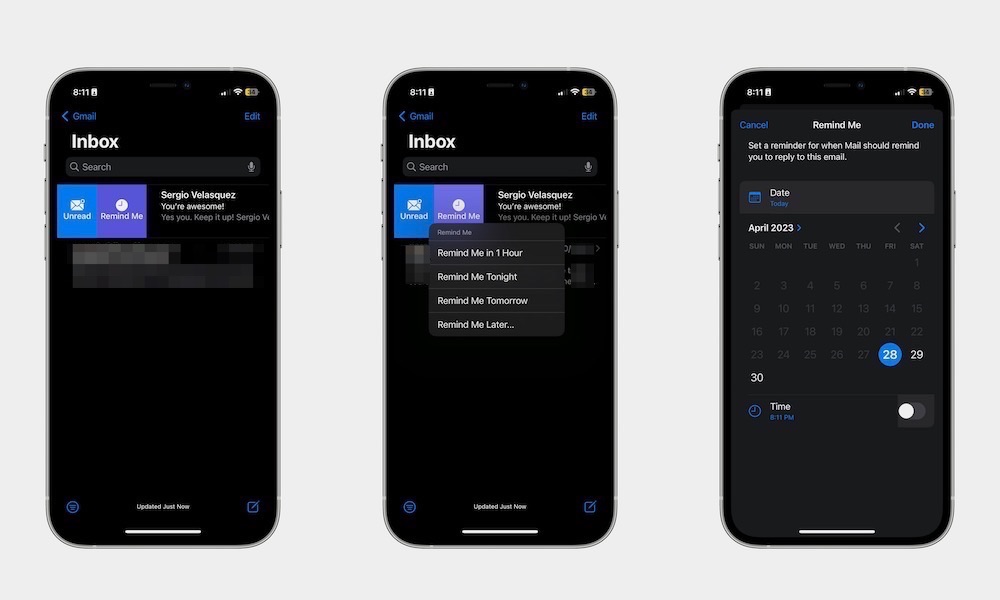
When you read an email that you're not yet ready to reply to, you can ask Apple's Mail app to send you a reminder so you won't forget to deal with it later.
Here's how to to set a reminder for an email message:
- Open the Mail app on your iPhone.
- Swipe the email you want to be reminded of slightly to the right.
- Select Remind Me.
- Choose a time from the list, or select Remind Me Later... to pick a more specific date and time.
You can also access the Remind Me option when reading an email by tapping the curved left-arrow icon in the toolbar at the bottom of the screen.
The message will remain in your inbox, but when the reminder time comes, you'll receive a notification, and it will be moved to the top of your inbox with a "Remind Me" tag on it. You can dismiss a reminded email by swiping to the left and selecting Clear; moving an email out of the inbox into another folder will also clear the reminder — even if it hasn't been triggered yet.
Note that email reminders are not synced between devices; a reminder set on your iPhone will only fire off on your iPhone, even if you're using the same email account on your Mac and iPad.
Customize Your Swipe Options
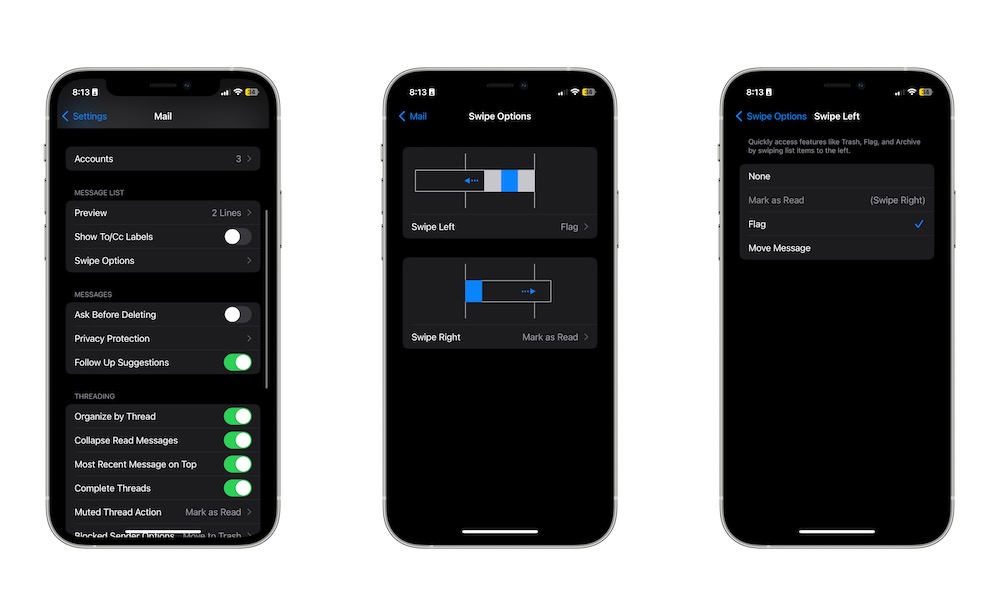
You may have noticed that you can get a bunch of useful buttons just by swiping an email to the left or right. These are your Swipe Options, and you can customize them by doing the following:
- Open the Settings app on your iPhone.
- Scroll down and select Mail.
- Scroll down again and choose Swipe Options.
- Select Swipe Left or Swipe Right, depending on which one you want to customize.
- Choose the action you want for that particular swipe gesture.
Convert Emails to PDF Files
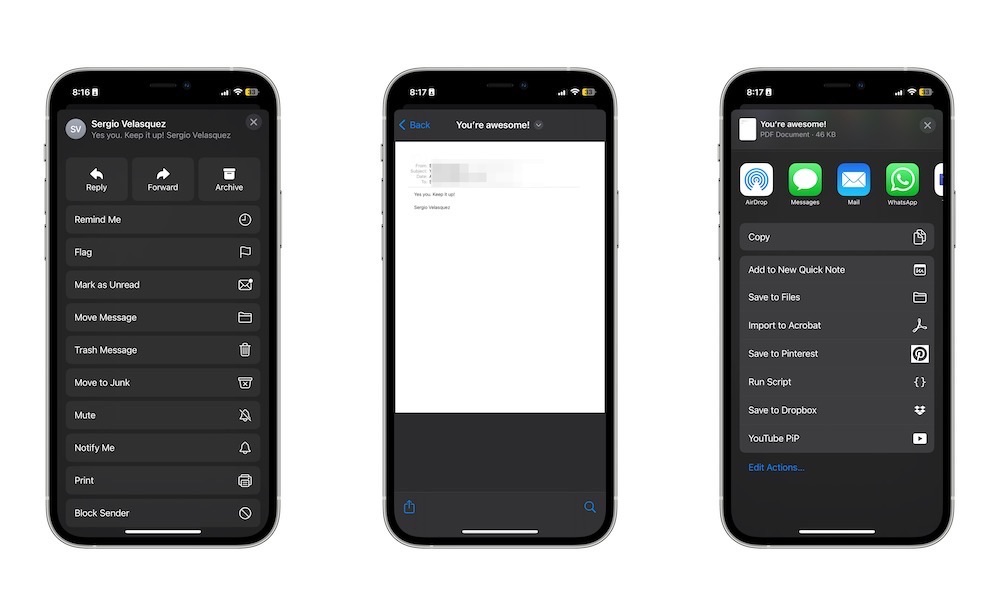
If you just received a very important email that you want to save, you can keep it as a PDF file on your iPhone. This works with any iPhone, but keep in mind that you won't be able to access any attached files.
This is how you can turn your emails into PDF files:
- Open the Mail app on your iPhone.
- Choose the email you want to convert.
- Tap the Reply button at the bottom of your screen (the curved left-pointing arrow).
- Scroll down and select Print.
- Tap the Share button in the top-left corner of your screen.
- Select Save to Files.
- Choose a folder where you'd like your PDF file to be saved.
Now you need to go to your Files app, and you'll be able to open the email as a PDF file. You can also share it or do whatever else you want with it.
The Share button in step 5 only appears in iOS 16 or newer; if you're running an older iOS version, you'll need to use two fingers to expand the preview at the bottom of your screen instead, as if you were zooming in on a photo. Then you'll see the Share button appear at the bottom of the screen.
Create Your Own Signature
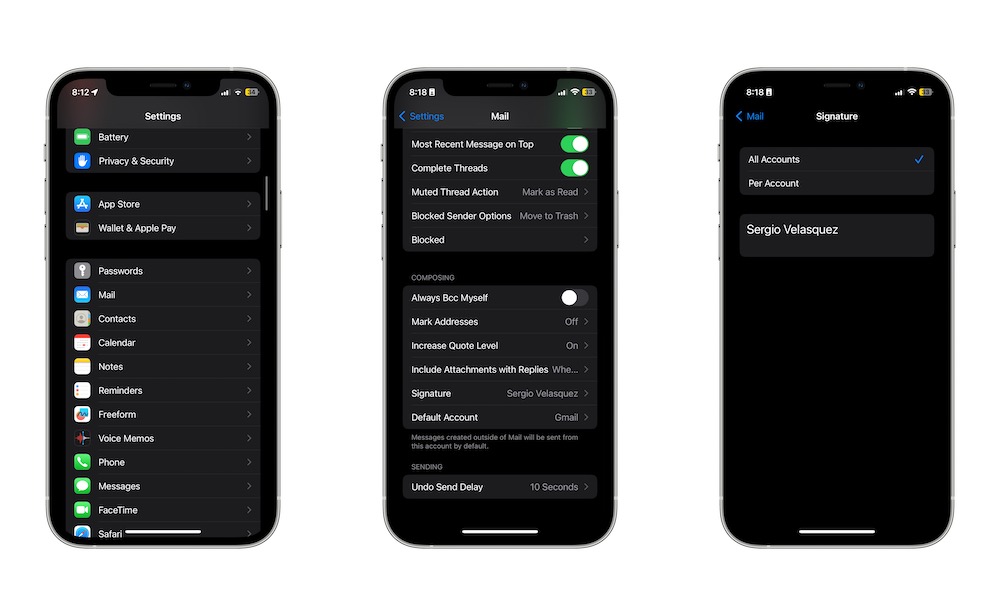
Don't you just hate that your Mail app always ends an email with "Sent from my iPhone?" Yes, it's annoying, but you can actually change it by adding your very own signature instead. Just follow these steps:
- Open the Settings app on your iPhone.
- Scroll down and choose Mail.
- Scroll down one more time and go to Signature.
- If you have more than one account configured in Apple Mail, choose either All Accounts if you only want to create a single signature, or Per Account if you want to use a different signature for each one, such as for business and personal use.
- Enter your custom signature(s) in the appropriate fields.
Ask Siri to Send Emails for You
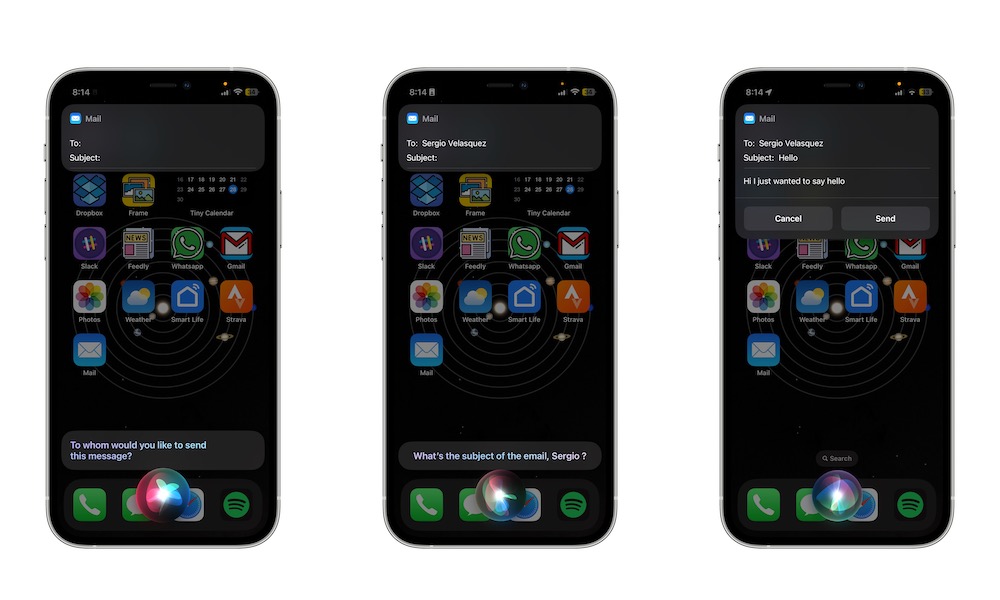
One of the coolest things you can do with Apple Mail is ask Siri to write your email messages for you.
All you need to do is say something like, "Hey, Siri, write an email." Siri will walk you through the process, asking you to whom you want to send the email, what subject line you want to put on it, and then for the text of the message.
After you're done with that, Siri will ask you if you want to send it. You can either say "send" or "yes," or tap the Send button that appears on your screen. If you say "no," Siri will give you options to change elements of the message, or cancel it if you've changed your mind.
You can also dictate an entire email message to Siri in a single sentence. Just say something like, "Hey Siri, send an email to Bob with the subject hi there and the body are we still on for lunch today."
Send Drawings in Your Emails
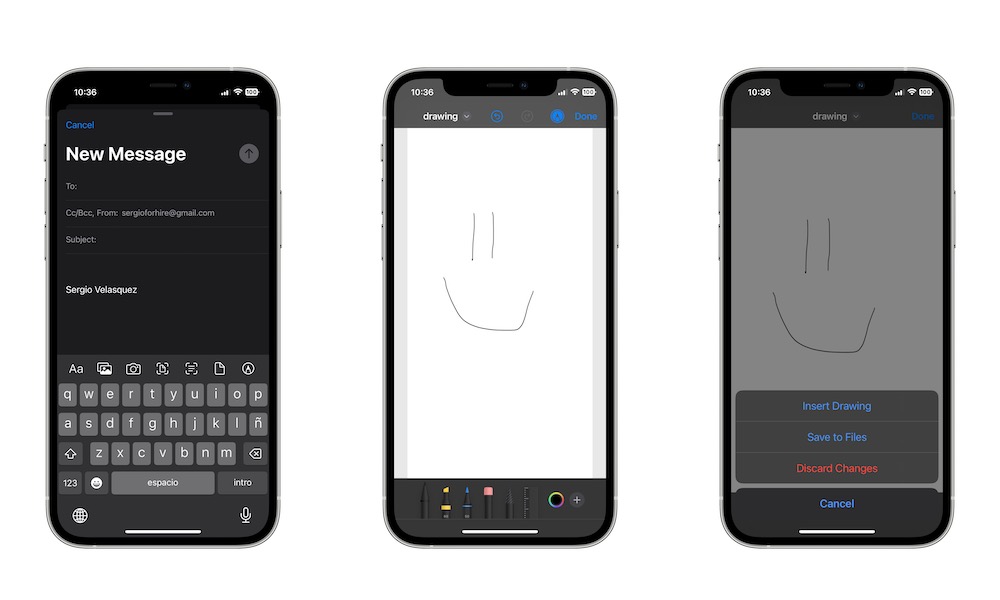
Granted, this isn't the most professional tip, but you can still have some fun with the Mail app by sending your drawings as attached files. The best part is that you don't need any third-party app; you can do it all from Mail. This is how:
- Open the Mail app on your iPhone.
- Select the Compose button in the bottom right corner of your screen.
- Choose the pencil icon right above your keyboard.
- Draw whatever you want.
- When you're finished, select Done in the top right corner of your screen.
- Select Insert Drawing.
If you want, you can also save your drawing as a PDF file by choosing Save to Files.