
Share and Delete Screenshots Without Saving Them to Your Photos
 Credit: Jesse Hollington / iDrop News
Toggle Dark Mode
How many screenshots have you saved before sharing them with your friends and family? If you’re like some of us, you probably have a lot of screenshots wasting your iPhone’s storage because you never got around to deleting them.
But what if we told you there’s a quicker way to share and delete any screenshot you take without having to save it to the Photos app?
And the best part is that it’s really easy and quick to do. Here’s everything you need to know.
How to Share and Delete Screenshots Before Saving Them
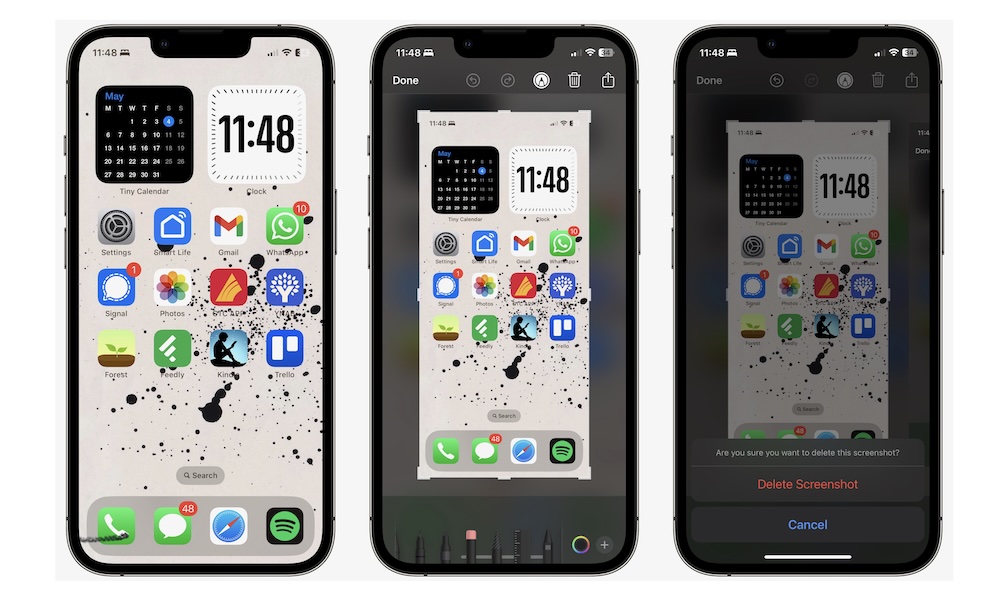
Your iPhone is capable of sharing any screenshot you take as soon as you take it. That means you don’t need to save them in the Photos app before sharing them.
Doing this is pretty easy. Here’s how you can share your screenshots before saving them:
- First take a screenshot. If your iPhone has Face ID, press the power button and the volume up button at the same time. If you have an iPhone with Touch ID, press the side button and the Home button at the same time.
- Tap the preview of the screenshot in the bottom left corner of your screen.
- To share your screenshot, tap the Share icon at the top right corner of your screen and select how you want to share it.
- To delete the screenshot, tap the Delete icon right next to the Share button in the top right corner.
- Tap on Delete Screenshot to confirm your decision.
And that’s it. You just shared a screenshot and got rid of it without it even touching your photo library. Also, as you probably noticed, this screen will also let you edit the image, so you write something, resize or crop the screenshot, or add a bit of color.
Remember that if you swipe the screenshot preview at the bottom of your screen, your iPhone will automatically save the screenshot, and you’ll need to go to the Photos app to share and delete it.
If you actually want to save the screenshot, simply tap on Done in the top left corner of your screen and select Save to Photos, Save to Files, or Save to Quick Note, depending on where you want to save it.
How to Recover or Permanently Delete Your Screenshots From Your iPhone
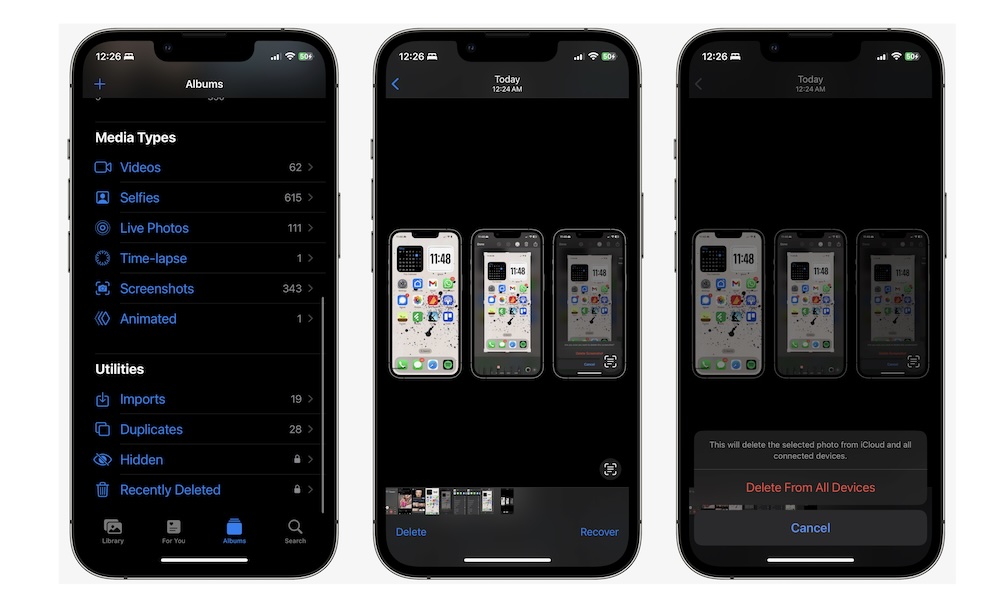
As we previously showed, deleting screenshots will prevent your iPhone from saving them in the Photos app. However, your iPhone will still save it in the Recently Deleted album, so you can recover the screenshot from there (or permanently delete it if you really don’t want it lying around).
In most cases, you can just keep the screenshot there and your iPhone will permanently delete it after 29 days. But if you want to free up some space, you can delete it immediately by doing the following:
- Open the Photos app.
- Tap on the Albums tab at the bottom of the screen.
- Scroll down to the bottom and tap on Recently Deleted.
- Unlock your Recently Deleted folder with Face ID or your passcode.
- Tap on the screenshot you want to delete. The newest screenshot will be in the bottom right.
- Tap on Delete.
- Tap on Delete Photo or Delete From All Devices to confirm your decision.
And that’s it. Remember that this will permanently delete the screenshot, making it impossible to retrieve it. So make sure you actually want to delete it before following the steps above.
Get Rid of Those Annoying Screenshots
Sharing screenshots on your iPhone couldn’t be easier. The best part is that you don’t have to save them in your Library before you use them.
Remember that if you didn’t mean to delete it or want to use the same screenshot again, you can recover it or permanently delete it by going to your Recently Deleted album in the Photos app.


