
Better Safe Than Sorry: 9 Things You Need to Do Before You Lose Your iPhone
 Tommaso79
Losing your iPhone is one of the worst feelings in the world. Whether someone took it from you or you just don't know where you left it, the feeling of not having your iPhone in your pocket will give you a small heart attack until you find it.
Unfortunately, losing your iPhone can happen, and more often than not, you might not be able to get it back.
Not only that but if someone stole it, there's a small chance that all the data you have stored in your iPhone is also at risk.
Of course, if you lose your iPhone, there are some things you can do to avoid losing more than just a phone. But what if we told you there are other things you can do before you even lose it?
It's better to be safe than sorry, and you can prepare your iPhone in case you lose it. That way, at least, you'll know that the data inside your iPhone will be safe until you find it or delete it remotely. Read on for 9 things you should do to ensure you're protected in the unfortunate event that your iPhone gets lost or stolen.
Use a Strong Passcode
Using a strong passcode is one of the best ways to protect your data by making it harder for an unwanted person to unlock your iPhone.
By default, you can set up a six-digit passcode that is usually more than enough to protect your iPhone. That's assuming you don't make it something obvious; you need to make the passcode hard to crack or guess.
So forget about using passcodes like "000000" or "123456." Also, avoid using passcodes that represent important dates to you, like your birthday or your wedding anniversary.
Instead, try using numbers that are as random as possible and don't mean anything to you. Sure, it might be hard to remember, but it will also be harder to crack.
Also, instead of only using digits, you can create an alphanumeric passcode with letters and numbers to make it even harder for people to crack.
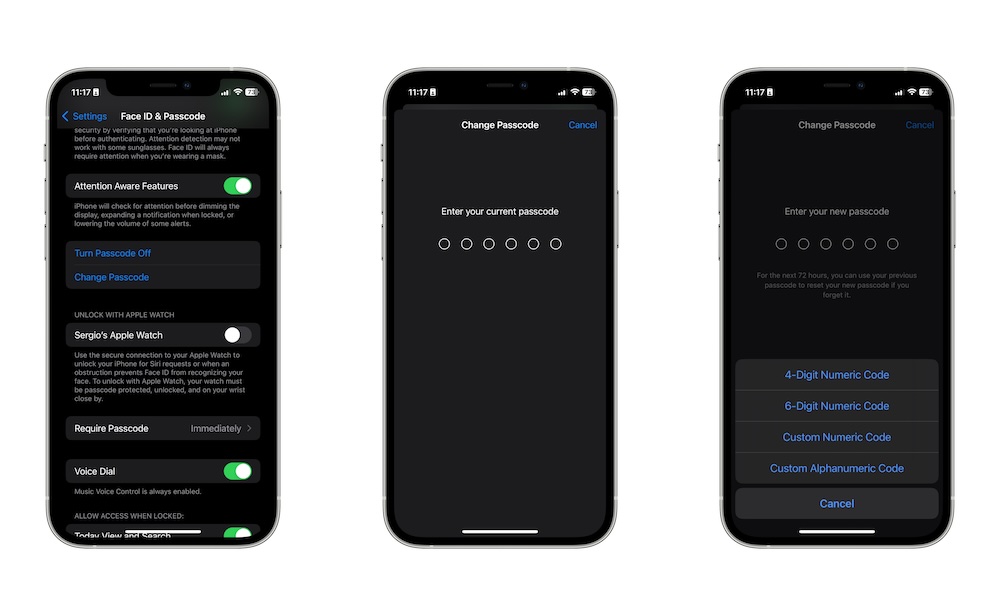
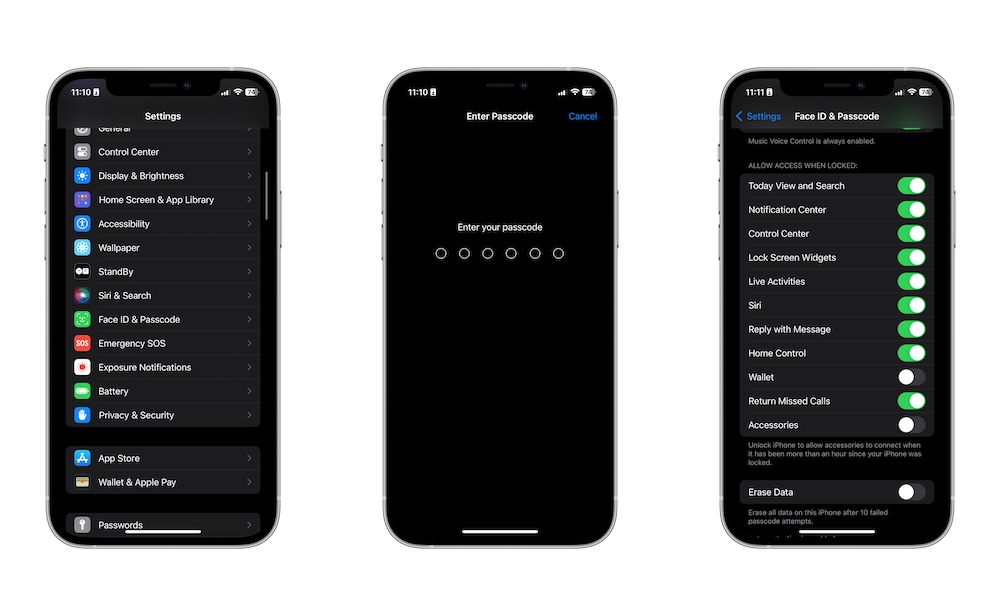
Whether you want to change your passcode or use an alphanumeric code, here is what you need to do:
- Open the Settings app.
- Scroll down and tap on Face ID & Passcode.
- Enter your passcode.
- Scroll down again and go to Change Passcode.
Now, you can enter a harder passcode or tap on Passcode Options to change to a different type of passcode, such as alphanumeric.
Set Up Stolen Device Protection
Stolen Device Protection is a recent feature that makes it more difficult to change your iPhone's most important security settings.
When Stolen Device Protection is turned on, actions that prompt you to authenticate with Face ID or Touch ID, such as opening locked apps, paying with Apple Pay, or changing security settings, will no longer fall back to asking for your passcode if biometric authentication fails. This helps to ensure that only you can access secure features and settings, and not just someone who has your passcode. Your passcode can always be used to unlock your iPhone, but when Stolen Device Protection is on, nearly everything else will require biometrics.
For added security, your iPhone will also require you to use Face ID (or Touch ID) and wait at least one hour before you can change any crucial security settings, such as your passcode or Apple ID password, or disable features like Stolen Device Protection or Find My iPhone. After the one-hour timer elapses, you must verify your identity with Face ID or Touch ID again to confirm the change. This makes it much harder for a thief to change these settings through social engineering tactics like getting you to look at your iPhone to authorize a quick change behind your back.
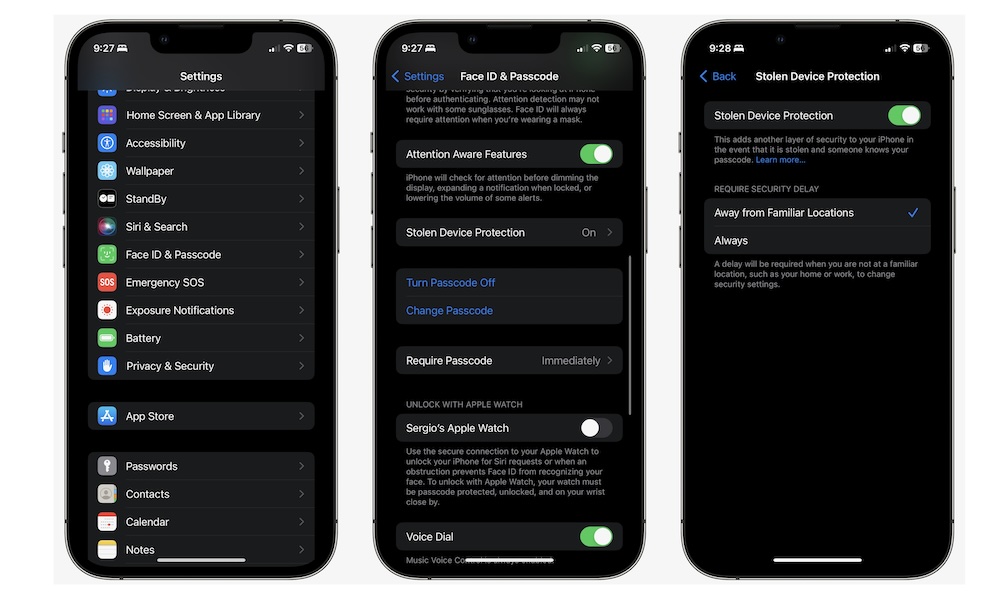
Here's how to set up Stolen Device Protection on your iPhone:
- Open the Settings app.
- Scroll down and go to Face ID & Passcode.
- Enter your passcode.
- Scroll down and tap on Stolen Device Protection.
- Turn on Stolen Device Protection.
You'll notice that under Require Security Delay, there are options for Away from Familiar Locations and Always. These determine where your iPhone will require a one-hour security delay and enforce biometric authentication with Face ID or Touch ID. "Familiar Locations" allows you to change key security settings without delay and use your passcode to unlock features like locked and hidden apps when you're in a location you frequent, such as your home or office.
While choosing Away from Familiar Locations can make it more convenient to change your security settings, it also allows your passcode to bypass Face ID or Touch ID when you're in those locations. Since most folks don't change their security settings often, it's best to be safe by choosing Always.
Turn on Find My on Your iPhone
Apple's Find My app lets you find your Apple devices and other third-party accessories. This network shows you the real-time location of your Apple devices on a map.
You can access this from your other Apple devices or by logging into your Apple ID on a Windows computer.
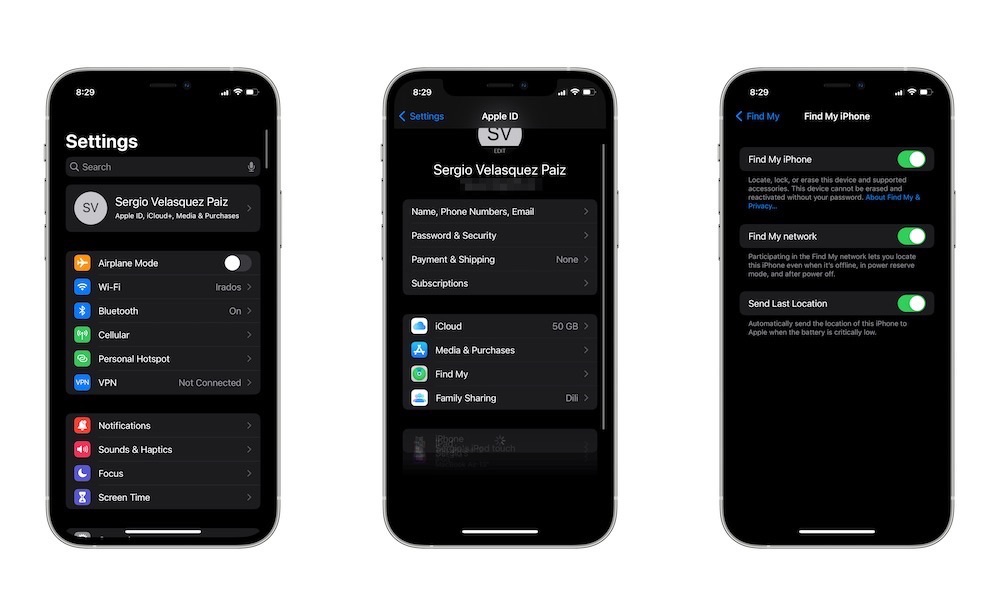
By default, Find My should be turned on on your iPhone, but you can double-check by doing the following:
- Open the Settings app.
- Tap on your Apple ID (that is, your name) at the top of the settings page.
- Tap on Find My.
- Go to Find My iPhone.
- If it isn't already, turn on Find My iPhone.
- Also, make sure to enable Find My network and Send Last Location.
Block iCloud Access on the Web
As we mentioned before, you can access your Apple ID, as well as all the iCloud features from the web. This is useful in the sense that you can access your data on Windows computers or Android devices, but it also means that someone else can do it, too.
Usually, this wouldn't be a problem since most Apple ID accounts already have two-factor authentication enabled. But since the person trying to access your account might have your iPhone, they could enter the 2FA code by themselves.
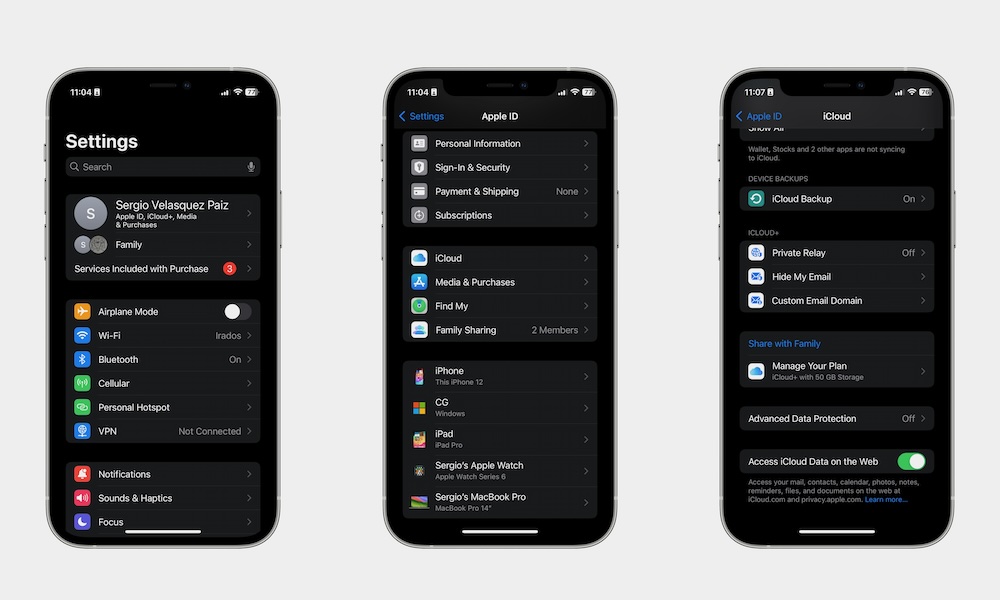
So it's best to make it harder for them by disabling web access to your iCloud data. This is how:
- Open the Settings app.
- Tap on your Apple ID at the top of the Settings page.
- Go to iCloud.
- Scroll down to the bottom and disable Access iCloud Data on the Web.
Block Access to Lock Screen Tools When Your iPhone Is Locked
Even if your iPhone is locked, you can still see and access a lot of data. For instance, you can check your notifications, see the Today View, or open the Control Center.
While this is useful, you might not want all these features available if someone can access your iPhone. However, the most important feature that you should block is the ability to connect accessories from your iPhone's port when it's locked.
If enabled, anyone could try to install malware or retrieve your data if your iPhone is locked, so it's best to disable it.
- Open the Settings app.
- Scroll down and go to Face ID & Passcode.
- Enter your passcode.
- Scroll down, and under Allow access when locked, disable any feature that you want to block. Most importantly, disable Accessories at the bottom of the list.
You can disable other options if you want. It'll all depend on how much data you want to have available when your iPhone is locked. If you're unsure which ones you should keep, we recommend starting with Reply with Message, Home Control, and Wallet.
Keep in mind that if you're using a Face ID-equipped phone, your iPhone will be unlocked as soon as you look at it, even before you swipe up to leave the Lock Screen, so it's still easy for you to access most of these features.
Back Up Your iPhone Regularly
This one might not seem necessary, but having a recent copy of the data on your iPhone could help you in the future.
Remember that if you lose your iPhone or if someone steals it, you might be forced to permanently delete it remotely if you can't find it right away. However, if you've backed it up, you'll have a copy of your iPhone configuration and all your data ready to be installed on your next device.
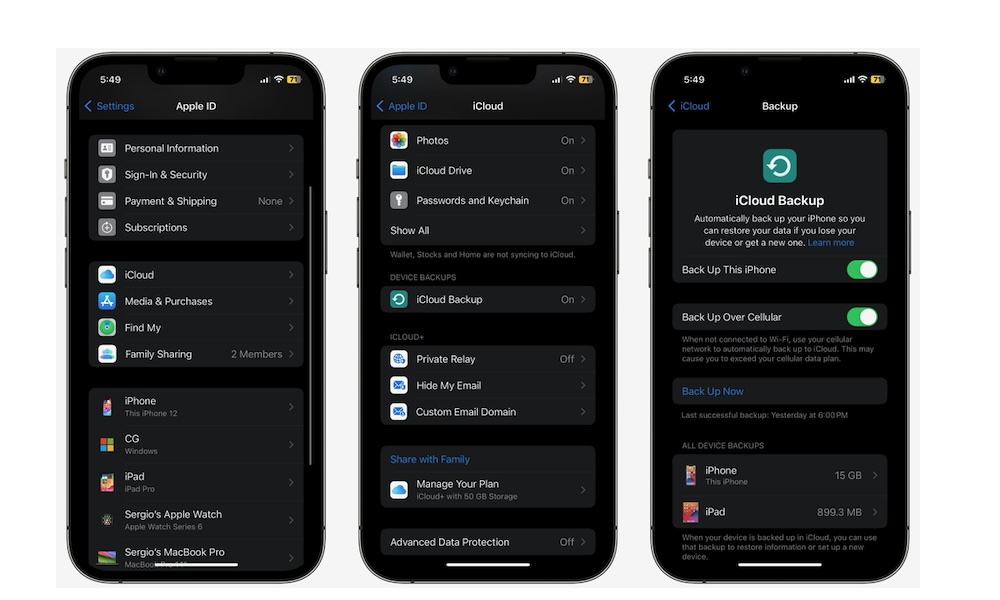
You can back up your iPhone manually or make it so your iPhone backs up automatically by doing the following:
- Open the Settings app.
- Tap on your Apple ID at the top of the Settings page.
- Go to iCloud.
- Scroll down and select iCloud Backup.
- If it isn't already, turn on Back Up This iPhone.
- Or, if you want to back it up right now, tap on Back Up Now.
Once iCloud Backups are enabled, your iPhone will back up automatically every 24 hours as long as it's charging and connected to Wi-Fi. On some carriers and plans, you may also have the option to enable backups over 5G, although we advise against doing this unless you have an unlimited (or virtually unlimited) data plan.
Automatically Erase Your Data After Failed Passcode Attempts
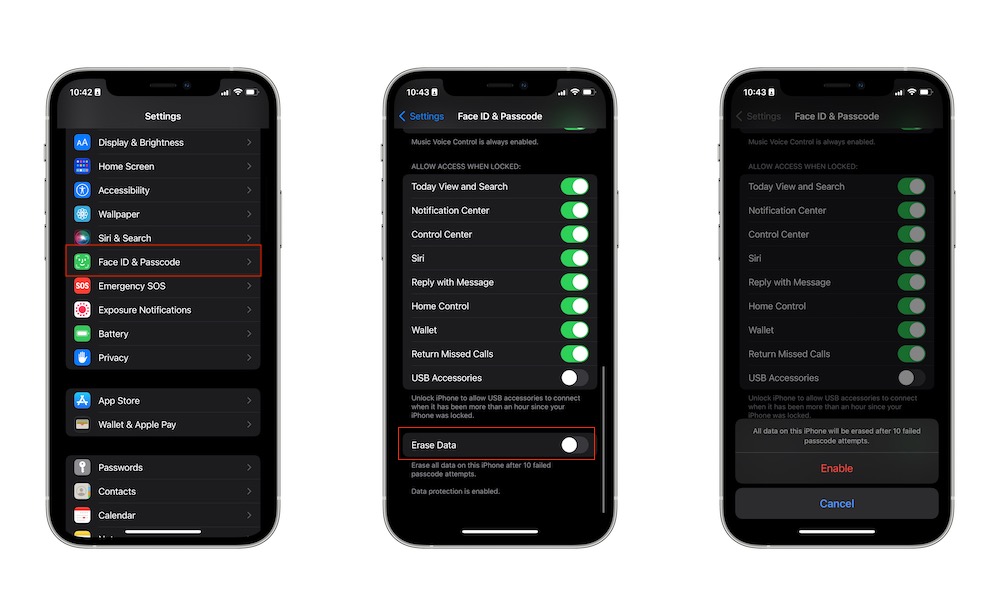
As we mentioned, having a secure passcode is important, and this feature is the perfect complement to it. Your iPhone can completely erase itself if someone fails to enter the correct passcode ten times in a row.
Granted, this sounds a bit scary, especially if you tend to forget your passcode. But it will guarantee that anyone trying to access your data will delete everything for you before it's too late.
Plus, if you regularly back up your iPhone's data, you can get most of your information back in a flash. Here's how to turn on the Erase Data feature:
- Open the Settings app.
- Scroll down and go to Face ID & Passcode.
- Enter your passcode.
- Scroll down to the bottom and turn on Erase Data.
Hide Your Private Pictures
Losing your iPhone is one thing, but having the risk of someone looking at your most important and private pictures is even worse.
Luckily, it doesn't have to be. You can hide your pictures in a hidden album in the Photos app. The only way to unlock this album is by using Face ID or Touch ID, so no one will be able to access it even if they have your passcode.
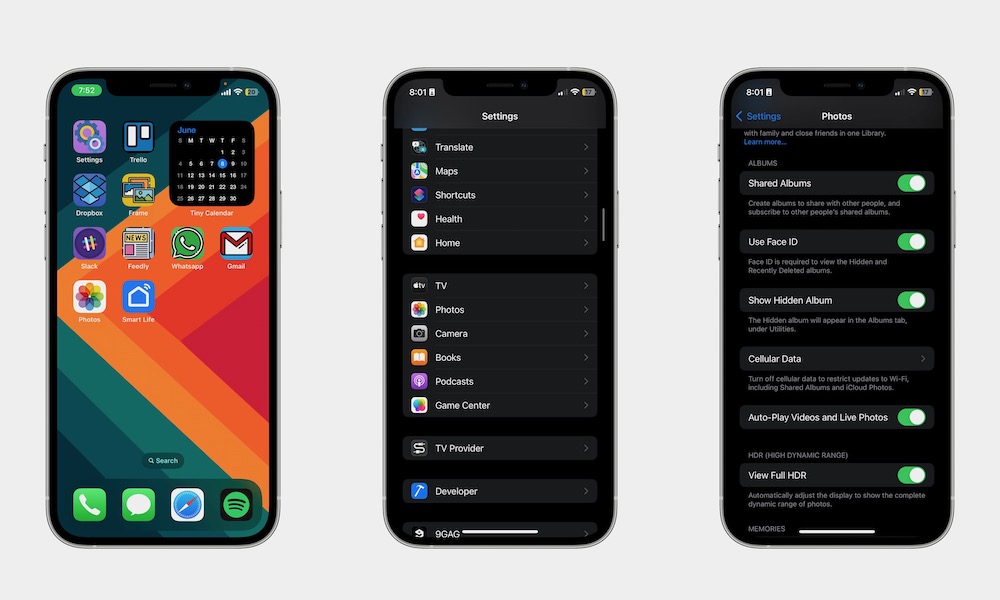
Here's how to hide pictures in your Hidden album:
- Open the Photos app.
- Find the picture that you want to hide.
- Tap the three-dot button in the top right corner of your screen.
- Tap on Hide.
And that's it. Your picture is now hidden. You can find it by going to your hidden album and unlocking it using Face ID, Touch ID, or your passcode.
If you want, you can go one step further and hide your hidden album so no one tries to access it. To do so, go to Settings > Apps > Photos and disable Show Hidden Album.
Hide or Lock Your Most Important Apps
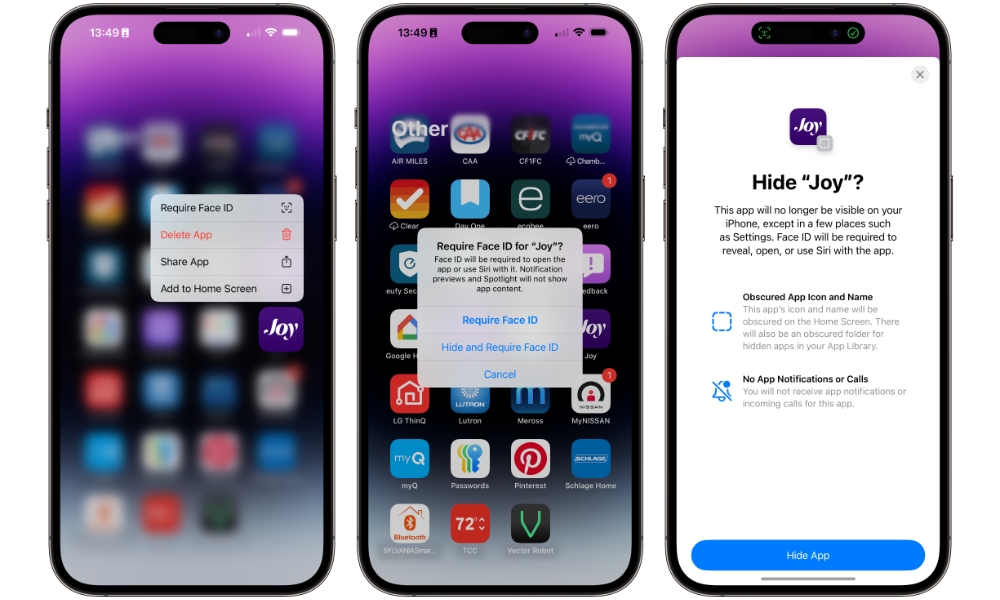
If hiding your pictures isn't enough, you can go one step further and hide or block your most important apps.
If you just lock the apps, you'll only be able to access them by authenticating with Face ID, Touch ID, or your passcode. If you hide them, no one can see them on your Home Screen or App Library. Instead, they'll be stored in your Hidden Folder in the App Library, where you'll need to authenticate in the same way to see what's inside.
This is also one key area where Stolen Device Protection makes a big difference. When Stolen Device Protection is enabled, locked and hidden apps can only be accessed using Face ID or Touch ID; you won't be asked to enter a passcode if those fail.
To hide or block any app on your iPhone, you need to have at least iOS 18 installed on your iPhone. Once you have that covered, do the following:
- Press and hold the app that you want to hide or lock.
- Tap on Require Face ID.
- Choose to Require Face ID to lock it or Hide and Require Face ID to hide it.
If you choose to hide an app, it will vanish from its spot on your Home Screen, along with any widgets that you've added for it. You'll also no longer receive notifications from it since that would give things away. You'll find the app in a "Hidden" folder at the bottom of your App Library.