
Make Sure You Do These 10 Things Before You Dispose of Your Old iPhone
 Anna Hoychuk / Shutterstock
Are you saying goodbye to your old iPhone? Sometimes, it's time to move on and get a new device before your aging iPhone starts to act up.
Of course, if you're getting rid of your old iPhone, it's usually not as simple as just throwing it away.
After all, you probably have tons of pictures, documents, and valuable data you don't want to lose — and definitely don't want to let other people get a hold of.
Unfortunately, disposing of an old iPhone isn't too difficult as long as you follow a few simple steps. Read on for 10 tips to make sure you're not throwing anything important away on your old iPhone.
Back Up Your iPhone
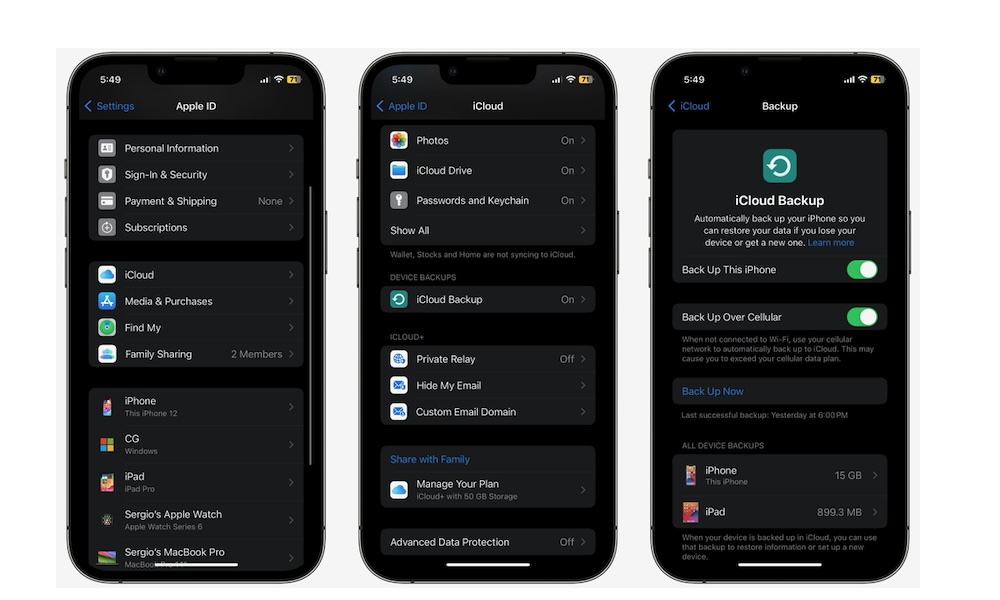
Before you dispose of your old iPhone, you need to make sure all the apps and data you have are safely stored somewhere. Apple provides 5GB of free iCloud storage, and the good news is that things like apps don't count against that in your backups, but it still may not be enough if you have a lot of pictures and videos stored on your iPhone.
On the other hand, if you're paying for an iCloud+ plan, that should give you plenty of space to back up your iPhone to the cloud — and even if you're not paying for storage or you don't want to upgrade to a larger plan, Apple will provide enough temporary iCloud storage for up to 21 days to help you transfer your data to a new iPhone.
Here's how to manually back up your iPhone to iCloud:
- Open the Settings app.
- Tap on your Apple ID.
- Go to iCloud.
- Select iCloud Backup.
- Tap on Back Up Now.
If you don't have enough storage in your iCloud plan and you're transferring your data to a new iPhone, you can follow these steps instead to take advantage of Apple's offer of temporary iCloud storage:
- Open the Settings app.
- Select General.
- Scroll down and choose Transfer or Reset iPhone.
- Select Get Started under Prepare for New iPhone.
- Choose Turn On Backup to Transfer.
- Select Continue at the prompt that says you're eligible to get extra iCloud storage for free.
Note that you'll only see the last two options if iCloud backups are disabled and you don't already have enough storage in your iCloud plan. After the backup completes, it will be kept on Apple's servers for up to 21 days to give you time to restore it to your new iPhone.
Store Your Pictures in the Cloud, Too

Your pictures are probably one of the most important things you have on your iPhone. After all, most of them are memories of you with your family and friends, so you probably don't want to lose that.
Note that your photos and videos will be included in your iCloud Backups made in the previous step — whether that's to your normal iCloud storage of the temporary transfer storage Apple gives you — but if you want to be able to access them more easily and sync them with your other devices, it's better to enable iCloud Photos — as long as you have the storage space, of course.
To make sure you're uploading your pics (and vids) to iCloud, you need to do the following:
- Open the Settings app.
- Go to your Apple ID.
- Select iCloud.
- Tap on Photos right under Apps Using iCloud.
- Select Sync this iPhone.
If you don't want to use iCloud, you can still back up your photos on your Mac. All you need to do is connect your iPhone to your Mac with a USB cable and then open the Photos app (or Image Capture) on your Mac. You should see an import screen that will let you copy all your pictures to your Mac.
Transfer Your Data to a New iPhone
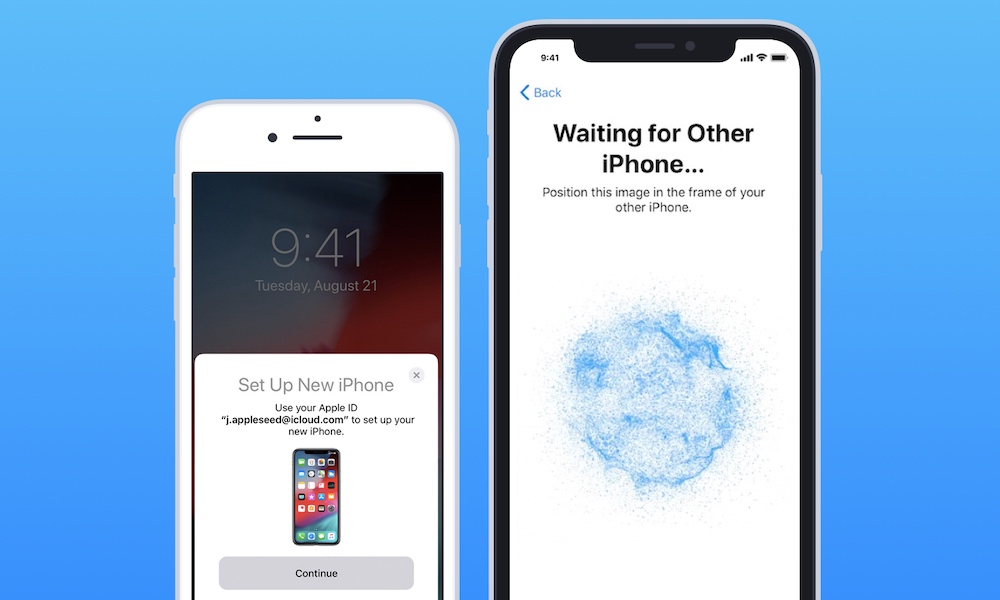
If you're getting rid of your old iPhone, chances are it's because you bought a new one. If that's the case, you can and should transfer all your data from your older iPhone to the new one.
In order to do this, you need to turn on your new iPhone and use the Quick Start feature. Follow the instructions on your screen, and be sure you have your new iPhone connected to your Wi-Fi network and that you already set up Face ID or Touch ID.
It might take a while, but this is the easiest way to transfer all of your data and make sure you aren't losing anything.
Cancel AppleCare
Something important that you might forget about is AppleCare. If you've subscribed to Apple's services for your older iPhone, the best course of action is to cancel before you get rid of it.
Note that erasing your iPhone or removing it from your Apple ID will not cancel your AppleCare plan — this must always be done manually.
AppleCare also can't be transferred to a new device; you'll need to purchase a new AppleCare plan if you want it for your new iPhone.
How you cancel AppleCare for your old iPhone will depend on the way you purchased it. If you paid for it in advance, you may be able to get a partial refund for the unused portion of your AppleCare coverage. To do this, you'll need to reach out to Apple's tech support and have the following ready:
- AppleCare Agreement Number.
- The Serial Numer of your iPhone.
- The original sales receipt.
On the other hand, if you've subscribed to AppleCare on a monthly or yearly basis, you can cancel it like any other in-app subscription. Here's how:
- Open the Settings app.
- Tap on your Apple ID.
- Go to Subscriptions.
- Tap on the AppleCare subscription.
- Select Cancel Subscription.
If you're selling your old iPhone or giving it away to a family member, you can also transfer your AppleCare plan to the new owner.
Sign Out of Your Apple ID
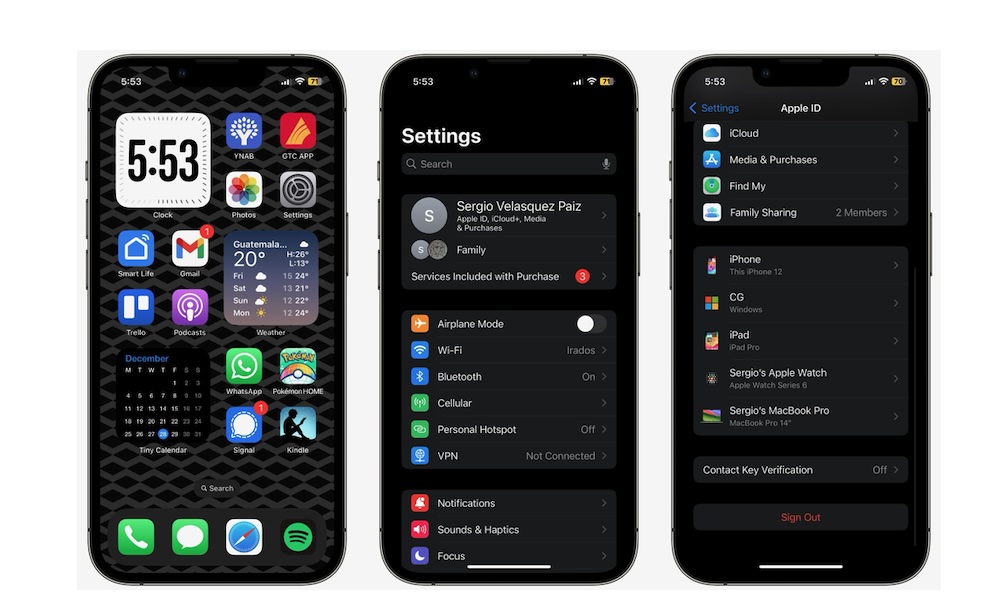
If you aren't careful, your Apple ID account might still be open after you get rid of your older iPhone. If that happens, anyone could possibly access all your important data on your iPhone and iCloud.
Granted, there is still two-factor authentication and other security methods, but if you want to stay safe, you should sign out of your Apple ID by doing the following:
- Open the Settings app.
- Go to your Apple ID.
- Scroll down to the bottom and tap on Sign Out.
Doing a full erase on your iPhone should also sign you out of your Apple ID, but you can still do this step manually to make sure everything is cleared out and your device is removed from your account on Apple's servers.
Unpair Your Apple Watch and Your AirPods
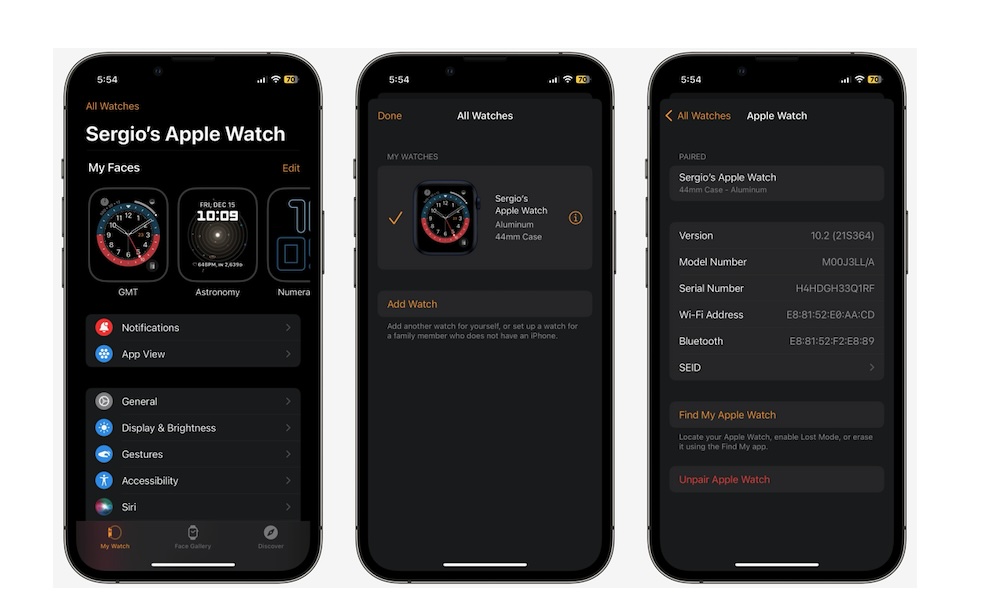
If you have an iPhone, chances are you also have an Apple Watch and a pair of AirPods. But if you're only getting rid of your iPhone, you might want to unpair your AirPods and Apple Watch so they aren't linked to your older iPhone.
Here's how to unpair your Apple Watch:
- Open the Watch app on your iPhone.
- Tap on All Watches in the top left corner of your screen.
- Tap the i icon right next to your Apple Watch's name.
- Select Unpair Apple Watch.
To unpair your AirPods, you have to do the following:
- Open the Settings app.
- Go to Bluetooth.
- Tap on the i icon next to your AirPods' name.
- Tap on Forget This Device.
Unpairing your Apple Watch also automatically creates a backup of the data on your Apple Watch, which can be automatically restored as soon as you pair it to your new iPhone.
Remove Your Credit Cards From the Wallet App
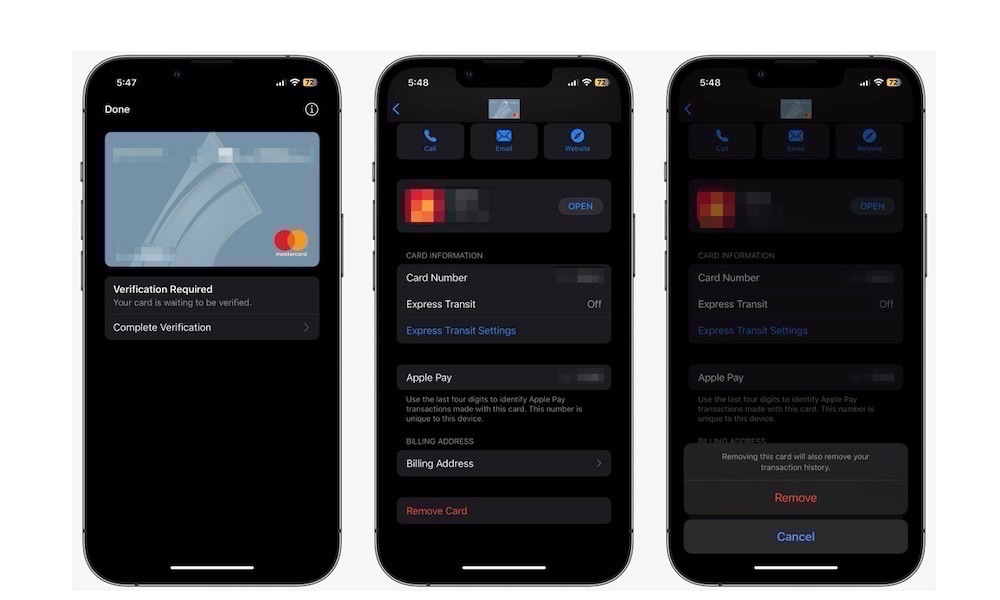
While it's pretty hard for someone to use your credit or debit card on your iPhone without you knowing about it, you can never be too careful.
Erasing your iPhone normally removes all of your Apple Pay cards automatically, but if you're not planning on wiping your iPhone — or you just want to make sure — you can remove your credit or debit cards manually by doing the following:
- Open the Wallet app.
- Scroll down and select the card you want to remove.
- Tap on the i icon that's next to your card.
- Choose Remove Card.
- Tap on Remove to confirm your decision.
Remove Your SIM Card From Your iPhone
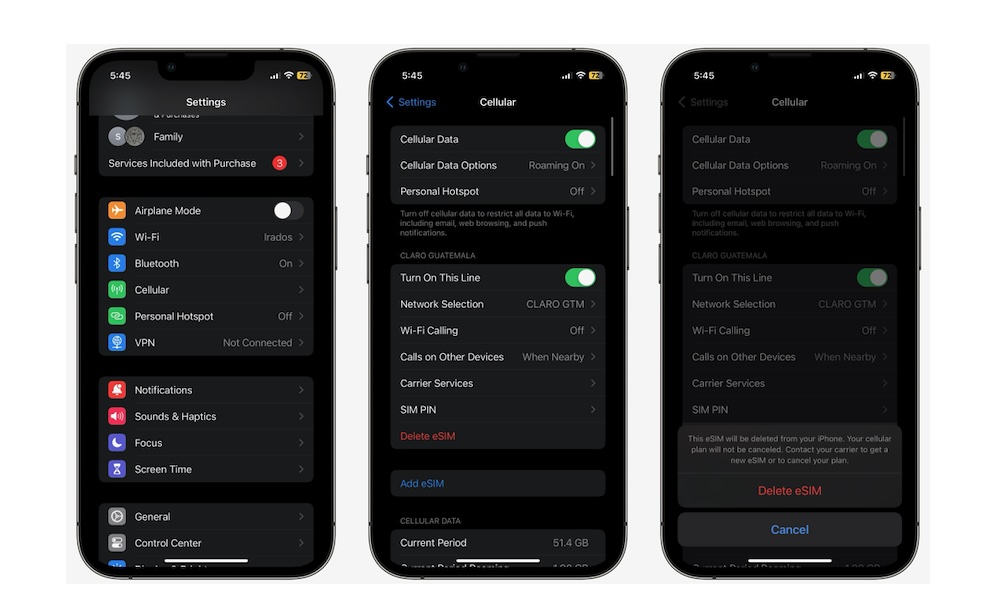
It doesn't matter if you use a physical or digital SIM; you need to make sure you remove it from your iPhone before you get rid of it.
You don't want to lose your SIM or keep it linked so other people can use it if they get a hold of your iPhone.
To remove a physical SIM, you'll need to remove the SIM tray that should be on the left side of your iPhone.
If you use an eSIM, you need to do the following:
- Open the Settings app.
- Tap on Cellular.
- Scroll down and select Delete eSIM.
- Tap on Delete eSIM to confirm your decision.
Note that you'll also be prompted to remove your eSIM when doing a full erase on your iPhone, so you can skip this step if you're planning to wipe your old iPhone completely anyway.
Erase Everything that's on Your iPhone
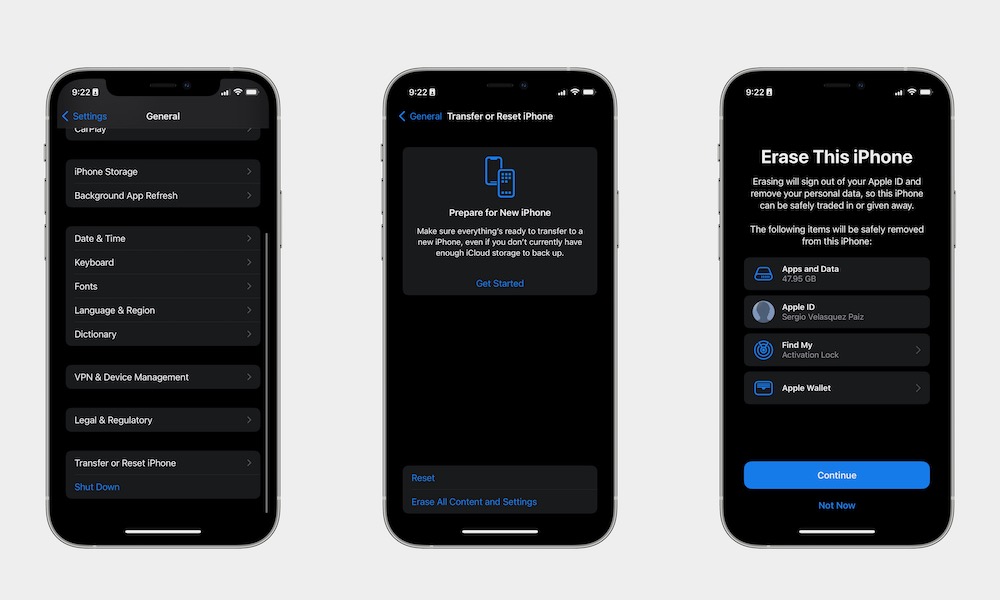
In most cases, you'll want to make sure that you delete everything from your iPhone. Depending on what you're doing with your iPhone, this should be one of the first things you do.
Here's how to completely erase your iPhone:
- Open the Settings app.
- Scroll down and go to General.
- Scroll down again and tap on Transfer or Reset iPhone.
- Tap on Erase All Content and Settings.
- Follow the instructions on the screen to erase your iPhone.
This will delete everything that's on your iPhone, so be sure to create a backup before you do this, or you might lose everything.
Erasing your iPhone will also disable Find My and Activation Lock, sign you out of your Apple ID, remove all credit and debit cards from Apple Pay, and offer to erase your eSIM. This means you can skip doing those things individually if you're planning to wipe your iPhone entirely — and we strongly recommend you do that, even if you're going to give your iPhone to a close family member.
Remove Your iPhone From Your Trusted Devices List
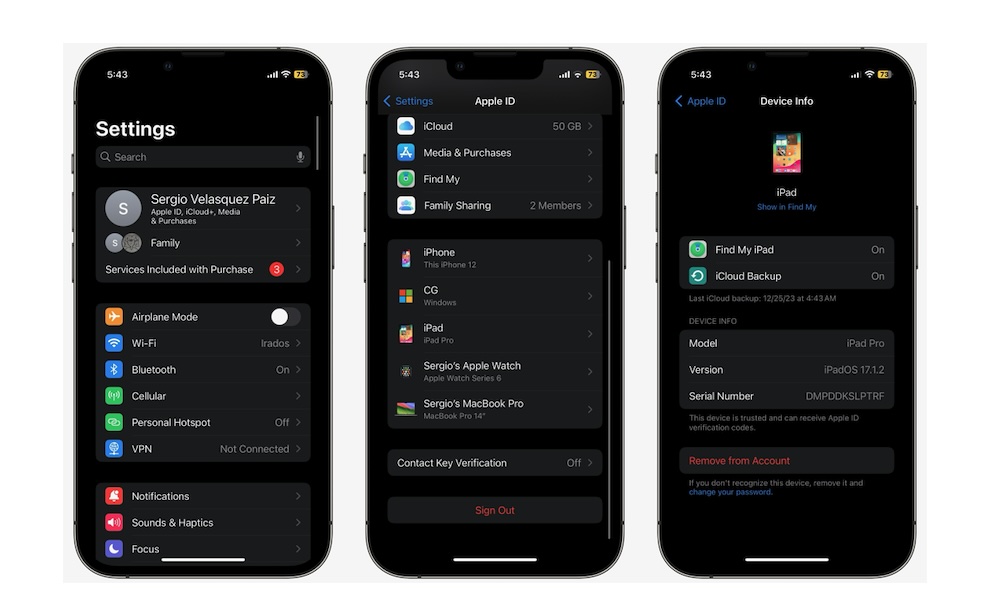
As you probably know, Apple automatically adds devices that use your Apple ID to a list of trusted devices. This makes it easier to know which devices are "safe," and it also lets you keep track of everything you own.
With that said, if you're disposing of your iPhone, you should remove it from your list of trusted devices first so it doesn't appear in your Apple ID account. Signing out of your Apple ID or even wiping your iPhone won't always accomplish this, so here's what you need to do:
- Open the Settings app on another device, such as your new iPhone or an iPad (or System Settings on a Mac)
- Tap on your Apple ID.
- Scroll down and select the older iPhone you want to dispose of.
- Choose Remove from Account.
And that's it. Keep in mind, however, that you'll need to do this from a different device. You can remove the Apple device you're currently using.