
9 Essential iPhone Accessibility Features for Everyday Productivity

If you think accessibility features are only for people with disabilities, then you’re missing out on some of the best quality-of-life tools Apple ships on the iPhone.
Accessibility is where Apple hides many of its most practical upgrades: features that help you stay focused, reduce eye strain, hear voices more clearly, control your phone when your hands are busy, and generally make your iPhone feel easier to use daily.
The best part is that you don’t need to turn your iPhone into a new device to benefit from these features. Most of them can be enabled in under a minute, and many of them work in a way that feels like they should be part of the main Settings app, not tucked into a separate category.
If you want to make the most out of your iPhone and get benefits you didn’t know you had, read on for 9 of our favorite accessibility tricks you need to try.
Back Tap
Back Tap is one of those features that feels almost like a secret you never knew you needed. It turns the back of your iPhone into a hidden button you can double-tap or triple-tap to trigger an action. This means that you access a shortcut without changing how you hold your phone. No extra button to press, and no reaching to the top of the screen. Just a quick tap with your index finger.
Back Tap stands out because you can use it for virtually anything. You can take screenshots, open Control Center, pull down Notification Center, launch the camera, trigger an accessibility feature, or even run a Shortcut. Once you get used to it, it feels natural, like the iPhone should have had a programmable button in the back from the start.
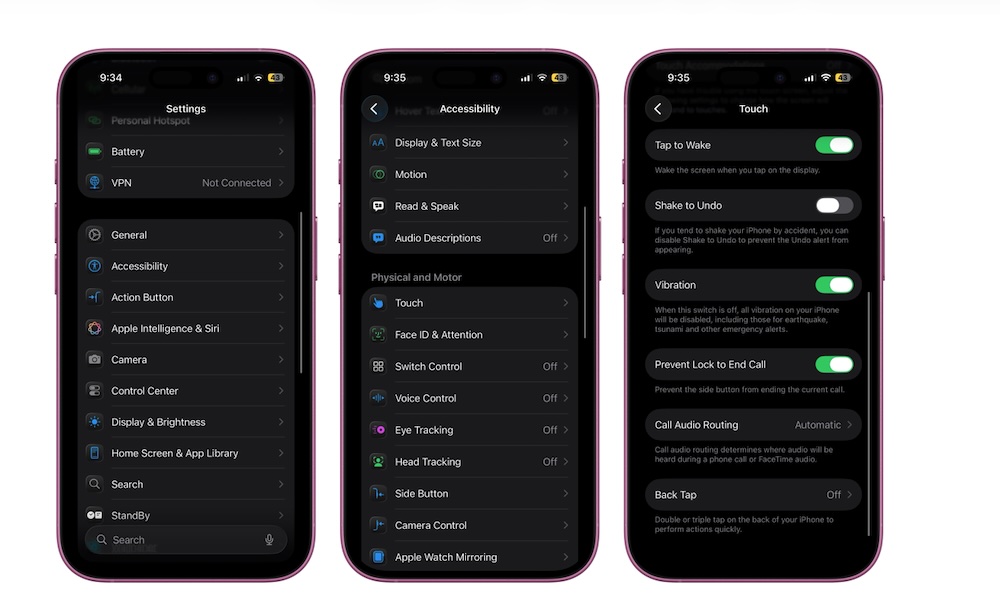
To turn Back Tap on, you need to do the following:
- Open the Settings app.
- Scroll down and go to Accessibility.
- Scroll down and under Physical and Motor, tap on Touch.
- Scroll down one more time and go to Back Tap.
- Tap on Double Tap or Triple Tap.
- Choose the action you want for that “button.”
And that's it. Now you can double- or triple-tap on the back of your iPhone anytime you want to access your chosen features. Just keep in mind that a thick case might reduce its sensitivity, though, so be prepared to tap a bit harder if you're using something like an Otterbox Defender.
Pro Tip: While not strictly an Accessibility feature, you can also map many of the same functions to the physical Action button found on the side of the iPhone 15 Pro, iPhone 16 and newer models.
AssistiveTouch
AssistiveTouch is often introduced as a way to replace physical buttons, but it’s much more than that. Think of it as an on-screen control hub that can simplify gestures, give you quick access to system actions, and make one-handed use feel more intuitive. If you’ve ever struggled with reaching, swiping, or doing multi-finger gestures consistently, AssistiveTouch can make your iPhone feel dramatically more forgiving.
You can set up AssistiveTouch so a single tap opens a menu of actions you care about. Or you can assign gestures to taps and long presses, which is especially helpful if you want a consistent way to do things like open App Switcher, lock the screen, take a screenshot, or talk to Siri without actually talking.
There’s also a feature within AssistiveTouch called Sound Actions, which lets you trigger certain actions with simple sounds. Even if you don’t use that part, the core AssistiveTouch menu is worth trying because it makes the iPhone feel more controllable, especially during busy moments when you can’t use both of your hands.
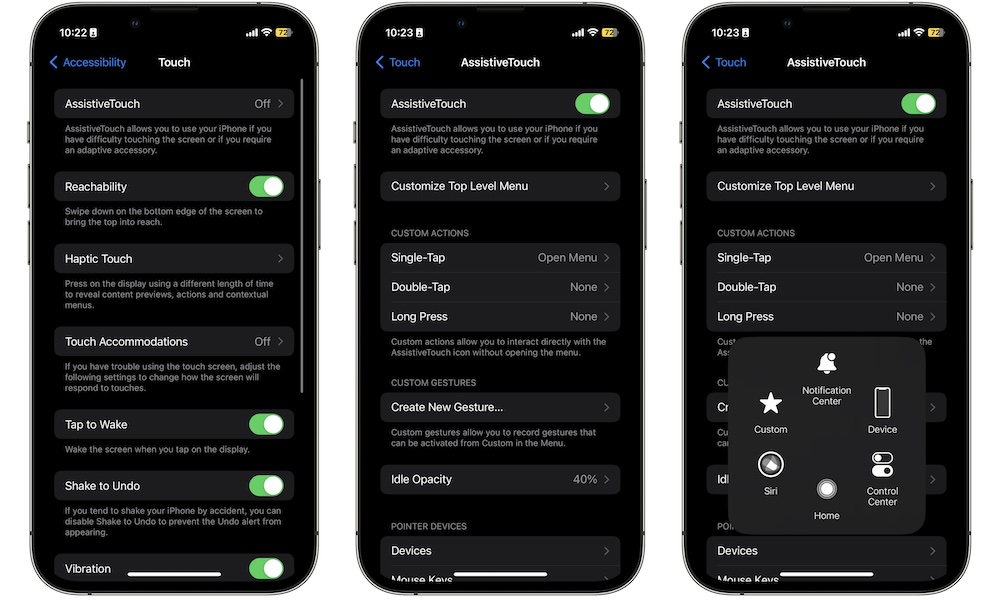
You’ll first need to enable AssistiveTouch on your iPhone, which you can do by following these steps:
- Open the Settings app.
- Scroll down and go to Accessibility.
- Scroll down and under Physical and Motor, tap on Touch.
- Tap on AssistiveTouch.
- Turn on AssistiveTouch.
Now you can start using AssistiveTouch with its default settings. Of course, you can scroll down and personalize this feature however you want.
Voice Control
Siri is great for quick requests, but Voice Control is on a different level. It’s designed for full, hands-free iPhone control using voice commands. That means you can navigate screens, tap buttons, scroll, open apps, dictate text, and interact with interface elements without touching the display.
This is perfect when your hands are busy, like when you’re cooking, holding a baby, working out, or wearing gloves. It’s also a surprisingly handy option if you want to reduce tapping throughout the day. The iPhone becomes more of a tool you talk to, rather than something you constantly tap at.
Voice Control works best when you learn a few basic commands you’ll actually use, such as scrolling, going to your Home Screen, opening specific apps, and selecting items on screen. The feature even has a built-in command list that helps you learn it without guessing.
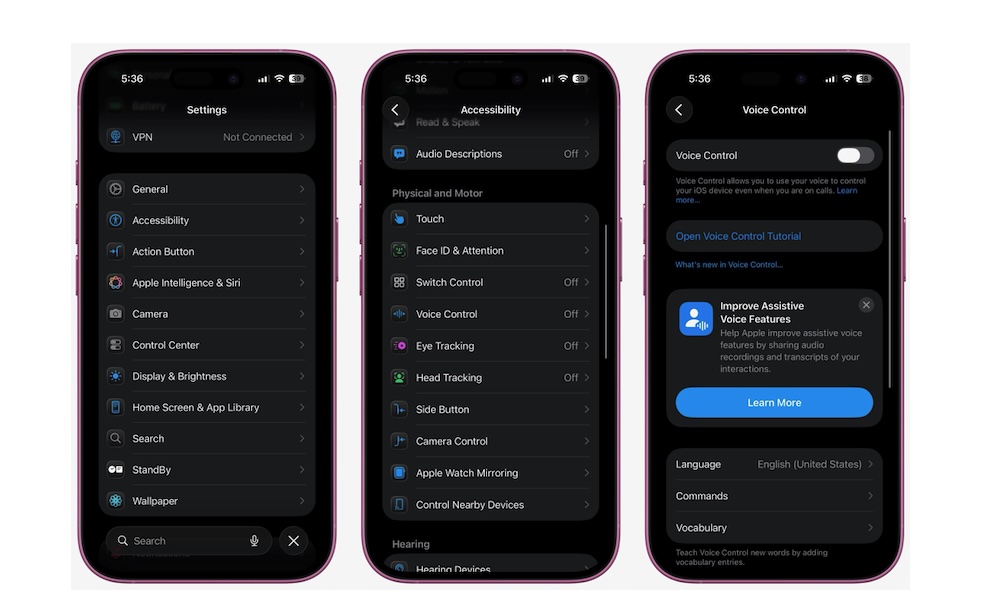
- Open the Settings app.
- Scroll down and go to Accessibility.
- Scroll down and under Physical and Motor, tap on Voice Control.
- Turn on Voice Control.
Once enabled, you can say something like “Show me what to say” to get an on-screen list of supported commands. If you want to go deeper, you can customize commands and create your own phrases, which is where it becomes especially powerful. It also runs entirely on your device, so you can use it even when you don't have cellular or Wi-Fi coverage.
Sound Recognition
Sound Recognition is a quiet safety feature that can also be a practical everyday tool. Your iPhone can listen for certain sounds, such as alarms, doorbells, smoke alarms, sirens, baby cries, and more, then alert you when it detects them.
It can also be trained to recognize custom sounds like a specific appliance beep or even alert you when someone is calling your name. This is helpful if you’re wearing headphones or simply tend to miss audio cues.
Even if you’re not using it for safety alerts, Sound Recognition can be useful in small ways. If you’re focused on work and want a reminder that the doorbell rang, or you have a loud environment and don’t trust yourself to notice the oven timer, this adds a layer of awareness.
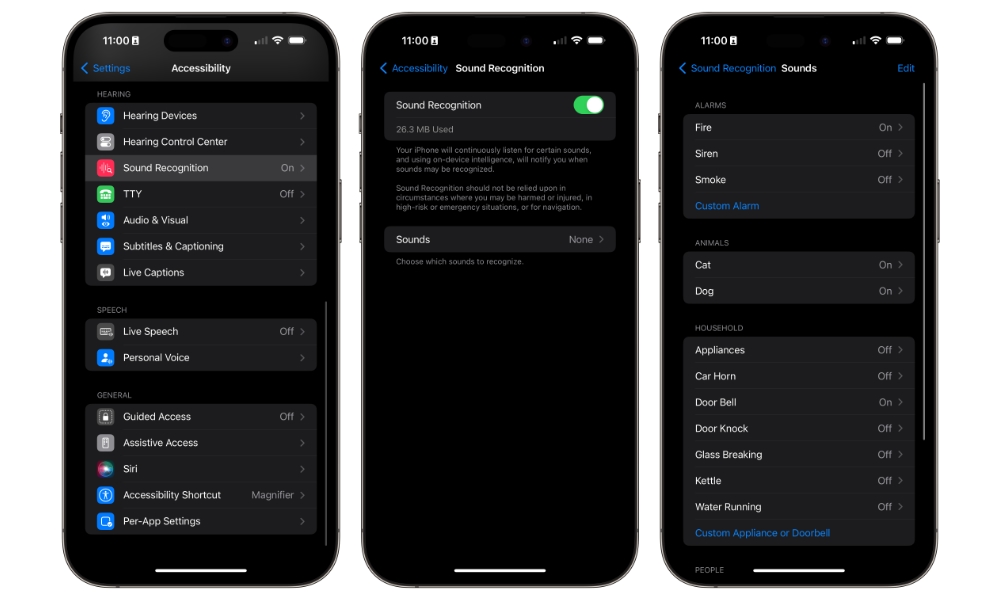
- Open the Settings app.
- Scroll down and go to Accessibility.
- Scroll down and under Hearing, tap on Sound & Name Recognition.
- Tap on Sound Recognition.
- Turn on Sound Recognition.
- Tap on Sounds.
- Choose the sounds you want your iPhone to detect. You can also choose Custom Alarm or Custom Doorbell to train it to recognize a unique sound.
Your iPhone will begin downloading all the sounds you chose. This is because your iPhone does the sound recognition in-device. This is so you can rest assured that Apple isn’t recording you while using this feature.
Pro Tip: To add your name, to Sound & Name Recognition (step 3 above) and select Name Recognition > Set up Name Recognition. Follow the instructions to teach your iPhone to recognize your name.
Live Listen
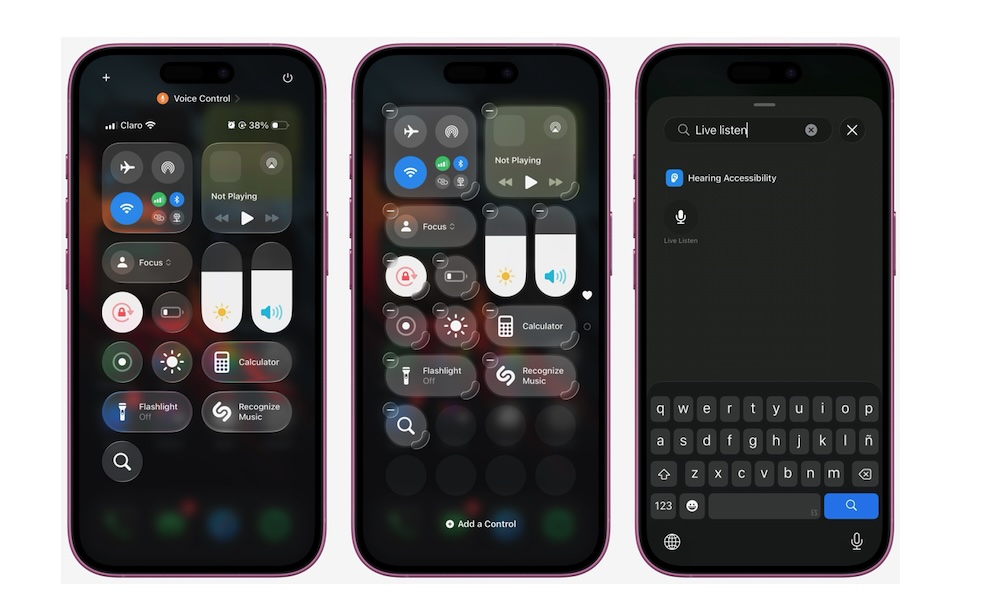
Live Listen turns your iPhone into a remote microphone that streams audio to your AirPods, Beats, or compatible hearing devices. This is incredibly useful in situations where you’re struggling to hear someone clearly, like in a restaurant, in a meeting, or during a lecture. You place your iPhone closer to the person speaking, and your AirPods relay the audio to you.
The beauty of Live Listen is that it doesn’t require special hardware beyond the headphones you already own. It’s also quick. First, you need to add it to your Control Center. Just open Control Center, tap the plus icon in the top right corner of your screen, and then tap Add a Control at the bottom. Search for Live Listen and add the control to your Control Center.
Once it’s added to Control Center, you can use it by connecting your AirPods or Beats and then opening Control Center. Next, tap Live Listen. Finally, place your iPhone near the speaker.
It’s not magic, and it won’t fix every environment, but in many real-world situations, it can make speech noticeably easier to follow. It's also so good at picking up audio that it often feels like it was practically meant for spying.
Spoken Content
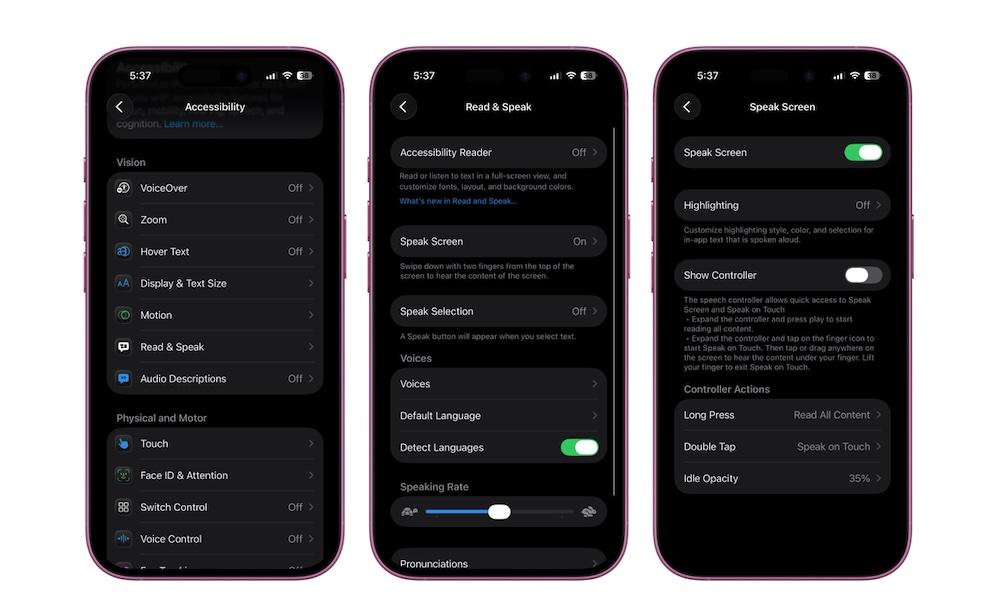
Spoken Content is one of the most underrated iPhone accessibility features for anyone who reads a lot. It can read selected text aloud or speak the entire screen, which is perfect when your eyes are tired, you’re multitasking, or you want to absorb an article while doing something else.
This is also a great feature for proofreading. Hearing text read back to you makes awkward phrasing jump out in a way that silent reading doesn’t. If you write emails, documents, or long notes on your phone, Spoken Content can catch mistakes your eyes gloss over.
The name is a bit different depending on whether you’re running iOS 18 or older or iOS 26 or newer, but it still works the same way. Here's where to find it:
- Open the Settings app.
- Scroll down and go to Accessibility.
- Tap on Read & Speak (iOS 26 and later) or Spoken Content (iOS 18 and earlier).
- Tap on Speak Screen, or Speak Selection, and turn either or both of them on.
Once you turn this feature on, you can make your iPhone read for you by swiping down two fingers from the top of your screen. You can also adjust voices and speaking rate so it sounds natural instead of robotic.
Zoom
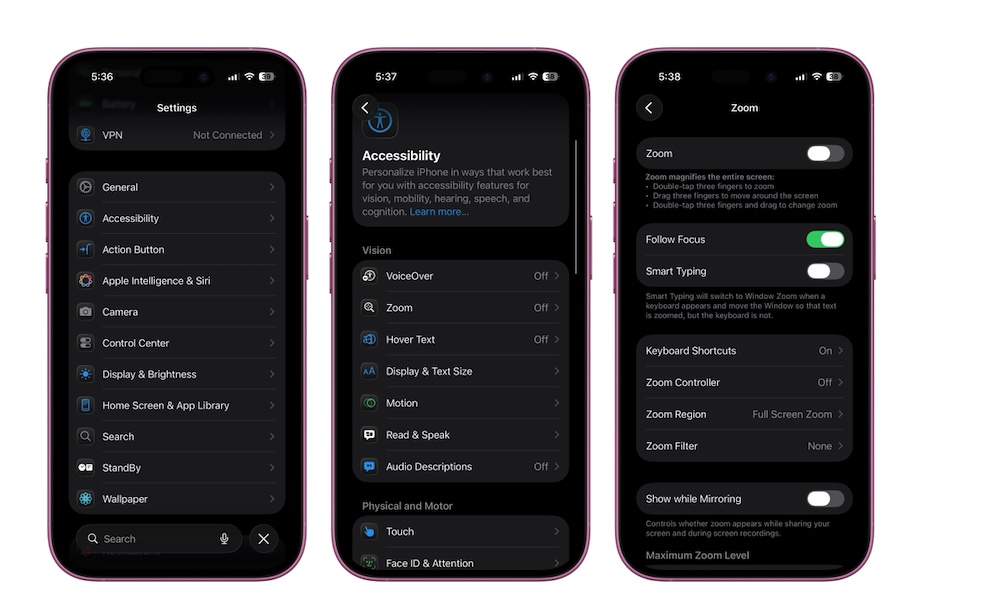
Zoom is the accessibility feature you don’t realize you need until you’re staring at tiny text, dense charts, or an interface that refuses to scale the way you want. Zoom is a system-wide magnification that can enlarge the whole screen or create a movable loupe -like window.
This is incredibly useful in real life. Maybe you’re reading a detailed receipt, checking a form, looking at a small map label, or trying to review something with fine print. Instead of squinting or struggling with tiny UI elements, Zoom lets you bring detail forward instantly.
To turn on Zoom on your iPhone, follow these steps:
- Open the Settings app.
- Scroll down and go to Accessibility.
- Tap on Zoom.
- Turn on Zoom.
You can choose Full Screen or Window, set the maximum zoom level, and enable the Zoom Controller for easier control. Even if you don’t keep it on all the time, it’s a great to know it exists. Plus, you can add it to your Control Center, so you can turn it on and off whenever you need to.
Magnifier

Magnifier is like Zoom’s real-world counterpart. It’s a dedicated tool that uses the camera to magnify text and objects around you, turning your iPhone into a pocket magnifying glass. It’s perfect for menus, labels, serial numbers, receipts, and any moment you’re dealing with small text.
Magnifier can also include detection features on supported devices, such as reading text aloud or helping you identify what’s in view. That can be useful not only for accessibility needs, but for convenience. If you’ve ever been in a dim room trying to, you already understand how helpful this can be.
Unlike other features on the list, Apple’s Magnifier is actually a standalone app. It comes preinstalled on your iPhone, but you can also download from the App Store in case you deleted it to save space.
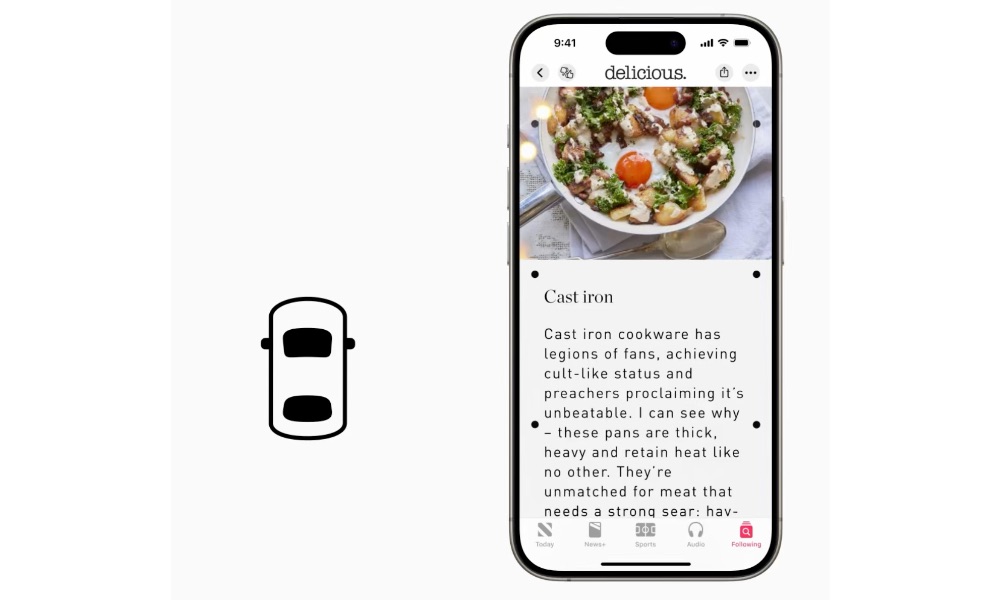
Vehicle Motion Cues
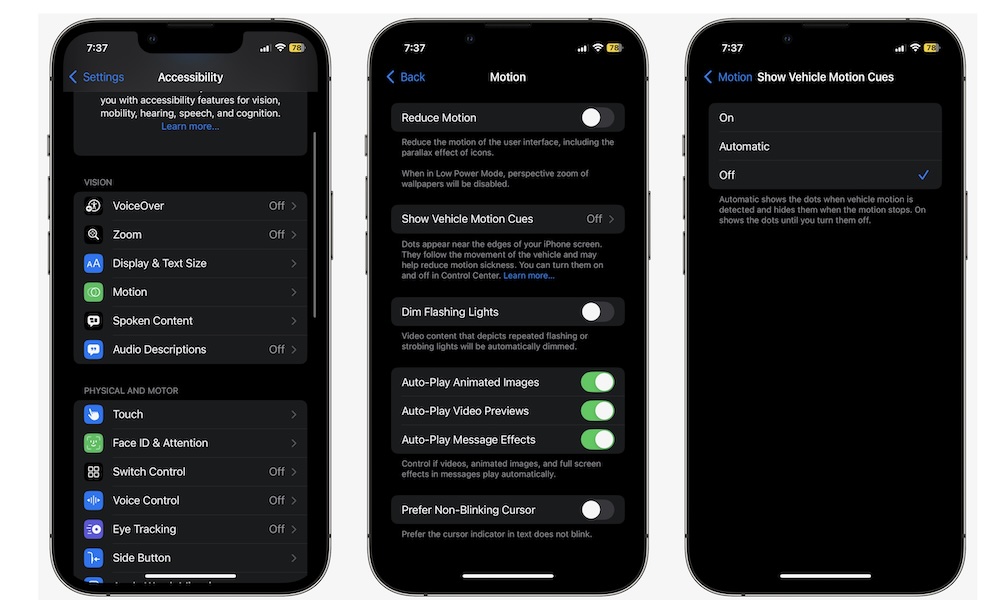
If you’ve ever felt nauseous trying to read or scroll through social media in a moving car, Vehicle Motion Cues is worth trying. This feature uses animated dots on the screen to help your brain reconcile what your eyes see with what your body feels, which can reduce motion sickness for some people. It doesn't block what's on the screen, but just adds some subtle dots on each side that react to the physics of the car.
It’s a simple concept, but it can be the difference between being able to use your iPhone during a ride and feeling like you need to put it away immediately. If you’re someone who gets carsick easily, it’s a genuinely practical feature to experiment with.
To start using Vehicle Motion Cues on your iPhone, you need to:
- Open the Settings app.
- Scroll down and go to Accessibility.
- Tap on Motion.
- Go to Vehicle Motion Cues.
- Choose On if you want to have it now, or Automatically in Vehicle if you want your iPhone to turn it on for you.
Your iPhone might not detect you're in a car all that fast, so if you need to, you can add this feature to your Control Center, so you can turn it on in a flash.
Make the Most of These Features
Accessibility features are where Apple hides some of its smartest iPhone tools, and you don’t need a specific diagnosis to benefit from them. These features are designed to make the iPhone easier to use in real life, where you’re busy, distracted, tired, or dealing with imperfect environments.
If you don’t know where to start, pick a couple of features that match your daily pain points and try them out. The goal isn’t to turn on everything. It’s finding a few accessibility tools that quietly support you every day, then making them easy to access so you actually use them.