
Stop the Drain: 8 Simple iPhone Settings to Save Your Battery

Every iPhone is bound to experience battery life problems sooner or later. Even if your iPhone is in great shape now, you can't change the laws of physics — all batteries wear out over time.
Of course, that doesn’t mean there aren't things you can do to slow down your battery’s aging process. Putting more stress on your iPhone does the same for your battery, causing it to get old before its time.
It’s not always your fault, though. A lot of power drain comes from background activity you don’t see, like apps quietly refreshing, location services checking in more often than you realize, and convenience features that keep waking your screen.
The good news is that you can easily do something about it without compromising your iPhone's performance. Read on for 8 battery-saving switches that make a real difference without turning your iPhone into a stripped-down dumb phone.
Turn Off Background App Refresh
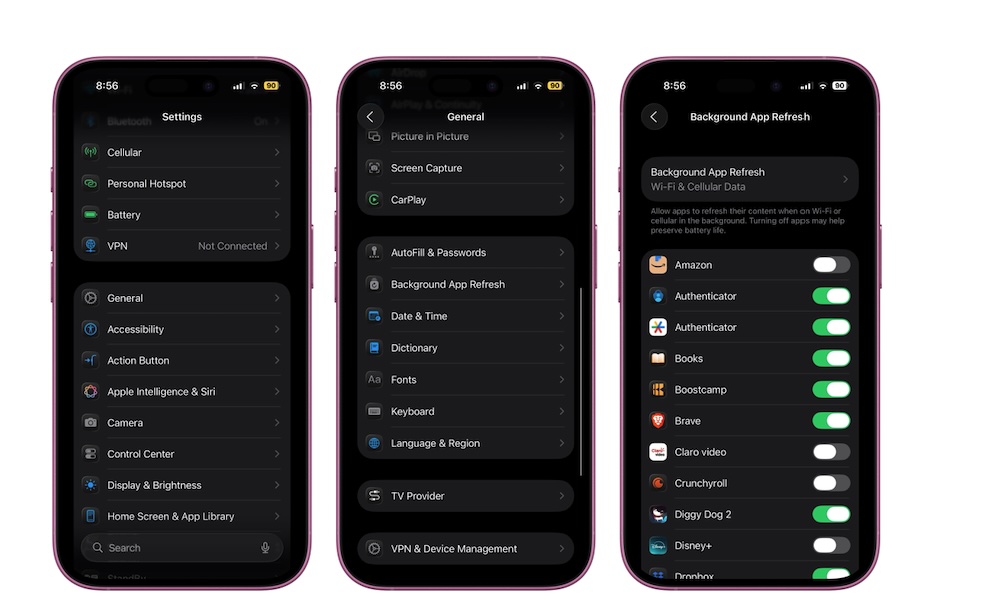
Background App Refresh sounds pretty harmless. It simply gives apps permission to wake up in the background when you’re not using them so they can update their data. That can be helpful for some apps, but it also means extra CPU work and extra network activity, which results in silent battery drain that can be multiplied if you have a lot of apps installed that want to be “helpful.”
Here’s the thing: you probably don’t need most apps to refresh in the background. Social apps will update when you open them. Shopping apps don’t need to refresh unless you’re actively using them. News apps can wait. The ones that sometimes benefit are things like navigation, audio, or apps where timely updates matter for your day. But even then, you can pick and choose. Here's how:
- Open the Settings app on your iPhone.
- Scroll down and tap on General.
- Go to Background App Refresh.
- Go through the list and turn off any apps that really don't need to update in the background.
You can also choose Background App Refresh from the top and select Off to disable this feature completely, but we don't recommend this, as off really does mean "off" in this case: this will disable all apps from running in the background, even Apple's built-in apps like Weather, Calendar, Mail, and Maps.
The good news is that disabling Background App Refresh won't typically block notifications from email, messaging and social media services, as these come directly from the servers; they aren't generated by these apps checking for new information in the background.
Set Location Access to “While Using”
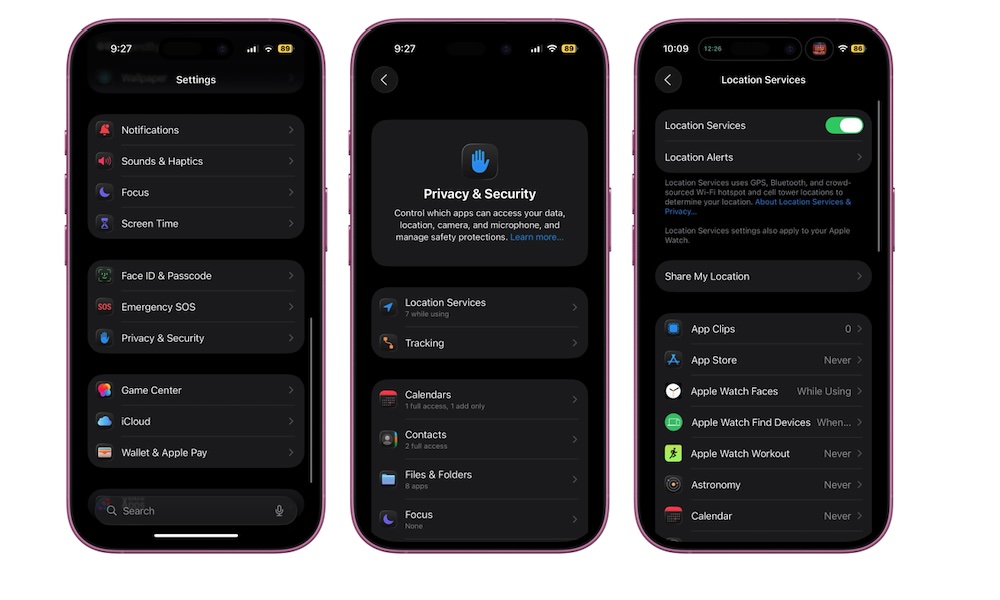
Location Services is another battery trap because it can consume power without you even knowing about it. A lot of apps ask for constant access to your location even when they don’t need it, and once that’s granted, they can ping your location in the background to keep things running behind the scenes.
Most apps should be set to While Using, which means the app gets access to your location only when you’re actually in it, which is what most apps need. You’ll still get maps, local recommendations, and location-based features when you want them, without your iPhone acting like a tracking device all day.
There's also more to this than just reducing the stress on your battery. It's even more important for privacy. That's where you should also pay attention to Precise Location, which can reduce unnecessary oversharing. After all, most apps don’t need your exact GPS coordinates to function; an approximate location is good enough for things like weather, news, and deals.
Here's how to manage your location services:
- Open the Settings app on your iPhone.
- Scroll down and tap on Privacy & Security.
- Tap on Location Services at the top.
- Select an app you want to adjust the location setting for.
- Choose While Using the App (or if it really doesn’t need it, Never).
- While you're here, toggle off Precise Location if the app only needs to know your general area.
If you want to go above and beyond, you can simply turn off Location Services altogether, but like Background App Refresh, it's important to remember this is a global setting that will also block apps like Apple Maps and Google Maps and render them useless for navigation.
Use Low Power Mode
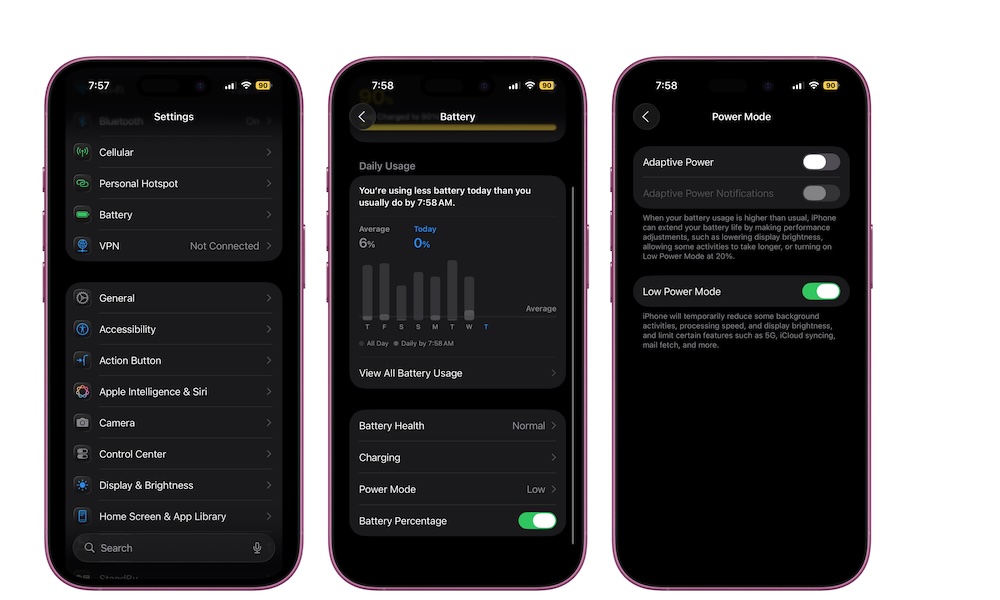
Low Power Mode is one of the best battery tools Apple gives you, but it’s meant to be used with intention. Think of it like a smart “save energy” switch for when you need extra hours, not something you keep enabled 24/7 out of fear.
The reason it works is that it targets background activity and certain processes that burn power without improving your actual day. For example, toggling on Low Power Mode will automatically disable Background App Refresh globally, stop fetching new emails in the Mail app, and stop syncing photos to iCloud. It also reduces your display brightness, sets your auto-lock to 30 seconds, and limits the refresh rate on ProMotion displays to 60 Hz.
Even so, your iPhone should still feel pretty normal for most daily tasks. Messages, browsing, music, maps, and social apps all still work mostly fine, although you might have to manually refresh or wait for new content to download when you open them. You’re just cutting down on background extras and saving a lot of battery while you’re at it.
Pro Tip: To make this really easy, the best move is to add a Low Power Mode button to Control Center so it’s just two taps away when you need it. If not, you can always go to Settings > Battery and turn on Low Power Mode.
Turn On Reduce Motion
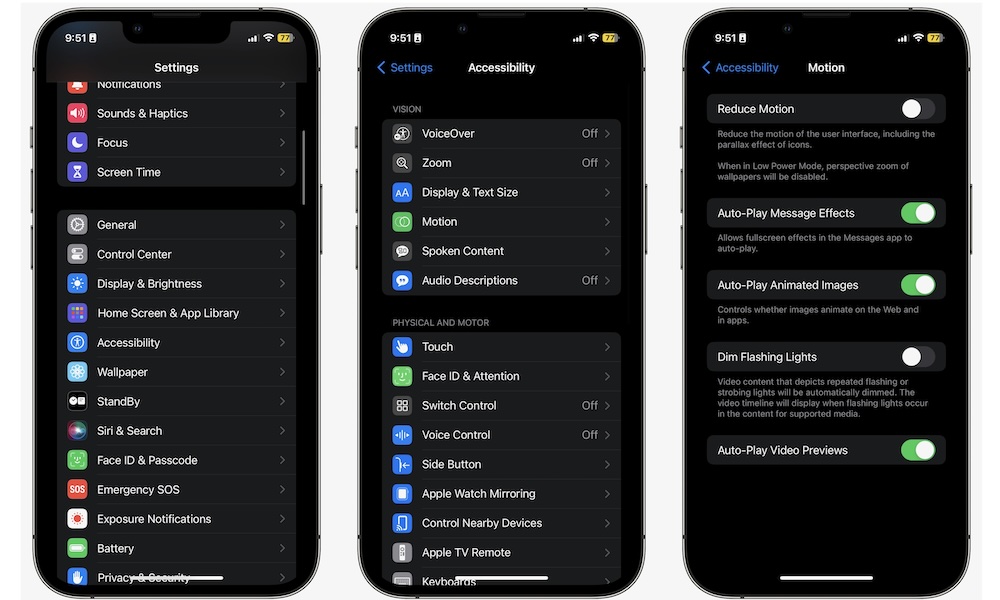
Animations are pretty, but they’re also extra work, especially for older iPhones. The Reduce Motion feature simplifies certain transitions and visual effects. For most people, this doesn’t change what the iPhone can do, but it will definitely feel different at first.
On newer iPhones, this is more of a small efficiency advantage. On older iPhones, it can make the whole phone feel snappier because the interface isn’t spending as much time animating everything.
If you try it and miss the fancy animations, you can always toggle it back. But a lot of people turn it on and forget about it because the iPhone still feels premium. Here's where to find it:
- Open the Settings app.
- Scroll down and tap on Accessibility.
- Go to Motion.
- Turn on Reduce Motion.
Turn Off Listen For Siri If You Rarely Use It
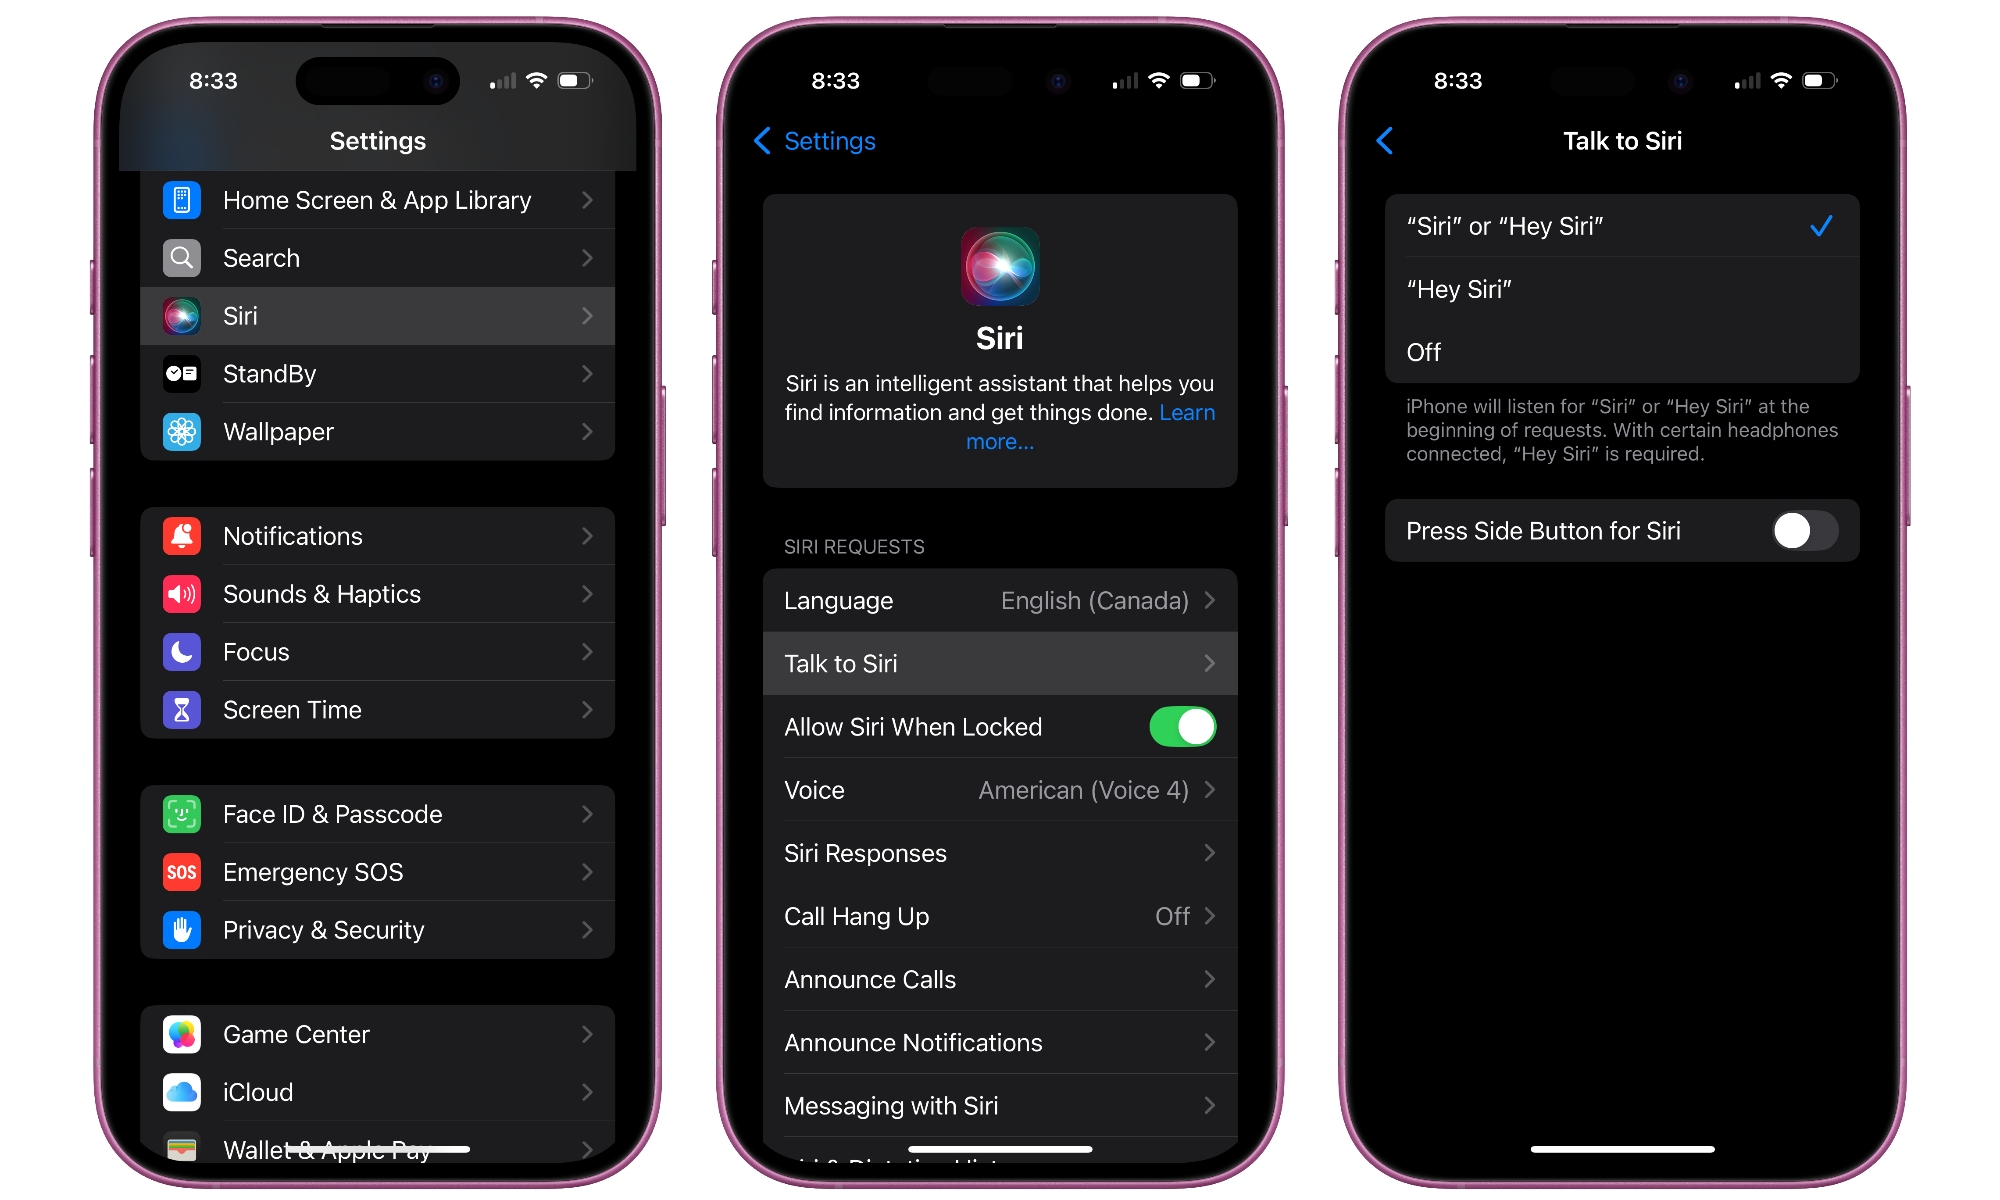
Having Siri always listening for its name is pretty handy, but it’s also one more background feature running on your iPhone. This is a must-have feature if you use Siri constantly, but if you rarely call it up by voice, you’re paying a battery tax for a tool you aren't using.
A simple compromise is turning off “Listen for Siri” but keeping Side Button Siri enabled. That way, Siri is still available when you intentionally want it without the always-on listening behavior. Here's how to do this:
- Open the Settings app.
- Scroll down and tap on Apple Intelligence & Siri.
- Go to Talk & Type to Siri
- Select Off from the options at the top.
One word of caution: Turning this setting off will also affect your ability to call up Siri while driving via CarPlay as there's no separate setting for that. However, you can still use the button on your steering wheel (if your car has one).
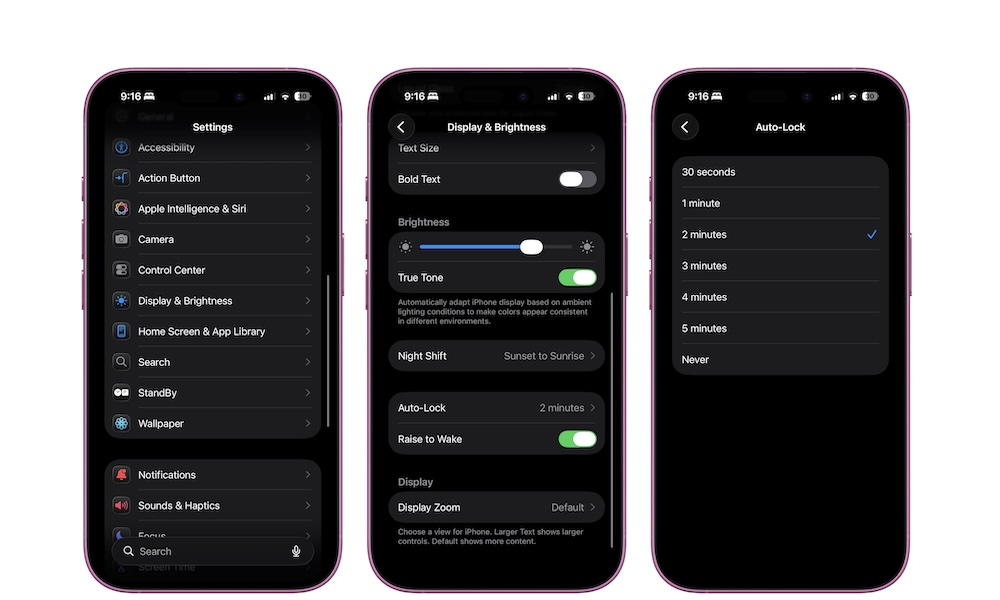
Turn Off Raise to Wake
Raise to Wake is a convenient feature, but it can also cause a lot of accidental screen wake-ups, especially if you move around with your iPhone a lot or pick it up constantly during the day.
Each wake-up is a little battery hit: the display turns on, sensors activate looking for a face to unlock the iPhone, and your phone does a small burst of work. If it happens dozens or hundreds of times a day, it adds up more than people expect.
Turning it off doesn’t make your iPhone harder to use. You can still tap the screen or press the side button when you actually want to check your notifications or unlock your iPhone. The difference is that your phone stops waking up when you didn’t ask it to.
Here's how to disable Raise to Wake:
- Open the Settings app.
- Scroll down and tap on Display & Brightness.
- Scroll down and disable Raise to Wake.
Note that you don't need to worry about this if you're carrying your iPhone in a pocket or bag, as the screen won't wake up when it's blocked, but it can definitely be a problem if you frequently walk around with your iPhone in your hand.
Pro Tip: For another huge screen-related energy saver, consider turning on Dark Mode. On the OLED screens found on all modern iPhones, black pixels are literally "off" and consume no power. With over 3 million pixels on an iPhone screen, those savings can add up fast.
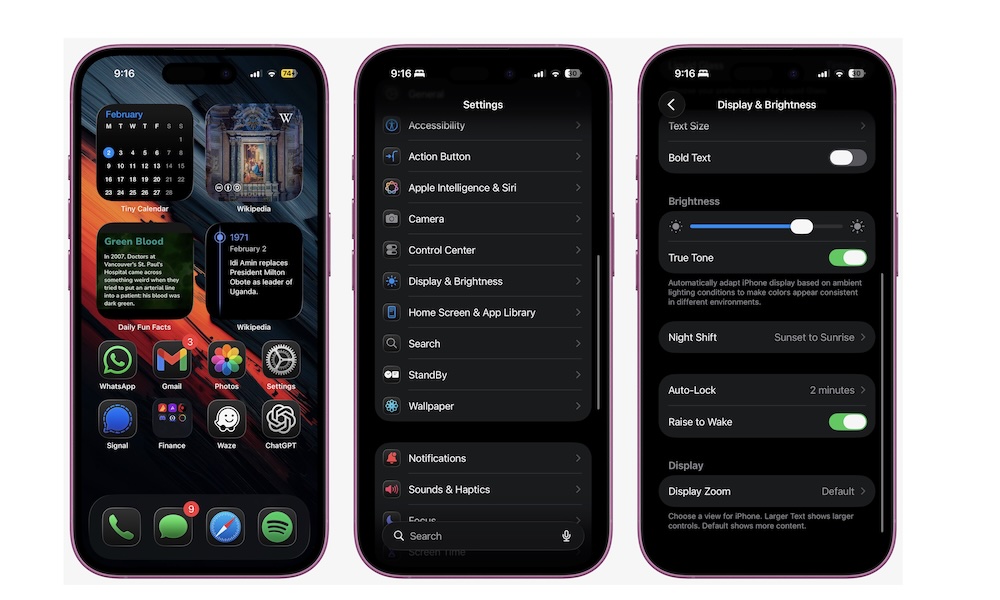
Shorten Auto-Lock Timeout
If there's one single setting that makes the biggest battery difference, it’s this one. Your display is one of the biggest battery drains on an iPhone (and any modern device, for that matter). The longer it stays on after you stop using it, the more power you’re consuming for nothing.
A shorter Auto-Lock means your iPhone goes to sleep more quickly when you’re done reading or you get distracted. It doesn’t make your iPhone slower. It doesn’t affect performance. It just prevents wasted screen-on time. It’s a win-win situation.
You can shorten your auto-lock time to as little as 30 seconds. If that feels like a little too much, pick the shortest option you won’t hate. The best setting is the one you’ll keep. This is how you can change it.
- Open the Settings app.
- Scroll down and tap on Display & Brightness.
- Scroll down and tap on Auto-Lock.
- Select the time you want.
Keep in mind that if you are using Low Power Mode, you won’t be able to change the Auto-Lock time, as it's set to 30 seconds by default to save power.
Pro Tip: You don't need to set a longer auto-lock time on a modern iPhone just to prevent the screen from shutting off while you're reading something as long as you have Attention Aware Features toggled on under Settings > Face ID & Passcode. When this setting is enabled — which it is by default — your iPhone will use the front-facing True Depth camera to avoid dimming or locking the screen as long as you're looking at it.
Audit Notification-Heavy Apps
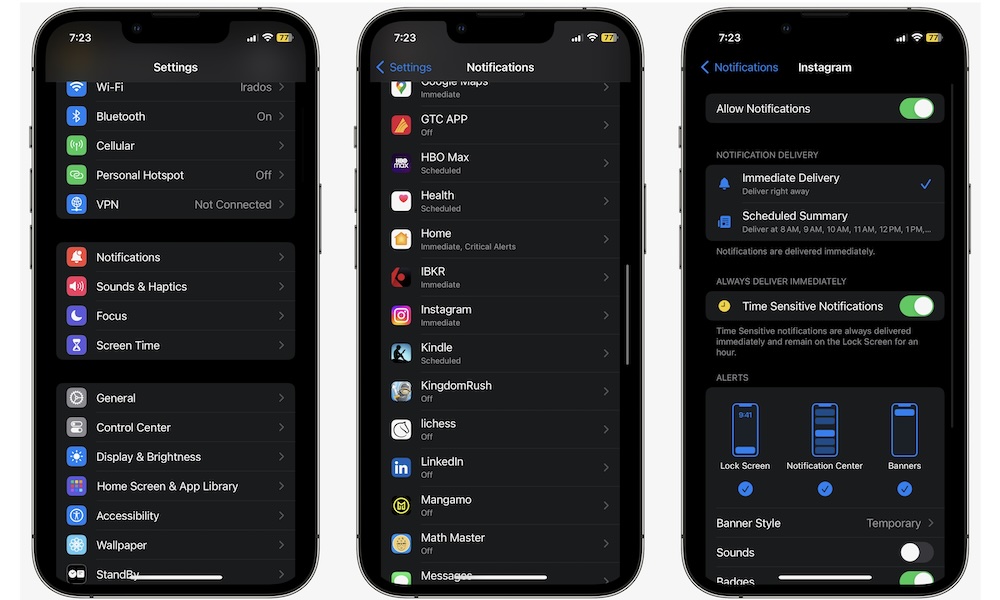
Let’s face it: Most notifications are not just noise. They’re small alerts that use your iPhone's haptics or sounds while also draining battery life. Each alert can light up your screen, trigger haptics, pull new data, and keep your phone active for longer than it needs to be.
Chat apps, social apps, shopping apps, and news apps are the usual culprits. The fix isn’t to live in silence, but to choose what deserves immediate attention and what can wait until you open the app.
Even a small change, like disabling Lock Screen notifications for the apps that send the most notifications, can reduce how often your iPhone wakes itself up throughout the day.
- Open the Settings app.
- Scroll down and tap on Notifications.
- Select the apps that send you the most (useless) notifications.
From here, you have a couple of options. For starters, you can turn off notifications completely. Or you can choose to get your notifications in a Scheduled Summary. When that happens, your notifications will still appear on your Notification Center, but they won’t bother you until a specific time of the day, which you choose.
Pro Tip: You can also usually get more fine-grained control by checking the notification settings and related features in individual apps. For example, group chats can be one of the worst offenders for notification overload, so try muting these individual conversation threads in Messages or WhatsApp rather than turning off all notifications. This ensures you won't miss any important messages sent directly to you, but your iPhone also won't be buzzing away and lighting up the screen all day while everyone else is chatting away.
Get Back Some Battery Life
Battery life gets a lot easier when you stop treating it like a mystery and start managing it yourself.
Your iPhone doesn’t usually drain fast because it’s working hard on the thing you’re doing; it drains because it’s doing extra work you never really asked for. Once you trim background refresh, calm down location behavior, cut accidental screen wake-ups, and clean up notification spam, your iPhone usually feels just as quick, but it also lasts longer.
And when you set these up once, you don’t have to keep worrying about them. You’ll get better battery life every day without changing how you actually use your device.