15 Tips to Organize Your Photo Library
 Credit: Kostikova Natalia / Shutterstock
If you've had an iPhone for a long time, your photo library is probably filled with a bunch of photos and videos you really don't want to miss.
Sure, not every photo is great, but they represent cute moments and significant memories that happened to you and your loved ones and maybe even your life's work. Either way, you don't really want to get rid of them.
Whatever the reason, it's likely that your Photos app has gotten a bit messy. Not to worry, though; with the tips that we're about to show you, you'll be able to start organizing your library in just a few taps.
Make the Most of Your Albums
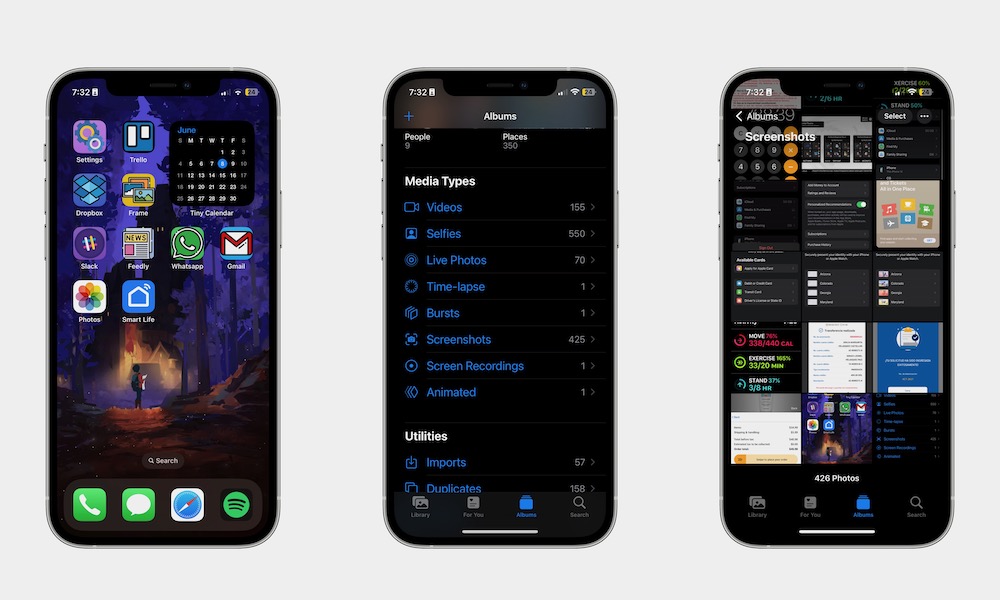
By default, the Photos app creates a bunch of smart albums to help you keep your photos organized.
These albums aren't perfect, and your iPhone won't organize everything for you, but they're still a handy way to quickly find photos you thought were missing.
To see all your albums, open the Photos app and go to the Albums tab at the bottom of the screen. From there, scroll down to find all your albums, people, and places of interest. You can go down a bit further, and you'll find other albums for things like screenshots or hidden photos, which we'll talk about in a moment.
Get Rid of Bad Photos
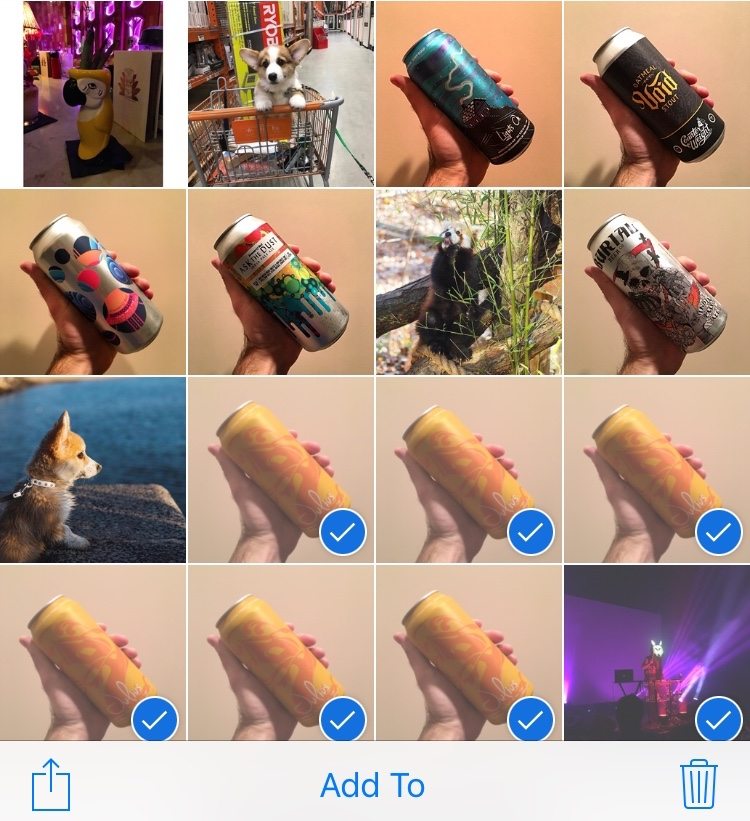
We all have bad photos that we won't ever use or even look at. Not only that, but sometimes we take a photo of a phone number or an assignment that we don't need to keep long term, but later forget to delete them.
One of the best ways to get started is to begin deleting unnecessary pictures and videos. It might be blurry photos, old pictures you don't really need anymore, or those memes you get on Whatsapp that no one really sees.
To start deleting a lot of pictures, you can open the Photos app and tap on Select in the top right corner of your screen. Then, tap all the photos you want to get rid of and tap on the trash can icon in the bottom right corner of your screen.
Finally, tap on Delete to confirm your decision. Don't worry, all the photos you delete go straight to the Recently Deleted album, which you can find in the Albums tab. From here, you can recover any photos you've deleted photo in the last 30 days; after that, they'll be permanently removed from your photo library.
Create Your Own Albums
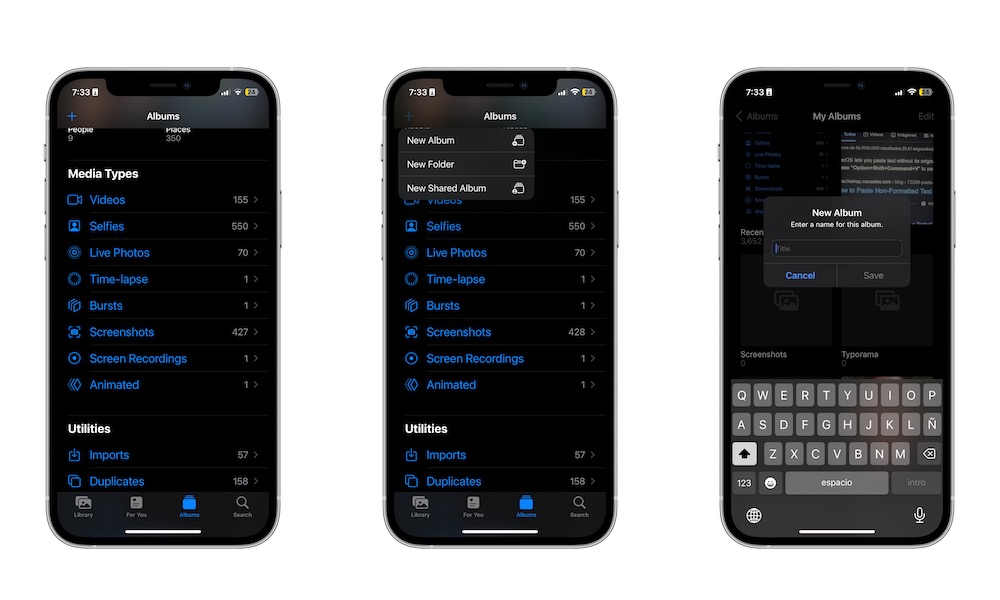
As we mentioned, the albums the Photo app creates aren't perfect, but the good news is you can create your own albums and manually add whatever pictures you want. To get started, you need to:
- Open the Photos app.
- Select the Albums tab at the bottom of your screen.
- Hit the Plus icon in the top right corner of your screen.
- Choose New Album.
- Enter the Album's name and select Save.
- Finally, choose the photos and videos you want to add.
Don't worry; you'll be able to add other pictures to your new album later, too.
Use the 'For You' Tab
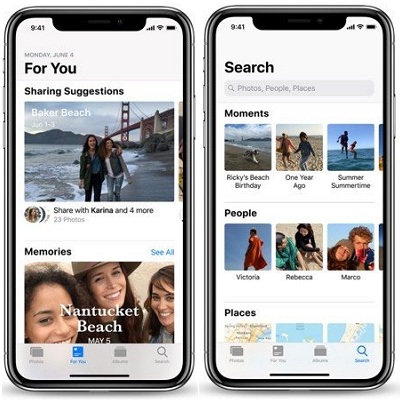
The Photos app has a For You tab, which captures all the memories your iPhone thinks are important. You'll find different events or themes, all filled with the photos you've taken of yourself or your friends and family.
The Photos app will automatically create these moments for you, so all you need to do is tap For You at the bottom of your screen, and you'll see everything Photos thinks is worth remembering or sharing.
Granted, you aren't the one organizing your pictures, but this is a great way to quickly find moments you didn't even remember.
Search for Any Photo You Want
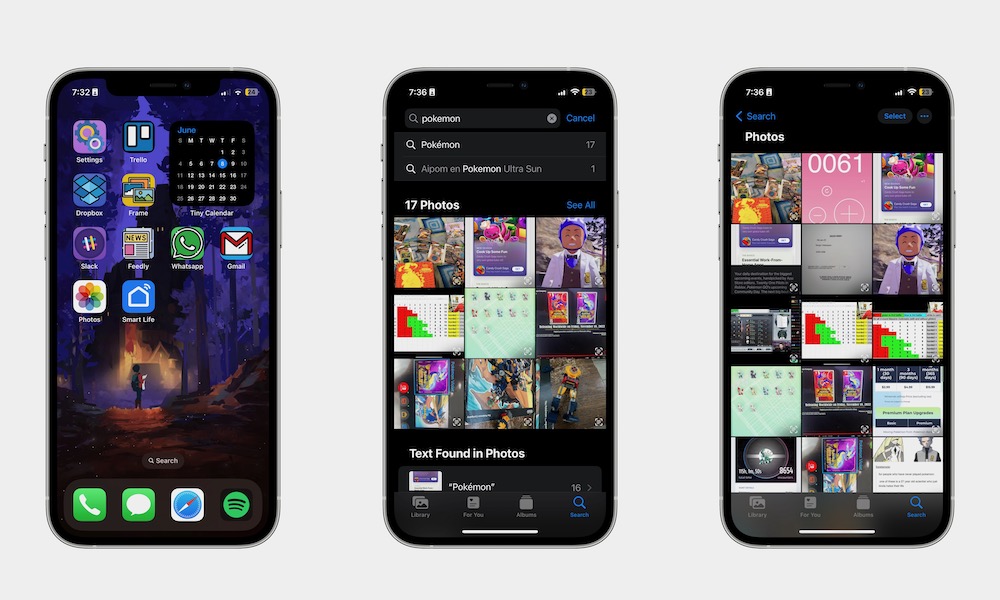
If you have so many photos that you can't find the picture you're looking for, don't worry; the Photos app comes with a built-in search feature that may surprise you with its accuracy.
Using this feature, you can search for specific moments, people, places, and categories. You can even search for text written in a photo, and the Photos app will use the iPhone's Live Text feature to read your images and find the matching results.
To use the Photos app's search feature, all you need to do is tap the Search tab at the bottom of your screen. Then, tap the search bar at the top and enter anything you want to search for.
Back-Up Everything in the Cloud
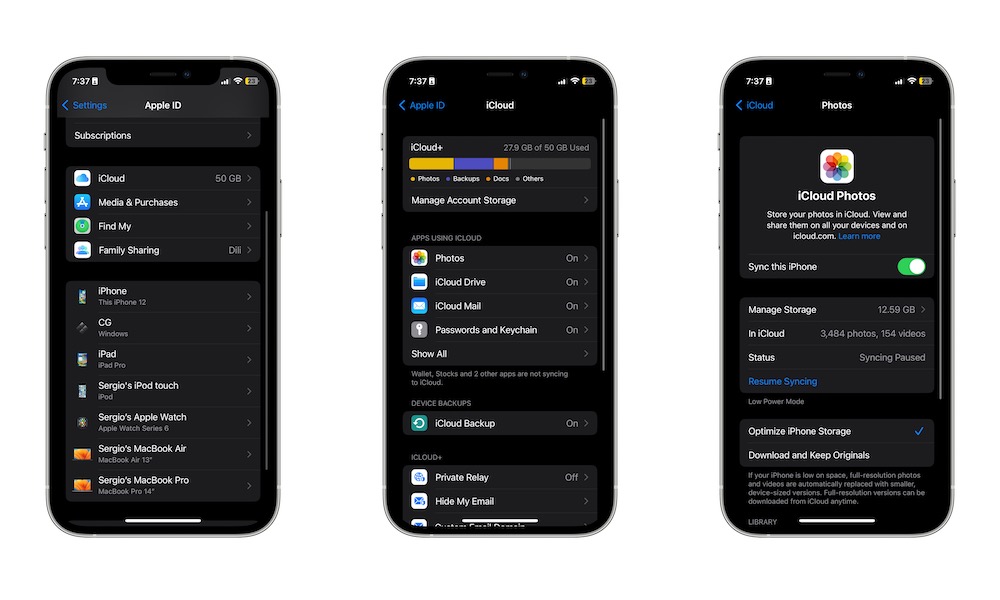
If you have a lot of photographic memories on your iPhone that you don't want to lose, then it's a good idea to back up your photos and videos to the cloud.
Thanks to iCloud, you can store all the photos and videos you've captured on your iPhone. This also lets you access your photos from other Apple devices and even on the web via the iCloud website.
To start using iCloud, you need to do the following:
- Open the Settings app.
- Select your name at the top of the screen.
- Go to iCloud.
- Select Photos.
- Toggle Sync this iPhone on.
And that's it. While you're there, you can also change a few other settings to better manage your storage.
Quickly See Your Photos by Date
A perfect way to find photos from specific holidays or dates you remember is to show all your photos in your library by Months, Days, or even Years.
All you need to do is open the Photos app, ensure the Library tab in the bottom left corner is selected, and then choose Years, Months, or Days, to make it easier to scroll to a specific time period you have in mind.
Pro tip: If you want to see your oldest photos, you can tap the top of your screen right below or beside the notch. The Photos app will automatically scroll back to your oldest photos. Want to go back to your most recent pictures? Then, tap the Library tab once, and your iPhone will take you to the bottom of your library.
Identify Your Favorite People
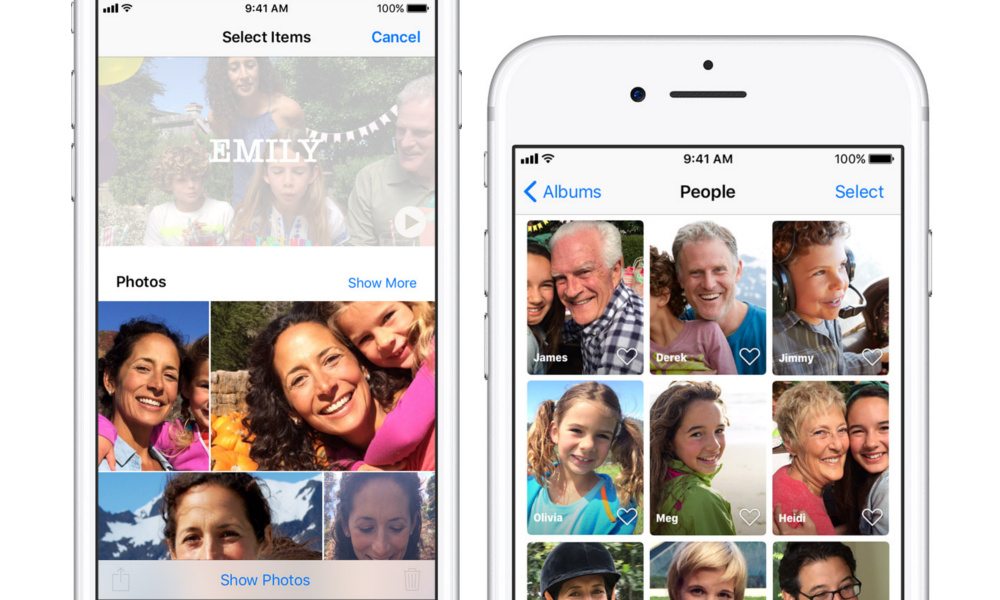
If you regularly take photos of close friends or family members, you can unlock many more powerful features by letting the Photos app know who those people are.
The Photos app uses face recognition to "know" when a person appears in your photos — and it's all done entirely on your iPhone so you don't need to worry about privacy. Once you identify a person, you'll be able to find all the pictures they appear in more quickly.
Here's how to get started:
- Open the Photos app.
- Select the Albums tab at the bottom of your screen.
- Scroll down, and under People & Places, choose People.
- Select a person's face.
- Choose Add Name at the top of your screen.
- Enter the name of the person and select Next in the top right.
- Finally, choose Done in the top right to finish.
After you've given names to the people in a few of your photos, your iPhone will also use that information to generate memories in the For You based on the significant people in your life.
Add Locations to Your Photos
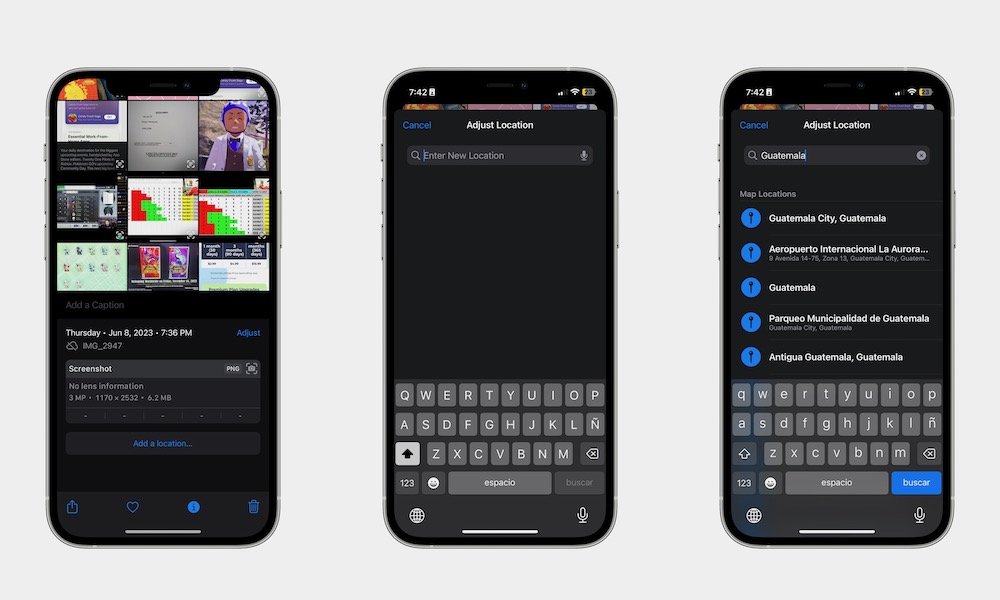
The Photos app uses the location where you take your pictures to help organize them in albums and the For You tab. This is done automatically for any photos that you take with the iPhone Camera app as long as Location Services are enabled, but you can also adjust it manually or add a location for photos you've imported from other cameras.
Here's how to add a location to a photo:
- Open the Photos app and tap the photo you want.
- With the image open, scroll down and choose Add Location.
- Enter the location in the search bar.
- You'll get a list of results. Select the location you want to add.
You'll then be able to search for these photos by their location. The Photos app also uses this information to create memories in the For You tab of things like vacations and other excursions to interesting places.
Adjust the Date and Time
Something else you can try is adjusting the date and time of the pictures you've taken. This information should already be there for photos you've taken on your iPhone, but it may be missing or incorrect for older photos. To do this, you need to:
- Open the photo you want.
- Tap the three-dot menu in the top right corner of your screen.
- Tap on Adjust Date & Time.
- Choose the date and time you want.
- When you're done, tap Adjust in the top right corner.
Add Photos to Your Albums
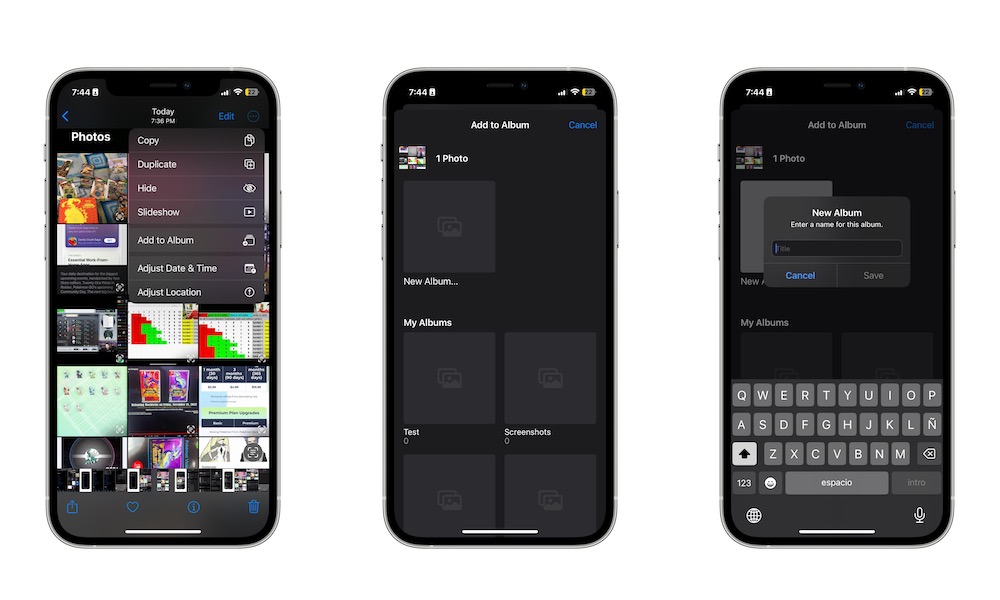
As we mentioned before, you can continue to add photos to your albums even after you've created them. This will make it really easy to find all your photos from the same event or date.
To add photos to your album, you need to:
- Open the photo you want.
- Tap the three-dot button in the top right corner.
- Tap on Add to Album.
- Choose the album you want to add the picture to.
If you haven't already done so, you can also create a new album right from the add to album screen.
Add Captions to Your Photos
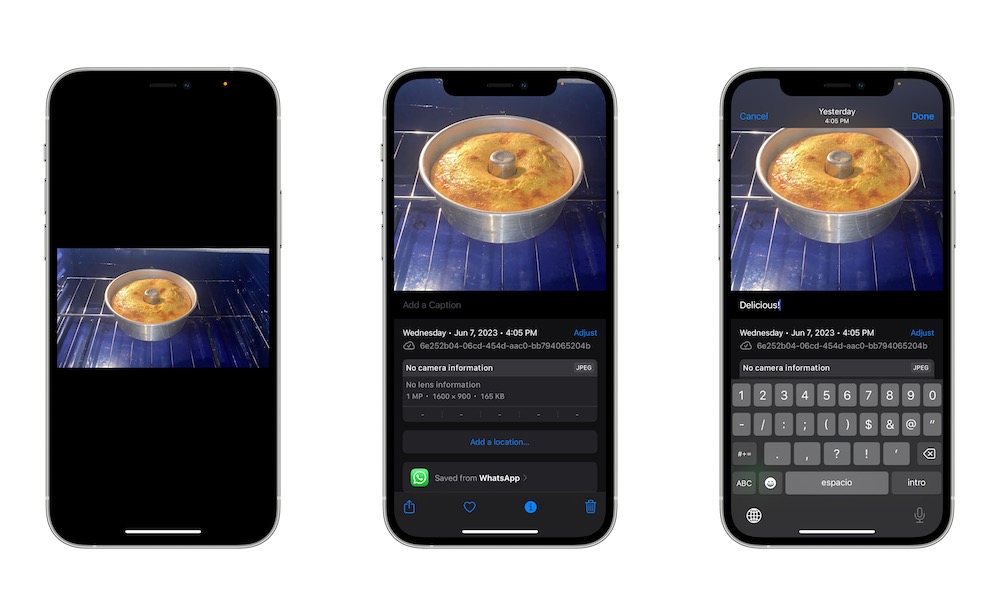
Adding a caption to any of your pictures will make it easier for you to remember something that happened when you snapped that photo. Not only that, but captions will also make it easier for your iPhone to find these pictures when you search for them.
- Open the photo you want to add a caption to.
- With your photo open, scroll down.
- Select Add a Caption.
- Enter the caption you want.
- When you finish, choose Done in the top right corner of your screen.
Get Rid of Duplicates
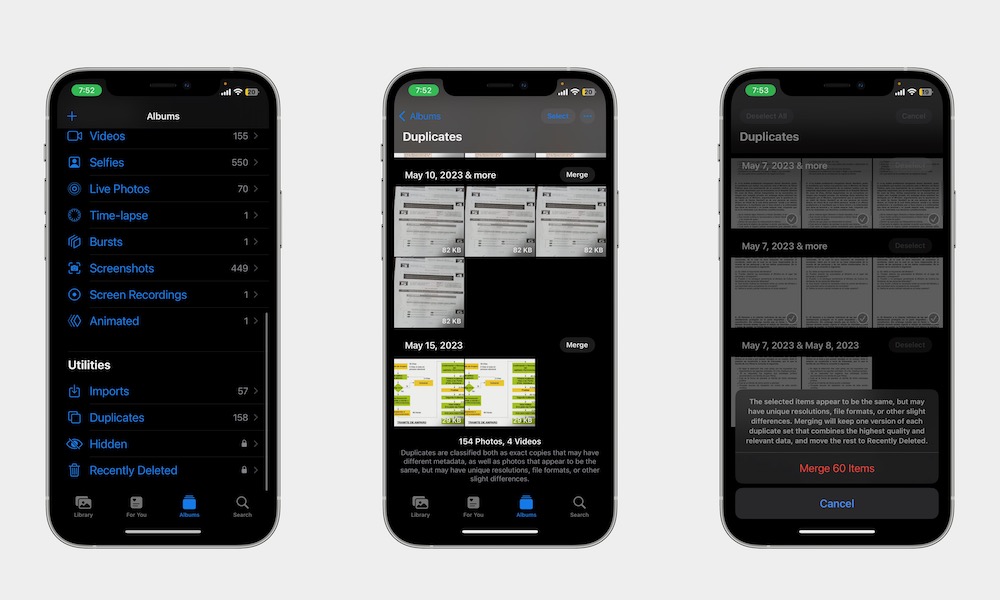
Whether it's memes or pictures people shared in different groups, you're bound to find duplicate pictures in your library. It's annoying, but your iPhone can help you get rid of them in a flash. This is how:
- Open the Photos app.
- Select the Albums tab at the bottom of your screen.
- Scroll to the bottom and choose Duplicates.
- Select the duplicates you want to delete and choose the trash can button to remove them, or use the Merge button next to the photos to merge all metadata into the highest quality photo and automatically most the rest into the Recently Deleted album.
Organize Your Albums With Folders
An album can help you organize your photos, but what do you do when you have too many albums in your Photos app? Well, that's where folders come in.
With folders, you can organize your albums into different categories, so it's even easier to organize your important photos. Here's how to create a folder:
- Open the Photos app.
- Select the Albums tab at the bottom of the screen.
- Choose the Plus icon in the top left corner.
- Select New Folder.
- Enter the folder's name.
- Choose Save in the top right corner.
- Select the Edit button in the top right corner of your screen.
- Choose the plus icon and then select whether to create a new folder or album inside your new folder.
Start Using Your Hidden Album
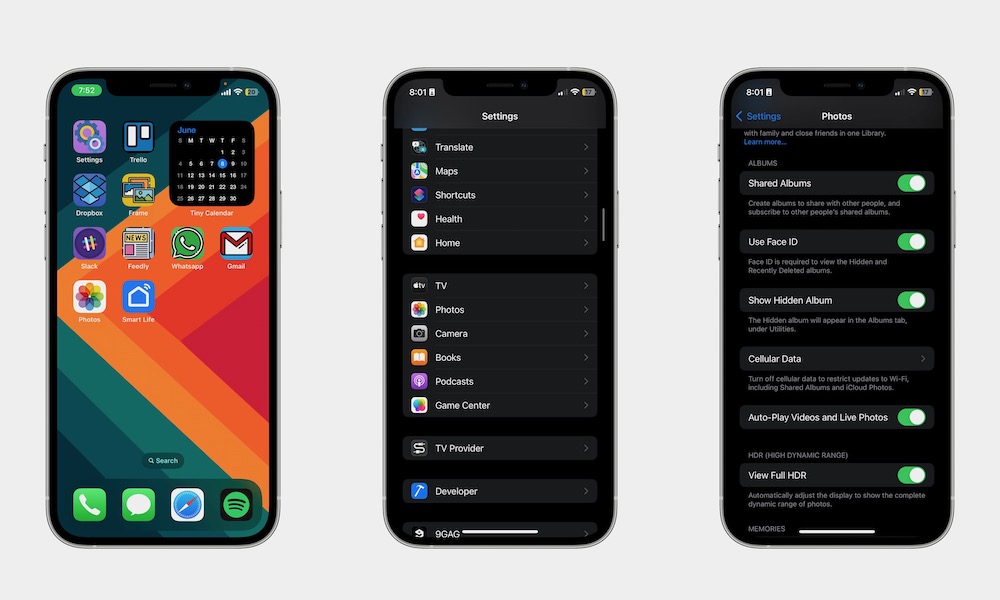
The hidden album is the perfect way to save and hide all your private photos. Not only will they be safely stored in a separate folder, but your main library won't be as cluttered.
To hide pictures away in your hidden album, you need to open the photo you want to hide and tap the three-dot button in the top right corner of your screen and choose Hide.
You'll find your hidden album at the bottom of the Albums tab. Of course, that might be a bit too easy to find, so if you want to hide your hidden album, you can do it by going to Settings > Photos and disabling Show Hidden Album.
Want your album to be even more secure? Then enable Use Face ID, so you're the only one with access to your hidden album.

