
Is Your iPhone Hurting Your Eyes? 12 Settings to Reduce Eye Strain
 Getty Images / Unsplash+
If you’ve ever noticed your eyes feeling sore, dry, or just plain tired after scrolling through your iPhone for hours, you’re not alone. While smartphones have become essential tools for everything from communication to entertainment, they also demand a lot from our eyes. Bright white backgrounds, tiny text, blue-heavy light, constant motion, and cluttered pages all add up over time.
The good news is that you don’t need special glasses or a new device to make things more comfortable. iOS already includes a ton of settings designed to soften the screen, cut down visual noise, and encourage healthier habits. You just have to know where to look.
Here are some iPhone settings you can tweak today to reduce eye strain. You don’t have to use every single one, but combining a few of them can make a huge difference, especially if you spend a lot of time reading, gaming, or doomscrolling at night.
Switch to Dark Mode for More Comfortable Browsing
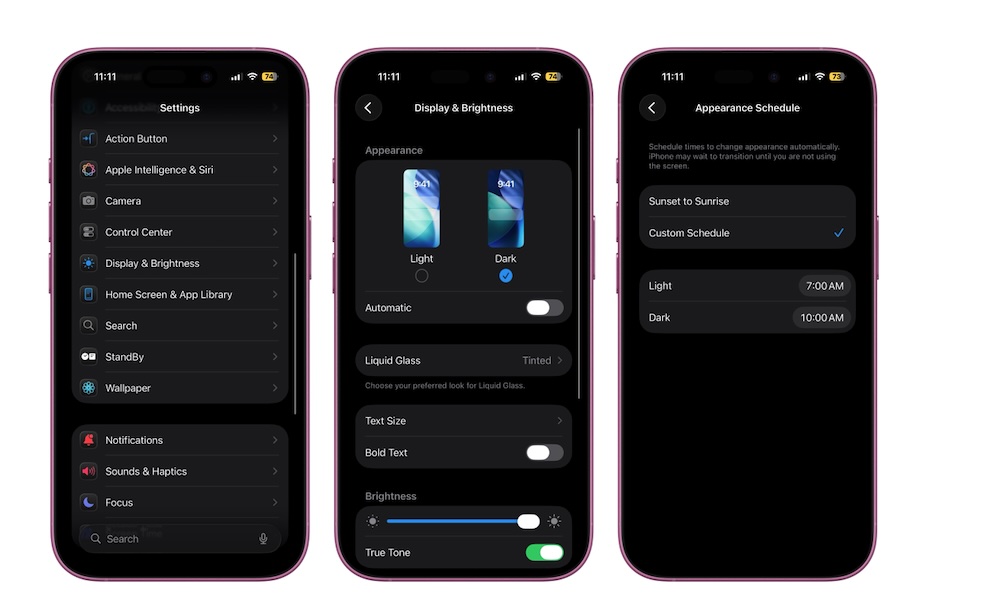
Staring at a bright white screen in a dim room is one of the fastest ways to experience eye fatigue. That’s where Dark Mode comes in. It flips most system backgrounds to dark tones and uses lighter text on top, which can feel a lot less harsh in low light. Plus, it just looks really cool.
Most native Apple apps and a huge number of third-party apps already support Dark Mode. Once you turn it on, you’ll see the effect across Messages, Mail, Settings, Safari, many social apps, and more.
Here's how to turn on Dark mode on your iPhone:
- Open the Settings app.
- Scroll down and tap on Display & Brightness.
- Select Dark.
- If you want it to switch automatically based on time of day, toggle Automatic and set a schedule.
Turn On True Tone So the Screen Matches Your Environment

Even with Dark Mode enabled, a screen that’s too bright can feel harsh, especially under warm indoor lighting. True Tone uses sensors to measure ambient light and subtly adjusts the display's color temperature and intensity to match. Whites look more like actual paper under warm light instead of glowing icy blue.
Most recent iPhones support True Tone, but it can be turned off. So if you want to make sure you have it turned on, you can go here:
- Go to the Settings app.
- Scroll down and tap on Display & Brightness.
- Scroll down, and under Brightness, turn on True Tone.
You can also long-press the brightness slider in Control Center, then tap the True Tone button to quickly toggle it.
Use Night Shift to Warm Up the Display
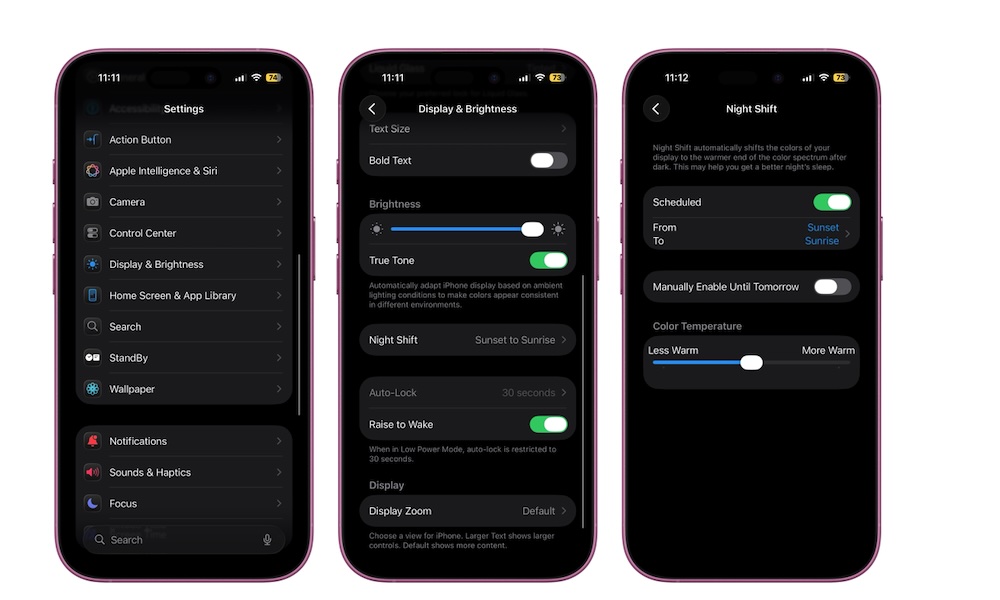
Blue-heavy light in the evening doesn’t just contribute to eye strain; it can also interfere with your sleep by making your brain think it's “daytime mode." Night Shift pushes the display toward warmer tones after dark, which makes the screen easier on the eyes and may help you wind down more naturally.
This change is adjustable, so you can choose a subtle warmth or an almost amber tint, depending on what feels right.
To configure Night Shift, do the following:
- Go to the Settings app.
- Scroll down and tap on Display & Brightness.
- Tap on Night Shift.
- Set it to Sunset to Sunrise or choose a Custom Schedule that matches your routine.
Use the Color Temperature slider at the bottom to pick how warm you want the screen to get at night.
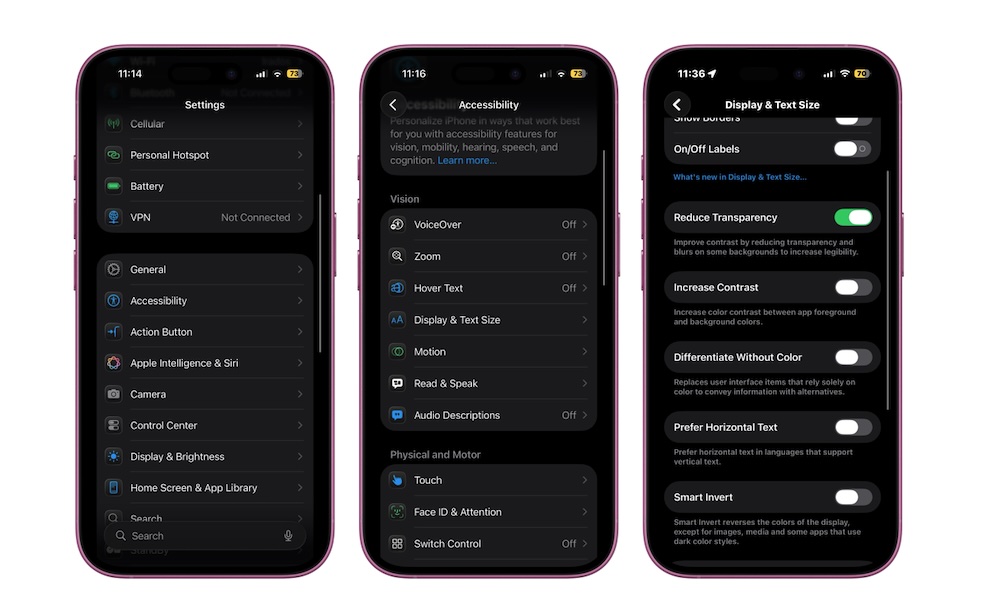
Tone Down Brightness a Bit More With Reduce White Point
Even at the lowest brightness, iPhones can still feel too bright in a dark room. That’s because brightness isn’t the only factor; the intensity of white and bright UI elements also matters. Reduce White Point lets you dim that intensity without changing the main brightness slider.
Apple describes this setting as a way to “reduce the intensity of bright colours,” and it’s specifically made for people who experience discomfort from bright displays. With that said, anyone can use it by following the next steps:
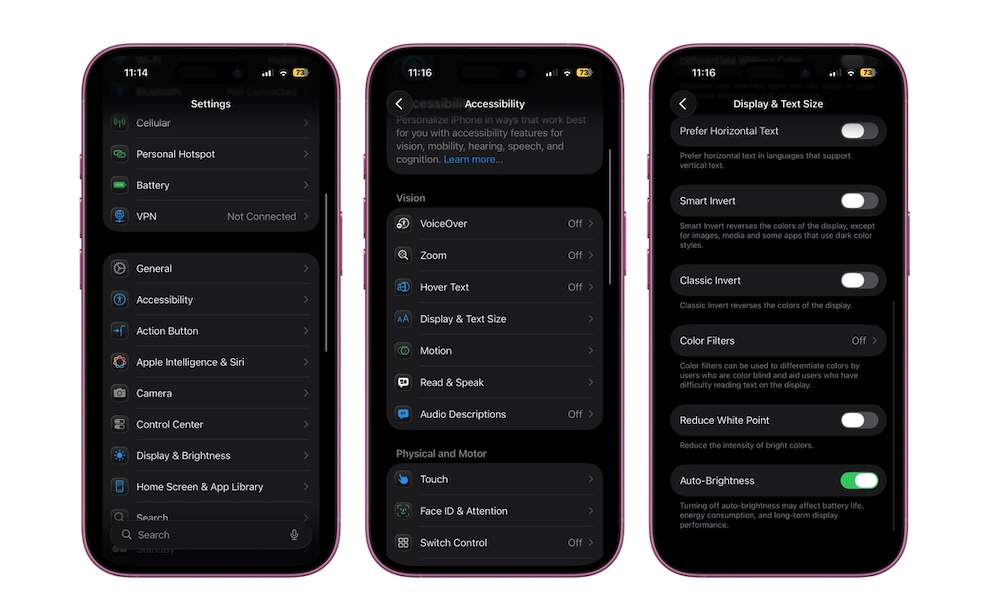
- Go to the Settings app.
- Scroll down and tap on Accessibility.
- Under Vision, tap on Display & Text Size.
- Scroll down to the bottom and turn on Reduce White Point.
Pro Tip: For a quick way to toggle this on or off on the fly, you can go to Settings > Accessibility > Accessibility Shortcut and select Reduce White Point. This lets you triple-click the side button to instantly dim your screen even further when you're in a pitch-black room.
Let Auto-Brightness Handle Your Display's Intensity for You
Manually riding the brightness slider all day gets old fast. Auto-Brightness uses your iPhone’s ambient light sensor to raise brightness in bright environments and lower it in darker ones. Used correctly, it prevents the 'flashlight to the face' sensation when you unlock your phone in bed while also keeping your screen readable outdoors. You'll find this setting at the very bottom of the same Display & Text Size menu we just visited in the previous step.
To make sure your iPhone is using auto-brightness, follow these steps:
- Go to the Settings app.
- Scroll down and tap on Accessibility.
- Under Vision, tap on Display & Text Size.
- Go down to the bottom and turn on Auto-Brightness.
Use Safari’s Reader Mode to Get Rid of Visual Clutter
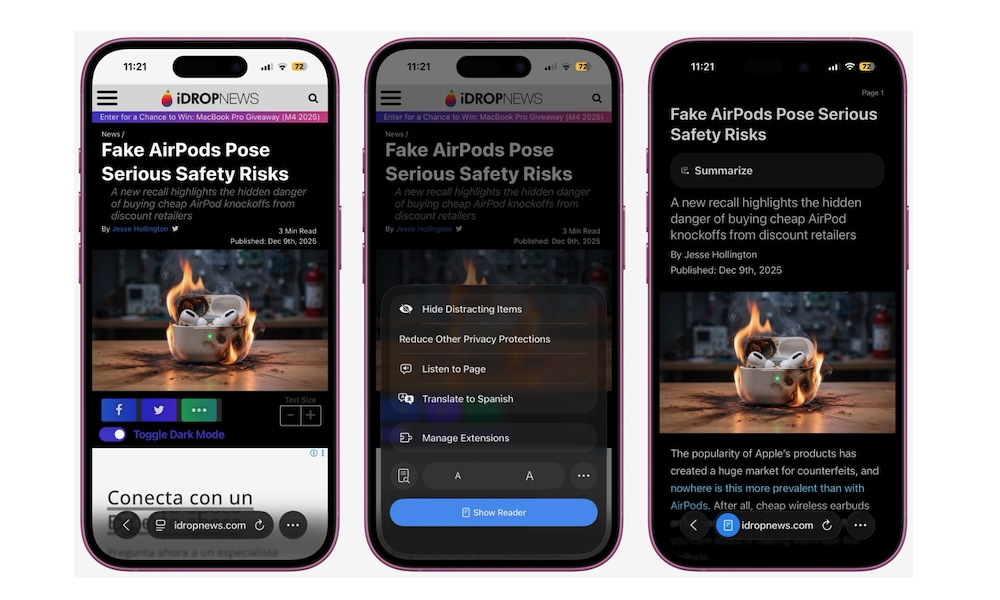
A lot of eye strain isn’t just about brightness; it’s also about messy layouts. Ads, auto-playing videos, sidebars, sticky headers, and tiny fonts all make articles harder to read. Safari’s Reader mode solves that by turning long pages into clean, customizable text views.
When Safari recognizes an article, you'll be able to use its native reader. The page switches to a minimal layout with adjustable fonts, text size, and background color — including a dark background option that pairs nicely with Dark Mode.
To use it, simply go to an article in Safari and tap the Page Menu button near the bottom left corner of your screen. From there, tap the Show Reader button at the bottom. Your iPhone will turn the web page into an easier-to-read article. If you have an iPhone 16 or later model, you can also use Apple Intelligence to summarize the article for you.
Increase the Default Text Size So You’re Not Squinting
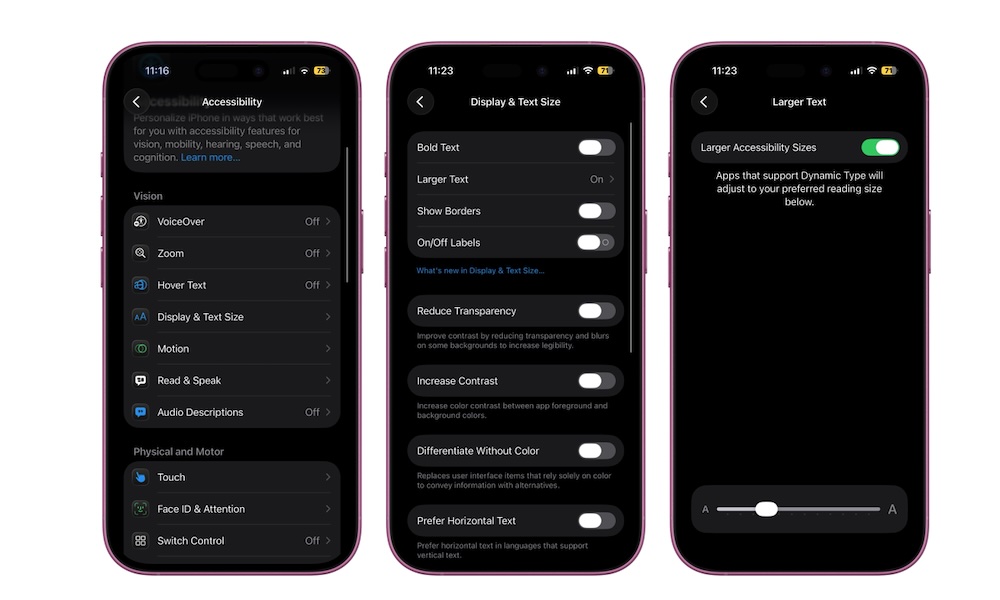
If you find yourself leaning in or squinting to read, that’s a clear sign your default text size is too small. iOS lets you increase text size for your whole iPhone or specific apps, in case you don't need a bigger font everywhere.
Here's how to make text larger:
- Go to the Settings app.
- Scroll down and tap on Accessibility.
- Under Vision, tap on Display & Text Size.
- Turn on Larger Accessibility Sizes if it’s available, then drag the slider until the preview text feels comfortable.
You can also add the Text Size control to Control Center to adjust the text size on each individual app you have. Just remember that you need at least iOS 15 to use this feature.
Turn On Bold Text and Increase Contrast
Thin fonts look modern, but they’re not always fun to read on a small screen. Bold Text thickens system fonts across all apps, improving legibility and reducing the effort it takes to scan menus, lists, and notifications. Additionally, tweaking Increased Contrast can also help with eye strain and visual fatigue.
Here's where to turn both features on:
- Go to the Settings app.
- Scroll down and tap on Accessibility.
- Under Vision, tap on Display & Text Size.
- Turn on Bold Text.
While you’re there, you can also turn on Increase Contrast to boost the contrast between foreground elements and backgrounds.
Dim Flashing Lights in Video Content
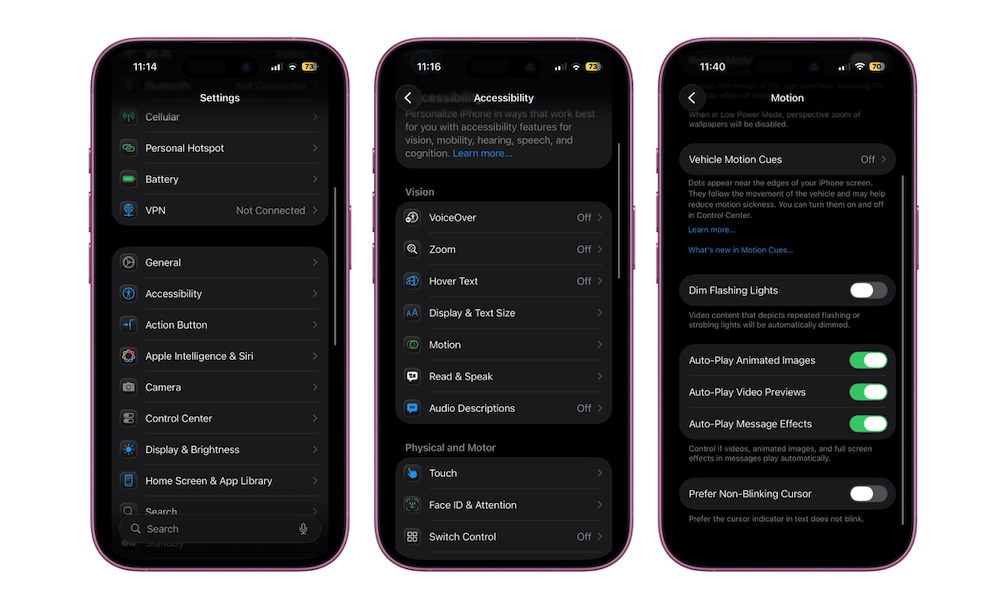
Rapid flashing and aggressive visual effects are uncomfortable for almost everyone and genuinely dangerous for some users. Since iOS 16.4, Apple has included a Dim Flashing Lights setting that automatically detects and dims flashing lights in videos across apps.
Even if you don’t have epilepsy or migraines, this can lower the overall “stress” of watching certain shows or action-heavy clips. To turn it on:
- Go to the Settings app.
- Scroll down and tap on Accessibility.
- Under Vision, tap on Motion.
- Turn on Dim Flashing Lights.
Once enabled, iOS quietly dims most flashing sequences in supported videos across many third-party apps. It doesn’t change everything, but for many people, it will be a noticeable comfort tweak.
Use Smart Invert for High-Contrast Relief
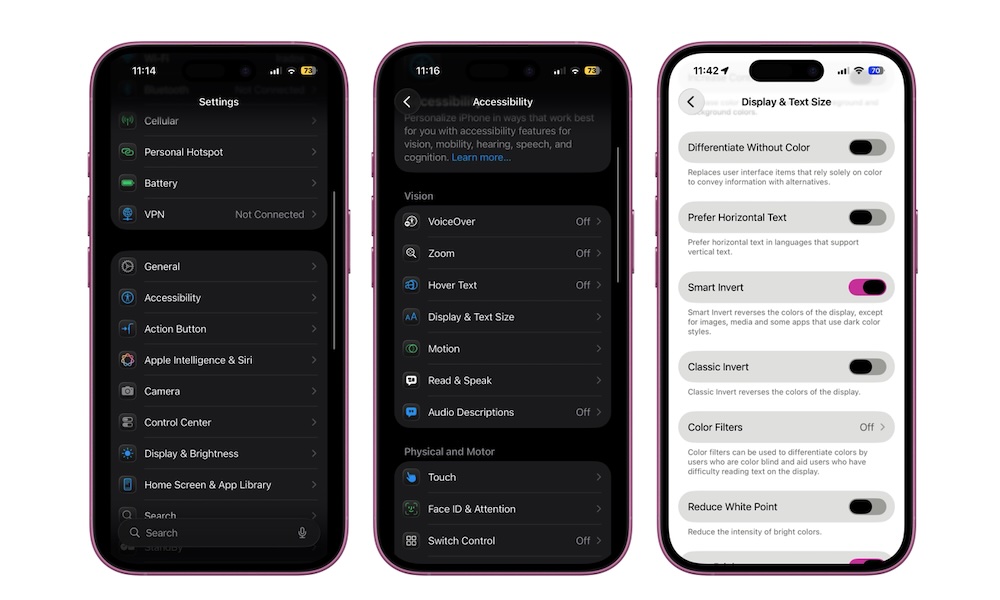
Smart Invert is a bit of a hidden gem. Instead of flipping every pixel like classic invert, it inverts the system UI while trying to keep photos, videos, and other media looking normal. That essentially gives you a “dark-by-force” mode in apps that don’t natively support Dark Mode.
This can be especially handy for late-night reading in stubbornly bright apps or websites. It’s not perfect (some elements may look weird), but it can still be a game-changer.
- Go to the Settings app.
- Scroll down and tap on Accessibility.
- Under Vision, tap on Display & Text Size.
- Turn on Smart Invert.
Keep Brightness Controls One Swipe Away
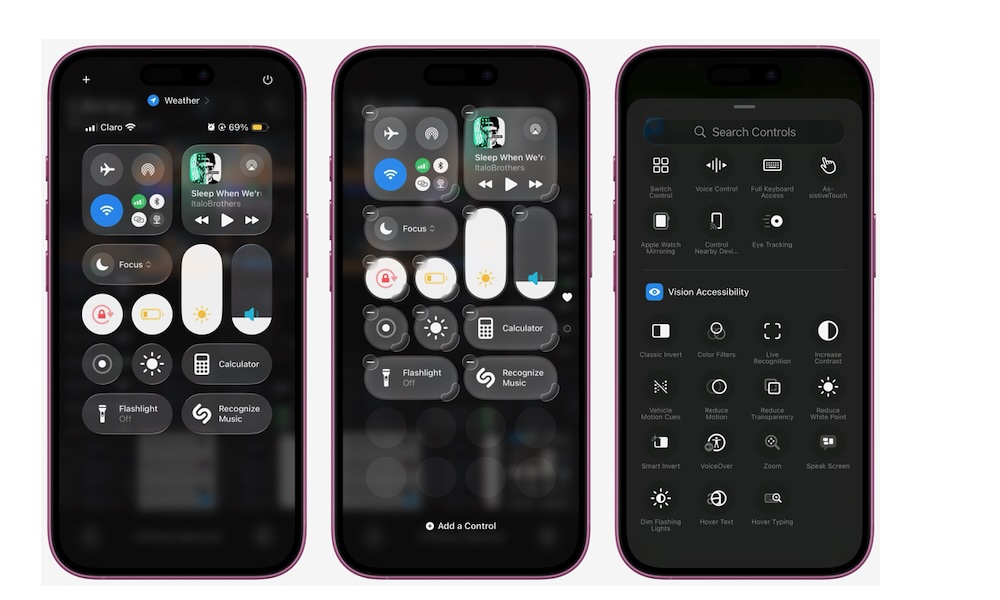
Even with Auto-Brightness and Night Shift, sometimes you just need to nudge the screen a bit darker or brighter in the moment. The key is making that adjustment effortless so you actually do it.
The Brightness slider lives in Control Center by default. On iOS 18 or later, you can customize nearly everything that appears there, including other eye-friendly toggles like Dark Mode, Increased Contrast, and Dim Flashing Lights.
To change your Control Center, simply swipe down from the top right corner of your screen and tap on the plus icon in the top left corner of the screen. Next, tap on Add a Control and scroll down to the bottom until you reach the Vision Accessibility section.
Choose a control you want to add by tapping it and then repeat the same steps until you've added all the controls you want.
If you don't see a plus icon in your Control Center, you can still add some of these buttons by going to Settings > Control Center and tapping the green plus icons next to the vision tools you want to add.
Turn On Screen Distance to Build Healthy Habits
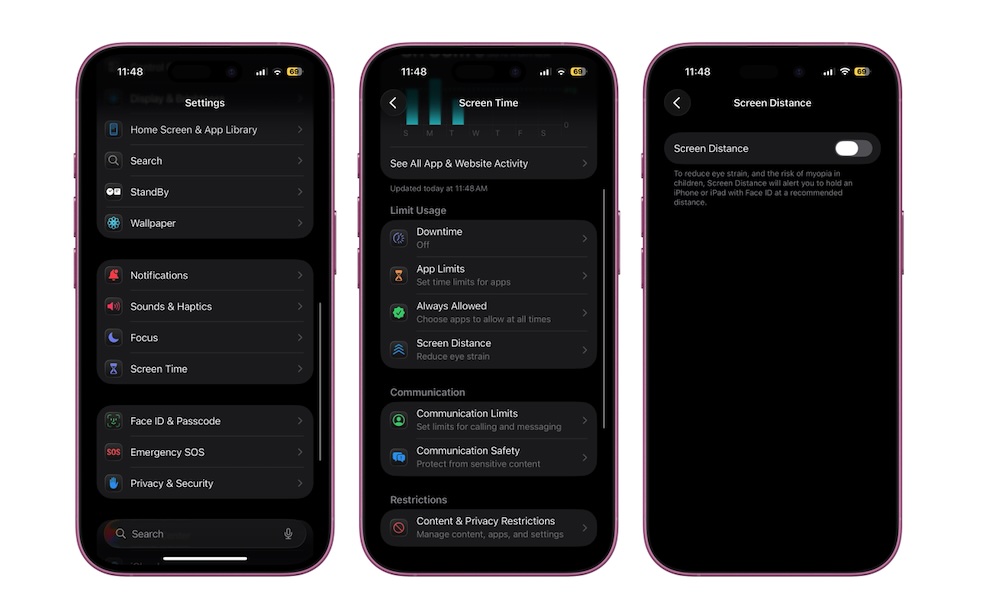
The last tip isn’t about display tweaks but about how close you hold your phone to your face. Apple introduced Screen Distance in iOS 17 as part of Screen Time to encourage both kids and adults to hold devices at a healthier distance.
Using the TrueDepth camera on supported models — that's any iPhone with Face ID — your iPhone can detect when you’ve been holding it closer than about 12 inches (30 cm) for too long and pop up a full-screen reminder to move it farther away. That matters because prolonged close-up viewing is linked with increased eye strain and a higher risk of myopia, especially in children.
To enable it, do the following:
- Go to the Settings app.
- Scroll down and tap on Screen Time.
- Under Limit Usage, tap on Screen Distance.
- Turn on Screen Distance.
Once it’s enabled, you don’t have to think about it. Your iPhone will quietly watch your viewing distance and give you a gentle nudge when it’s time to hold it farther away.
Your iPhone Doesn’t Have to Be Hard on Your Eyes
Eye strain isn’t just “part of the deal” when you use your iPhone a lot. With a handful of smart tweaks, you can make the screen warmer, less intense, less cluttered, and a lot calmer. All without buying new hardware or installing third-party apps.
You don’t have to enable every single option right off the bat, and your ideal setup might look different from someone else’s. The key is to experiment until the screen feels less like a flashlight and more like a comfortable page.
Pro Tip: Physical therapists and optometrists recommend the "20-20-20" rule to reduce eye strain. Every 20 minutes, look at something 20 feet away for at least 20 seconds. This helps the tiny muscles in your eyes relax after focusing on a close-up screen.