
New iPhone? Here Are 10 Settings You Need to Change First
 Semeon Hrozian
By default, your new iPhone is ready to start using after you download all the apps you need. But if you want to make your iPhone feel like your own, you should also change a few settings as soon as possible.
While these changes are small, they will ensure that your iPhone is more useful than before. For instance, you'll be able to pay using your iPhone or become more productive by reducing the distractions from unwanted notifications.
Read on for 10 settings that will help you master your brand-new iPhone.
Change Your Lock Screen's Controls
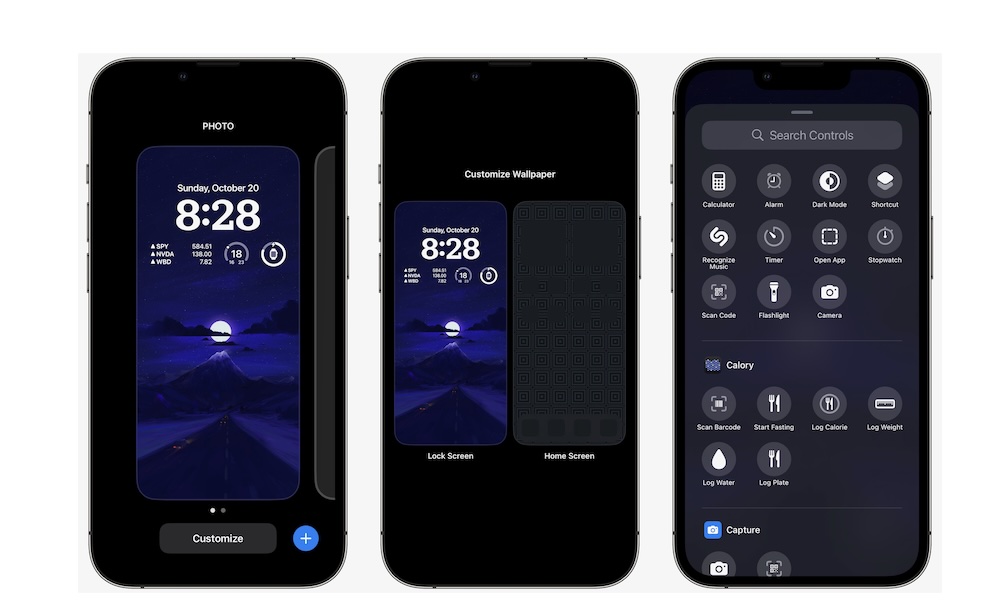
When you check your iPhone's Lock Screen, you probably already noticed two small buttons at the bottom of your screen. These controls work as shortcuts for specific actions.
By default, they turn on your flashlight or open the Camera app. However, with iOS 18 you can now change those controls to perform nearly any function or open any app you want. Here's how to set these up:
- Press and hold your Lock Screen until you feel a haptic response and the screen changes.
- Tap on Customize at the bottom of your screen.
- Select Lock Screen.
- Tap the minus button on top of the button you want to remove.
- Now tap the plus button to add a new control.
- Select the control you want to use.
- Repeat the same steps for the other control.
- Tap on Done in the top right corner of your screen.
- Swipe up from the bottom of your screen to return to the regular Lock Screen.
You can choose any of the default controls available, or you can go to Shortcuts and select a control to perform a specific task, such as opening any app.
Personalize Your Control Center
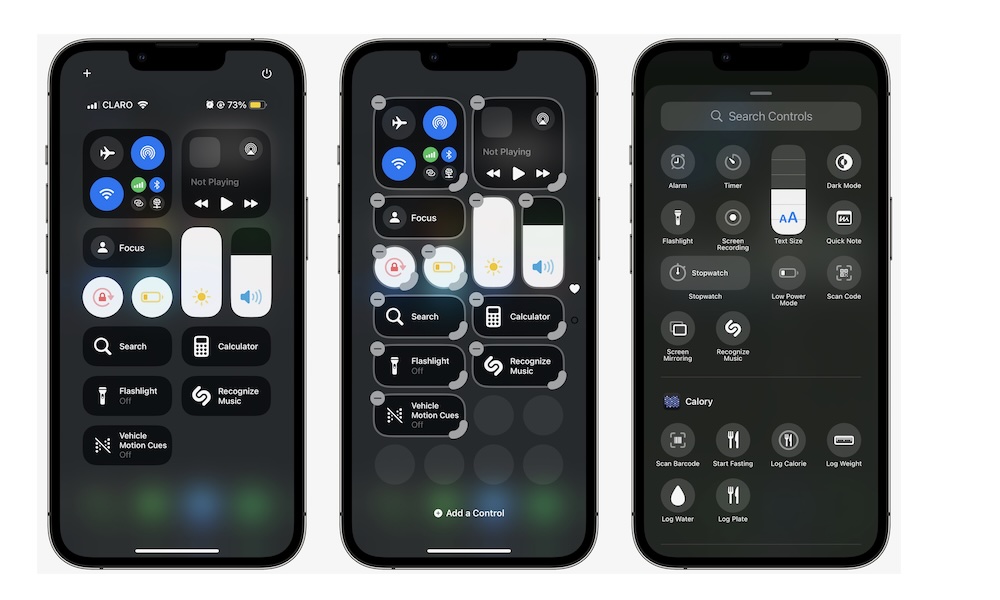
Another huge change Apple implemented in 2024 was the ability to fully customize your Control Center. You can now add or remove as many controls as you want, and you even have the option to add controls from third-party apps.
To change your Control Center, you must have at least iOS 18 or later installed on your iPhone. Here's how to add new controls:
- Open your Control Center by swiping down from the top right corner of your screen (if your iPhone has Face ID) or from the bottom (if your iPhone has Touch ID).
- Tap the plus icon in the top left corner.
- Tap on Add a Control at the bottom.
- Select the control you want to add to your Control Center.
- After adding it to your Control Center, you can drag it to change its location or pull it from the bottom right corner to change its size.
- When you're done, tap on any empty space on your screen.
And that's it. You can follow these steps to add or remove any available controls. To keep things more organized, you can also create different pages for specific controls.
Turn On Dark Mode
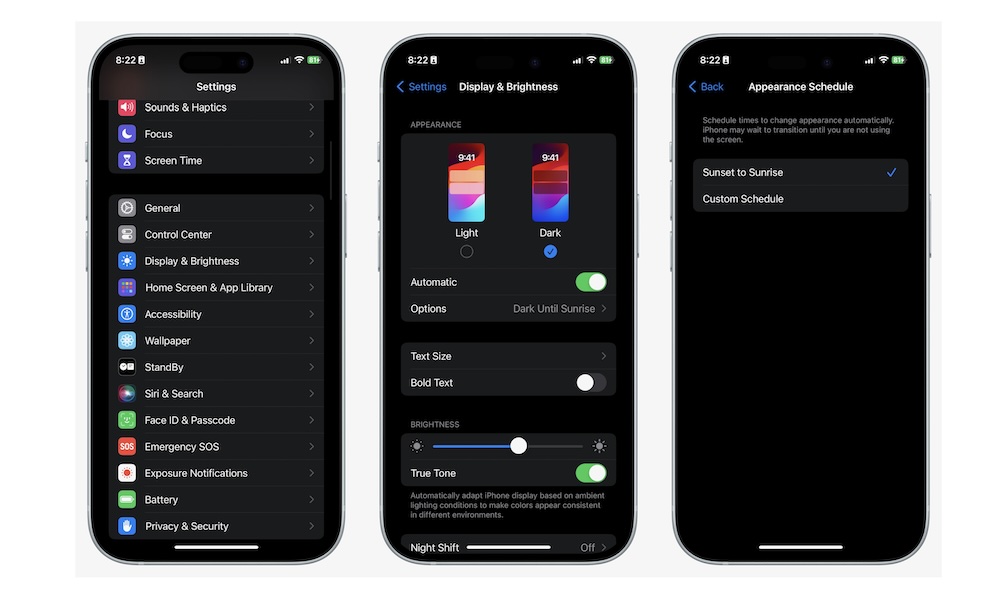
There are two people in this world: those who use Dark Mode and those who are wrong. And if you don't want your iPhone's brightness to burn your retinas while you use it, you would be better off turning on Dark Mode by doing the following:
- Open the Settings app.
- Scroll down and go to Display & Brightness.
- Tap on Dark.
If you don't want to use Dark Mode constantly, you can also select Automatic and choose a schedule for when you want to turn on Dark Mode.
Set Up a Notification Schedule
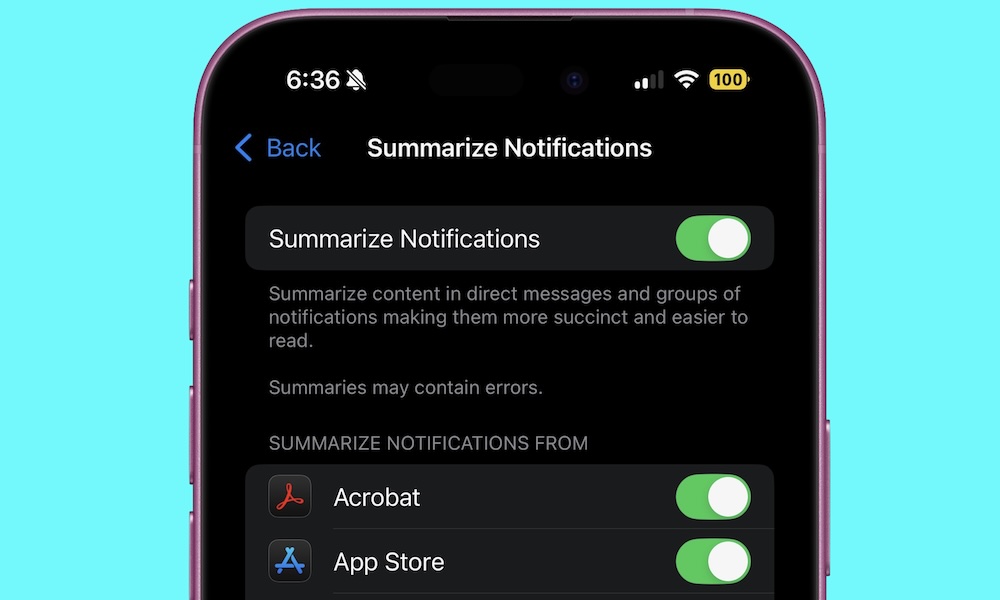
Most of us get bombarded with notifications throughout the day, which can be annoying and distracting. Luckily, you can set up a schedule for when you want to receive these notifications. That way, your iPhone will only alert you of new notifications at a specific time you choose. This is how you set it up:
- Open the Settings app.
- Scroll down and go to Notifications.
- Tap on Scheduled Summary.
- Turn on Scheduled Summary.
- Tap on Add Summary and change the time for when you want to receive your notifications.
- Scroll down and choose which apps will be included in that summary. Any app you remove will send you notifications instantly.
It's worth noting that you will still get essential notifications immediately. For instance, alerts from your reminders or people you mark as important will still go through instantly.
Create Your Own Focus Modes
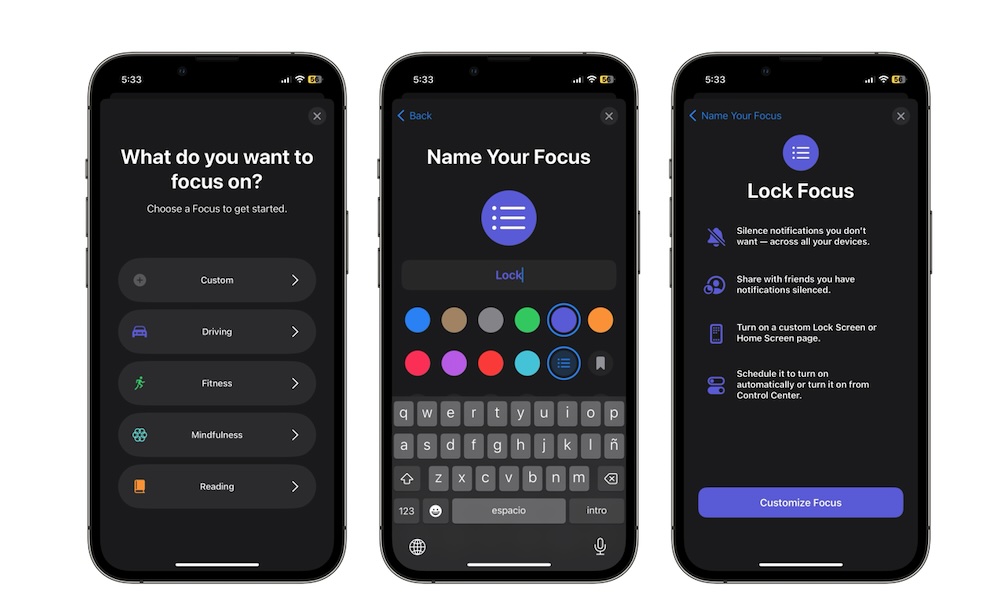
Your iPhone has a feature called Focus mode, which works like Do Not Disturb: As long as the Focus mode is turned on, you won't get notifications from apps or people you don't want.
What's great about Focus modes is that you can customize them in many ways. For instance, when you turn them on, you can choose a different Home Screen so you only have access to the apps you will need when you're working. You can also automatically turn them on at a specific time or place.
Here's how to set up your own Focus mode:
- Open the Settings app.
- Scroll down and tap on Focus.
- Tap on the Plus icon in the top right corner of your screen.
- Choose a default Focus mode, or tap Custom to make your own.
- Follow the instructions on your screen to complete the Focus mode.
Once you're done, you can customize your Home Screen and add a schedule and Focus filters to improve your experience.
Change the Default apps on Your iPhone
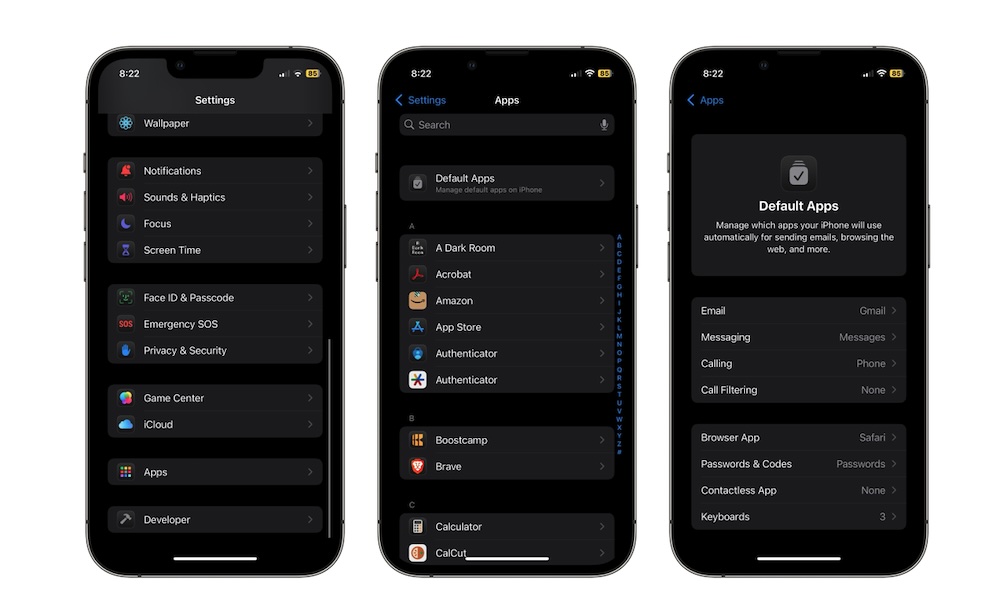
By default, Apple will use its own browser and mail apps as your primary apps, which is to be expected. However, you can change these apps to be whatever app you use the most, like Google Chrome, Gmail, and many more. This is how:
- Open the Settings app.
- Scroll down to the bottom and tap on Apps.
- Go to Default Apps.
- Select the category you want to change.
- Choose the app you want to mark as default.
And that's it. Your iPhone will now use that app to open a link or craft an email. You can also select defaults apps for calling, messaging, and more. However, third-party developers also have to offer the ability to set their apps as defaults. Some of these categories only arrived in iOS 18, so there aren't too many options yet.
Reduce Your iPhone's Brightness Even More
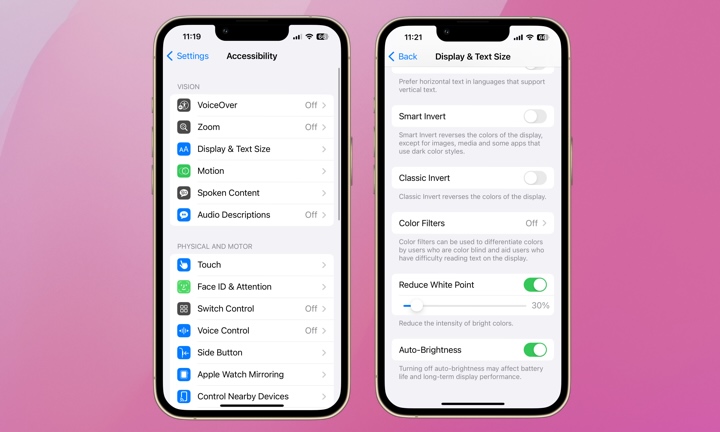
By now, you probably know how to turn down your screen brightness. But if you've used your iPhone at night, you probably know the screen can still be too bright to use in low-light environments. Luckily, there's an accessibility feature that can help you reduce the screen brightness even more.
- Open the Settings app.
- Go to Accessibility.
- Tap on Display & Text Size.
- Scroll down and turn on Reduce White Point.
When you turn it on, your iPhone's brightness will decrease significantly, but you can adjust the slider to choose your preferred level.
You can follow these steps whenever you want to lower your screen or add the Reduce White Point accessibility control to your Control Center to make things much easier.
Manage the Type of Data You Share With Apple
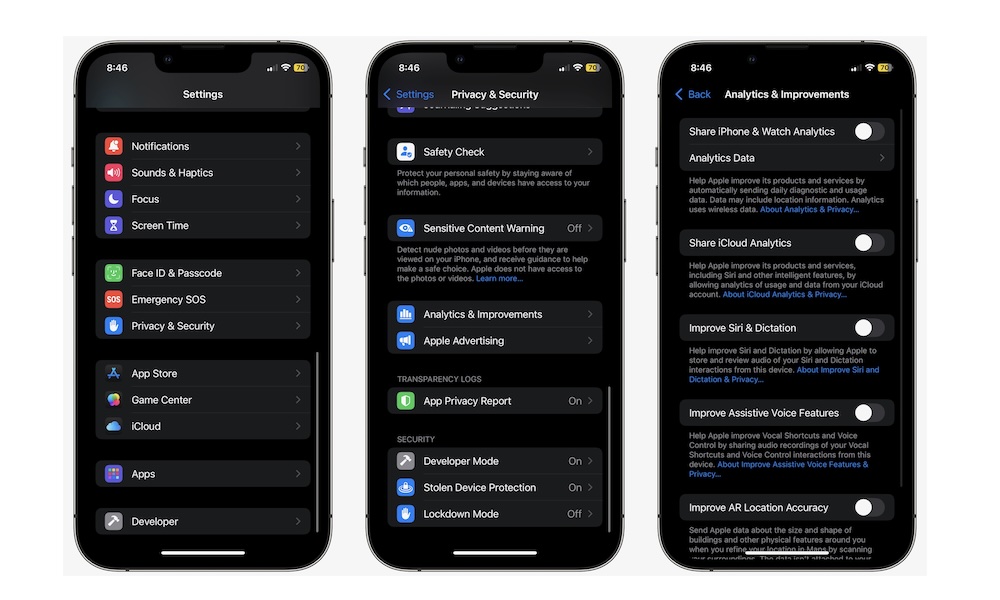
When you first set up your iPhone, Apple will ask you if you want to share specific analytics with the company so they can improve its products and devices in the future. While that might seem like a good idea, you don't need to share anything with Apple if you don't want to.
Fortunately, the company makes it easy to manage the type of data you share. This is what you need to do:
- Open the Settings app.
- Scroll down and go to Privacy & Security.
- Scroll down to the bottom and tap on Analytics & Improvements.
- Disable all the data you don't want to share with Apple.
We recommend that you don't share any data with Apple, as it doesn't really need it to improve its devices. But you can choose which data you're okay with sharing.
Set Up Your Apple Wallet
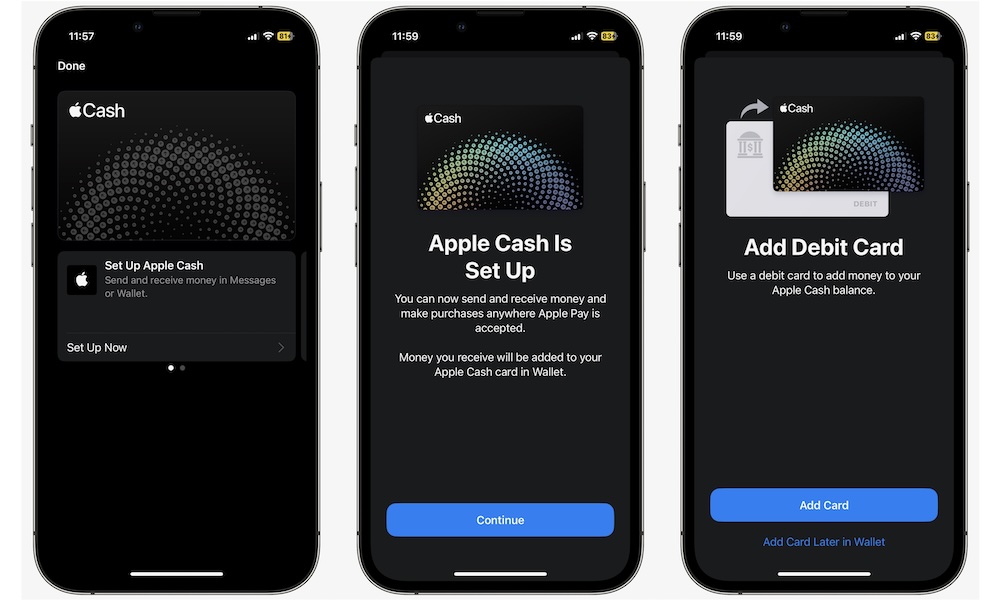
The Wallet app is a valuable tool for storing all your credit cards in one place. This way, you can use your iPhone to pay instead of carrying your wallet or credit card with you at all times.
To use this feature, you'll need to set up Apple Pay and add a credit or debit card to your iPhone. This is how:
- Open the Wallet app.
- Tap the Add button near the top right corner of your screen.
- Select Debit or Credit Card to add a new card.
- Tap on Continue.
- Hold the card's chip near your iPhone to add it automatically, or select Enter Card Details Manually to do it yourself.
- You might need further authentication to finish adding your credit or debit card.
After you're done, you can pay with your iPhone by pressing the side button twice, using Face ID or Touch ID, and placing your iPhone near the contactless card reader.
Hide or Lock Your Apps
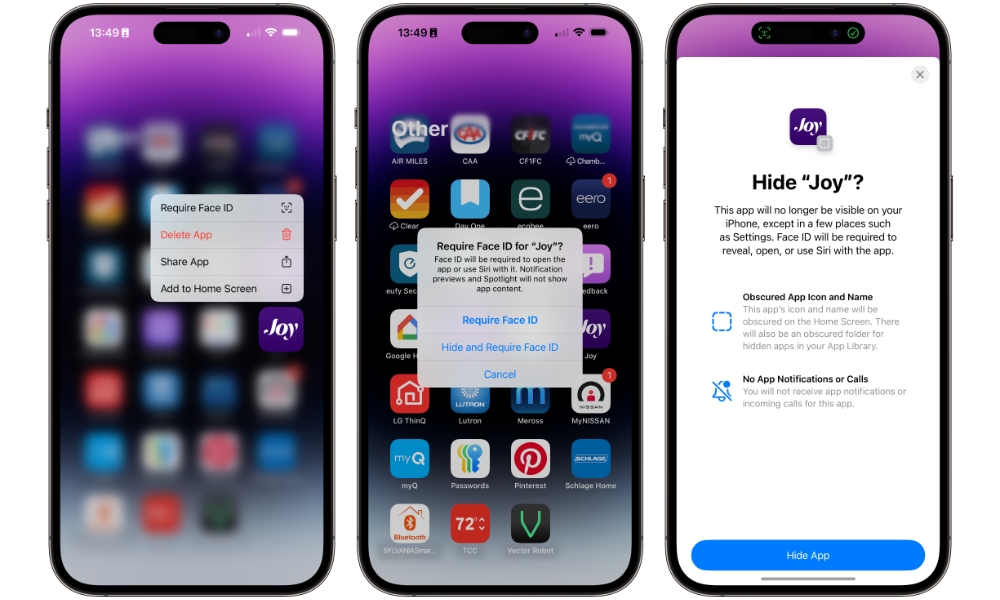
A cool new feature Apple added to the iPhone is the ability to hide or lock your apps. That way, you'll be the only one with access to your most private apps and games. Here's how:
- Press and hold the app you want to hide or lock on your iPhone's Home Screen or App Library to open a pop-up menu.
- Press on Require Face ID.
- Choose to Require Face ID to lock it or Hide and Require Face ID to hide it.
And that's it. If you hide the app, it will completely disappear from your iPhone, and you won't receive any alerts or notifications from it.
To find your hidden apps, swipe to the left on your Home Screen until you access your App Library, and then scroll down to the bottom. You'll find the hidden album, which you can unlock with Face ID or Touch ID.
Make the Most Out of Your New iPhone
As you can see, there are many settings that you probably didn't even know existed. By changing these settings, you'll improve the quality of life of your iPhone and make it feel more like your own.
Of course, that's just the tip of the iceberg; there are plenty more settings that you'll find when using your iPhone. So play around with the settings and customize your iPhone so it's just the way you like it.