6 Ways Your iPhone Could Save Your Life in an Emergency
 Credit: GUNDAM_Ai / Shutterstock
With all of the really cool things that we do with our iPhones every day, it's easy to miss the fact that Apple has actually built some really practical and important safety features into its products, allowing you to not only quickly contact emergency services in the event of a problem, but also to make sure that friends and family know what's going on and where to find you, and that first responders have access to critical medical information.
It's our hope that you'll never need to use any of these features, but it's always better to be prepared just in case. Continue reading for some tips on how to make sure your iPhone (and Apple Watch) are ready to help you in the event you ever find yourself in a bad situation.
Using Emergency SOS
While you've always been able to make emergency calls from your iPhone, even when it's locked, Apple enhanced this in iOS 11 with a new "Emergency SOS" feature that makes the process even easier, and also integrates with new services that can automatically share your location with emergency services, and even notify important friends and family members. Further, this feature is great for world travellers who may not know the appropriate number to call when in a foreign country — contrary to a popular North American misconception, it's not always 911.
The process for activating Emergency SOS differs slightly depending on what model of iPhone you're using. On 2017 or later iPhone models (e.g. the iPhone 8, iPhone 8 Plus, and all iPhone X-series devices):
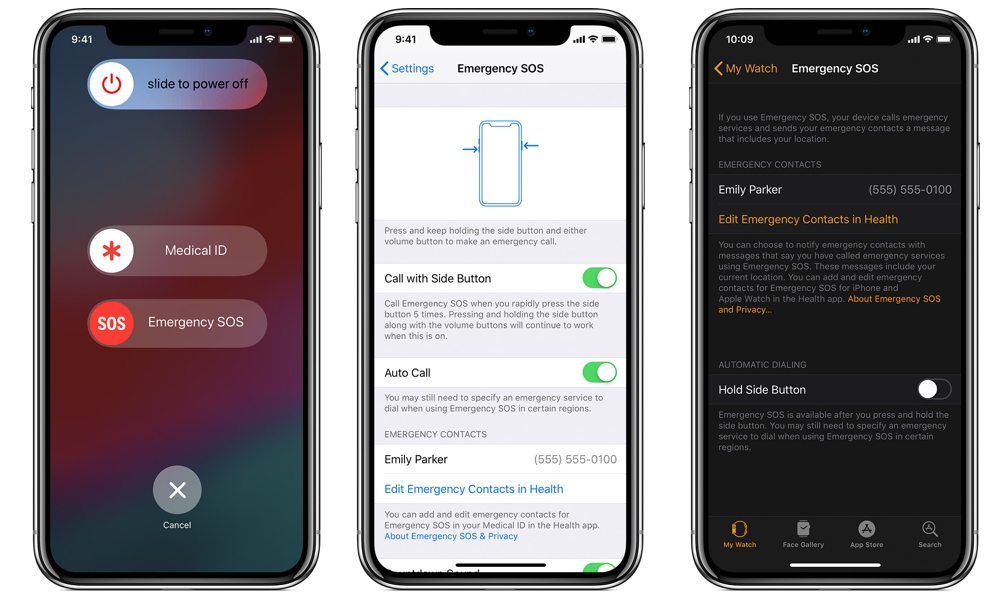
- Press and hold the side button and either one of the volume buttons until the "Slide to Power Off" and "Emergency SOS" sliders appear.
- Drag the Emergency SOS slider to call emergency services immediately; OR
- Continue holding the side and volume buttons; a countdown will begin, after which emergency services will be automatically called unless you release the buttons before the countdown ends.
On earlier iPhone models (e.g. iPhone 7 and older), Emergency SOS is activated instead by rapidly pressing the side or top button five times.
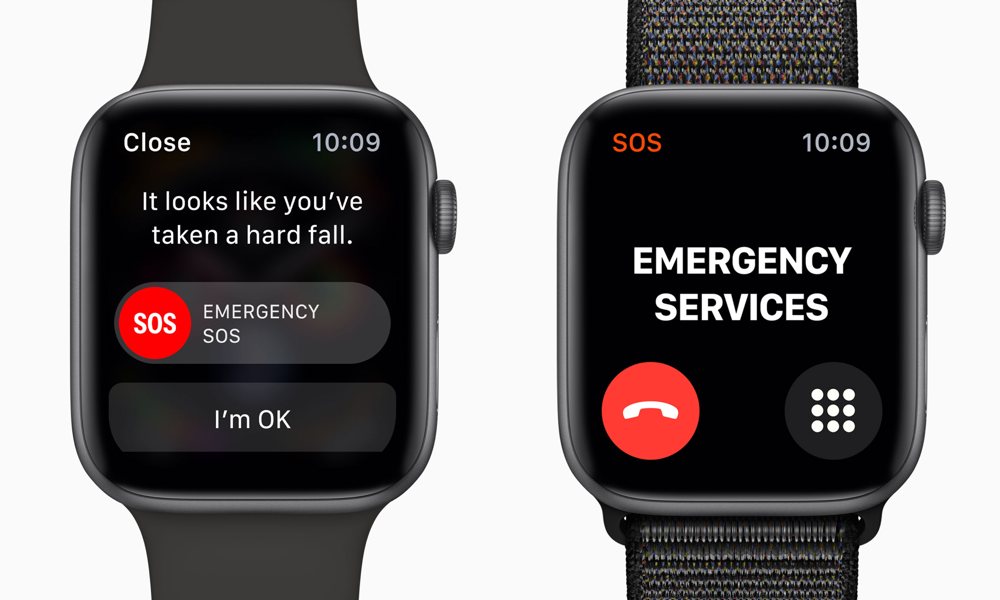
The Emergency SOS feature is also available on the Apple Watch, provided that you have your iPhone nearby or have a Wi-Fi or Cellular data connection from the watch itself. On the Apple Watch, the feature is activated by pressing and holding the side button, and then either actuating the "Emergency SOS" slider that appears, or continuing to hold the button down to begin a countdown instead.
Customizing Emergency SOS
You can also customize the Emergency SOS feature further in the iPhone Settings app or the Apple Watch app (on your iPhone).
On the iPhone 8 and iPhone X or later models, you can choose to enable a five-time press of the side button as an alternate trigger for Emergency SOS, similar to how older iPhone models work, and can also choose to enable "Auto Call" to initiate the Emergency SOS countdown immediately in this case, rather than simply presenting the slider screen. For the Apple Watch, a similar setting can be found in the Emergency SOS section in the Apple Watch app on your iPhone.
Set Up Your Medical ID
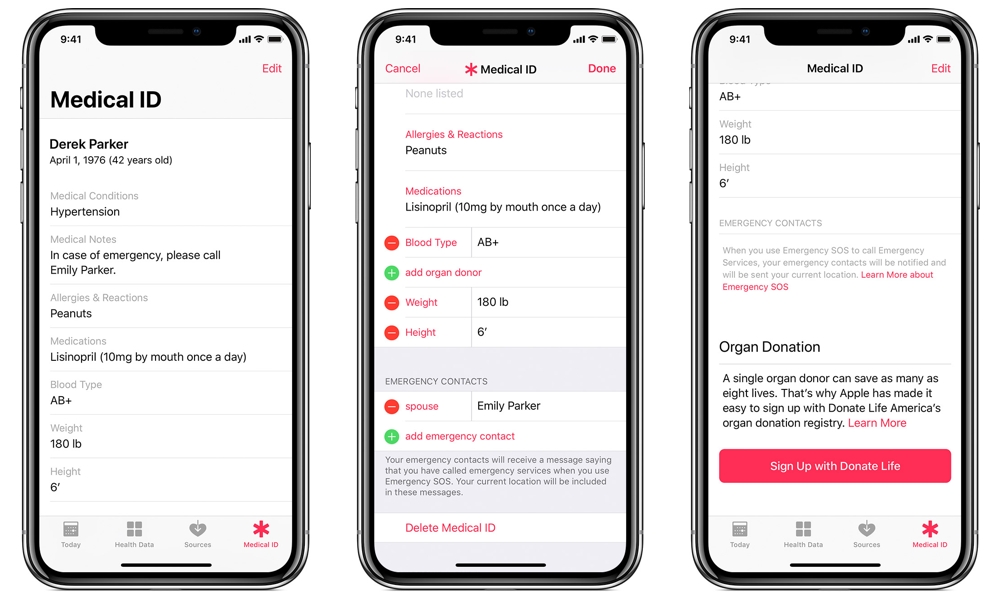
If you've ever used Apple's Health app, you've probably noticed a Medical ID section tucked away in there that allows you to fill in important medical information such as blood type, height, weight, allergies, medications, and other medical conditions.
However, there's a lot more to this feature than simply providing a place for you to record these details for your own use. The Medical ID section can function as a digital card that can be viewed by others in an emergency, such as paramedics or other first responders, even if your phone is locked. To set up your Medical ID:
- Open the Health app on your iPhone
- Tap the Medical ID button in the bottom-right corner
- Tap Edit in the top-right corner.
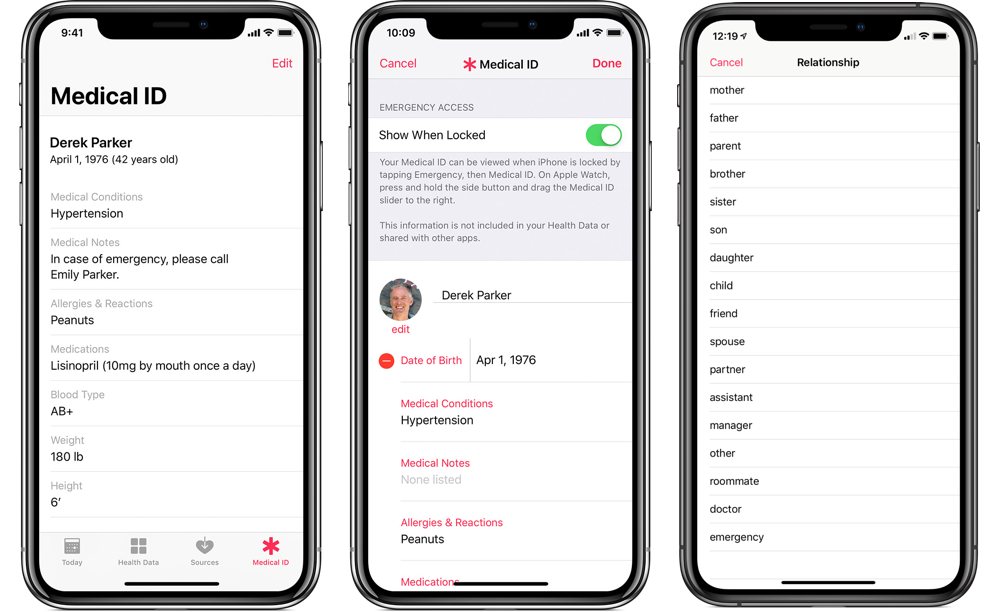
- Fill in your health information, in much the same way as you would a contact card in the Contacts app. If you're in the U.S., you can even sign up to be an organ donor within the app.
- Tap Done
Apple naturally allows privacy-conscious users to lock this information down if desired — simply toggle off the Show When Locked switch at the top — but we'd strongly recommend filling it out and making it available when your device is locked; if you have medical conditions or allergies that medical professionals should know about before administering treatment, this feature alone could save your life.
Accessing your Medical ID
Apple's Medical ID feature is well-known among professional first responders, so many have been trained on how to bring up the Medical ID on an iPhone. However, it's a good idea to familiarize yourself and other friends and family members with the feature so you know what to do if you ever encounter someone else in trouble. To check for a Medical ID on a locked iPhone:
- From the lock screen, swipe to bring up the passcode entry screen
- Tap Emergency. This will bring up the emergency call screen.
- Tap Medical ID to display the users' medical ID.
You can also access the Medical ID by holding down the side button (iPhone 7 or older) or side and volume buttons (iPhone 8/iPhone X or newer) for a few seconds. A Medical ID slider should appear below the swipe-to-power-off slider.
If no "Medical ID" button appears in either case, this means that the user either hasn't set up their medical ID, or has chosen to disable it when their iPhone is locked.
Add Emergency Contacts
While filling out your Medical ID, you'll also notice that there's a section for specifying emergency contacts. There's more to this feature, however, than simply showing someone who to call in case of an emergency.
If you specify mobile phone numbers for your contacts — that is, numbers that are capable of receiving SMS text messages — then those contacts will automatically be sent an emergency alert — including a link to your current location — whenever you trigger an Emergency SOS.
Note that the Emergency SOS feature calls emergency services first, and only after that's been done are your emergency contacts notified. It's also worth noting that the notifications are sent out via SMS text messages, not iMessage, so you'll only be able to notify people who actually have a mobile phone, not an iPad or iPod touch, but the upside is that they don't need to be iPhone users either, any device that can receive a standard text message will do.
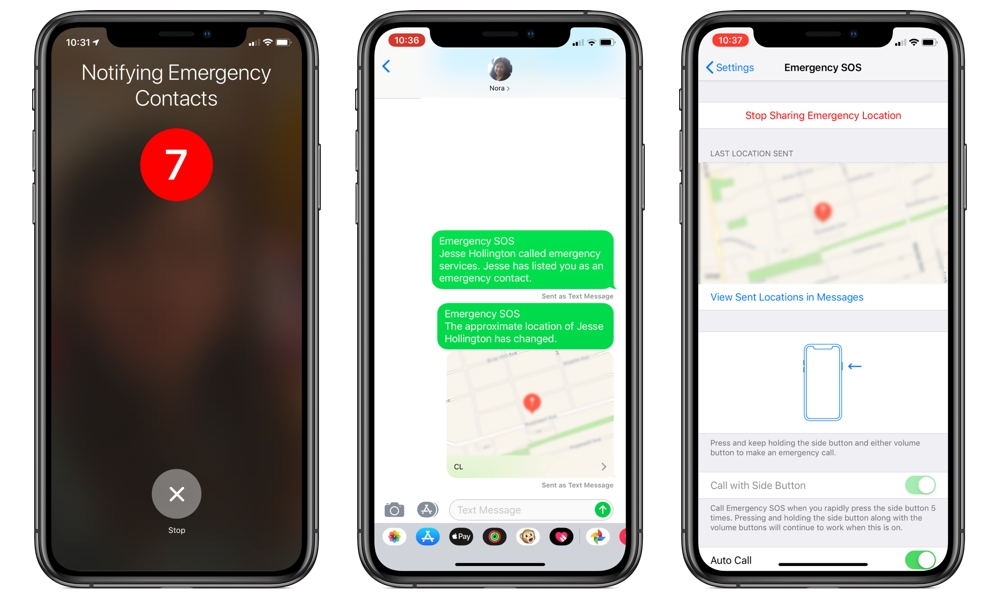
Once you've initiated Emergency SOS, your location will continue being shared until you disable it, and contacts will get another notification every time your location changes. This also works even if you have location services otherwise turned off on your iPhone — the feature is temporarily switched on while Emergency SOS is still active. You'll know this is the case by a red "SOS" indicator in the status bar. Tapping this will take you to the Emergency SOS settings screen, where you can select "Stop Sharing Emergency Location" to exit SOS mode and return to your normal settings.
One other thing that's worth mentioning is that it is possible to use the Emergency SOS feature to simply notify your emergency contacts without actually calling emergency services, but it can be a bit tricky — if you cancel the actual 911 call immediately then the call won't go through, but your device will still move on to the next stage of notifying your contacts. We don't recommend this, however, as there's still a chance the emergency services call could be initiated just long enough to trigger a "hang up" alert at the dispatch centre.
Use Find My Friends
Emergency SOS will allow specific contacts to get your location in the event of an actual serious emergency, but the feature basically has to be accompanied by at least an attempt to call emergency services (i.e. 911), and of course you actually have to be conscious in order to do that.
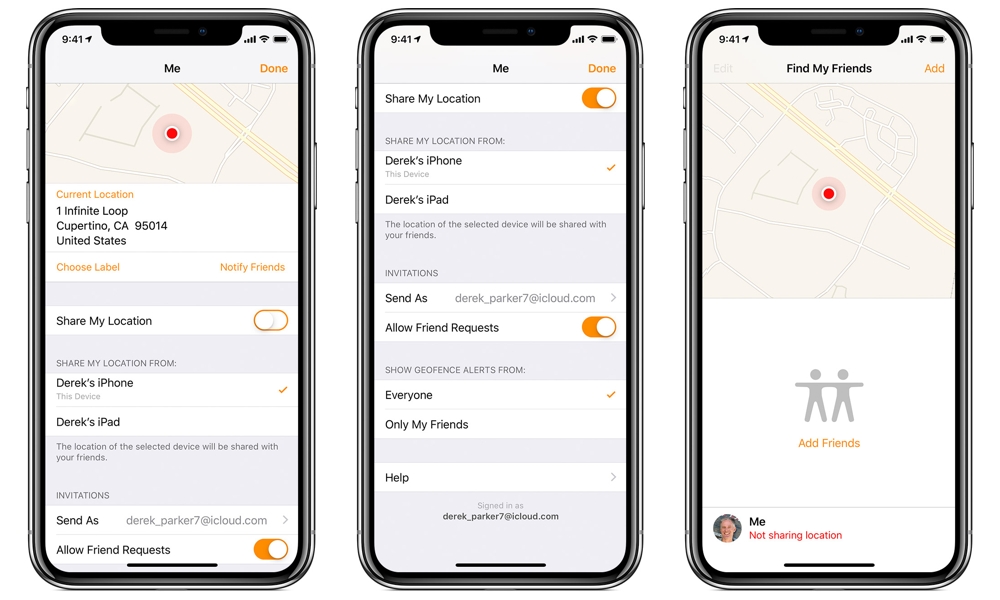
Although many view Apple's Find My Friends app as a more social app, it can also be invaluable for helping keep family members safe by ensuring that everybody knows where everybody is, and it's already helped to save at least one kidnapping victim.
Those who are more privacy conscious can use Find My Friends more selectively, such as when travelling or going out on the town for a night; the Find My Friends app allows locations to be shared temporarily for limited time periods that automatically expire.
Enable Apple Watch Fall Detection
While this isn't specifically an iPhone option, it's such a useful Apple Watch safety feature that it's worth its own shout-out. If you have an Apple Watch Series 4, you can ensure that Fall Detection is on to have an Emergency SOS automatically triggered if your watch determines that you've fallen and aren't getting back up.
Fall Detection has been credited with saving multiple lives already, but the key is that you have to make sure it's turned on; by default, Apple only enables it for users who are over 65 years of age.
Keep Your Battery Juiced Up
This next one may sound like a blinding flash of the obvious, but it's actually not something many people think of. Even without Emergency SOS, your iPhone and Apple Watch may be your only lifelines in an emergency situation, so ensuring that you have enough battery when you're away from home can be really important. Taking that last selfie when your battery has less than 5% remaining may not be worth compromising your safety.
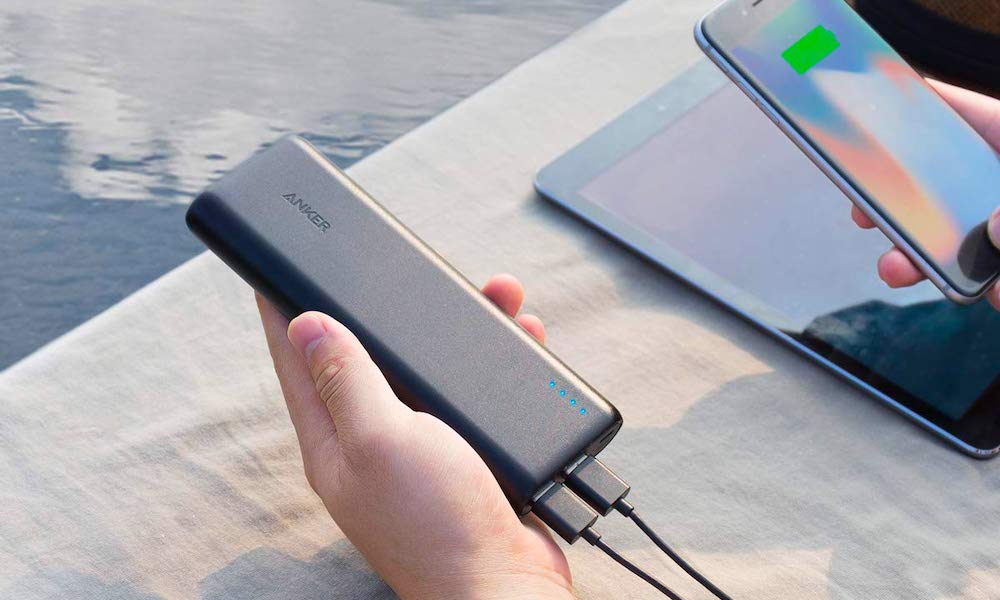
However, we'd also recommend always having a spare battery pack around, especially on longer excursions, even around town. There are numerous really small batteries that can fit into a purse or pocket, and in fact they've become so popular that we've seen companies giving them away as marketing materials in the same way that they used to give out pens. These won't really power up your iPhone for normal use, but they make great backup power if you need to get juiced up again in an emergency.

