
7 Tips and Tricks to Get Started With Apple’s Journal App
 DenPhoto / Adobe Stock
It's been nearly two years since Apple launched its Journal app — a simple and free first-party tool designed to help you be more present, reflective, and mindful. And for the most part, it does a surprisingly good job of it. Granted, it's still a bit barebones, especially when compared to other journal apps for iPhone, but it's getting better — and iOS 26 has added some nice upgrades.
Whether you’re looking to build a gratitude practice, document important memories, or simply make journaling part of your routine, Apple's Journal app offers a great balance of features, making it accessible without feeling overwhelming.
Like any new app, Apple’s Journal has a bit of a learning curve. To make things easier, we’ve rounded up some quick tips to help you get started. Read on for 7 tips and tricks to make the most of Apple’s Journal app.
Enable Journal Suggestions in Settings
If you haven't gotten into the habit of journaling, starting with the Journal app might be tough at first. You might not even know where to start or what to write about. If that's the case, you can ask your iPhone for help.
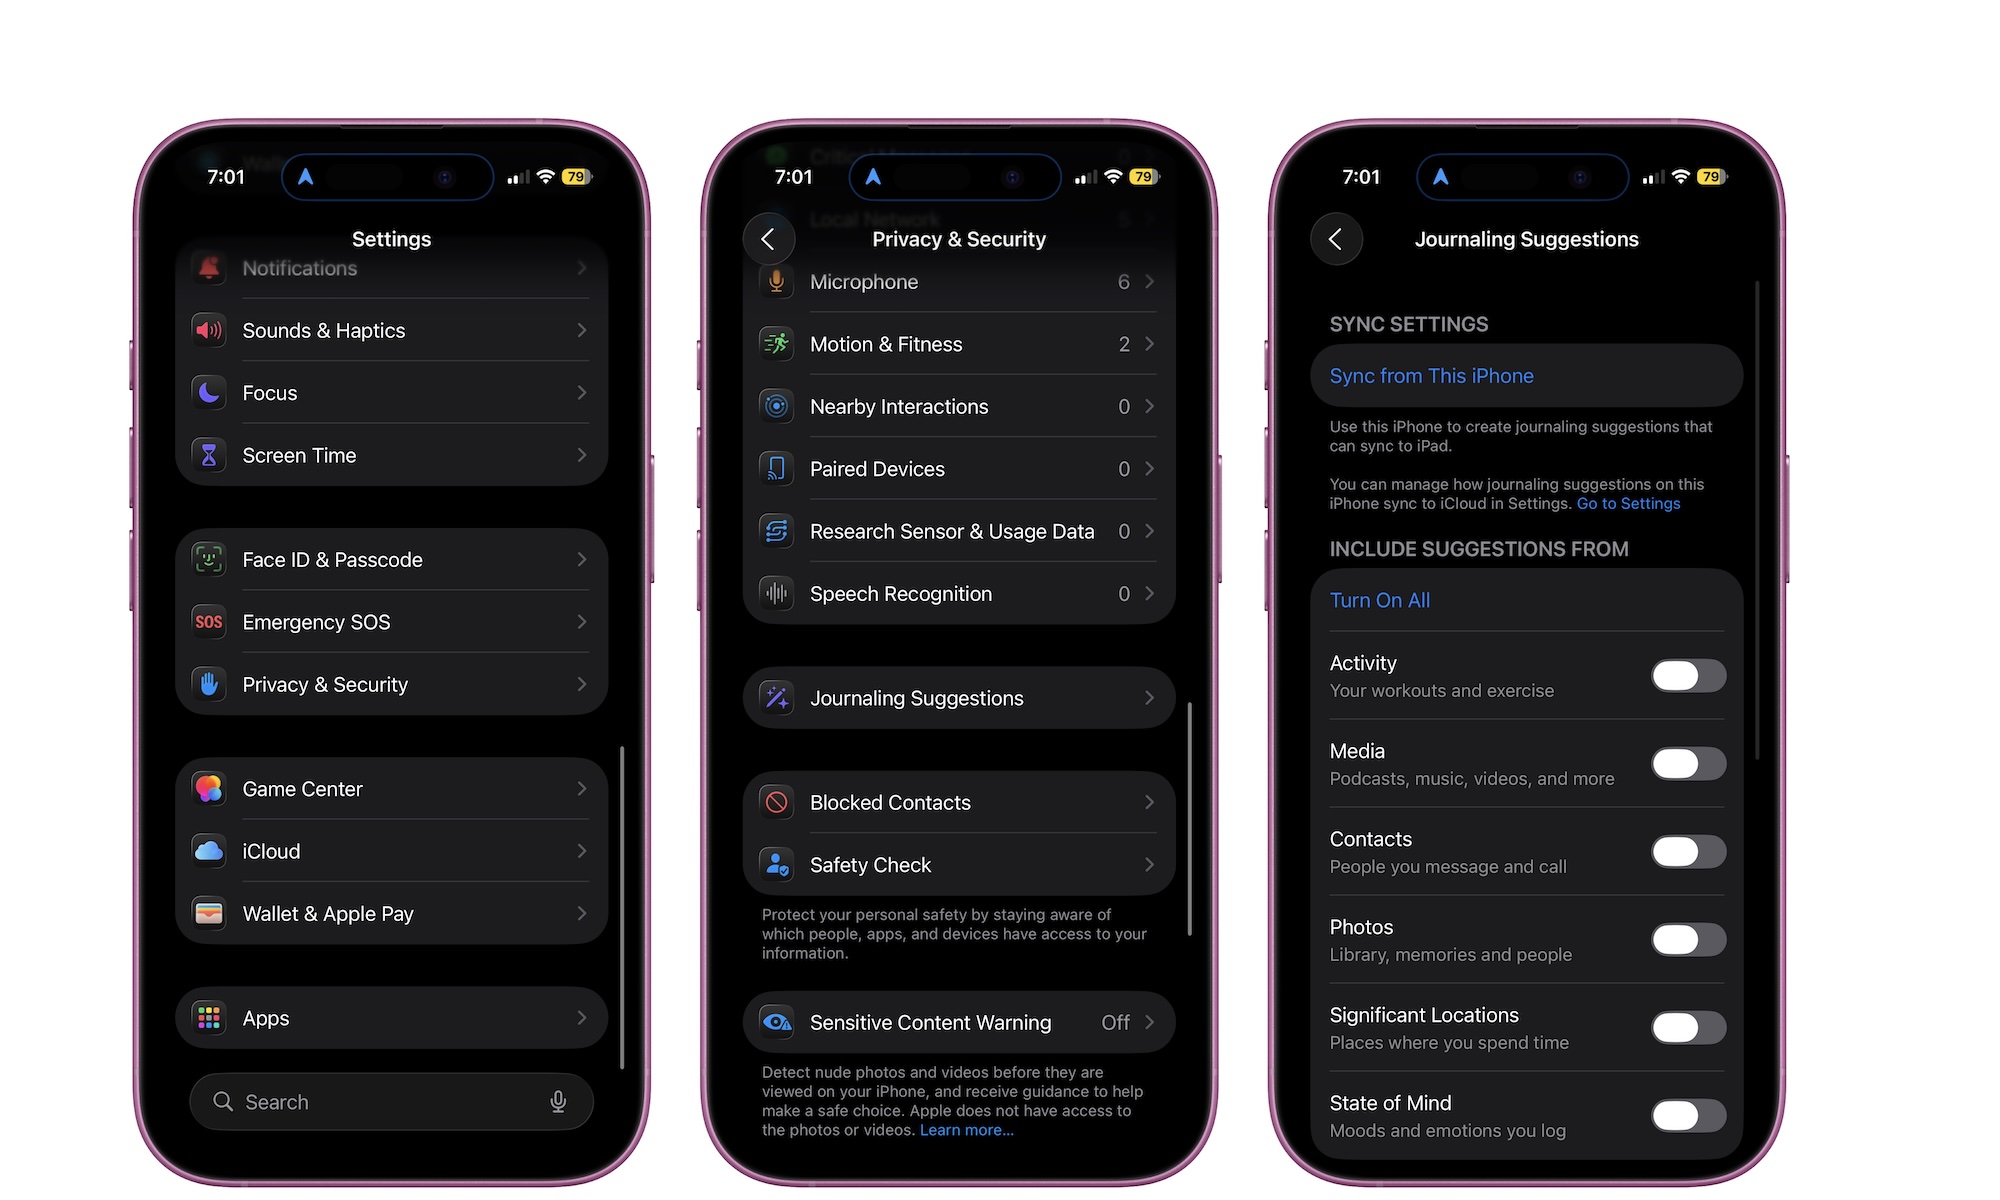
When you first open the Journal app, you’ll be asked if you want to turn on Journaling Suggestions. This feature looks at your daily activity — how you use other apps — and offers ideas for what to write about. For example, it might draw from your recent photos, workouts, locations, or even the people you’ve been messaging.
For some folks, that might sound a bit invasive — and that’s fair. That’s why Journaling Suggestions is off by default, and you’ll need to enable it manually if you want to use it. You can also choose exactly which kinds of data the app can access.
It’s also worth noting that all the data handled by the Journal app — including your entries and Journaling Suggestions — stays private and is stored only on your device. You can choose to sync it through iCloud to keep your journal up to date across your iPhone, iPad, and Mac, but even then it’s protected with end-to-end encryption, so not even Apple can read or access it.
You should see a prompt to enable Journaling Suggestions the first time you open the Journal app. If you skipped or declined it, or just want to adjust your settings later, here’s where to find them:
- Open the Settings app on your iPhone.
- Scroll down and choose Privacy & Security.
- Scroll down again and select Journaling Suggestions.
- Under Include Suggestions From, choose the categories you’d like the app to draw from. To save time, you can tap on Turn On All.
Once enabled, the Journal app will offer writing prompts based on what you’ve done throughout the day — from workouts to conversations to recent photos. It’s a helpful way to inspire new entries, but you can go back to the settings if you’d like to limit the activities that are used for suggestions. There's also the option to Clear History if you want to delete all your previously collected data.
Speak Your Thoughts With Voice Notes
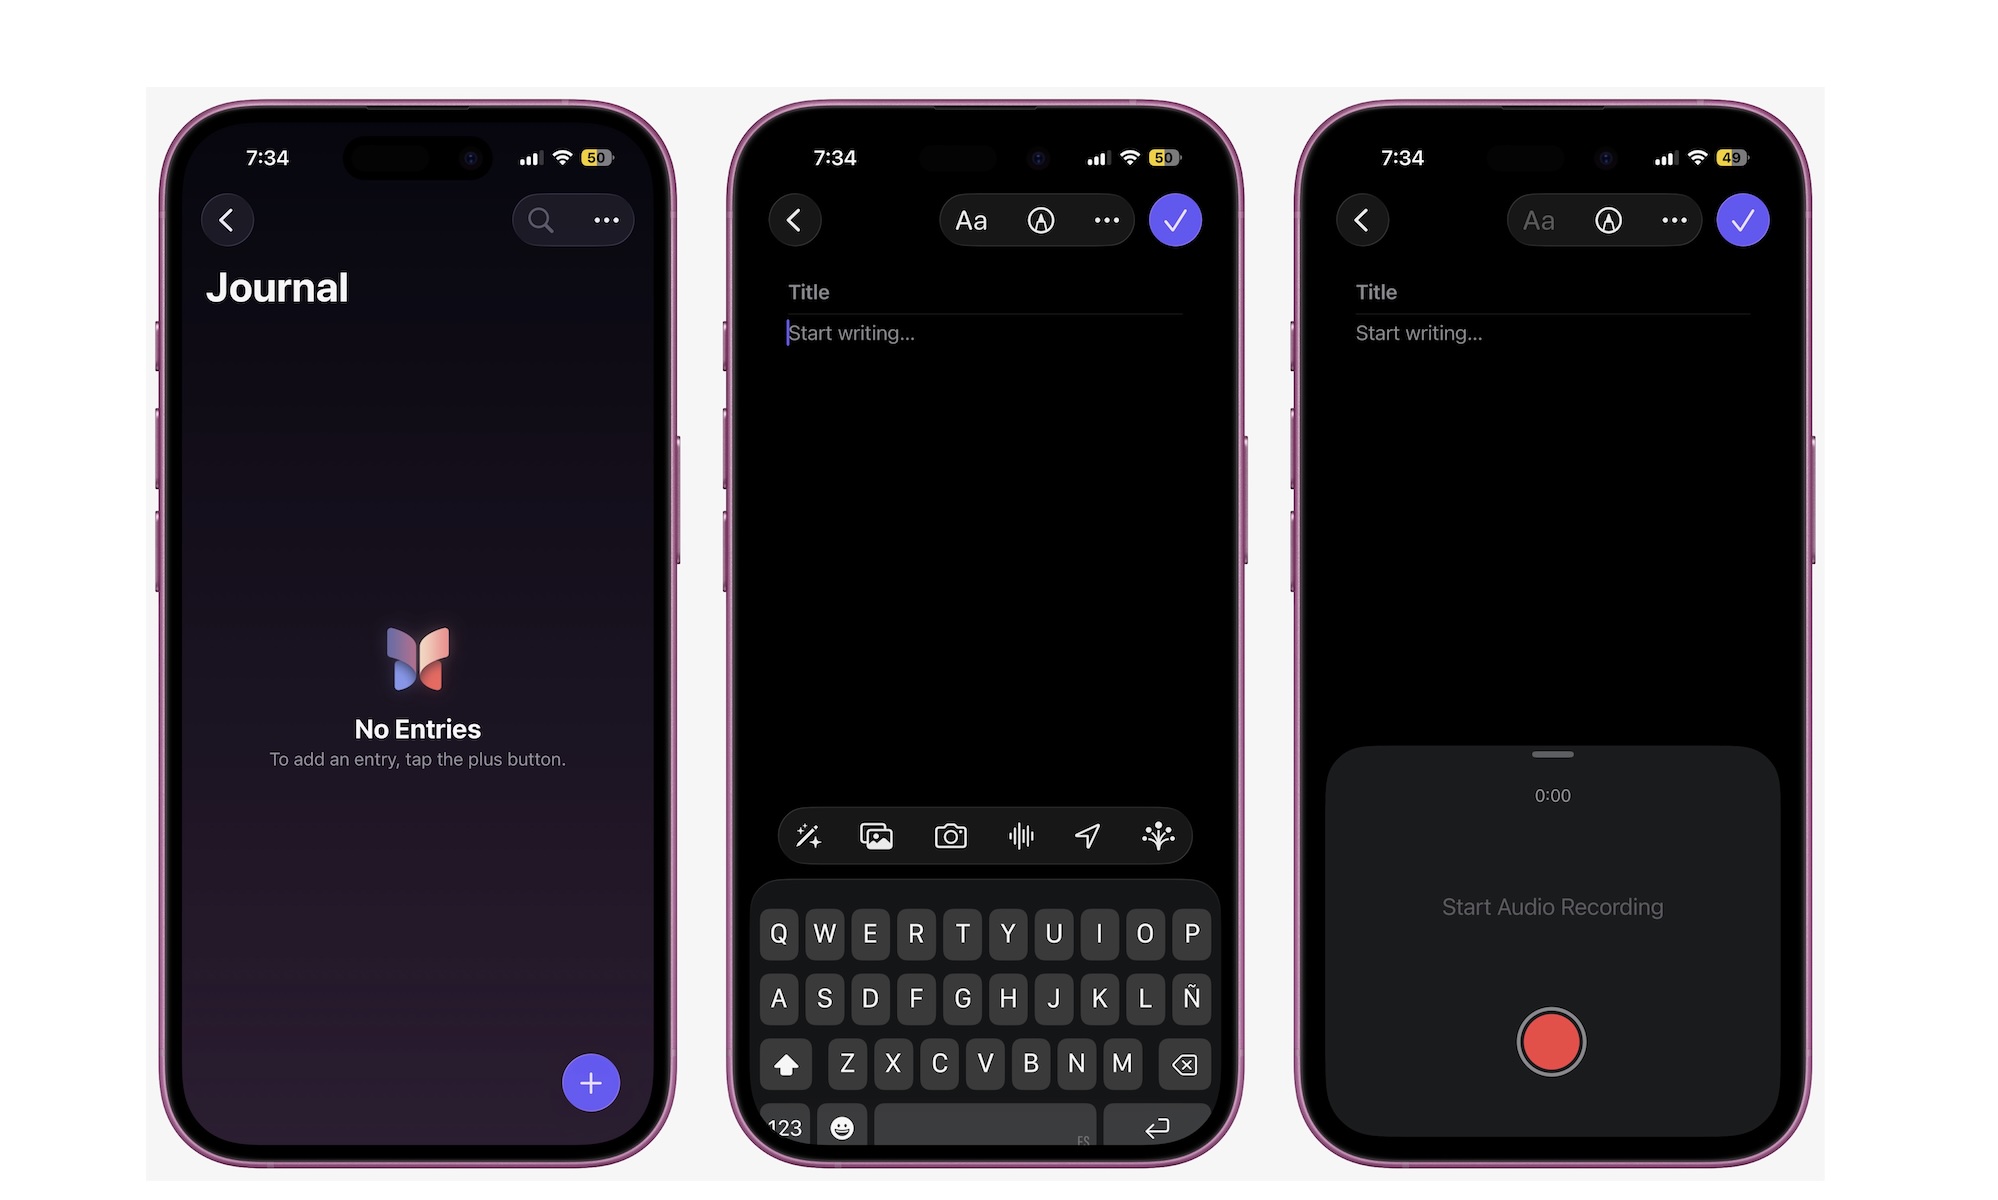
Not everyone loves typing — and Apple knows that. If you're the kind of person who thinks better out loud, the Journal app lets you capture your thoughts using either dictation or audio recordings.
Here's how to add a voice recording:
- Tap the plus icon in the bottom right corner of the Journal app to add a new entry.
- If the recommendations panel appears, tap the × icon to close it.
- Tap the Recording button (the sound wave icon next to the camera button).
- If prompted, allow the Journal app to use your microphone.
- Once you’re ready, hit Record and start talking.
When you're done, tap Stop. The recording will be added automatically to your entry as an audio clip. You can tap the play button to listen to it, or tap the note itself to open it.
If you’d like a text version, tap the Transcription button in the lower-left corner of the recording to see your spoken words appear as text.
If all you want to do is get a voice-to-text transcription without the audio recording, just tap the Microphone button in the bottom right corner of your keyboard and start talking — your words will appear instantly in the entry field.
Voice notes make Journal more accessible and flexible, especially for those who find typing tedious or want to capture thoughts in the moment.
Add Photos, Locations, or Workouts to Your Entries

Journaling doesn’t have to start with words — and Apple’s Journal app embraces that idea. It encourages you to capture meaningful moments by adding photos, locations, workouts, or even moods drawn from your Health data.
To get started, open the Journal app and tap the plus icon in the bottom-right corner of the screen. From there, you should get some recommendations from the Journal app itself, but if you'd rather start fresh, tap the x icon in the top left corner of the menu.
A small menu will appear above the keyboard. You can tap each button to add content like a picture, your current location, or a mood.
Once you’ve added something, you can type or speak your thoughts to go along with it. This feature is especially handy if you’re a visual thinker — perfect for remembering a trip, reflecting on your mood after a tough day, or simply adding some real-world context. These small touches can make your journal feel more personal and alive.
Bookmark Entries You Want to Revisit
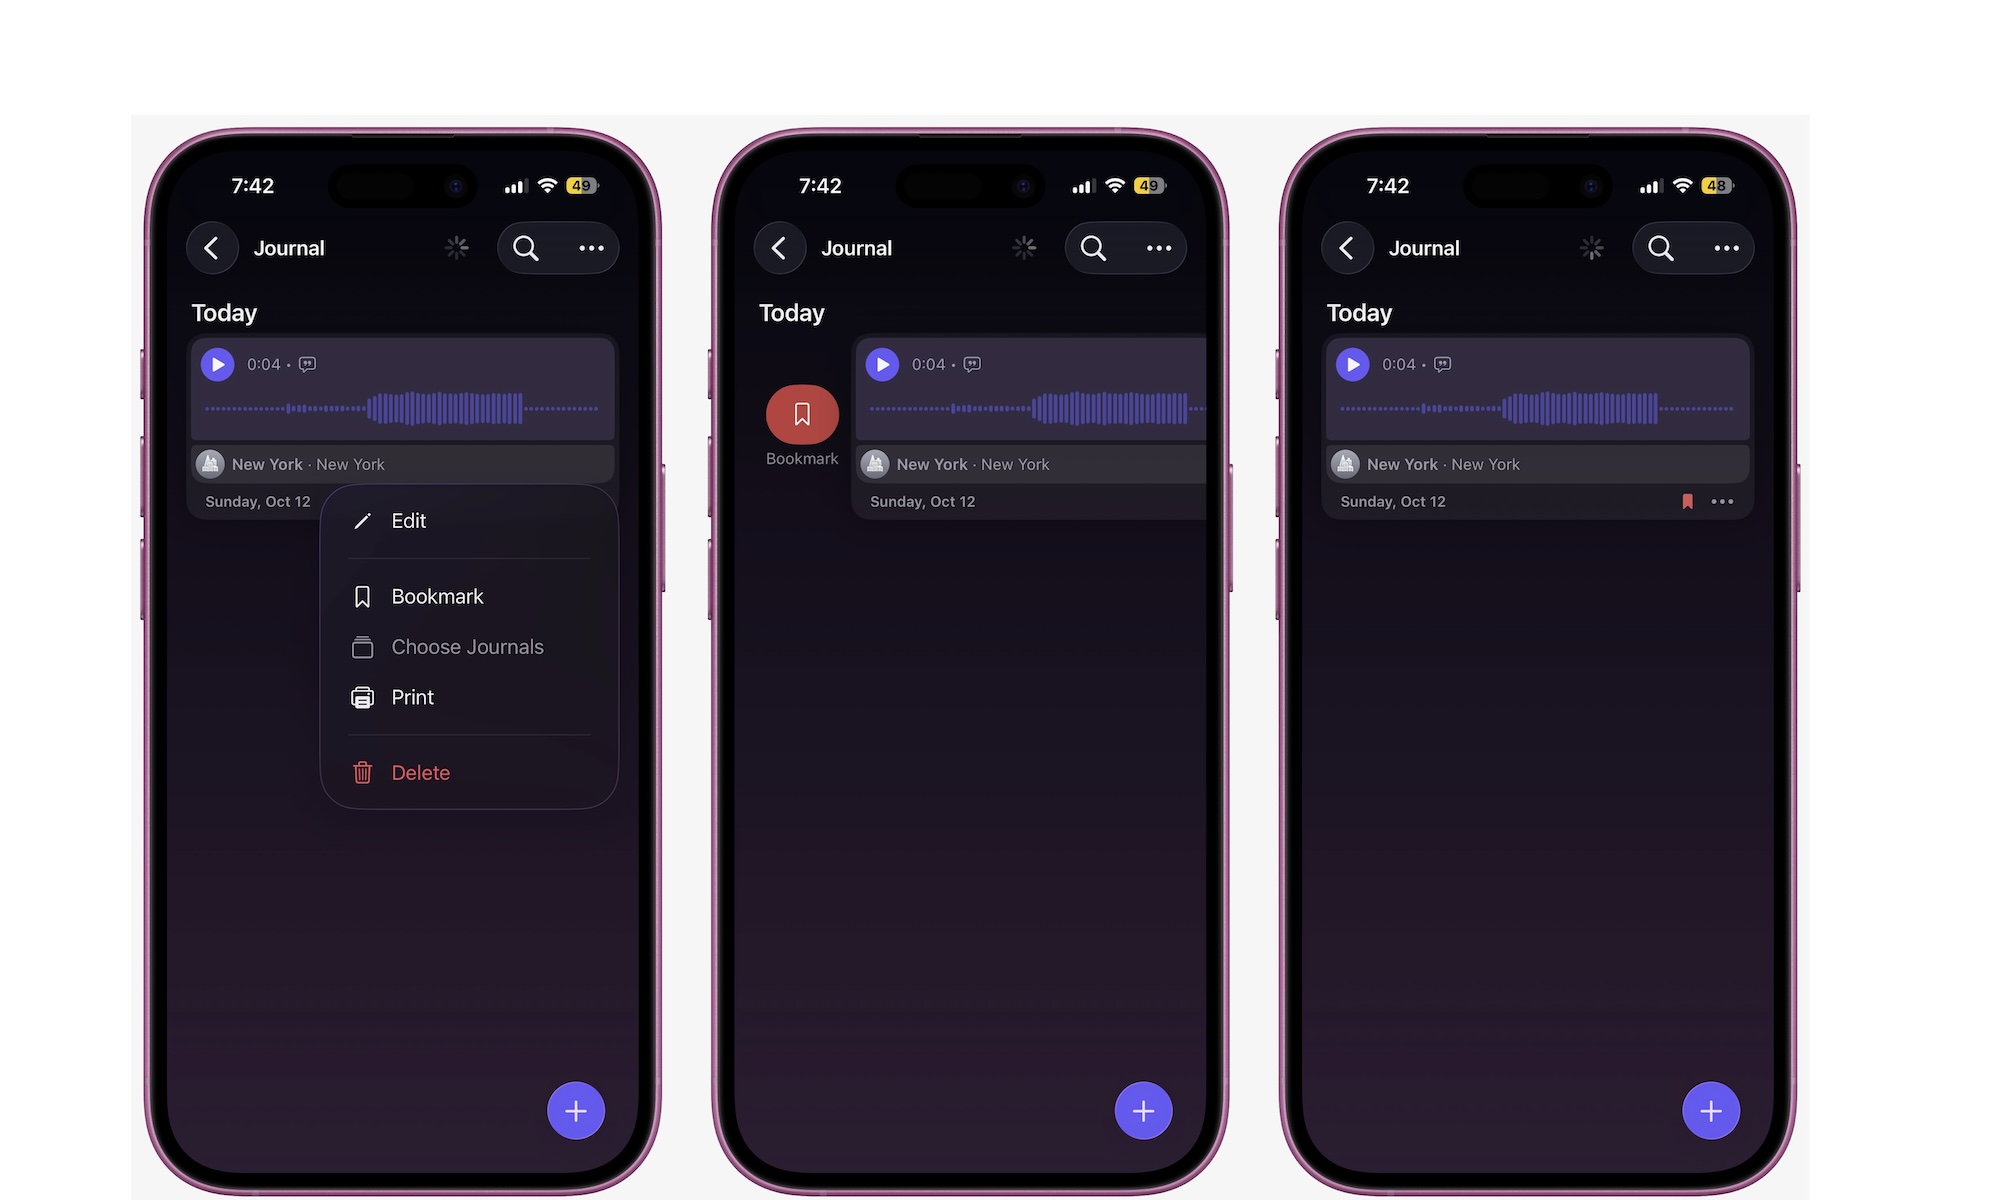
Over time, you may end up with dozens or even hundreds of journal entries. And while we're sure they're all unique, some will always stand out from the rest. The Journal app makes it easy to highlight those favorites so you can find them again later.
You can bookmark an entry in two ways:
- Open the Journal app, find the note you want, and tap the three-dot menu in the bottom-right corner of the entry. Then tap Bookmark.
- An even faster way is to swipe the entry to the right to reveal the Bookmark icon, then tap it.
Whichever option you use, you'll know you did it right because a small, red bookmark icon will appear at the bottom of your journal entry.
You can use bookmarks to keep track of important milestones, emotional breakthroughs, or just entries you particularly liked.
Set a Journaling Schedule So You Never Miss a Day
Building a habit takes time and consistency, but Apple can help you with both. The Journal app lets you schedule reminders to prompt you to write even on days you’re feeling uninspired.
Here's how to set up reminders:
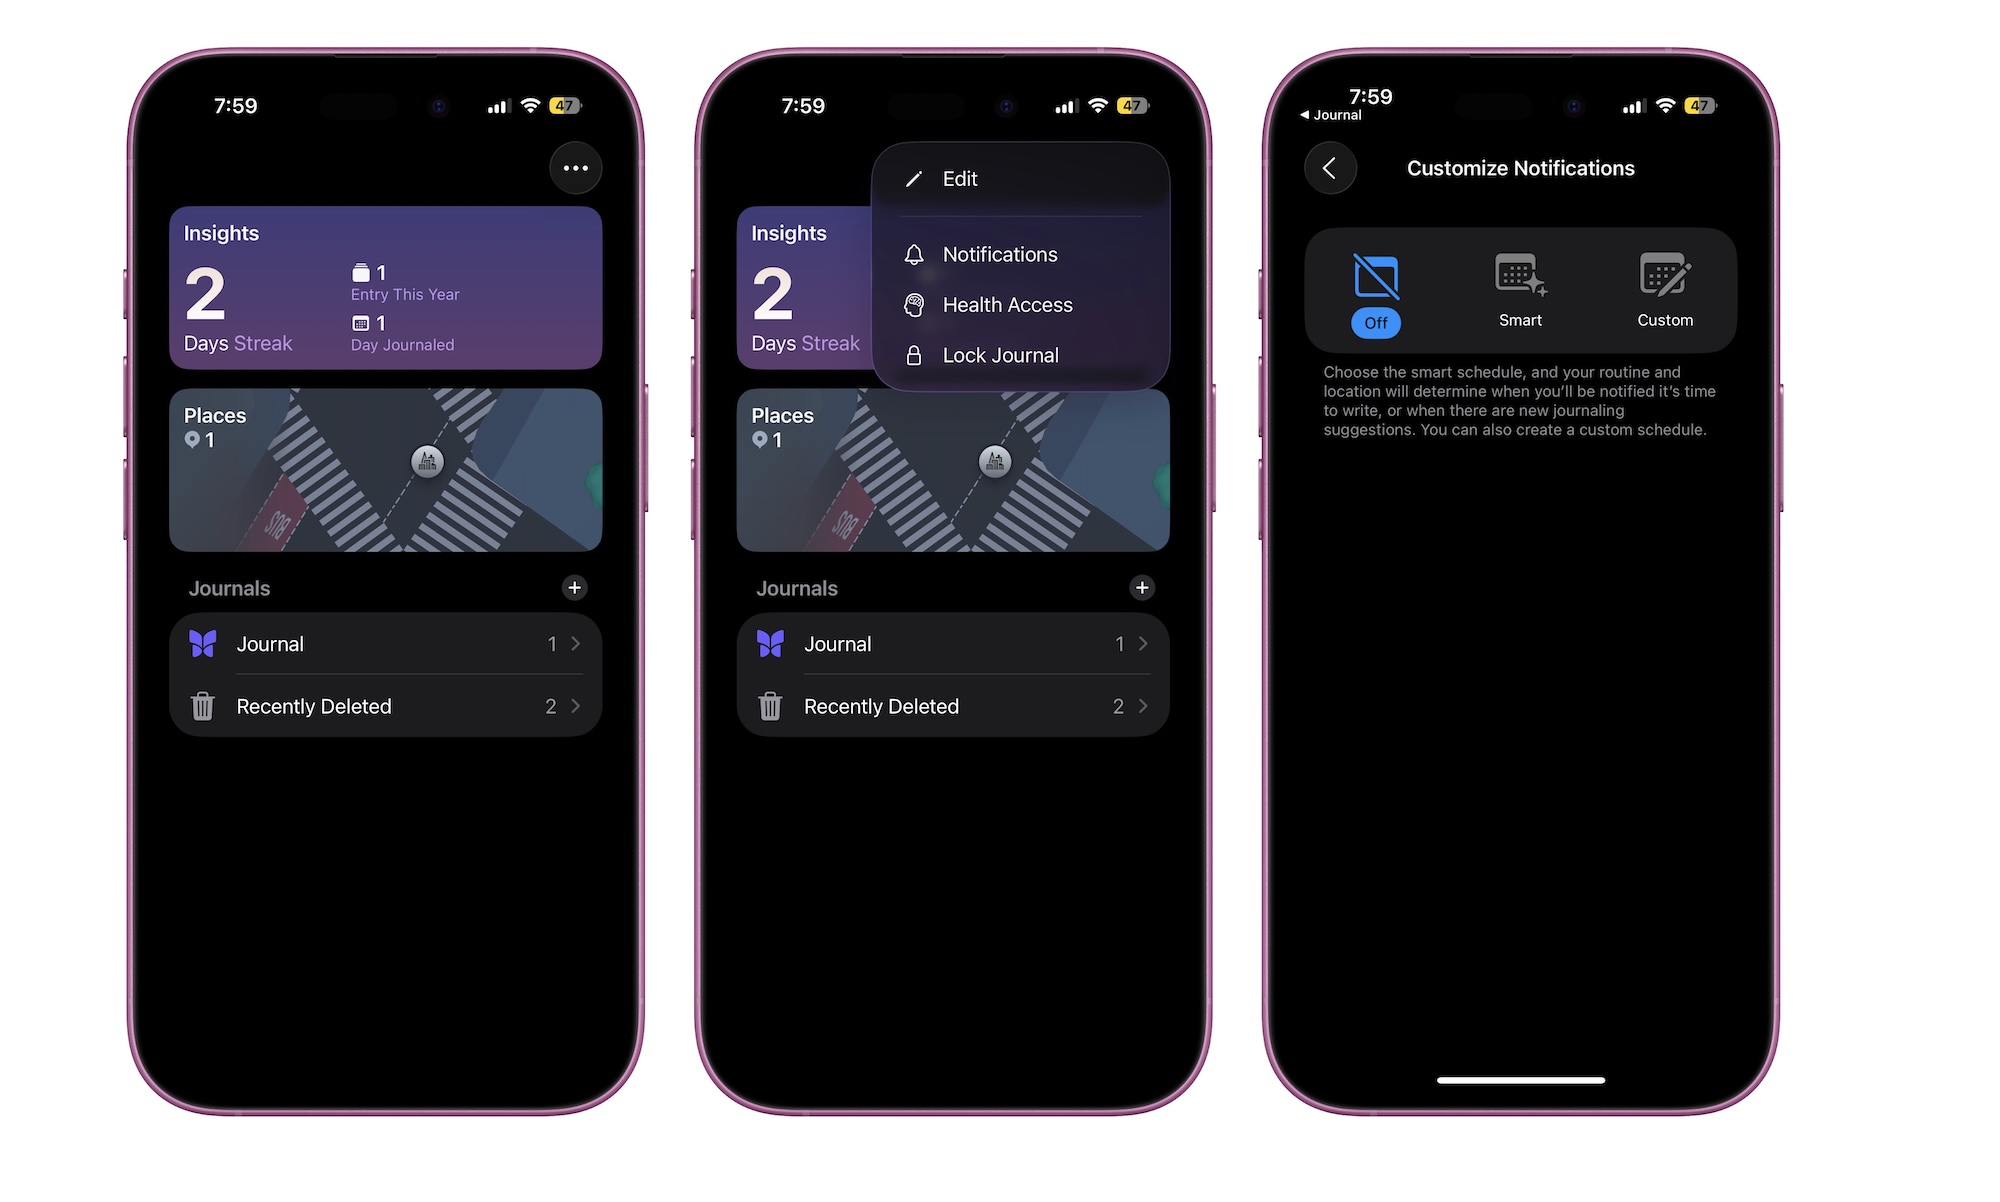
- Open the Journal app.
- Tap the back button to go to your Journal Insights.
- Tap the three-dot button in the top right corner of your screen.
- Tap on Notifications.
- Choose which type of notifications you'll want to get.
The notification options are pretty self-explanatory. Custom Notifications let you choose specific weekdays and times you want to be reminded to write, but the real power lies in Smart Notifications. This feature lets your iPhone learn from your daily routine, so reminders appear at times and places when you’re most likely to journal — whether that’s during your morning coffee or when you're usually winding down at the end of a long day.
Lock Your Journal Behind Face ID
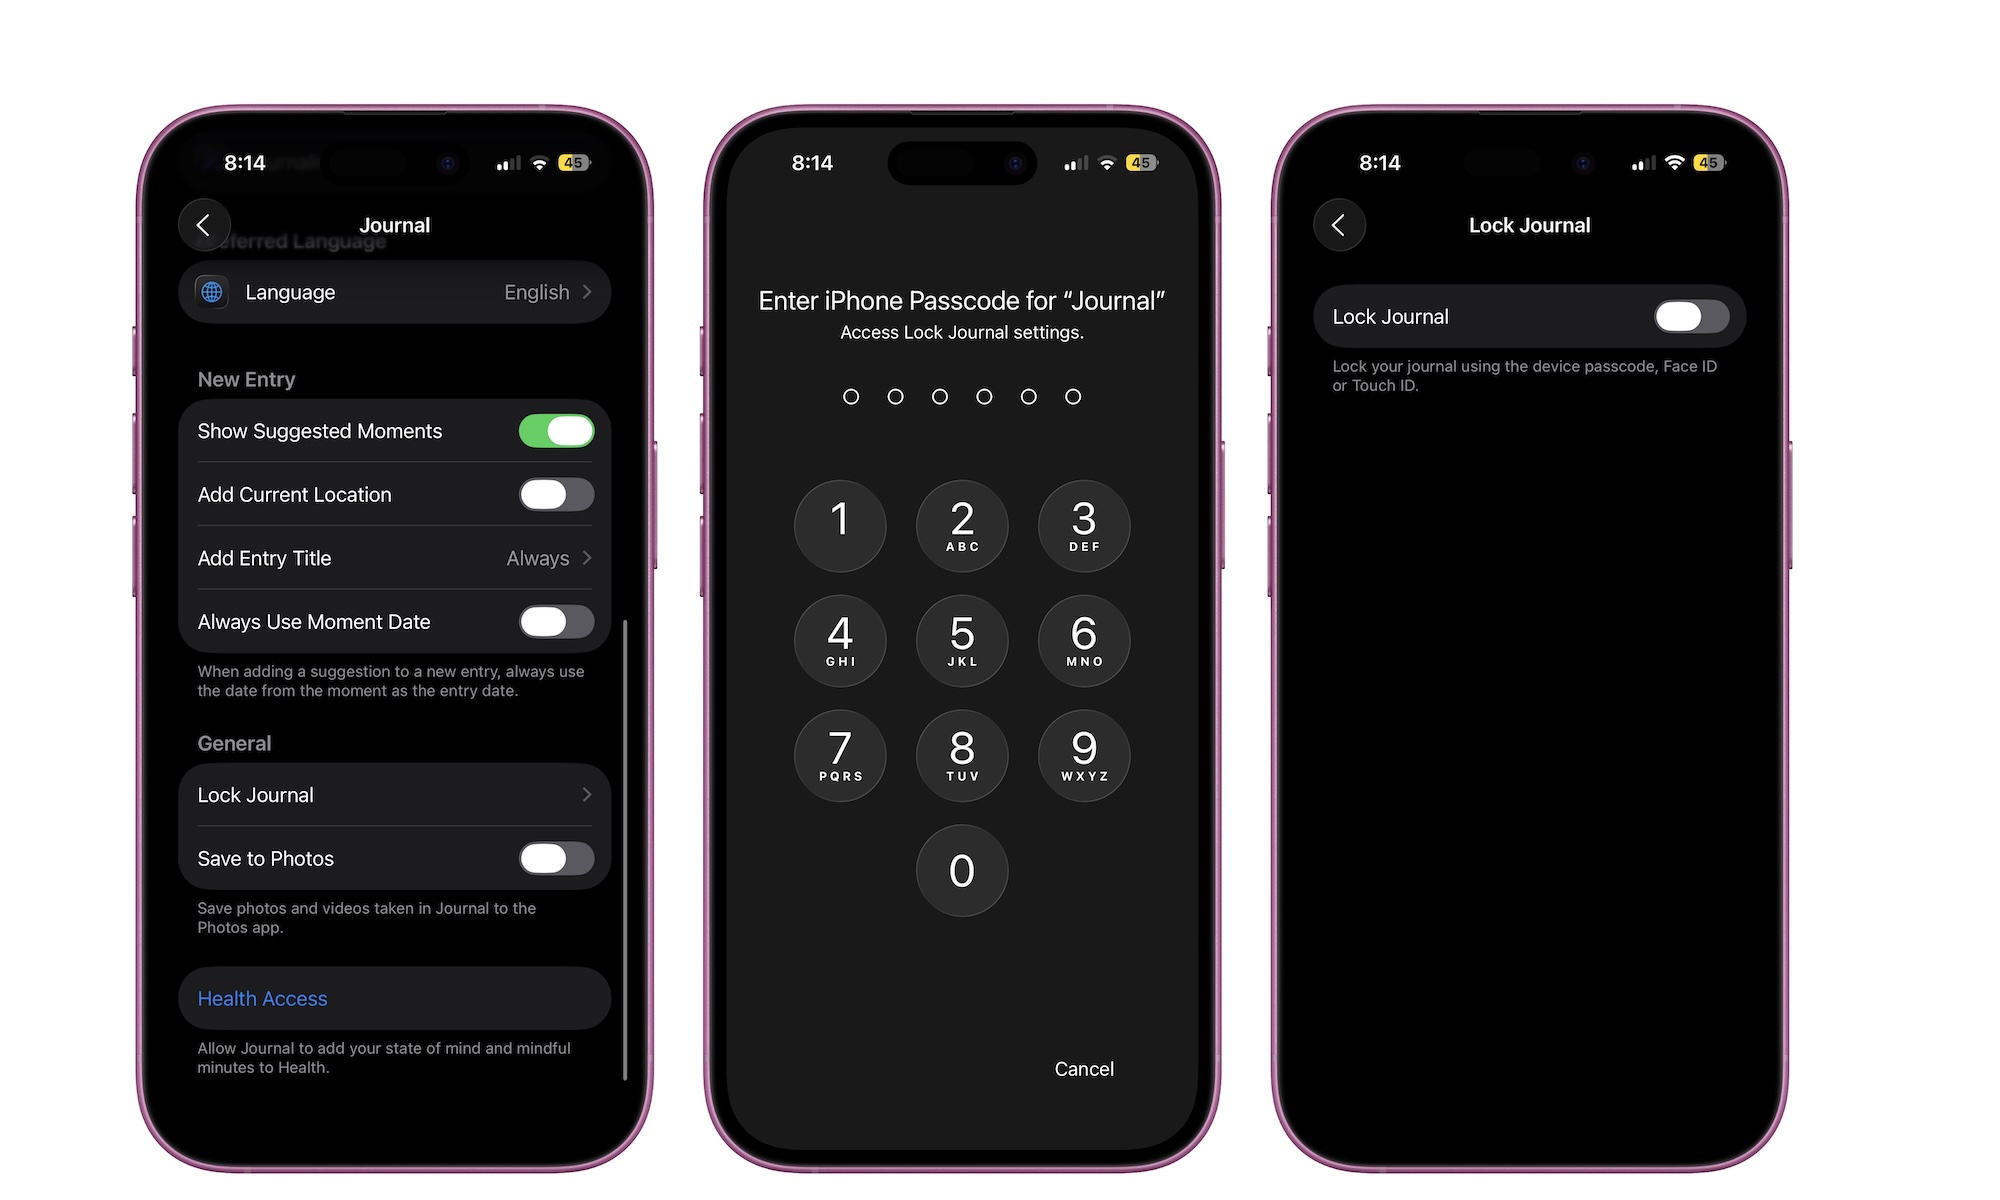
A good journal should feel private enough for you to record your most honest thoughts. Fortunately, Apple understands this, which is why it lets you lock your Journal so your entries remain for your eyes only.
If you share your phone with family or friends, locking the Journal app behind Face ID is a must. Here's how you can do it.
- Open the Settings app.
- Scroll down and select Apps.
- Scroll down again and tap on Journal.
- Under General, select Lock Journal.
- Enter your device passcode.
- Toggle Lock Journal on.
Once enabled, you’ll need Face ID, Touch ID, or your passcode to open the Journal app, keeping your thoughts safe from curious eyes.
Create Different Journals to Keep Things Organized
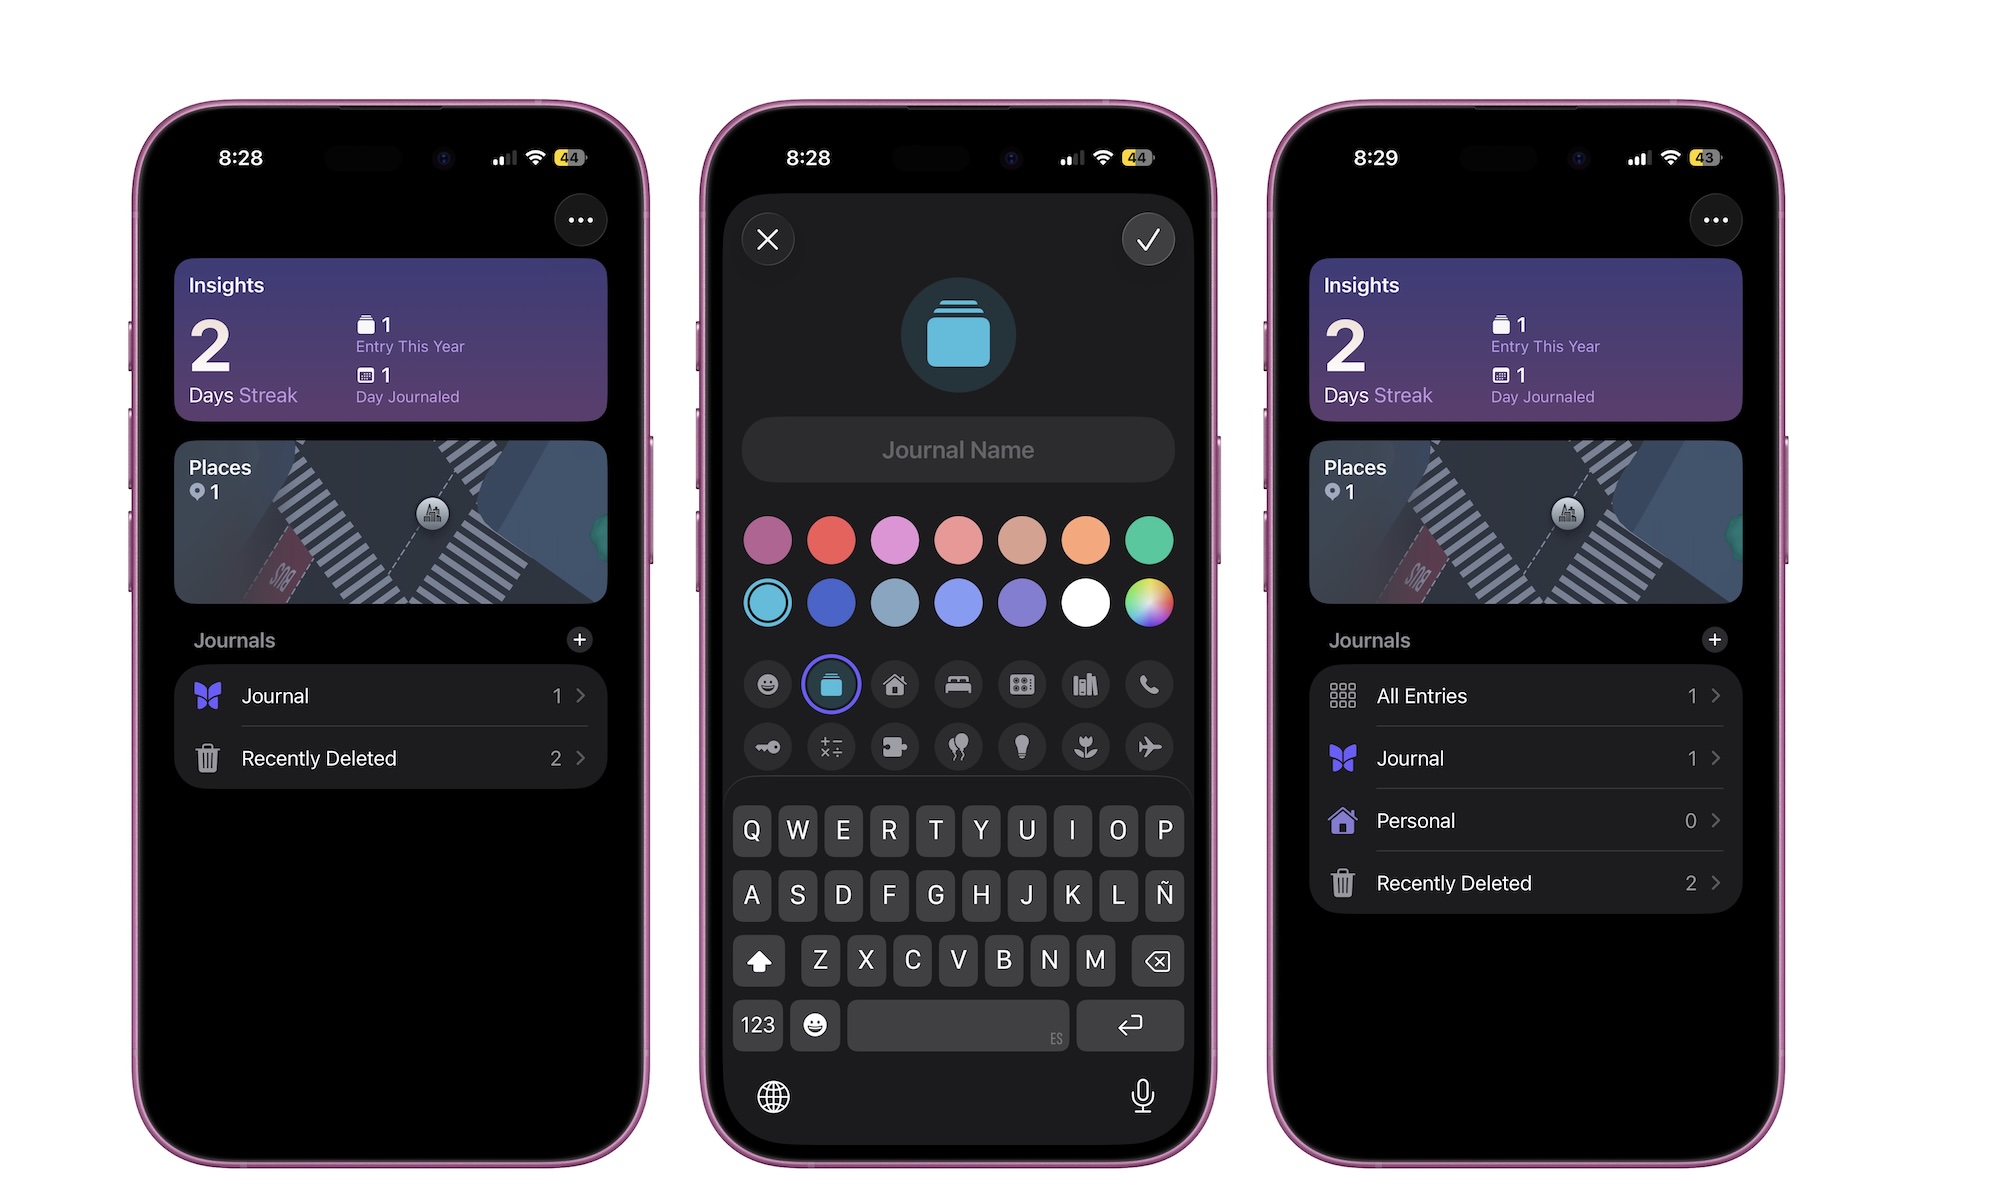
Once you get serious about journaling, you'll probably want to keep things as organized as possible. Sure, you can search for specific notes, but creating separate journals is an even better way to organize different themes or parts of your life.
By default, the Journal app includes a single main journal called Journal. However, you can easily add more and customize them however you like.
Here’s how to create a new journal:
- Open the Journal app.
- Tap the Back button in the top-left corner to open your Journal Insights.
- Tap the plus button next to Journals.
- Add a name, then choose an icon and color.
- When you’re done, tap the checkmark in the top-right corner.
Now you can start organizing your journal entries the right way. You can go to your new journal and create entries from scratch, or move some of your existing entries by long-pressing them and selecting Choose Journal.
It’s a simple way to organize your writing — whether you’re separating work reflections from personal notes, tracking travel memories, or keeping gratitude entries in their own space.
Make the Most of Apple Journal
Apple’s Journal app may be simple on the surface, but it hides a surprisingly rich set of features that can make daily reflections effortless.
Whether you're new to journaling or just want a quiet, focused space to capture your thoughts, Journal gives you a beautifully designed, distraction-free environment to do just that.
With smart suggestions and a bunch of ways to record your thoughts — from quick notes to voice entries — it’s never been easier to build a consistent journaling habit right from your iPhone. Not everyone takes to journaling right away, but it can do wonders for your mental health and overall well-being. Give it a try — you might be surprised by how much it helps you in the long run.