
10 Features Every New iPhone User Should Know
 Joshua Hoehne
If you've had your iPhone for a while, you're likely already familiar with its capabilities. Whether you want to do basic things like browsing the web, blocking all your notifications to focus on your work, or just shooting high-quality videos, your iPhone can do that and so much more.
That said, most people don't know everything the iPhone can do. It comes with a ton of features right out of the box, and Apple regularly adds more new and useful features with every software update.
So, we can't blame you for not knowing about all the iPhone features you can make the most of. However, there are some features that you should be aware of. These features can be settings that you can change to make your iPhone more private and safe or just useful things that you didn't know your iPhone could do.
Whether you know them or not, it's always useful to keep these features in mind when you need them. Read on for 10 features that every iPhone user should know.
Stop Sharing Your Location With All Your Apps
Many apps will ask you to share your location. While some, like Waze or Google Maps, require your specific location to provide an accurate service, other apps don't need to know your location at all times.
By default, any apps that want to access your location will ask for permission the first time you open them. However, you can take it one step further and manage your location settings, so you know which apps are tracking you and how much access they have.
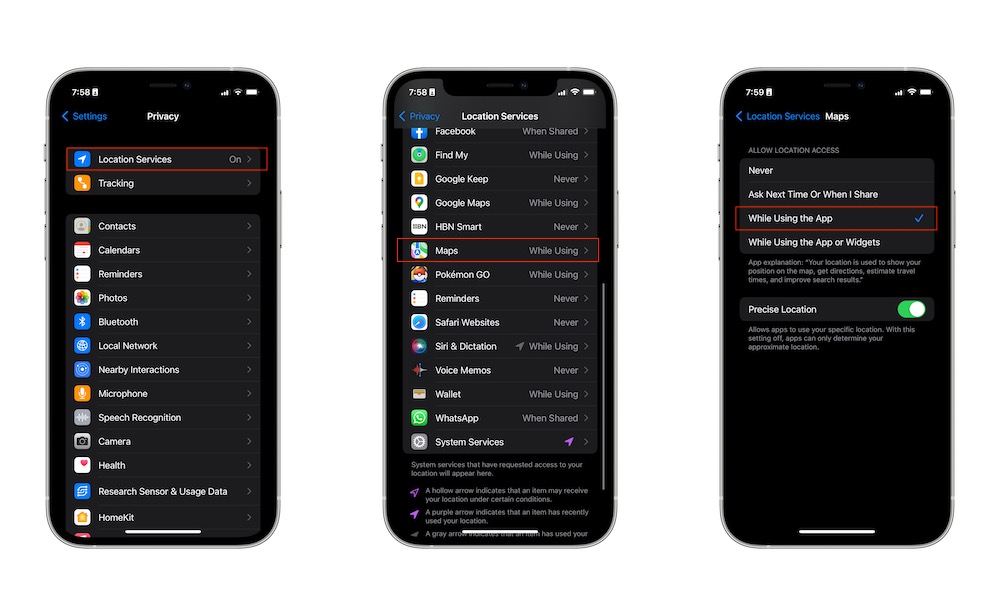
Here's how to check your location settings:
- Open the Settings app.
- Scroll down and go to Privacy & Security.
- Go to Location Services.
- Scroll down to see a list of all your installed apps. On the right side, you'll see which apps can access your location.
You can tap on any app and choose between Never, Ask Next Time or When I Share, or While Using the App. Review the apps you don't want to share your location with and select Never. For apps that only need your general location, such as local news, weather, and shopping apps, you can disable the Precise Location option to prevent them from knowing your exact location.
If you want to take it one step further, you can scroll up and turn off Location Services entirely. This will prevent all apps from accessing location services — but keep in mind this also includes Apple's built-in apps like Maps.
Limit the Contacts an App Can Access
Just like your location, you can also choose to share your contact list with an app or not. What's more, iOS 18 took it one step further, and now you can choose which contacts you want to share with specific apps.
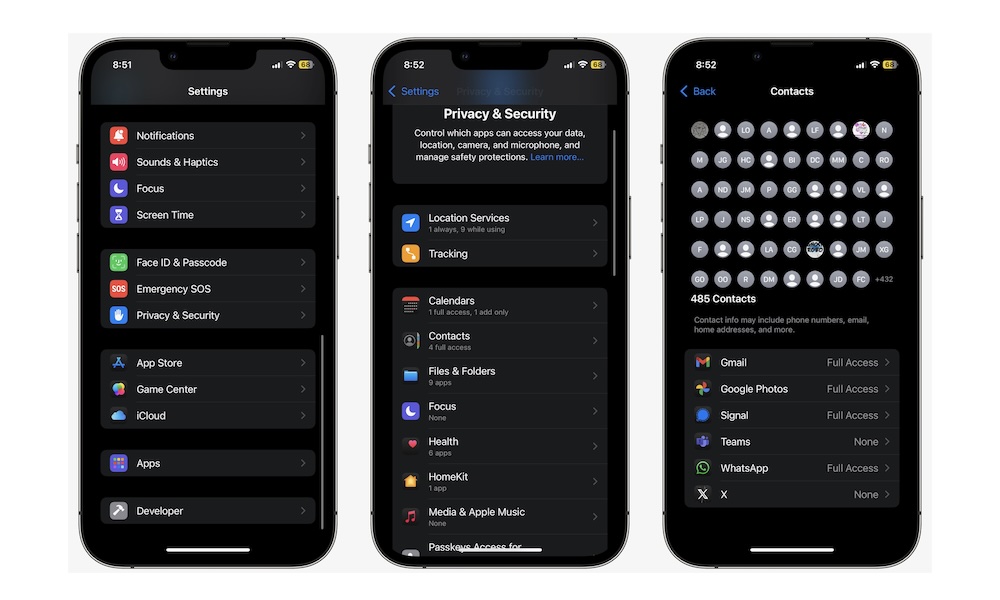
This feature ensures that specific apps can only access specific people, which is a great way to limit access to apps used for work or school. Here's how to check this and make changes:
- Open the Settings app.
- Scroll down and go to Privacy & Security.
- Scroll down and tap on Contacts.
- At the bottom of your screen, tap on any app that you want to change.
- Choose None if you want to stop sharing information or Full Access to share all your contacts with that app.
- If you want to use this app with specific contacts, tap on Limited Access.
- Next, select the contacts that you want to share with that app.
- When you finish, tap on Done in the top right corner of your screen.
Remember that sharing your contacts may include information like phone numbers, email, and even your contacts' home addresses, so be careful how much data you share with these apps.
Change Your Lock Screen Controls
This is a fairly new feature that Apple introduced with iOS 18. After years of requesting it, iPhone users can now customize their Lock Screen controls.
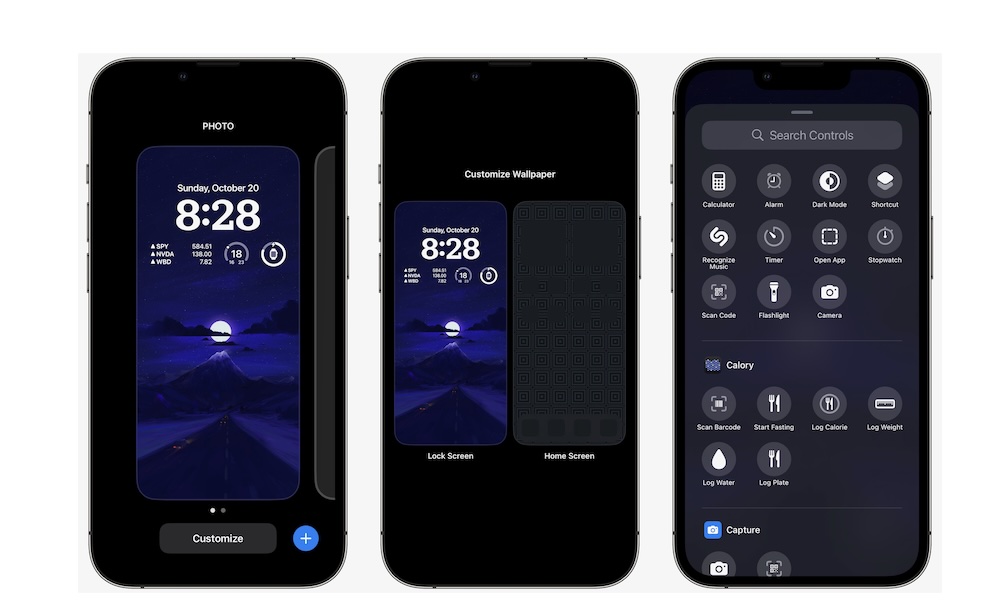
If you don't want to continue having the flashlight and camera controls at the bottom of your screen, here's how to change them:
- Unlock your iPhone and access the Lock Screen page by swiping down from the top of your screen.
- Press and hold any empty space in your Lock Screen until it changes the screen.
- Tap on Customize at the bottom.
- Select Lock Screen.
- Tap the minus button at the top of the control you want to remove.
- Tap the empty space of the control.
- Select the control you want to add.
And that's it! Repeat the process for the other control. You can choose any of the available controls or the Open App control in the Shortcuts section to open any app you have installed.
This trick will also let you add third-party controls, but not every third-party app has a control available. You'll have to wait for the developers to add it first.
Turn Any App Into a Home Screen Widget (and Vice Versa)

Another cool feature Apple recently added is the ability to change any app into a widget.
By now, you probably already know that you can access all the widgets available on your iPhone by pressing and holding the Home Screen and tapping the plus icon in your screen's top left corner.
However, Apple added an easier way to add a widget to your Home Screen. If you already have an app with a widget on your Home Screen, simply press and hold it until a menu appears.
Next, look for the available widget icons. Sometimes, they're at the top of the menu or right above the Edit Home Screen option. Depending on what type of widget the app has, you should see square or rectangle icons.
Tap the one you want, and watch how your iPhone turns the app icon into a widget.
The first thing you'll notice is that you won't have the app icon anymore. However, you can repeat the same steps to turn the widget back into an app if you want. You can also grab another app icon from the App Library on the far right of your iPhone.
Turn Your iPhone's Keyboard Into a Trackpad
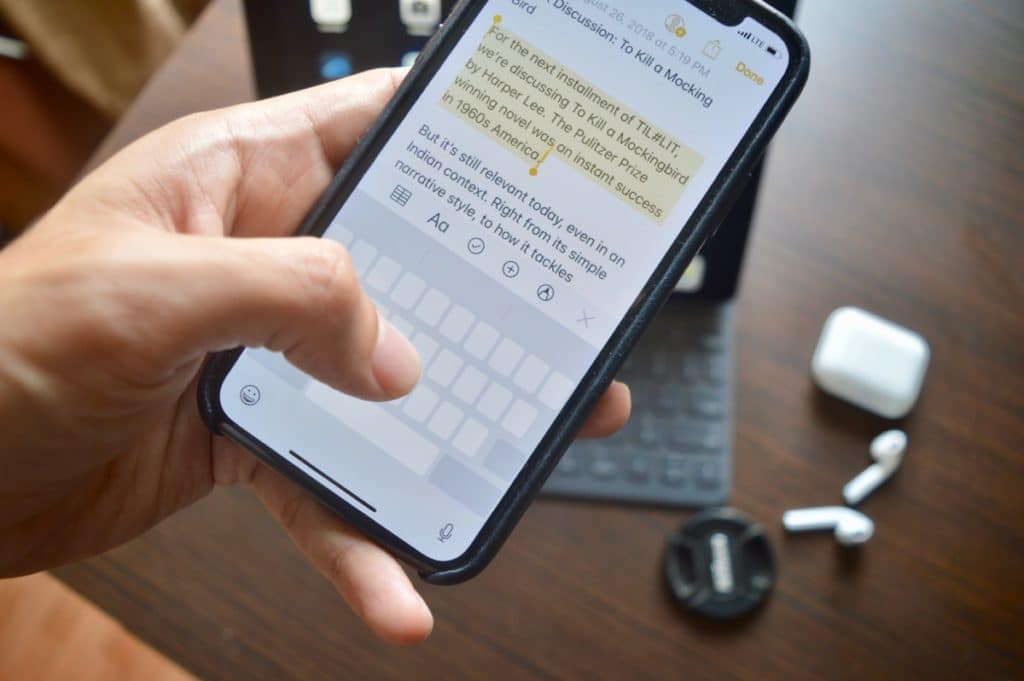
Whether you're sending a long message or writing a journal entry, you'll probably make a few mistakes here and there. While they're easy to correct, sometimes it can be hard to place the cursor on the right letter or word you need to change.
Sure, you can place the cursor near the mistake and simply delete the whole word, but your iPhone has a cooler and more useful feature: you can turn your keyboard into a trackpad.
All you need to do is press and hold the spacebar on your iPhone. You'll know it worked when your keyboard turns into an empty great square and you feel a haptic response in your finger.
Next, move the cursor to the exact word or letter you want to fix without lifting your finger. Once you get there, release your finger, and the trackpad will return to a regular keyboard.
Record Your Screen and Your Voice at the Same Time
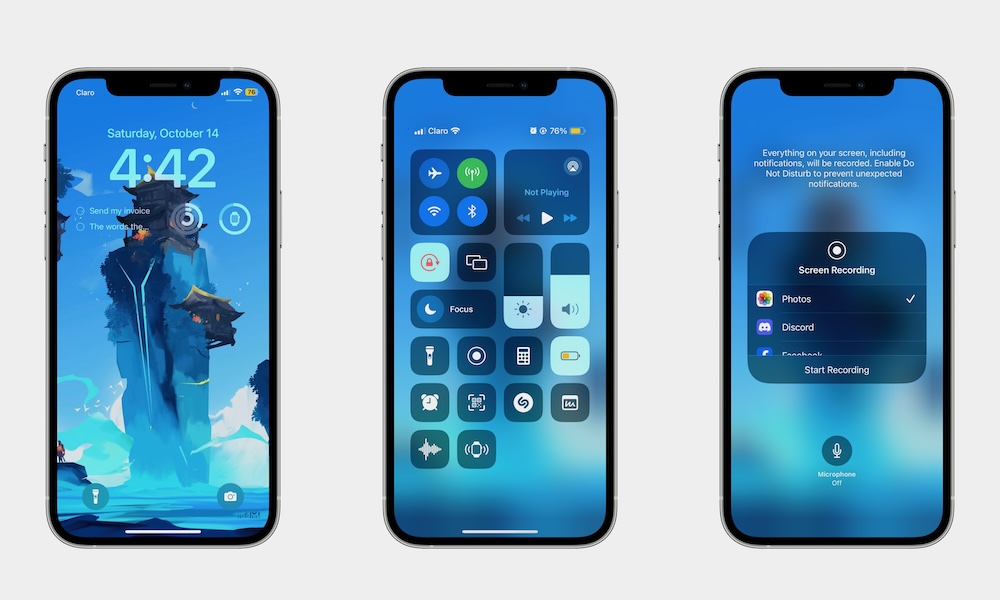
By now, you probably already know that your iPhone can record anything that's happening on your screen and save it into the Photos app. This is extremely helpful if you want to show someone else how to do something on their iPhone.
However, you can do more than show your screen; you can also record your voice while recording your screen. And the best part is that it's just as easy.
For this to work, you'll first need to add the Screen Recording control to your Control Center. Here's how:
- Open your Control Center by swiping down from the top right corner of your screen (if your iPhone has Face ID) or swiping up from the bottom of your screen (if your iPhone has Touch ID).
- Press and hold a space in the Control Center until you feel a haptic response.
- Tap on Add a Control.
- Tap the Screen Recording control at the top. If you can't find it, use the search bar to locate it.
Afterward, simply open your Control Center again and press and hold the Screen Recording control. When another menu appears, tap Microphone to enable audio recording.
Now, every time you record your screen, your iPhone's microphone will also record your voice. Of course, you can repeat the steps to turn off the microphone if you don't want it to record your voice.
Change Your Default Mail App
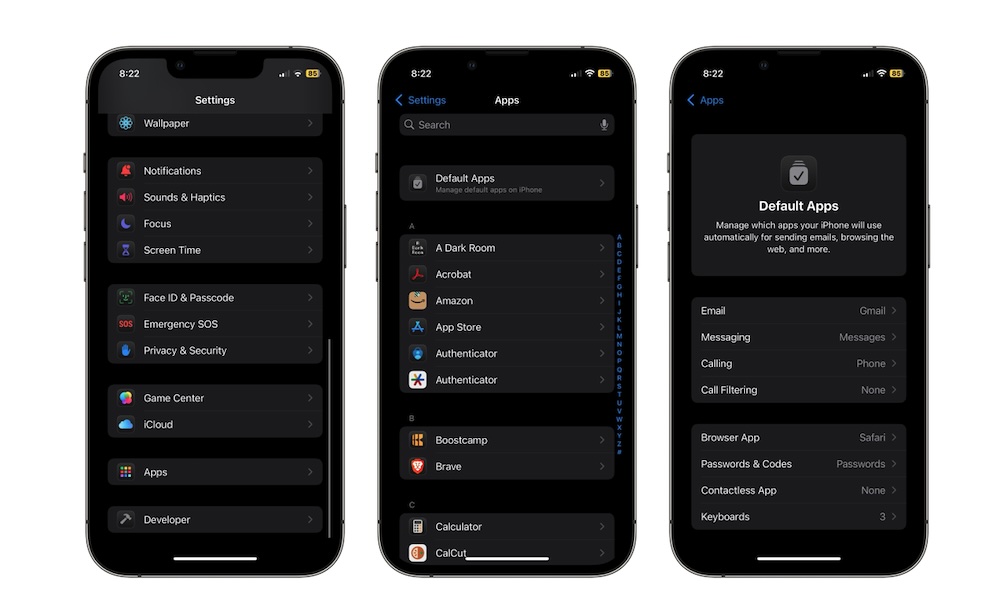
A few years ago, Apple finally changed iOS so it would let you choose which Mail app you wanted to set as a default.
Changing this will cause Siri or any other app to select the app you specified as the default mail app. This is how you can change your default mail app on your iPhone:
- Open the Settings app.
- Scroll down to the bottom and tap on Apps.
- Tap on Default Apps.
- Tap on Email and choose your default mail app.
Schedule Messages
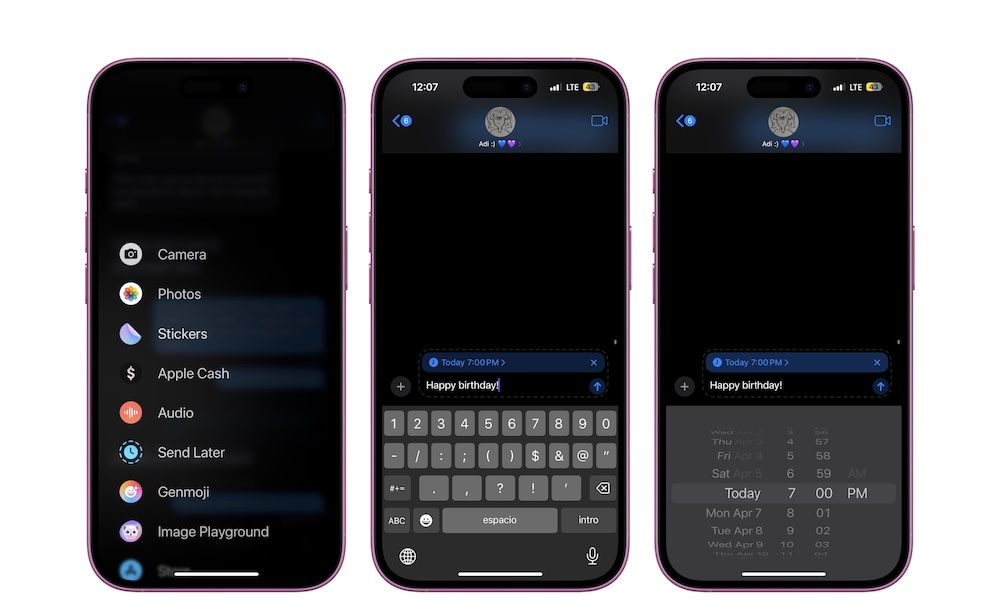
This is a new feature introduced by Apple in iOS 18. After waiting a long time, you can finally schedule text messages on iMessage. This is how:
- Open the Messages app.
- Open any iMessage conversation.
- Tap the plus icon in the bottom left corner of your screen.
- Select Send Later.
- Write the message you want to schedule.
- Tap the default day and time (it usually says Tomorrow 9:00 AM).
- Choose the day and time when you want to send that message.
- Hit the send button.
And that's it. The Send Later feature will remain turned on automatically, so be sure to tap the x icon on the far right to prevent scheduling all your messages.
When you schedule a message, you can tap the Edit button below Send Later to edit the time, delete the message, or send it right away.
Block Specific Features in the Lock Screen
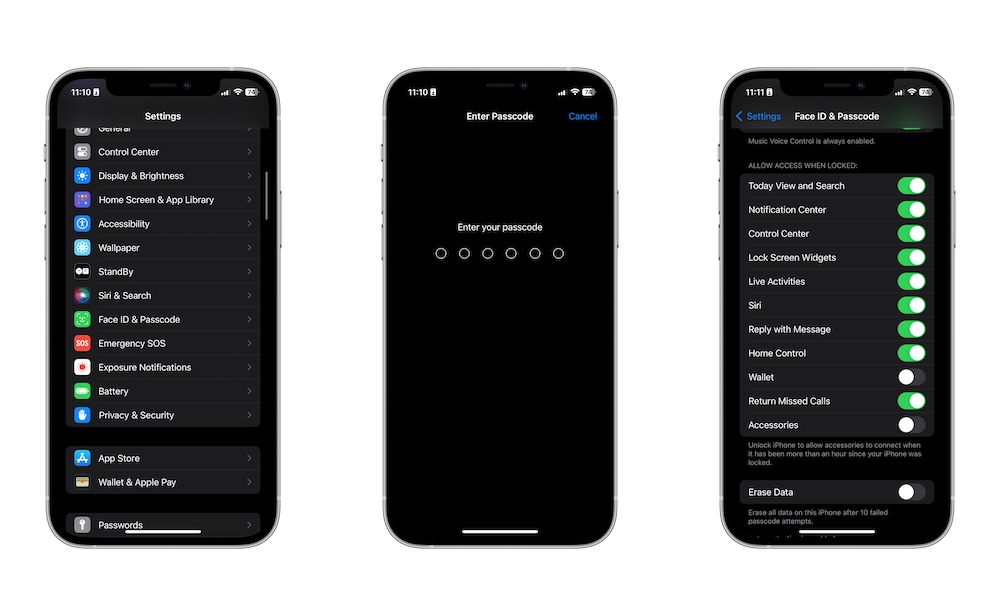
By default, even if your iPhone is locked, your Lock Screen will still let you access certain features, like Siri, your Today View, or the Notification Center.
While this might be useful in most cases, you might also feel like it's not secure to have this feature out in the open in case someone grabs your iPhone.
Luckily, you can customize which features you want to have access to from your Lock Screen when your iPhone is locked. Here's how:
- Open the Settings app.
- Scroll down and tap on Face ID & Passcode.
- Enter your passcode.
- Scroll down and under Allow Access When Locked, disable all the features you don't want to access when your iPhone is locked.
It's okay if you want to keep all these features enabled, but it's also worth mentioning that if you have an iPhone with Face ID (which is nearly all of them these days), you probably don't need to use them. Your iPhone will authenticate your face as soon as you pick it up and look at it, even before you swipe up to leave the Lock Screen, making features like Notification Center and Control Center readily available for you while denying them to anybody who doesn't have your face (or passcode).
Either way, we recommend that you disable Accessories. Enabling this feature allows your iPhone to connect with accessories after it has been locked for more than an hour. Turning it off will require you to unlock your iPhone to connect any accessory, making it less susceptible to hacking attempts if it falls into the wrong hands.
Let Your iPhone Pause Your Music or TV Shows Automatically
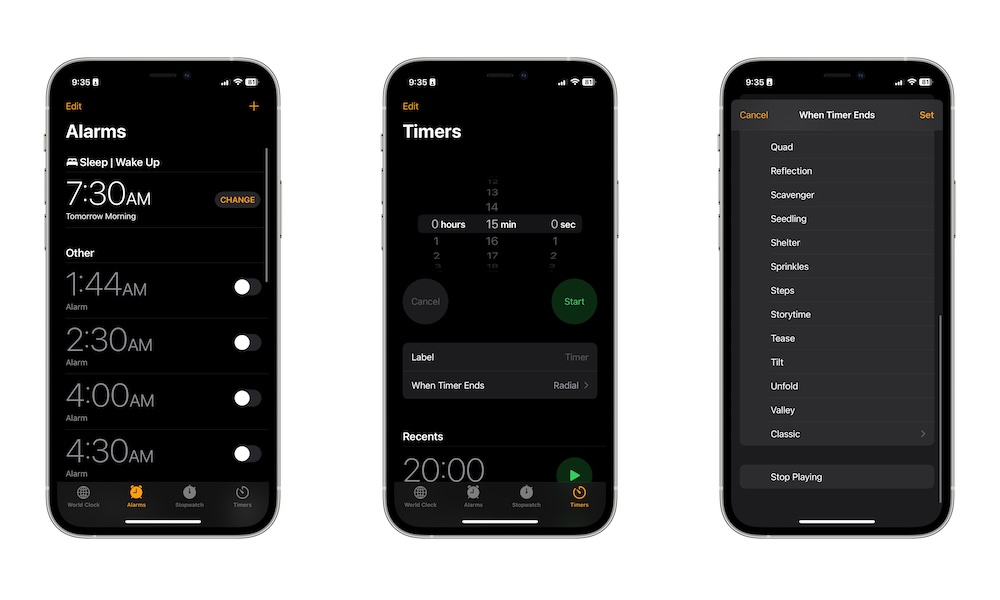
Some of us like to go to bed while listening to music or watching a stream or movie until we fall asleep. However, if you're not careful, your iPhone might end up playing a video or a playlist all night long, which will definitely affect its battery or, worse, wake you up in the middle of the night.
Luckily, Apple thought of this, which is why you can set a timer on your iPhone; when it reaches zero, everything playing will pause. Here's how you can use it:
- Open the Clock app.
- Tap on the Timers tab in the bottom right corner of your screen.
- Tap on When Timer Ends.
- Scroll down to the bottom and choose Stop Playing.
- Tap on Set in the top right corner.
- Change the timer and hit Start.
Now, you can start watching a movie or video, and your iPhone will automatically pause everything when the timer ends.
Master Your iPhone
Your iPhone is capable of more than you can think of. Whether you want to control how much data you share with specific apps or customize your Lock Screen however you want, there are many options.
Of course, that's just the tip of the iceberg; your iPhone has so many features and settings you can change that we couldn't put them all together in a single article. But by getting started with the features on this list, you'll start making the most of what your iPhone offers.